


step 1: remove diff from car

Thread Starter
Racer


Joined: Aug 2005
Posts: 431
Likes: 0
From: Oita, Japan

I started setting up the clutches today following Gary's instructions. If you are not familiar with his technique, he sets them up without the springs and plates. If I understand right, the idea is that the springs are in there to take up slack in the clutches so you don't have to be as careful setting them up. The springs also contribute to posi "chatter" during cornering. Following Gary's instructions, we will set the clutches up to a tighter tolerance and leave out the springs and plates. If set up correctly, we should still get good posi action without any chatter during cornering.
OK, here are the materials. Those are new solid clutches. You can compare to the "snowflake" ones that were in here to begin with. The goal here is to shim the clutches with a thick enough shim that the spider gears are on the verge of binding but don't. By the way, my differential had 10/17 spider gears -- 17 teeth on the side gears and 10 on the other two. Gary says these are the strongest.

I set up a side yolk with both of the needle bearings I took out of my case and set the carrier on it.

I first tried to assmeble the gears with an .040" spacer but could not get the gears put together. I backed off to the .035" spacer and was able to assemble it. I am supposed to check to see if the spider gears bind by turning the case but I am not able to turn it by hand. I probably need to try to .030" spacers. Whoever set this rearend up before used .030" spacers.

OK, here are the materials. Those are new solid clutches. You can compare to the "snowflake" ones that were in here to begin with. The goal here is to shim the clutches with a thick enough shim that the spider gears are on the verge of binding but don't. By the way, my differential had 10/17 spider gears -- 17 teeth on the side gears and 10 on the other two. Gary says these are the strongest.
I set up a side yolk with both of the needle bearings I took out of my case and set the carrier on it.
I first tried to assmeble the gears with an .040" spacer but could not get the gears put together. I backed off to the .035" spacer and was able to assemble it. I am supposed to check to see if the spider gears bind by turning the case but I am not able to turn it by hand. I probably need to try to .030" spacers. Whoever set this rearend up before used .030" spacers.
Tech Contributor


Joined: Aug 1999
Posts: 15,195
Likes: 4,024
From: Connecticut, USA
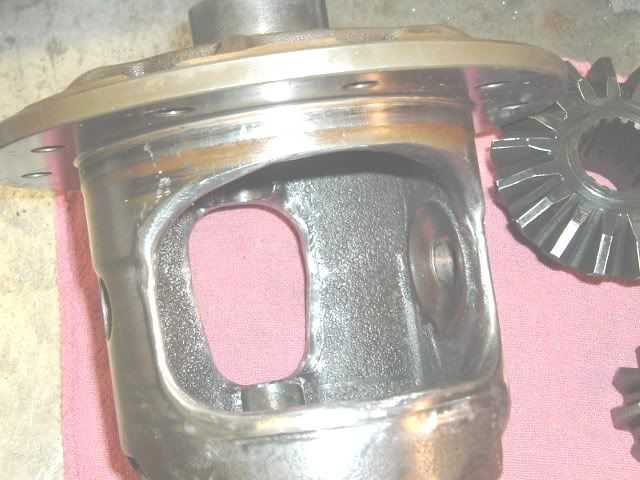
looking good so far. Couple of comments. I like to fully polish the carrier windows so there is no casting,just smooth surface. Probably overkill but when doing this for someone we both know what they are getting. Also did you stagger the clutch faces when assembling them? Shim until you can't turn the gears and they start to bind. Then flip over and check the other side. Once you know where the starting point is then reduce the shim in the .005 increments they come in. What I do since I have a surface grinder here is to machine a set of shims in between to get the feel I want. So if 040" is too tight and 35 is loose I'll go to .037-.038 and see how it feels. Once you get them fit I use a large spanner wrench to rotate each side about 20 times. After use the clutches will "fit" themselves and loosen up a little bit. I like to try and get the shims as close to the same size for each side. It takes times doing it but you're doing a great job.
Gene what did you end up with when setting up yours?
Here is a posi I worked on.

Gene what did you end up with when setting up yours?
Here is a posi I worked on.
Thread Starter
Racer
Joined: Aug 2005
Posts: 431
Likes: 0
From: Oita, Japan
So when you are finding the shim size, you do one side at a time? I thought you need both side gears in to see if the gears bind. Doing one side at a time, the 0.40" were too tight on each side and the .035" were loose. I then put both sides in with the .035". Once I put the pin through the center, I couldn't rotate it by hand but I think its the clutches holding it rather than the gears binding. From your last post, it sounds like you only rotate it with one side gear in at a time? If that is the case, I probably need to end up between .035 and .040.
Also, I did stack the clutches so that the deeper grooves all face the same way.
Also, I did stack the clutches so that the deeper grooves all face the same way.
Tech Contributor
Joined: Aug 1999
Posts: 15,195
Likes: 4,024
From: Connecticut, USA
Sorry maybe I wasn't as clear since I have this in my head.
I set up the posi with shims in each side. In your case .040 in each side. Then if too tight I'll reduce both sides to see what happens. Then I usually will have to fine tune each side to get as equal a feel per side as I can get.
You have to watch that you don;t get them too loose, under .030" and the side gear starts to move in/out too much. I had this happen on one unit that was machined slightly off. I spend hours on it and couldn't get to setup. It was only good for the stock spring setup. That was the only one I found like that.
If you have any questions I'll be in the shop today for a while.
I set up the posi with shims in each side. In your case .040 in each side. Then if too tight I'll reduce both sides to see what happens. Then I usually will have to fine tune each side to get as equal a feel per side as I can get.
You have to watch that you don;t get them too loose, under .030" and the side gear starts to move in/out too much. I had this happen on one unit that was machined slightly off. I spend hours on it and couldn't get to setup. It was only good for the stock spring setup. That was the only one I found like that.
If you have any questions I'll be in the shop today for a while.
Thread Starter
Racer
Joined: Aug 2005
Posts: 431
Likes: 0
From: Oita, Japan
As you can see in the picture, I made up a lever to rotate the carrier. Once I got it to move a little ways, I was able to rotate it by hand. I rotated it around a few times. I've still got the .035" shims in there and it was a little bumpy from the gears. I'll try the .030's tomorrow and if that is smooth, I will take the thicker shims to a machine shop and see if they can machine them down to .032 - .033 for me. I'm assuming we don't want any bumpy feeling while rotating the carrier.

I started disassembling one of the trailing arms. The good news is that it came apart very easily, the bad news is that someone has been in there before.... Some pictures follow but I used a spindle knocker to knock the spindle out (it came right out). At this point, I thought it was my lucky day. After removing the spindle, I looked at the parking brake and saw that there was a spring missing. Someone must have left that off when they put it back together before. As I was taking it apart and cleaning it up I noticed that the seals were bent and the bearings had grease smeared over them but not really packed. As I was trying to figure out how to press off the outer bearing, it pretty much came off in my hands. I've heard (and read here) many horror stories about getting those bearings off. My luck can't be that good.


Upon inspecting the spindle closer, I noticed that it looked like it had been "fixed" to allow the bearings to slip on to it a bit easier. It looks like someone ground down the surfaces that the bearings are supposed to press on to. In addition, there are some deep gouges in the surface of the spindle where the inner bearing goes. I'm thinking they are from a torch.

So, OK, it looks like I need a new spindle. I started cleaning up the other parts and found a couple of things I don't like on the trailing arm. There are a couple of broken welds and the bumper stop is pretty bent up. I'm fairly handy with a welder so I'll try to weld those up tomorrow. I'm not much of a body man so I don't know what I can do with the bump stop but I'll try to hammer that out a little better as well.
I'd like to know from people who have done trailing arms before -- do you think its worth patching this one up or should I be looking for another one?


One more question. I've looked at many pictures of trailing arm rebuilds on this site and so far it looks like everyone keeps the four original studs that hold everything together. Is there any reason you guys don't put new ones in? Mine are pitting from rust and I'd like to replace them. Is it hard to get them out without damaging the TA?
I started disassembling one of the trailing arms. The good news is that it came apart very easily, the bad news is that someone has been in there before.... Some pictures follow but I used a spindle knocker to knock the spindle out (it came right out). At this point, I thought it was my lucky day. After removing the spindle, I looked at the parking brake and saw that there was a spring missing. Someone must have left that off when they put it back together before. As I was taking it apart and cleaning it up I noticed that the seals were bent and the bearings had grease smeared over them but not really packed. As I was trying to figure out how to press off the outer bearing, it pretty much came off in my hands. I've heard (and read here) many horror stories about getting those bearings off. My luck can't be that good.
Upon inspecting the spindle closer, I noticed that it looked like it had been "fixed" to allow the bearings to slip on to it a bit easier. It looks like someone ground down the surfaces that the bearings are supposed to press on to. In addition, there are some deep gouges in the surface of the spindle where the inner bearing goes. I'm thinking they are from a torch.
So, OK, it looks like I need a new spindle. I started cleaning up the other parts and found a couple of things I don't like on the trailing arm. There are a couple of broken welds and the bumper stop is pretty bent up. I'm fairly handy with a welder so I'll try to weld those up tomorrow. I'm not much of a body man so I don't know what I can do with the bump stop but I'll try to hammer that out a little better as well.
I'd like to know from people who have done trailing arms before -- do you think its worth patching this one up or should I be looking for another one?
One more question. I've looked at many pictures of trailing arm rebuilds on this site and so far it looks like everyone keeps the four original studs that hold everything together. Is there any reason you guys don't put new ones in? Mine are pitting from rust and I'd like to replace them. Is it hard to get them out without damaging the TA?

Le Mans Master


Joined: Nov 2001
Posts: 8,858
Likes: 1,966
From: LONG ISLAND
2025 C3 ('68-'73) of the Year Finalist - Unmodified
2024 C3 of the Year Finalist - Unmodified
2023 C3 of the Year Finalist - Unmodified
Arms
The arms look kinda narly dude !!
while everything is all apart i'd replace them & not worry ever again about them, you dont want one to break, i had that happen on my yellow 68 & it crushed the rear quarter when the car fell.
ZIXXX PACKER
while everything is all apart i'd replace them & not worry ever again about them, you dont want one to break, i had that happen on my yellow 68 & it crushed the rear quarter when the car fell.
ZIXXX PACKER
Thread Starter
Racer
Joined: Aug 2005
Posts: 431
Likes: 0
From: Oita, Japan
I think the pictures make it look worse than it really is. There is lots of good metal there. I'm concerned that there are 2 broken welds, the bump stop is mangled, and the fender has been repaired. I think its been hit here but I think the TA is straight and will be solid after fixing the welds. On the other hand, I hate to do all this work back here and then use a TA that is suspect.
Corvette Stories
The Best of Corvette for Corvette Enthusiasts

5 Best & 5 Worst Corvette Daily Drivers
Joe Kucinski
The Headlights of Every Corvette Generation Explained
Joe Kucinski
5 Best & 5 Most Overrated Corvette Track Packages of All Time!
Joe Kucinski
Every 2027 Corvette Engine Explained
Joe Kucinski
Designer Imagines A Corvette That Looks More Like a Corvette Than the Corvette
Verdad Gallardo
10 Ugly Corvettes That We Still Kinda Love
Joe Kucinski
Top 10 Most Expensive Corvettes Ever Sold on Bring A Trailer
Brett Foote
10 Things Every Corvette Owner Needs (2026 Edition)
Michael S. Palmer
8 Most "Only Corvette Owners Understand" Quirks and Problems
Pouria Savadkouei
Le Mans Master
Joined: Nov 2001
Posts: 8,858
Likes: 1,966
From: LONG ISLAND
2025 C3 ('68-'73) of the Year Finalist - Unmodified
2024 C3 of the Year Finalist - Unmodified
2023 C3 of the Year Finalist - Unmodified
Replace Em
Originally Posted by yukon988
I think the pictures make it look worse than it really is. There is lots of good metal there. I'm concerned that there are 2 broken welds, the bump stop is mangled, and the fender has been repaired. I think its been hit here but I think the TA is straight and will be solid after fixing the welds. On the other hand, I hate to do all this work back here and then use a TA that is suspect.
REPLACE EM:
AFTER all that hard nice cleaned up work you have done, i'd just replace them with rebuilds, that are media blasted & ready to go.......no worries at all...........all new azz end

ZIXXX PACKER
Tech Contributor
Joined: Aug 1999
Posts: 15,195
Likes: 4,024
From: Connecticut, USA
If the arm is rusted then you'll have to see if it's worth it. New arms run about $140 +/- $10? They are powder coated, have a new rubber bushing, and 4 new studs.
If the rot isn't bad and take a weld without burn through then you can re-use. Is there any sign of it being bent? The studs are knurled and should drive out. I use Loctite on the new ones. If they are not damaged or rusted I re-use them.
The spindle should be replaced. Someone made a poor attempt at slip fitting them. To slip fit they should be polished in a lathe not on a pedestal grinder. I had a new spindle come in last week and the nut was rolled on the end. I got it off but it wrecked the threads, had to return it.
The posi will turn, if notchy the backlash is tight. If you want to drag race it then this is where I set them but that's too tight for the street and cornering. I get them to the point where the backlash is tight then backoff until it just frees up. This may only be a few thousands.
If the rot isn't bad and take a weld without burn through then you can re-use. Is there any sign of it being bent? The studs are knurled and should drive out. I use Loctite on the new ones. If they are not damaged or rusted I re-use them.
The spindle should be replaced. Someone made a poor attempt at slip fitting them. To slip fit they should be polished in a lathe not on a pedestal grinder. I had a new spindle come in last week and the nut was rolled on the end. I got it off but it wrecked the threads, had to return it.
The posi will turn, if notchy the backlash is tight. If you want to drag race it then this is where I set them but that's too tight for the street and cornering. I get them to the point where the backlash is tight then backoff until it just frees up. This may only be a few thousands.
Thread Starter
Racer
Joined: Aug 2005
Posts: 431
Likes: 0
From: Oita, Japan
I am leaning towards replacing the trailing arms. I'm afraid if I don't, I'll always be dissapointed that I didn't. I'm looking at VBandP offset arms. Is there any reason not to go with offset arms?

Melting Slicks

Joined: Oct 2004
Posts: 2,510
Likes: 4
From: Austin Texas
Originally Posted by gtr1999
The spindle should be replaced. Someone made a poor attempt at slip fitting them. To slip fit they should be polished in a lathe not on a pedestal grinder..

Tech Contributor
Joined: Aug 1999
Posts: 15,195
Likes: 4,024
From: Connecticut, USA
Originally Posted by MikeC4
is spindle grinding/polishing to obtain a "slip fit" for the inner bearing a common practice? I can understand how too tight a fit could distort the bearing housing leading to bearing failure....
Yukon- replacing the arms is only necessary if they are rotted or bent, otherwise you should be able to rebuild them. As for the offset arms, I have setup a couple of Danny's from Van Steel. They were well fabricated arms and the bearing setup is the same.
Thread Starter
Racer
Joined: Aug 2005
Posts: 431
Likes: 0
From: Oita, Japan
gyopp -- why did you need longer wheel studs? I'm replacing mine since a couple were already broken off.
I had to balance my checkbook tonight and the budget is going to win this one. I will try to use my trailing arms instead of replacing them. This one seems to be solid and I think the other one is OK too. I don't see any bends in it. I was on the fence today so I didn't try to fix the welds but I'll try it tomorrow.
I tried the .030" shims in the posi today. They are definitely loose. I'll see if I can get the .045's ground down to about .033 and try that.
I had to balance my checkbook tonight and the budget is going to win this one. I will try to use my trailing arms instead of replacing them. This one seems to be solid and I think the other one is OK too. I don't see any bends in it. I was on the fence today so I didn't try to fix the welds but I'll try it tomorrow.
I tried the .030" shims in the posi today. They are definitely loose. I'll see if I can get the .045's ground down to about .033 and try that.
Thread Starter
Racer
Joined: Aug 2005
Posts: 431
Likes: 0
From: Oita, Japan
Originally Posted by gyopp
Lookin good one of the hardest things to me was trying to figure out how to shim this. You have to climb into Gary's head and try to "feel" what he is feeling.
one of the hardest things to me was trying to figure out how to shim this. You have to climb into Gary's head and try to "feel" what he is feeling.Bottom line is that I am learning a lot here and starting to understand what I am trying to accomplish with the clutches so I'm feeling pretty good and think that I am close.
One thing I did on the differential today is drill and tap a drain hole. This is 1/8" NPT tap. If I can find a magnetic plug for it, I'll use that. If not, I already have a non-magnetic plug for it.

My other accomplishement for today was putting the rest of the gas tank together and getting it mounted back in the car. WooHoo! Something going on to the car instead of coming off!
 I did this by myself and it was a pain. I think it is really a 2 person job. I ended up wraping the straps tightly around it before lifting it up and tiying everything together with string so it wouldn't fall apart as I was trying to push it up into its hole.
Thread Starter
Racer
Joined: Aug 2005
Posts: 431
Likes: 0
From: Oita, Japan
Originally Posted by gyopp
Hmmm, I thought that was a piece of cake. I did it with the body off