


Car audio upgrade ?
Safety Car


Joined: Jun 2005
Posts: 3,775
Likes: 4
heh, great... one more thing to pick up for this project. i see ill be spending a whole lot more time and money on this then i originaly planned.
somehow that seems to be the way most of my projects turn out....
somehow that seems to be the way most of my projects turn out....
Le Mans Master


Joined: May 2006
Posts: 9,993
Likes: 1,136
From: League City Tx
I just did mine yesterday. I bought a new bezel from Willcox for $79, then bought my head unit, speakers and install kit all from www.millionbuy.com.
That bezel is a bastard to cut though. Use masking tape on any area not to be cut incase you slip with the dremel.

That bezel is a bastard to cut though. Use masking tape on any area not to be cut incase you slip with the dremel.
Team Owner

Joined: Aug 2006
Posts: 24,125
Likes: 15
From: Columbia Missouri
I just did mine yesterday. I bought a new bezel from Willcox for $79, then bought my head unit, speakers and install kit all from www.millionbuy.com.
That bezel is a bastard to cut though. Use masking tape on any area not to be cut incase you slip with the dremel.
That bezel is a bastard to cut though. Use masking tape on any area not to be cut incase you slip with the dremel.
That's clean. Good job.


Pro

Joined: Sep 2004
Posts: 595
Likes: 0
From: Boston MA
I did the same thing on my 68.....
Thanks,
Joe
Thanks,
Joe
I would recommend buying a modern CD player of your choice. Most newer models have an auxillary plug on the front to hook up an IPod or MP3 player. I cut the stock radio bezel and then finished off with a bezel cover from millionbuy.com I think the cover was about $14 including shipping. I used the plastic bezel as a template to scribe a line on the stock stereo bezel and used that as my cut line.
Here is the finished product:
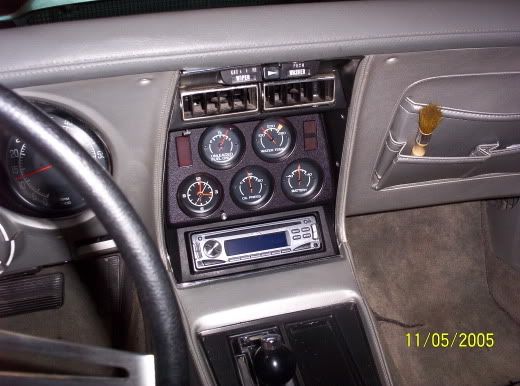
Here is the finished product:
Burning Brakes

Joined: Mar 2003
Posts: 892
Likes: 166
From: Oswego IL
Yes. I used the bezel cover as a template and as the final cover. A picture of the bezel from millionbuy.com is posted above by another-user. The bezel cover is plastic and can be used for 2 shaft radios or din radios (rectangular opening for modern cd players). To use the bezel from millonbuy for a cd player, the plastic bezel needs to have two shaft area cut out. There is a scribe line on the back of the plastic bezel that is the size of the din opening. I used a dremel with a cut off wheel to cut through the plastic making the rectangular opening on the bezel. Once that was done, I simply placed the plastic bezel over the stock radio bezel and then scribed a line by following the inside of the retangular cut. Hope that helps.
Le Mans Master
Joined: May 2006
Posts: 9,993
Likes: 1,136
From: League City Tx
Yes. I used the bezel cover as a template and as the final cover. A picture of the bezel from millionbuy.com is posted above by another-user. The bezel cover is plastic and can be used for 2 shaft radios or din radios (rectangular opening for modern cd players). To use the bezel from millonbuy for a cd player, the plastic bezel needs to have two shaft area cut out. There is a scribe line on the back of the plastic bezel that is the size of the din opening. I used a dremel with a cut off wheel to cut through the plastic making the rectangular opening on the bezel. Once that was done, I simply placed the plastic bezel over the stock radio bezel and then scribed a line by following the inside of the retangular cut. Hope that helps.
Thanks DB!
Melting Slicks

Joined: Jun 2005
Posts: 2,938
Likes: 2
From: Arkansas
I used a cut-off wheel on mine, made the opening a little smaller and sized it to fit with a file. In my opinion jigsaws vibrate too much and you run a risk of cracking something.
You can see it and all my car-audio installs on my homepage
<-----------------------------------------------------
You can see it and all my car-audio installs on my homepage
<-----------------------------------------------------
Burning Brakes

Joined: Jun 2004
Posts: 872
Likes: 3
From: Cortlandt Manor New York
Don't buy those Autosound units listed by Eckler's and other Corvette vendor's. They are junk, sound like crap and only last about 6 months. I have had 2 and one was worse than the other. The only thing they do is fit the bezel.
I finally broke down and cut the bezel and installed a Pioneer unit, best thing I ever did. Sounds great, works great and its been in for 3 years without a hitch. I cut the bezel and fabricated a front facia and it looks great.
I finally broke down and cut the bezel and installed a Pioneer unit, best thing I ever did. Sounds great, works great and its been in for 3 years without a hitch. I cut the bezel and fabricated a front facia and it looks great.
Corvette Stories
The Best of Corvette for Corvette Enthusiasts

Top 10 Most Expensive Corvettes Ever Sold on Bring A Trailer
Brett Foote
10 Things Every Corvette Owner Needs (2026 Edition)
Michael S. Palmer
8 Most "Only Corvette Owners Understand" Quirks and Problems
Pouria Savadkouei
10 Reasons the C6 Z06 is Still A Performance Benchmark After 20 Years
Joe Kucinski
How Much Horsepower Every Corvette Engine "LOST" in 1972
Joe Kucinski
Top 10 DOs and DON'Ts for Protecting Your Convertible Top!
Michael S. Palmer
Top 10 Most Explosive Corvettes Ever Made: Power-to-Weight Ratio Ranked!
Joe Kucinski
150 hp to 1,250 hp: Every Corvette Generation Compared by the Specs That Matter
Joe Kucinski
8 Coolest Corvette Pace Cars (and Replicas) of All Time
Verdad GallardoBurning Brakes

Joined: Jan 2006
Posts: 1,223
Likes: 174
From: Fort Wayne IN
I have seen these bezel covers like the one from million buy, and I might end up going that route. How are you guys affixing the cover to the center console? Just with the tension of the head unit in there? Also, what about the actual mounting of the head unit itself? How are you attaching it physically behind the dash?
Burning Brakes
Joined: Mar 2003
Posts: 892
Likes: 166
From: Oswego IL
I have seen these bezel covers like the one from million buy, and I might end up going that route. How are you guys affixing the cover to the center console? Just with the tension of the head unit in there? Also, what about the actual mounting of the head unit itself? How are you attaching it physically behind the dash?
Team Owner
Joined: Aug 2006
Posts: 24,125
Likes: 15
From: Columbia Missouri
 He explained that perfectly. Those tabs he mentioned are what hold everything in place. Make sure those tabs are bent out so that everything is tight, and nothing wiggles. If it wiggles at all, the head unit will move around as you drive, and may cause wires to come loose or even skipping CDs.
Something I recommend, is a block of soft foam behind the stereo, on top of the trans tunnel. When the head unit is pushed in for it's final resting position, it compresses the foam, and rests it weight on the foam instead of dead air. Also, the pressure that foam applies as it pushes up on the bottom of the head unit, helps keep everything tight and secure.
One more tip. Make all your wires, including the antenna wire, long enough to pull through the bezel, and attach to the head unit. You'll want to test it before inserting it for good. Make sure it plays and has a radio signal.
To help with splicing into the harness, these are the important wires from the back of the head unit.
Red - IGN lead. Important so the stereo is only active when the key is in the IGN position.
Yellow - Always hot 12V source. This keeps the memory of the head unit.
Black - Ground. Just as important as the power wire.
Antenna - Also a ground, and this is your radio signal.
Blue/White stripe - Remote wire for turning on amps.
Blue - Remote wire for turning on power antennas.
If you have a multi meter, check all the wires before installing. Find and mark which wires from the car's harness is the 12V, IGN, and GRD.
Let me know if you have any other install questions.
Safety Car
Joined: Nov 2004
Posts: 4,359
Likes: 57
From: Mundelein Illinois
 .. No thanks .. I will get another standard bezel and get a top end din unit for a lot less.
