There hypnotizing me!


LED Taillight install
Thread Starter
Drifting

Joined: Feb 2005
Posts: 1,738
Likes: 2
From: San diego ca
Well with all the chatter about LED taillights I finally got around to installing a set of the Harbor freight units in my 78.

The price has recently gone up - I got mine for $9.99 ea.
Other parts needed for this install is a
$21.50 for ancillary
$61.50
Starting point:
Now I have a fiberglass rear tail cap so in some ways its a bit easier for me. but I wanted an install that was easily undoable without drilling any new holes so we decided that since the rubber grommet would prevent any rattling all we needed was a method to hold the light straight and in position.
Therefore we decided on a single post off the center of the light that went through a bar mounted in the taillight bucket. I would then mount the light with a wingnut from behind.
The post was countersunk into a short strip of aluminum which was then epoxied to the back of the taillight the center of the light being measured off the edge of the connector boss as seen in this image.

The mounting piece screws into the same holes that the original tailights attached to - so if I ever decide I need to go back the same holes are used.
The brackets are straightforward and look like this.

From behind the stud passes through the mounting bracket and is fastened with a wingnut touched with a dap of blue threadlocker.

To be honest the rest is just soldering and installing the lights..

The light buckets on the ZR-1 style cap is pretty deep so the lights are very unobtrusive during the day.

But the brakelights are quite visible during the day.

Finally once the car got in shadow we took a shot with just the headlights on.
And with the brakes on
A really easy install requiring nothing more than a hacksaw, dremel tool and soldering iron. Compared to my dim old taillights through original darkened lenses these things are like lasers..more than bright enough day or night.
The price has recently gone up - I got mine for $9.99 ea.
Other parts needed for this install is a
- 1/8"x1"x30" stick of aluminum flat bar from Home depot.
- (8) stainless steel 10x1 screws
- (4) 1/4-20 x 2 stainless flat head screws,
- (4) 1/4-20 stainless wing nuts
- some washers.
- Electronic flasher relay
$21.50 for ancillary
$61.50
Starting point:
Now I have a fiberglass rear tail cap so in some ways its a bit easier for me. but I wanted an install that was easily undoable without drilling any new holes so we decided that since the rubber grommet would prevent any rattling all we needed was a method to hold the light straight and in position.
Therefore we decided on a single post off the center of the light that went through a bar mounted in the taillight bucket. I would then mount the light with a wingnut from behind.
The post was countersunk into a short strip of aluminum which was then epoxied to the back of the taillight the center of the light being measured off the edge of the connector boss as seen in this image.
The mounting piece screws into the same holes that the original tailights attached to - so if I ever decide I need to go back the same holes are used.
The brackets are straightforward and look like this.
From behind the stud passes through the mounting bracket and is fastened with a wingnut touched with a dap of blue threadlocker.
To be honest the rest is just soldering and installing the lights..
The light buckets on the ZR-1 style cap is pretty deep so the lights are very unobtrusive during the day.
But the brakelights are quite visible during the day.
Finally once the car got in shadow we took a shot with just the headlights on.
And with the brakes on
A really easy install requiring nothing more than a hacksaw, dremel tool and soldering iron. Compared to my dim old taillights through original darkened lenses these things are like lasers..more than bright enough day or night.
Thread Starter
Drifting
Joined: Feb 2005
Posts: 1,738
Likes: 2
From: San diego ca
BTW, I dont know if trailer lights use a different color wire for ground and hot or not... these lights have a funky color scheme.
It threw me for a loop as I am so used to black being a ground, so if anyone plans to do this keep that in mind.
The pigtails provided are long enough that they can both be soldered to the place where you remove the factory socket then simply route one pigtail into each taillight bucket. with ample room to pull them through far enough to connect them.
- The ground wire is white.
- the Headlights Hot is black
- the directional/brake hot is red
It threw me for a loop as I am so used to black being a ground, so if anyone plans to do this keep that in mind.
The pigtails provided are long enough that they can both be soldered to the place where you remove the factory socket then simply route one pigtail into each taillight bucket. with ample room to pull them through far enough to connect them.
Thread Starter
Drifting
Joined: Feb 2005
Posts: 1,738
Likes: 2
From: San diego ca
Just a standard electronic flasher in lieu of the original thermal is all that was required..flashers work just fine.
The rear bumper is a ZR-1 type with 3rd brakelight that I purchased from American Sportscar Design. I bought from them as theirs was the only one with the 3rd brakelight option..it uses the factory (91?) model year third brakelight.
Unfortunately they stopped making corvette parts not long thereafter and I havent seen the 3rd brakelight option since.
BTW this part bolted right on with no need for any fiberglass work to get it to align perfectly, unlike the many stories you hear about other bumpers.
What bumper do you have on your �78?
Unfortunately they stopped making corvette parts not long thereafter and I havent seen the 3rd brakelight option since.
BTW this part bolted right on with no need for any fiberglass work to get it to align perfectly, unlike the many stories you hear about other bumpers.
Corvette Stories
The Best of Corvette for Corvette Enthusiasts

Top 10 Most Expensive Corvettes Ever Sold on Bring A Trailer
Brett Foote
10 Things Every Corvette Owner Needs (2026 Edition)
Michael S. Palmer
8 Most "Only Corvette Owners Understand" Quirks and Problems
Pouria Savadkouei
10 Reasons the C6 Z06 is Still A Performance Benchmark After 20 Years
Joe Kucinski
How Much Horsepower Every Corvette Engine "LOST" in 1972
Joe Kucinski
Top 10 DOs and DON'Ts for Protecting Your Convertible Top!
Michael S. Palmer
Top 10 Most Explosive Corvettes Ever Made: Power-to-Weight Ratio Ranked!
Joe Kucinski
150 hp to 1,250 hp: Every Corvette Generation Compared by the Specs That Matter
Joe Kucinski
8 Coolest Corvette Pace Cars (and Replicas) of All Time
Verdad GallardoLe Mans Master


Joined: Aug 2005
Posts: 7,009
Likes: 11
From: Philadelphia, sub burbs Wynnewood, PA
The rear bumper is a ZR-1 type with 3rd brakelight that I purchased from American Sportscar Design. I bought from them as theirs was the only one with the 3rd brakelight option..it uses the factory (91?) model year third brakelight.
Unfortunately they stopped making corvette parts not long thereafter and I havent seen the 3rd brakelight option since.
BTW this part bolted right on with no need for any fiberglass work to get it to align perfectly, unlike the many stories you hear about other bumpers.
Unfortunately they stopped making corvette parts not long thereafter and I havent seen the 3rd brakelight option since.
BTW this part bolted right on with no need for any fiberglass work to get it to align perfectly, unlike the many stories you hear about other bumpers.
Oh and I really like the color of your Vette


Racer

Joined: May 2006
Posts: 423
Likes: 3
From: New Port Richey, FL
Just a standard electronic flasher in lieu of the original thermal is all that was required..flashers work just fine.
The rear bumper is a ZR-1 type with 3rd brakelight that I purchased from American Sportscar Design. I bought from them as theirs was the only one with the 3rd brakelight option..it uses the factory (91?) model year third brakelight.
Unfortunately they stopped making corvette parts not long thereafter and I havent seen the 3rd brakelight option since.
BTW this part bolted right on with no need for any fiberglass work to get it to align perfectly, unlike the many stories you hear about other bumpers.
Thread Starter
Drifting
Joined: Feb 2005
Posts: 1,738
Likes: 2
From: San diego ca
in the 78 the flasher is under the passenger side dash just below the glovebox in a spring clip. Electronic flashers can be found right along side the older thermal style at your auto parts place.
They say electronic right on the packaging, whereas not all of the older ones will say thermal.
the difference? I couldnt tell ya since as far as electrical stuff goes all i know is that its important to keep the smoke in the wires.
They say electronic right on the packaging, whereas not all of the older ones will say thermal.
the difference? I couldnt tell ya since as far as electrical stuff goes all i know is that its important to keep the smoke in the wires.
Burning Brakes


Joined: May 2004
Posts: 1,100
Likes: 3
From: belle plaine ks
I have those in mine, The beauty of them is that they are sealed up so moisture cannot mess up the connection with bulb and socket, and they will probably still work long after the car does as led's take along time to burn out. The previous owner put them in mine because all the bayonet connections were corroded. I think they are a big win all the way around.

Advanced
Joined: Feb 2008
Posts: 92
Likes: 0
10 LEDS in each light?! Is this "Bright"? Are some specific individual LED's brighter than others? Or is it strictly a numbers game?
Since I can't get much comment on my '74 specific request, this may be the best consideration. Was just hoping for feedback specific, so I'd know what to anticipate.
Thanks, Steve
p.s. & thanks to the one response regarding rear access and mounting configuration.
Since I can't get much comment on my '74 specific request, this may be the best consideration. Was just hoping for feedback specific, so I'd know what to anticipate.
Thanks, Steve
p.s. & thanks to the one response regarding rear access and mounting configuration.


Team Owner

Joined: Aug 2006
Posts: 24,125
Likes: 15
From: Columbia Missouri
10 LEDS in each light?! Is this "Bright"? Are some specific individual LED's brighter than others? Or is it strictly a numbers game?
Since I can't get much comment on my '74 specific request, this may be the best consideration. Was just hoping for feedback specific, so I'd know what to anticipate.
Thanks, Steve
p.s. & thanks to the one response regarding rear access and mounting configuration.
Since I can't get much comment on my '74 specific request, this may be the best consideration. Was just hoping for feedback specific, so I'd know what to anticipate.
Thanks, Steve
p.s. & thanks to the one response regarding rear access and mounting configuration.
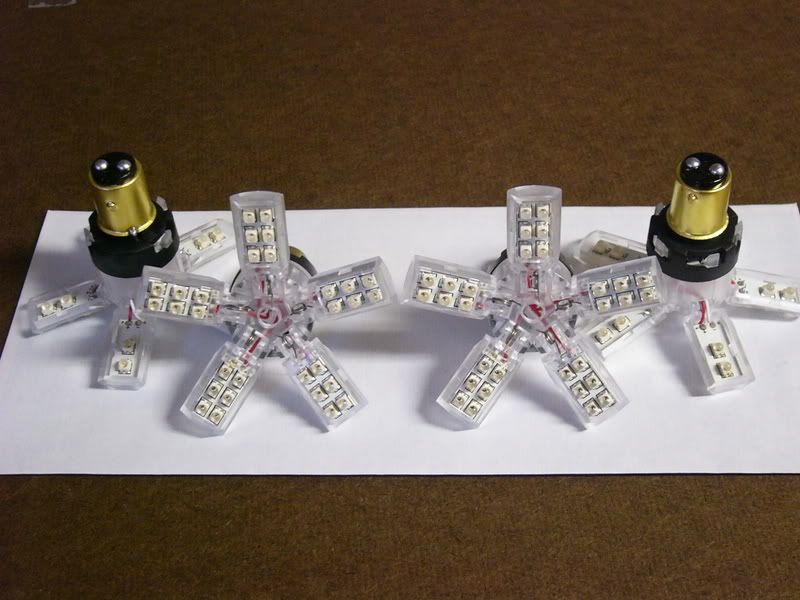
There are higher watt LEDs in use but for the most part it's quantity and directionality.
Take the two bulbs pictured for instance. The one on the right has more LEDs, and is brighter overall, but the one on the left 'appeared' brighter because the majority of the LEDs aim straight out.

Then there are these...my favorites. Costly to say the least, but MAN are these bright.