


 I was thinking the same thing.
Rust Question......
Racer


Joined: Apr 2008
Posts: 436
Likes: 2
One more question, should I get a quart or gallon of the Marine Clean and Metal Ready? I need them to last the entire frame, T/A, etc. I guess I can always get the gallon if no one's sure, but it'd be nice just to get the quart size if that's all I need.
Melting Slicks


Joined: Apr 2004
Posts: 2,008
Likes: 38
From: Space Coast Gator Territory
I only purchased a quart of each and had some left over. You must read the marine clean is diluted with water, so it will become much more volume. I used full strenth, but that is not necessary. 50-50 seemed to be more than strenth enough. The directions say not to use any cleaner with hydrocarbons, or it will affect the paint. I needed to wash parts of my frame with lacquer thinner to remove heavy deposits of grease. This was not recommended, but even Marine Clean wouldn't cut this crud. I washed the first time with Simple Green, a non hydrocarbon cleaner, and finished with a second wash with Marine Clean.
I scrubbed all parts with a Scotch Brite pad, so it was very clean. Then apply the Metal Ready. You only need to wet the clean metal and let it dry. It will leave a white powdery film when dry. In some places it would brush off, so I quickly brushed the loose powder off before applying the POR 15. The rusty but clean parts will look amazing after the paint. I used one coat of gloss black on my frame and it looks as good as new 18 months later. I clean the underside of my car, so I monitor its condition regularly. My fuel tank and lines were painted in silver and also look as just painted.
I scrubbed all parts with a Scotch Brite pad, so it was very clean. Then apply the Metal Ready. You only need to wet the clean metal and let it dry. It will leave a white powdery film when dry. In some places it would brush off, so I quickly brushed the loose powder off before applying the POR 15. The rusty but clean parts will look amazing after the paint. I used one coat of gloss black on my frame and it looks as good as new 18 months later. I clean the underside of my car, so I monitor its condition regularly. My fuel tank and lines were painted in silver and also look as just painted.
Racer
Joined: Apr 2008
Posts: 436
Likes: 2
Did you get the black or semi-gloss POR15? Those are the only "black-based" colors they have. Is the "black" a flat black or actually a high gloss and it just doesn't say? Also, the directions say you should use 2 coats, but is 1 good enough?

Burning Brakes

Joined: Mar 2008
Posts: 838
Likes: 0
From: starting to wonder if im welcome here texas
Duplicolor Truck Bed Coating also work real nice as well. http://www.duplicolor.com/products/truckbed.html:
Race Director

Joined: May 2008
Posts: 17,140
Likes: 3
From: Houston (NW of) Texas
Also, what about the inside of the frame? I know there's access through the "keyholes" and the other few holes; would you recommend using some kind of a sprayer to spray POR15 in there also? I could always use a power washer or something to force all the dirt/rust flakes out of there, but obviously I couldn't get in there and scrape. What's your recommendation?
Race Director
Joined: Oct 2000
Posts: 11,891
Likes: 3
From: Kansas City, MO ...I'd like to go fishing and catch a fishstick. That'd be convenient. - Mitch Hedberg
I used 3M rubberized undercoating on my floor pans.
I asked a similar question when I did my carpets and floors 4 years ago. I got lit up by several members for thinking my '80 had metal floor pans. Luckily the later C3 owners came to my rescue.
I asked a similar question when I did my carpets and floors 4 years ago. I got lit up by several members for thinking my '80 had metal floor pans. Luckily the later C3 owners came to my rescue.
Melting Slicks
Joined: Apr 2004
Posts: 2,008
Likes: 38
From: Space Coast Gator Territory
OK...here I go again! Paint doesn't stick to loose material, so you need to remove debris from inside the frame. I've done two, one body off and one with the body on. In either case, hammer the frame with a plastic face hammer to get inside material loose. Solidified material will be at the bottom of the frame.
Vacuum the inside of the frame of as much loose material as you can. Go to your building supply store and by a PVC reducer from the plumbing department to fit on the end of your vacuum. You may need to reduce it twice to get a hose small enough on the end that will fit into the frame.
The plate at the end of your frame rail has drain holes at the bottom corners. Poke a small rod into them to free up material collecting there and blocking it. Out of mine came rust particles and the remains of a rat nest. You will want to run a hose into the frame after you have done the hammering and vacuuming. After you have it as clean as possible, it is ready for a coating. I sprayed mine using a cheap spray cleaner from JC Whitney, I think. It is powered by an air compressor and works on a vacuum principle. One end goes into the material to be sprayed and the vacuum created by air going by draws the spray material. I simply put it into the frame holes and srrayed until it ran out of the frame. Remember, the frame is made of two pieces welded together, so there are gaps along the bottom that provide drainage.
I don't think you can go wrong coating the inside of the frame with any material that is advertised to retard rust. I would think POR would work well and from my experience would prefer it. There are many other options that would probably work as well. I hope this gives you some ideas to get started.
Corvette Stories
The Best of Corvette for Corvette Enthusiasts

Every 2027 Corvette Engine Explained
Joe Kucinski
Designer Imagines A Corvette That Looks More Like a Corvette Than the Corvette
Verdad Gallardo
10 Ugly Corvettes That We Still Kinda Love
Joe Kucinski
Top 10 Most Expensive Corvettes Ever Sold on Bring A Trailer
Brett Foote
10 Things Every Corvette Owner Needs (2026 Edition)
Michael S. Palmer
8 Most "Only Corvette Owners Understand" Quirks and Problems
Pouria Savadkouei
10 Reasons the C6 Z06 is Still A Performance Benchmark After 20 Years
Joe Kucinski
How Much Horsepower Every Corvette Engine "LOST" in 1972
Joe Kucinski
Top 10 DOs and DON'Ts for Protecting Your Convertible Top!
Michael S. PalmerSafety Car


Joined: Oct 2006
Posts: 3,930
Likes: 15
From: Calgary Alberta
Ummm...yeah. Obviously whoever powdercoated your parts did a terrible job of prepping the parts, or didn't completely cure them. Powdercoat is tough as nails. When I have to strip powdercoat, I have a hell of a time removing it - and that is using aircraft stripper.
Melting Slicks
Joined: Apr 2004
Posts: 2,008
Likes: 38
From: Space Coast Gator Territory
As a side note to anyone considering powder coating I'd share this: shop around on prices. I had one guy charging me more than I thought was reasonable and should have compared prices. By accident, I found another guy doing the same work for about half what I had paid.
From my experience I know I can trust POR and my labor. When I have other people do things for me it is always a gamble. That applies to everything and not just powder coating.
Safety Car
Joined: Oct 2006
Posts: 3,930
Likes: 15
From: Calgary Alberta
You may be right, I'm not an authority on powder paint. All I know is, after wiping the underside of my lower control arm with lacquer thinner, I could slowly begin to see the bare steel underneith. The person who I asked about this told me it is just paint and will come off. If powder coating is resistant to lacquer thinner, I've been hoodwinked! Your powder coated frame and susp parts sure look great.
As a side note to anyone considering powder coating I'd share this: shop around on prices. I had one guy charging me more than I thought was reasonable and should have compared prices. By accident, I found another guy doing the same work for about half what I had paid.
From my experience I know I can trust POR and my labor. When I have other people do things for me it is always a gamble. That applies to everything and not just powder coating.
Yes, I think you've been had. Powdercoat is not paint. It is a plastc powder that melts/flows out once heated.
Instructor
Joined: May 2008
Posts: 118
Likes: 0
From: Pittsburgh Pa
Any of the products mentioned will work on your floor pans. Personally, I don't care for powder coating in the engine area as it is not resistant to harsh chemicals. My upper and lower control arms were powder coated gloss black several years ago. I found wiping grease off with lacquer thinner also removed the powder paint. POR is resistant to chemicals and it will not come off. I painted my frame with POR-15 in HG black with the body on, and still happy the the result several months later. I have used PPG DP epoxy primer applied with a brush with good results. That is how I painted the fiberglass underside of both my 79 and 69. Here is a before and after.
[IMG]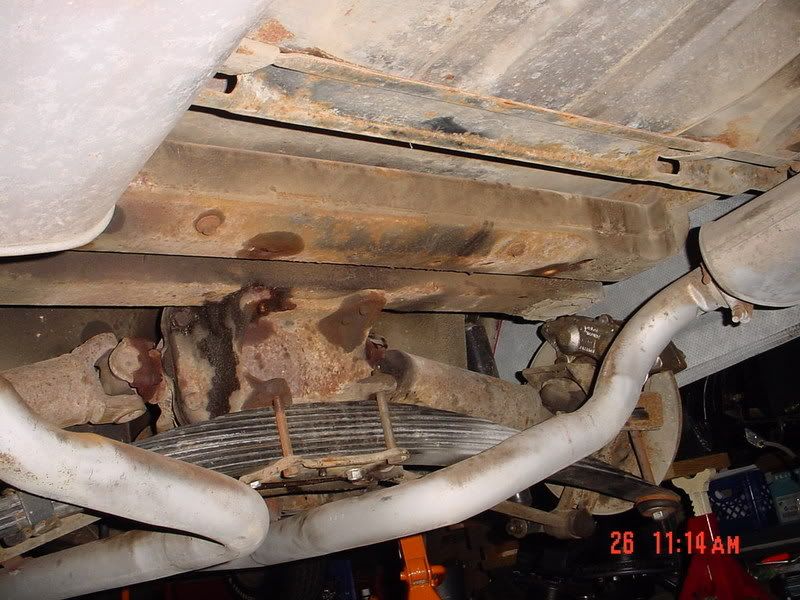 [/IMG]
[IMG] [/IMG]
[IMG] [/IMG]
This was done with the body on and over the course of about six months. I was having everything out back freshened up, and thought 'while I was at it,' use the opportunity to clean everything. The gloss black POR holds up better than powder coating where grease and chemicals are involved IMO. My gas tank crossmember and front susp is powder coated; the rest of the frame, trans crossmember, gas tank and rear frame crossmember are POR coated. The underside fiberglass is brush painted with PPG epoxy primer. All fiberglass bonding seams have been molded in the four wheel wells.
You can do this to your new 73, but enjoy driving it until maintenance needs to be done. Then, put your plan into action. My floor pans were painted with PPG as are the #2 body mount areas behind the kick panels.
BTW...I also powdercoated my differential, half shafts and DS in chrome powder. Next time, I will POR the shafts, TA's and diff in gloss silver, as it much easier for way less $$ and looks as good IMO.
[IMG] [/IMG]
[IMG]
[/IMG][IMG]
[/IMG][IMG]
[/IMG]This was done with the body on and over the course of about six months. I was having everything out back freshened up, and thought 'while I was at it,' use the opportunity to clean everything. The gloss black POR holds up better than powder coating where grease and chemicals are involved IMO. My gas tank crossmember and front susp is powder coated; the rest of the frame, trans crossmember, gas tank and rear frame crossmember are POR coated. The underside fiberglass is brush painted with PPG epoxy primer. All fiberglass bonding seams have been molded in the four wheel wells.
You can do this to your new 73, but enjoy driving it until maintenance needs to be done. Then, put your plan into action. My floor pans were painted with PPG as are the #2 body mount areas behind the kick panels.
BTW...I also powdercoated my differential, half shafts and DS in chrome powder. Next time, I will POR the shafts, TA's and diff in gloss silver, as it much easier for way less $$ and looks as good IMO.
[IMG]
[/IMG]
Burning Brakes
Joined: May 2005
Posts: 1,145
Likes: 5
From: South of London, Engerland
There are two types of powder coating: epoxy and polyester. I understand that epoxy is the tougher of the two options but - like POR15 - it doesn't enjoy sunlight.
I've just stripped a load of paint from various fixings on my chassis, including the bush retainers on the A-arms, which I had powder coated with epoxy last year as part of a suspension rebuild. Paint stripper had no problem removing the coating just like it did the other paints.
I've also cleaned the arms up using standard hydro-carbon degreaser and that dulled the semi-gloss finish, so PC is by no means immune from chemical attack.
These are just my experiences.

More info about powder coating here -> http://www.pcfpowder.com/allaboutpc.html
Racer
Joined: Apr 2008
Posts: 436
Likes: 2
Red 69 (or anyone else), what do you think about using the foam brushes instead of the standard bristle brushes? Ex: Foam Brushes
It seems it should work the same, except they're cheaper and I don't have to worry about loose bristles. Thoughts?
It seems it should work the same, except they're cheaper and I don't have to worry about loose bristles. Thoughts?
Melting Slicks
Joined: Apr 2004
Posts: 2,008
Likes: 38
From: Space Coast Gator Territory
I'm sure others have had similar experiences with foam brushes. I'm talking about the cheap ones that usually come several to a pack. They work fine for a short while and then begin to soften from the paint. In brushing both POR 15 and PPG epoxy paint the foam came off the brush handle. I was wearing latex gloves, so I just grabbed the foam and kept going into the tight space I was working. There may be high density foam brushes that hold up better. Maybe, slip on a pair of kitchen gloves and with a spare sponge get to work. When doing a large but irregular surface, I keep a small roller, bristle brush and sponge handy. Completing an entire job at one time has always yielded the best reuslt for me. Good luck with the foam, wear good gloves and don't be afraid to reach in and get your covered hands dirty.
Racer
Joined: Apr 2008
Posts: 436
Likes: 2
Sounds like I'll just stick w/ sponges, roller brush and bristle brushes. I don't want to deal w/ slipping foam brushes.
Forgot to mention this...I talked to a guy at the auto shop and he recommended doing one area at a time (i.e. wire brush/chip off dirt - Marine Clean - Metal Etch - POR15). He said if I try to do the entire underside one step at a time (i.e. wire brush entire frame first), I'd just end up w/ the clean surface flash rusting in a day or so (it's been really humid here). Do you think I'll be OK doing manageable sections at a time? There's obviously no way you could do the whole thing in a day (I wish!), so this seems to be the only real option. What would you recommend?
Forgot to mention this...I talked to a guy at the auto shop and he recommended doing one area at a time (i.e. wire brush/chip off dirt - Marine Clean - Metal Etch - POR15). He said if I try to do the entire underside one step at a time (i.e. wire brush entire frame first), I'd just end up w/ the clean surface flash rusting in a day or so (it's been really humid here). Do you think I'll be OK doing manageable sections at a time? There's obviously no way you could do the whole thing in a day (I wish!), so this seems to be the only real option. What would you recommend?
Last edited by FlyViper; Jun 23, 2008 at 11:23 PM.

Instructor
Joined: Mar 2008
Posts: 121
Likes: 0
From: Salt Lake City Utah
Red69: Your car looks great!! What did you use to prep the underside glass before painting it? Also, how hard was it to remove the guts to the differential and then put them back in? Mine is a frame off so everything is very accessible. Thanks!
Any of the products mentioned will work on your floor pans. Personally, I don't care for powder coating in the engine area as it is not resistant to harsh chemicals. My upper and lower control arms were powder coated gloss black several years ago. I found wiping grease off with lacquer thinner also removed the powder paint. POR is resistant to chemicals and it will not come off. I painted my frame with POR-15 in HG black with the body on, and still happy the the result several months later. I have used PPG DP epoxy primer applied with a brush with good results. That is how I painted the fiberglass underside of both my 79 and 69. Here is a before and after.
[IMG][/IMG]
[IMG][/IMG]
[IMG][/IMG]
This was done with the body on and over the course of about six months. I was having everything out back freshened up, and thought 'while I was at it,' use the opportunity to clean everything. The gloss black POR holds up better than powder coating where grease and chemicals are involved IMO. My gas tank crossmember and front susp is powder coated; the rest of the frame, trans crossmember, gas tank and rear frame crossmember are POR coated. The underside fiberglass is brush painted with PPG epoxy primer. All fiberglass bonding seams have been molded in the four wheel wells.
You can do this to your new 73, but enjoy driving it until maintenance needs to be done. Then, put your plan into action. My floor pans were painted with PPG as are the #2 body mount areas behind the kick panels.
BTW...I also powdercoated my differential, half shafts and DS in chrome powder. Next time, I will POR the shafts, TA's and diff in gloss silver, as it much easier for way less $$ and looks as good IMO.
[IMG][/IMG]
[IMG]
[/IMG][IMG]
[/IMG][IMG]
[/IMG]This was done with the body on and over the course of about six months. I was having everything out back freshened up, and thought 'while I was at it,' use the opportunity to clean everything. The gloss black POR holds up better than powder coating where grease and chemicals are involved IMO. My gas tank crossmember and front susp is powder coated; the rest of the frame, trans crossmember, gas tank and rear frame crossmember are POR coated. The underside fiberglass is brush painted with PPG epoxy primer. All fiberglass bonding seams have been molded in the four wheel wells.
You can do this to your new 73, but enjoy driving it until maintenance needs to be done. Then, put your plan into action. My floor pans were painted with PPG as are the #2 body mount areas behind the kick panels.
BTW...I also powdercoated my differential, half shafts and DS in chrome powder. Next time, I will POR the shafts, TA's and diff in gloss silver, as it much easier for way less $$ and looks as good IMO.
[IMG]
[/IMG]Melting Slicks
Joined: Apr 2004
Posts: 2,008
Likes: 38
From: Space Coast Gator Territory
I can't find a picture, but most C-3's have a void in the splash apron behind the front wheel and leading to the rocker channel. This allows water and debris back and into the channel, so I wanted to close it. I used some SEM adhesive to bond the screen material that comes with a can of Bondo over that opening. Then, use Bondo to cover it and blend it into the main splash apron. When everything is smooth it is ready for paint.
On the underside I used a cheap 1" bristle brush and foam brush to paint the tight spots and a small foam roller brush for the large areas. You will find the roller does a very nice job that keeps the texture uniform. My roller brushes were bought from Wal Mart's paint dept. You will probably need several rollers, so buy a brush where extra rollers are available. Any pause in your painting and the roller will dry and need to be disposed. I used PPG DP primer paint for the fiberglass underside. It comes in several colors to select from. Add about 1/3 more hardner when you mix it and it will take on more gloss. I prefer a semigloss finish over flat, as it cleans better and I just prefer it. One quart will do your entire underside with paint left over. One qt is the smallest quantity you can buy and the hardner is seperate. You will need extra hardner when going for the glossier finish. Remember to mix the same, or the texture will change from batch to batch. That is all I used and no topcoat is necessary. You will need to give bondo areas a second or even a third coat, as it soaks up the paint and leaves a flat finish.
Now for the differential rebuild: unless you are set up with the tools and experienced in the process, send it out. If you are building performance into your engine and plan on doing some racing, use new screw in yokes. Before leaving your differential at a shop explain what yoke end play you expect when they are finished. If they can't guarantee providing what you expect, take it elsewhere. Ship it to Gary1999 and you can be assured it will be right. Do a search for his letter on rebuilding a differential where he has all the specs you need to know. Ditto for the T/A's.
I rebuilt a set of T/A's before the internet and access to shims and proper tools, so I winged it. The wheels turned fine and I put a few hundred miles on them, but ultimately had them redone properly by a shop. Getting the spindel bearing shimmed to specs is difficult without the proper tools. Since I do not do it often, it is cost effective to send it out. The caveat is, send them to a shop that will meet your expectation. Anyone can take them apart and reassemble with new parts, getting them right is what you want to be paying for. I hope this helps get the result you want!
Last edited by Red 69; Jun 24, 2008 at 12:04 PM.
Melting Slicks
Joined: Apr 2004
Posts: 2,008
Likes: 38
From: Space Coast Gator Territory
I'm also not an expert, but can share my recent experiences.
There are two types of powder coating: epoxy and polyester. I understand that epoxy is the tougher of the two options but - like POR15 - it doesn't enjoy sunlight.
I've just stripped a load of paint from various fixings on my chassis, including the bush retainers on the A-arms, which I had powder coated with epoxy last year as part of a suspension rebuild. Paint stripper had no problem removing the coating just like it did the other paints.
I've also cleaned the arms up using standard hydro-carbon degreaser and that dulled the semi-gloss finish, so PC is by no means immune from chemical attack.
These are just my experiences.
More info about powder coating here -> http://www.pcfpowder.com/allaboutpc.html

Instructor
Joined: Mar 2008
Posts: 121
Likes: 0
From: Salt Lake City Utah
Red 69, Thanks for the detailed explanation. The body is off the car so now is the time  So, it's not a problem using lacquer thinner on the glass? I've already power washed mine and it looks to be bare glass.
So, it's not a problem using lacquer thinner on the glass? I've already power washed mine and it looks to be bare glass.