






Bonding Seams - Pics

Thread Starter
Drifting


Joined: Feb 2005
Posts: 1,583
Likes: 5
From: Richardson Tx.
 Bonding Seams - Pics
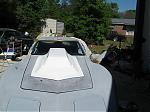
I filled in all of the bonding seams with epoxy mat and resin. I then ground it down so that it is slightly raised above the 2 sides of the seam.
I'm trying to think of the best way to level it out so that it looks seamless. I haven't done much sanding so should I purchase a flexible sanding block or board (grit ?) and start going up and down on it?
Also, I made some divots in the glass in picture #2 with my grinder. What should I fill these in with?


I'm trying to think of the best way to level it out so that it looks seamless. I haven't done much sanding so should I purchase a flexible sanding block or board (grit ?) and start going up and down on it?
Also, I made some divots in the glass in picture #2 with my grinder. What should I fill these in with?
Drifting
Joined: Jul 2006
Posts: 1,871
Likes: 6
From: Sault Ste. Marie Ontario
I'm no expert here on bodywork, but I have completed a similar task on my car.
My suggestion here would be to block out the resin/cloth you've applied using a flexible hand block and 80 grit paper. I was able to buy the blocks from Napa which are about 2 1/2" x 4" in size. They are a stable rubber block that holds a quarter sheet of paper well and do not cost too much.
With the 80 grit paper I suggest a X-cross sanding pattern down the length of the seam felling the surface as you go until you have remove the high area.
I noticed several air bubbles in the cloth so you will have to address these after you have the panel smoothed out. Use a small die grinder to open up each bubble and rough up the inner surface. Once you have this prepared, apply a thin coat on Mar-Glass down the length of the seam to fill in all the voids. The Mar-Glass is available from Evercoat and can be bought at Napa. It is a two part mixture that goes on like putty and sets-up hard.
Smooth the Mar-Glass out in a similar method to the resin/cloth again with 80 grit paper.
Once you're happy with that, apply a thin coat of two-part putty (again Evercoat) and block the panel with 80 and then 180 paper.
Stay away from the edges as you can deal with them after you prime the panel.
Depending on how deep your divets are, you can fill them with Mar-Glass or two-part and block them out.
A final prep prior to priming the panel would be to block the entire panel out with 180.
Hope this helps,
Ian
My suggestion here would be to block out the resin/cloth you've applied using a flexible hand block and 80 grit paper. I was able to buy the blocks from Napa which are about 2 1/2" x 4" in size. They are a stable rubber block that holds a quarter sheet of paper well and do not cost too much.
With the 80 grit paper I suggest a X-cross sanding pattern down the length of the seam felling the surface as you go until you have remove the high area.
I noticed several air bubbles in the cloth so you will have to address these after you have the panel smoothed out. Use a small die grinder to open up each bubble and rough up the inner surface. Once you have this prepared, apply a thin coat on Mar-Glass down the length of the seam to fill in all the voids. The Mar-Glass is available from Evercoat and can be bought at Napa. It is a two part mixture that goes on like putty and sets-up hard.
Smooth the Mar-Glass out in a similar method to the resin/cloth again with 80 grit paper.
Once you're happy with that, apply a thin coat of two-part putty (again Evercoat) and block the panel with 80 and then 180 paper.
Stay away from the edges as you can deal with them after you prime the panel.
Depending on how deep your divets are, you can fill them with Mar-Glass or two-part and block them out.
A final prep prior to priming the panel would be to block the entire panel out with 180.
Hope this helps,
Ian
Racer

Joined: Apr 2008
Posts: 418
Likes: 0
From: destin fl
I filled in all of the bonding seams with epoxy mat and resin. I then ground it down so that it is slightly raised above the 2 sides of the seam.
I'm trying to think of the best way to level it out so that it looks seamless. I haven't done much sanding so should I purchase a flexible sanding block or board (grit ?) and start going up and down on it?
Also, I made some divots in the glass in picture #2 with my grinder. What should I fill these in with?
I'm trying to think of the best way to level it out so that it looks seamless. I haven't done much sanding so should I purchase a flexible sanding block or board (grit ?) and start going up and down on it?
Also, I made some divots in the glass in picture #2 with my grinder. What should I fill these in with?


Drifting

Joined: Oct 2007
Posts: 1,458
Likes: 1
From: Collinsville MS
St. Jude Donor '08
I have to do the same on my car when I get back, the seams are showing through. When I was at the parts house a couple of weeks ago talking to their paint guy, he referred me to another guy who he said was an expert on painting the older vettes. I met with him and he said the only way to fix them was to do exactly as you did, then seal it with epoxy primer. He told me that if you didnt grind them out and put mat in there the lines will come back thru a new paint job eventually.
Drifting
Joined: Jul 2006
Posts: 1,871
Likes: 6
From: Sault Ste. Marie Ontario
I have to do the same on my car when I get back, the seams are showing through. When I was at the parts house a couple of weeks ago talking to their paint guy, he referred me to another guy who he said was an expert on painting the older vettes. I met with him and he said the only way to fix them was to do exactly as you did, then seal it with epoxy primer. He told me that if you didnt grind them out and put mat in there the lines will come back thru a new paint job eventually.
Now I'm just a rookie at this, but that's my thinking on the repair.
Anyone else?

Race Director


Joined: Mar 2006
Posts: 14,112
Likes: 28
From: Florida
Use either an air straight line sander or hand long block with 80 grit to get it as straight and smooth as possible.
Then remix some epoxy resin again and just paint a thick coat over your sanding. When cured at least 24 hours, then you can long block it again starting with 120 or so and go finer as needed. No need to use any fillers.
Then epoxy primer etc, etc and prep for paint.
Then remix some epoxy resin again and just paint a thick coat over your sanding. When cured at least 24 hours, then you can long block it again starting with 120 or so and go finer as needed. No need to use any fillers.
Then epoxy primer etc, etc and prep for paint.
Corvette Stories
The Best of Corvette for Corvette Enthusiasts

10 Reasons the C6 Z06 is Still A Performance Benchmark After 20 Years
Joe Kucinski
How Much Horsepower Every Corvette Engine "LOST" in 1972
Joe Kucinski
Top 10 DOs and DON'Ts for Protecting Your Convertible Top!
Michael S. Palmer
Top 10 Most Explosive Corvettes Ever Made: Power-to-Weight Ratio Ranked!
Joe Kucinski
150 hp to 1,250 hp: Every Corvette Generation Compared by the Specs That Matter
Joe Kucinski
8 Coolest Corvette Pace Cars (and Replicas) of All Time
Verdad Gallardo
Top 10 Corvette Engines RANKED by Peak Torque (70+ Years of Muscle!)
Joe Kucinski
Corvette ZR1X Will Be Pacing the Indy 500, And Could Probably Race, Too!
Verdad Gallardo
Top 10 Corvettes Coming to Mecum Indy 2026!
Brett Foote

Drifting
Joined: Feb 2008
Posts: 1,560
Likes: 4
From: Arlington texas
Glad to see this post. I'm about to be working on the same area and can use all the advise I can get on it. Let me know how it comes out. You still live in the Richardson area? I'm in Arlington.
Drifting
Joined: Oct 2007
Posts: 1,458
Likes: 1
From: Collinsville MS
St. Jude Donor '08
I'm not sure I agree you have to grind out the seam and fill it with mat. I believe the seam shrinks over time and ends up lower then the panels its bonding. All you should have to do is rough the seam and the surrounding panels and give it a lick of short strand filler followed with two part putty and high build primer. The short strand will be plenty strong enough and will not shrink. The two-part will clean it up making it easier to blend and shape and the high build will give you the finish.
Now I'm just a rookie at this, but that's my thinking on the repair.
Anyone else?
Now I'm just a rookie at this, but that's my thinking on the repair.
Anyone else?

Thread Starter
Drifting
Joined: Feb 2005
Posts: 1,583
Likes: 5
From: Richardson Tx.
Here's an update for those following along:
I'm concerned that there may be way too many air bubbles in my epoxy after it cured. There are so many white colored freckles so I took an air die grinder to them but they are so numerous. Are the white spots air bubbles? I used a pretty thick fiberglass mat and I rolled it out as best as I could after applying it.

I'm concerned that there may be way too many air bubbles in my epoxy after it cured. There are so many white colored freckles so I took an air die grinder to them but they are so numerous. Are the white spots air bubbles? I used a pretty thick fiberglass mat and I rolled it out as best as I could after applying it.

Drifting
Joined: May 2005
Posts: 1,629
Likes: 4
From: Somers CT
I don't think those are bubbles, the white marks have the pattern of the glass weave. That's where one strand of the glass weave crosses another, there's less resin in that area because it's taken up by the glass material and it appears white. I'm not saying it's 100% bubble free, it's hard to tell from the photo but generally it looks like the weave.
Last edited by TopGunn; Nov 9, 2008 at 11:07 AM.
Thread Starter
Drifting
Joined: Feb 2005
Posts: 1,583
Likes: 5
From: Richardson Tx.
I think you're right. Its like the mat didn't get saturated enough by the resin. Its kind of a chaulky consistency now where its white. I'm wondering if I should grind the white parts out and just come back with a thick coat of resin over top to fill back in.
Any opinions?

Any opinions?
Last edited by 79vetter; Nov 9, 2008 at 04:05 PM.

Melting Slicks

Joined: Sep 2007
Posts: 2,429
Likes: 0
From: Tucson AZ
The white spots are air bubbles. Period. If you want a good finish, you need to pre-impregnate your cloth. After that, place on the car, cover with some plastic, not saran wrap (too thin). Use the kind you can get at home improvement stores. Then roll it out with your roller, and wait for cure time. Mix your resin right by the instructions, unless you've got alot of practice doing this.
My qualifications? I started in the US Air Force in 1975 as a structural maintenance worker. I've done composite repairs on jets that fly really, really fast.
My qualifications? I started in the US Air Force in 1975 as a structural maintenance worker. I've done composite repairs on jets that fly really, really fast.
