
Heater core install done - PICS
 09-10-2009, 02:26 PM
#21
Le Mans Master

Thread Starter
Nice job, Glenn. BTW: looks like a birds nest in that 1st image. Did you find pigeons nesting in there? LOL.
Your son and yourself did a fine job getting that ironed out nicely. If time and money ever come back around and you're motivated to dig back in, I'd share my experiences to clean up that housing.
I was scared to unbutton but after a few barley pops, I gained the courage to go for it. Ha!

I know you'll have a warm cockpit to enjoy this coming fall. I'm hoping to be equally comfortable once I'm running, out here in the West.
Your son and yourself did a fine job getting that ironed out nicely. If time and money ever come back around and you're motivated to dig back in, I'd share my experiences to clean up that housing.
I was scared to unbutton but after a few barley pops, I gained the courage to go for it. Ha!
I know you'll have a warm cockpit to enjoy this coming fall. I'm hoping to be equally comfortable once I'm running, out here in the West.
Glenn

 09-10-2009, 02:55 PM
#22
Terrorizing Orange Cones


Thanks for the opportunity, Glen.
Yeah, it's always interesting how a couple cold beers can make or break a project. (in moderation, of course)
When I get home later tonight, I'll load up pictures of the disassemble/clean/paint/reassemble process.
Outside of procuring a gasket kit from Dr. Rebuild and careful drilling of the rivets, the cleanup was media blasting of metal pieces, hot soapy water, elbow-grease everything else, and rattle can.
I think the pictures will explain better once posted.
Eddie
09-10-2009, 02:58 PM
#23
Le Mans Master
Thread Starter
Thanks for the opportunity, Glen.
Yeah, it's always interesting how a couple cold beers can make or break a project. (in moderation, of course)
When I get home later tonight, I'll load up pictures of the disassemble/clean/paint/reassemble process.
Outside of procuring a gasket kit from Dr. Rebuild and careful drilling of the rivets, the cleanup was media blasting of metal pieces, hot soapy water, elbow-grease everything else, and rattle can.
I think the pictures will explain better once posted.
Eddie
Yeah, it's always interesting how a couple cold beers can make or break a project. (in moderation, of course)
When I get home later tonight, I'll load up pictures of the disassemble/clean/paint/reassemble process.
Outside of procuring a gasket kit from Dr. Rebuild and careful drilling of the rivets, the cleanup was media blasting of metal pieces, hot soapy water, elbow-grease everything else, and rattle can.
I think the pictures will explain better once posted.
Eddie
Glenn
09-10-2009, 04:52 PM
#24
Melting Slicks


Member Since: Sep 2007
Location: Tucson AZ
Posts: 2,429
Likes: 0
Received 0 Likes
on
0 Posts
Absolutely, but at every spot in the job, there was the question, "what the hell is that" and of course, it was another component (vacuum canister, etc.) that didn't work or was very sluggish to work, etc, etc, etc. You all know the story. Well, there is all kinds of stuff I didn't know was in that area. Well, it's all new now, I even replaced the vacuum hoses that control the heat and A/C operation. I never want to break into that crap again, I think I just might sell it first.
09-11-2009, 01:50 PM
#25
Terrorizing Orange Cones
Hi Glenn,
OK, got sidetracked with afterhours shop work last eve and finally managed to get the images loaded.
Thanks again for allowing me to ride on your original post.
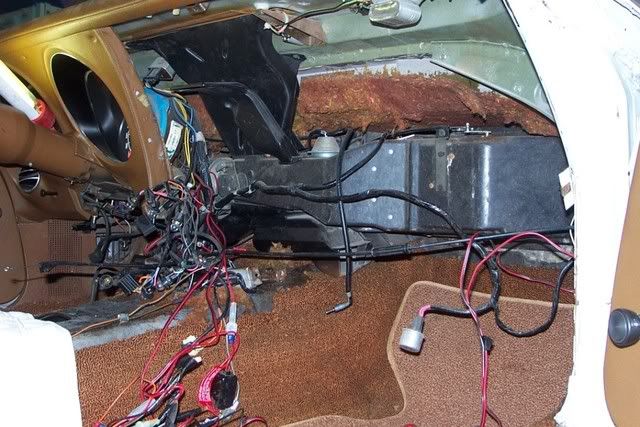
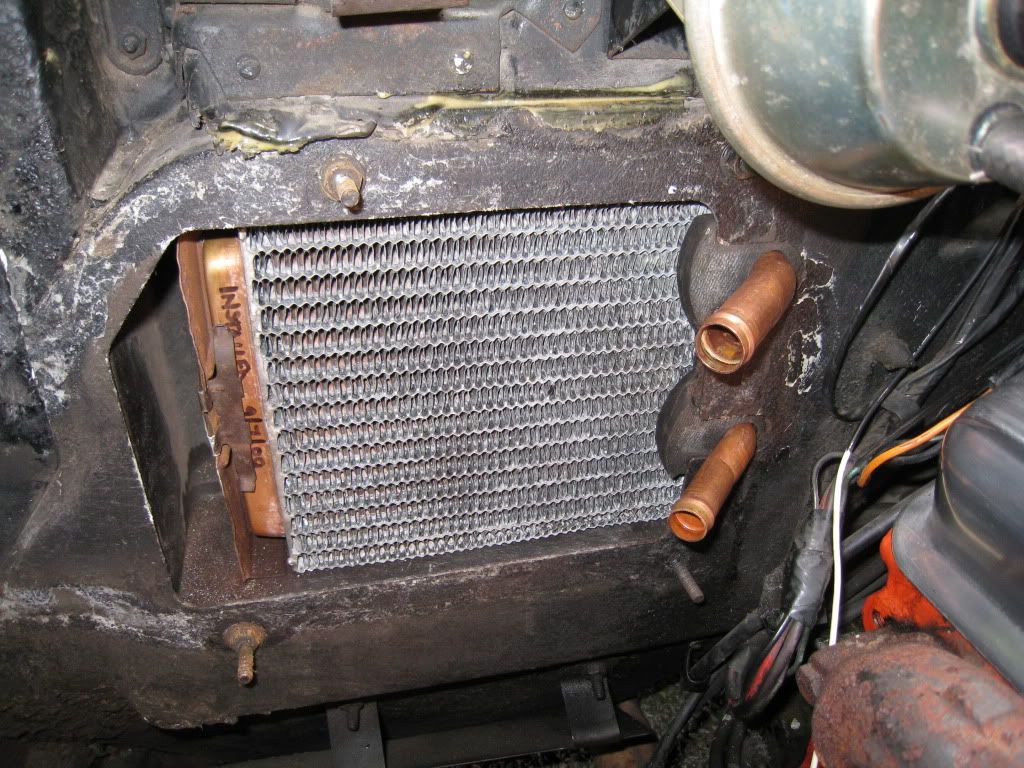
These instructions are for a non-AC car. As you've explained, accessing the core is done through engine bay.
Like many of us, my heater project was one of those "while I'm at it" deals fixing other stuff. It wasn't planned and I already had motor/trans pulled out.
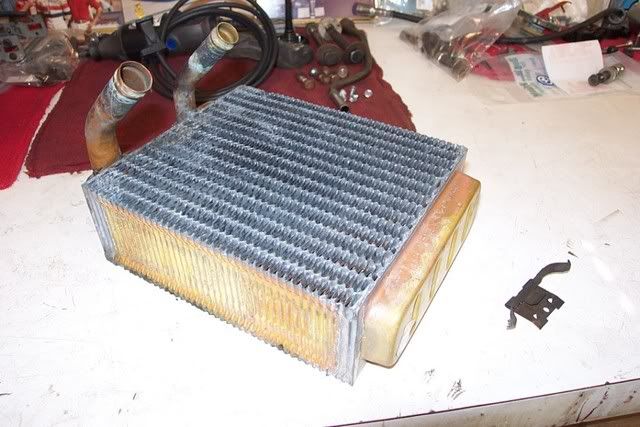
My core didn't leak and took it to local radiator shop for testing anyway. No one wants to miss an opportunity "while you're at it". It passed without problem.
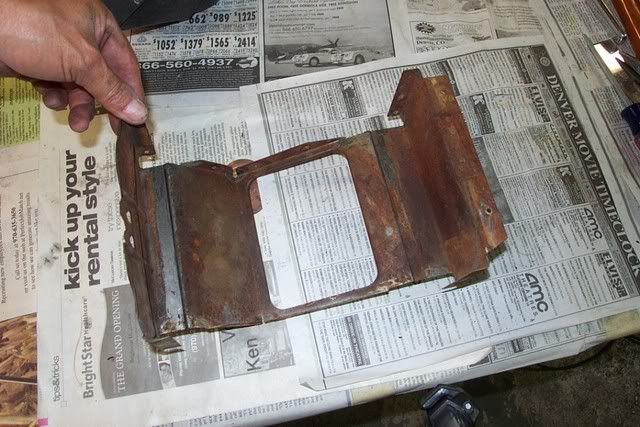
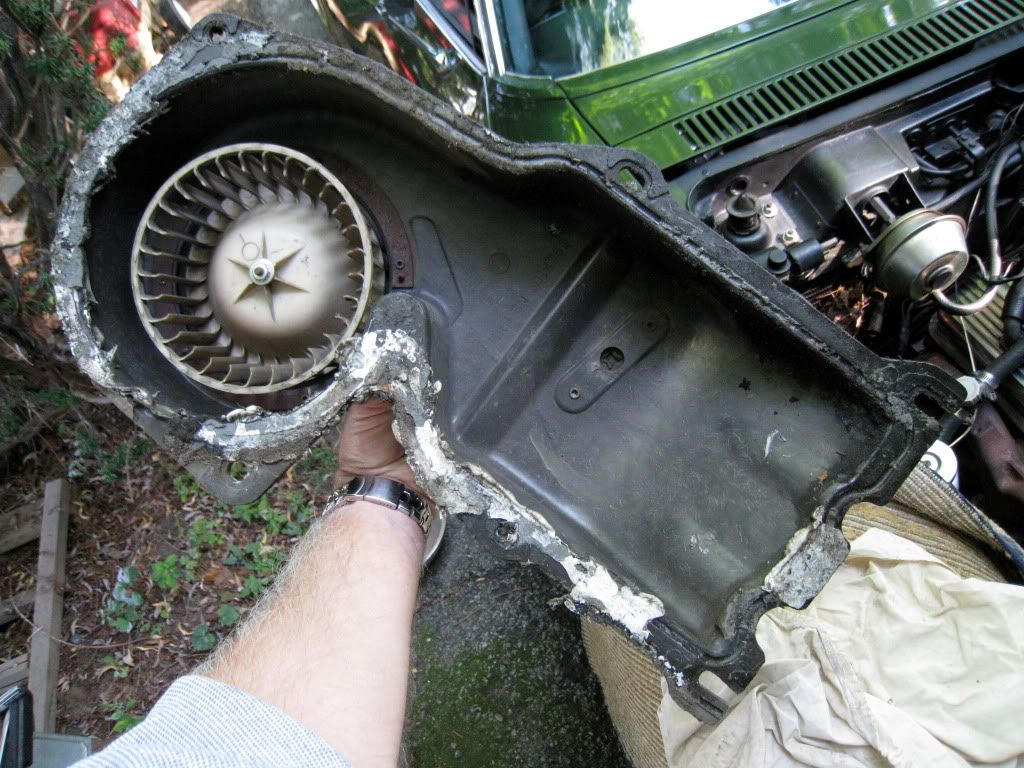
There are 30 or 32 small rivets to remove the cover and inner support. I used a Dremel tool with a cutting disc to slot the top of the rivet head. Then I carefully chiseled off the head and small punched them out.
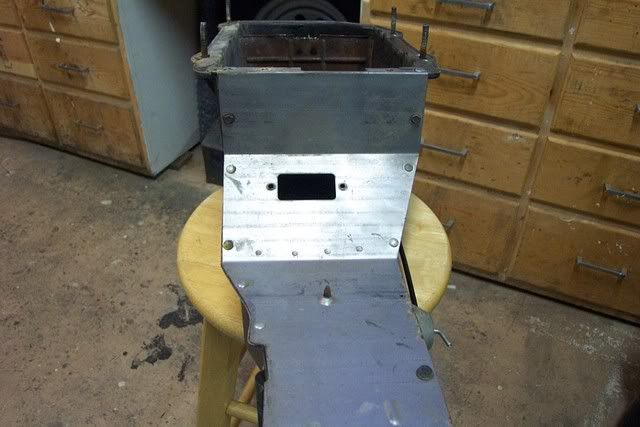
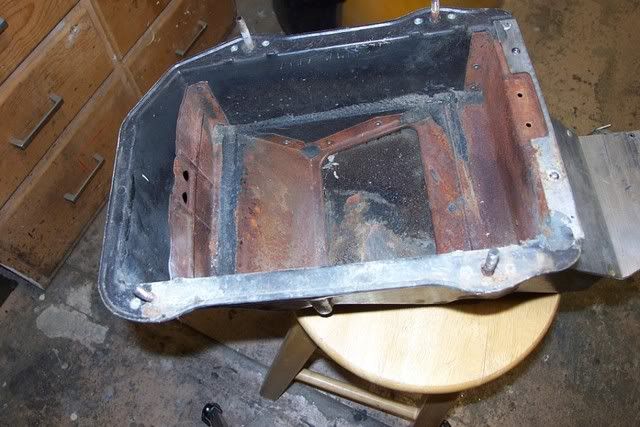
There are 16 rivets to remove just to see the inner support free like this.
Then it was time for hot, soapy water to remove 35+ years worth of crap (literally: some classy mouse chose my Vette to nest behind the dash). The OEM foam on large flapper had deteriorated so much it fell away to the touch. The adhesive was not so quick: used a gasket scraper to get most off. Any rivet holes that looked too big from removing old rivets were cleaned & filled in using standard 2-part resin/hardner from a Bondo brand kit I had. Redrilled to 1/8th size.
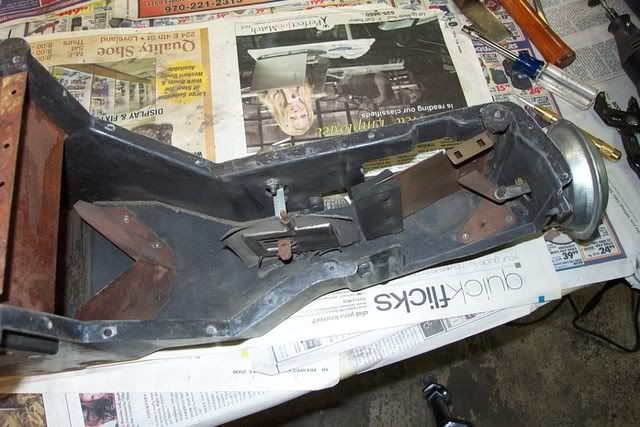
After the fiberglass housing was washed and dried, I painted it with Rustoleum Hi-Performance enamel in semi-gloss black.
The plastic vent pieces I painted with Krylon Fusion in satin black, as it's designed for plastic.
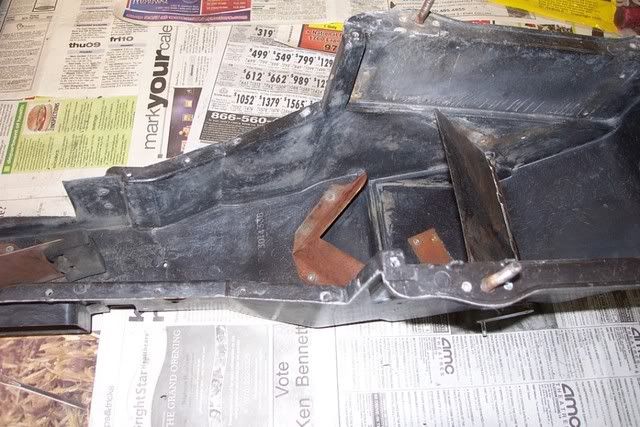
After quick wash and dry, the metal pieces went into the blast cabinet, using 70 grit aluminum oxide to remove rust. Another wash and dry later, I sprayed them with Duplicolor engine enamel cast coat aluminum because I like the color. Being heat resistant doesn't hurt, I suppose.
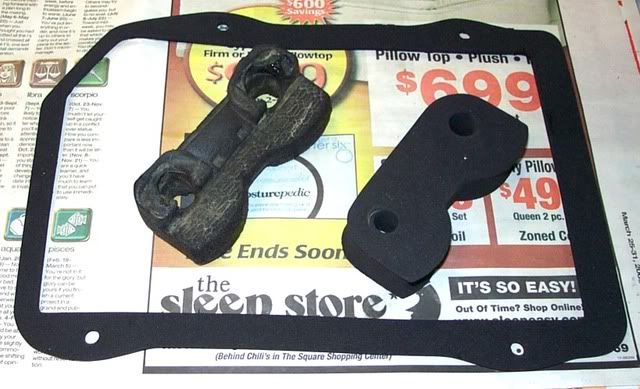
The Dr. Rebuild kit includes gaskets and a pkg of correct rivets. Following the directions, I used black weatherstripping adhesive to glue the new gaskets in place. One rectangular gasket needed a slice length-wise and also uses staples (wire supplied in kit: cut to fit) to hold in place.
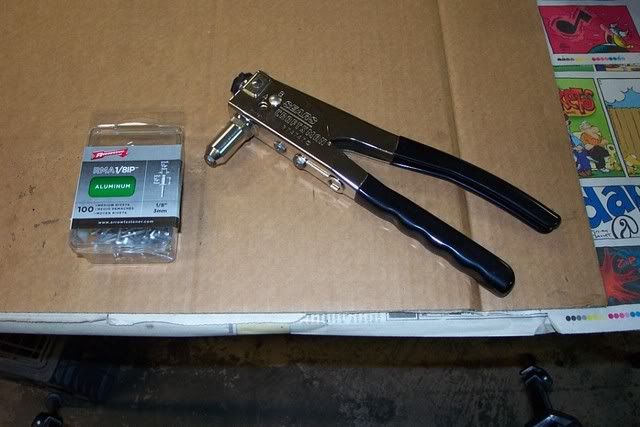
I didn't have the correct OEM-style rivet tools and not planning a NCRS-level restore so I used my trusty Craftsman rivet tool with a pkg of 1/8" x 1/4" long aluminum rivets to reassemble the support and cover.
Riveted the support, used some black RTV to reseal small air-gaps, checked that flapper operation was free and all gaskets positioned correctly, then riveted-fastened cover back in place.
I reused the OEM tubes seal because it was in good shape instead of the one in kit.
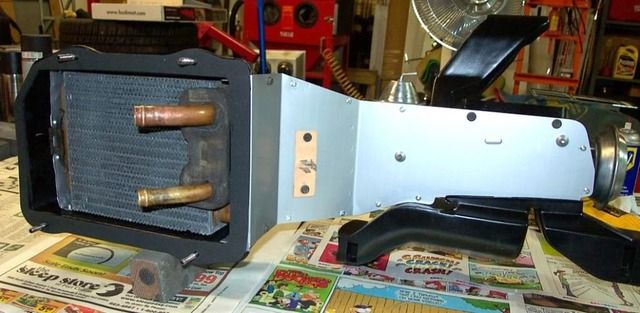
Assembled all the pieces and remounted to firewall.


Piece of cake with room to work. You had the the challenge of repairing a functional ride so your repair has equal integrity, as it was done with the clock being watched.
Hope that helps anyone who's crazy enough to break down one of these heater boxes in a non-ac application; it's not so bad afterall.
Later Guys...
OK, got sidetracked with afterhours shop work last eve and finally managed to get the images loaded.
Thanks again for allowing me to ride on your original post.
These instructions are for a non-AC car. As you've explained, accessing the core is done through engine bay.
Like many of us, my heater project was one of those "while I'm at it" deals fixing other stuff. It wasn't planned and I already had motor/trans pulled out.
My core didn't leak and took it to local radiator shop for testing anyway. No one wants to miss an opportunity "while you're at it". It passed without problem.
There are 30 or 32 small rivets to remove the cover and inner support. I used a Dremel tool with a cutting disc to slot the top of the rivet head. Then I carefully chiseled off the head and small punched them out.
There are 16 rivets to remove just to see the inner support free like this.
Then it was time for hot, soapy water to remove 35+ years worth of crap (literally: some classy mouse chose my Vette to nest behind the dash). The OEM foam on large flapper had deteriorated so much it fell away to the touch. The adhesive was not so quick: used a gasket scraper to get most off. Any rivet holes that looked too big from removing old rivets were cleaned & filled in using standard 2-part resin/hardner from a Bondo brand kit I had. Redrilled to 1/8th size.
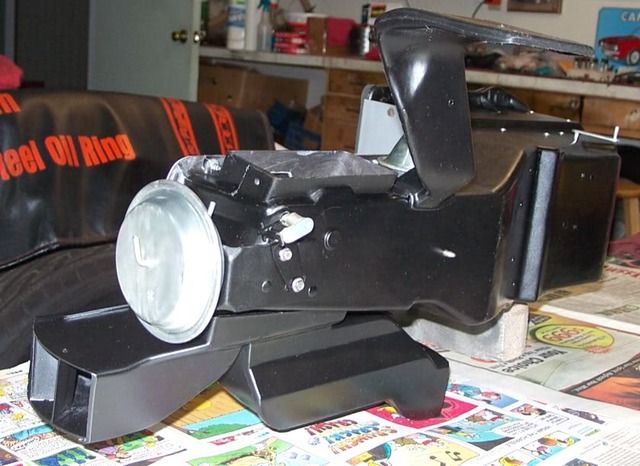
After the fiberglass housing was washed and dried, I painted it with Rustoleum Hi-Performance enamel in semi-gloss black.
The plastic vent pieces I painted with Krylon Fusion in satin black, as it's designed for plastic.
After quick wash and dry, the metal pieces went into the blast cabinet, using 70 grit aluminum oxide to remove rust. Another wash and dry later, I sprayed them with Duplicolor engine enamel cast coat aluminum because I like the color. Being heat resistant doesn't hurt, I suppose.
The Dr. Rebuild kit includes gaskets and a pkg of correct rivets. Following the directions, I used black weatherstripping adhesive to glue the new gaskets in place. One rectangular gasket needed a slice length-wise and also uses staples (wire supplied in kit: cut to fit) to hold in place.
I didn't have the correct OEM-style rivet tools and not planning a NCRS-level restore so I used my trusty Craftsman rivet tool with a pkg of 1/8" x 1/4" long aluminum rivets to reassemble the support and cover.
Riveted the support, used some black RTV to reseal small air-gaps, checked that flapper operation was free and all gaskets positioned correctly, then riveted-fastened cover back in place.
I reused the OEM tubes seal because it was in good shape instead of the one in kit.
Assembled all the pieces and remounted to firewall.
Piece of cake with room to work. You had the the challenge of repairing a functional ride so your repair has equal integrity, as it was done with the clock being watched.
Hope that helps anyone who's crazy enough to break down one of these heater boxes in a non-ac application; it's not so bad afterall.
Later Guys...
Last edited by Dustup7T2; 09-11-2009 at 06:06 PM. Reason: correct text
09-11-2009, 02:30 PM
#26
Le Mans Master
Thread Starter
Hi Glenn,
OK, got sidetracked with afterhours shop work last eve and finally managed to get the images loaded.
Thanks again for allowing me to ride on your original post.
These instruction are for a non-AC car. As you've explained, accessing the core is done through engine bay.
Like many of us, my heater project was one of those "while I'm at it" deals fixing other stuff. It wasn't planned and I already had motor/trans pulled out.
My core didn't leak and took it to local radiator shop for testing anyway. No one wants to miss an opportunity "while you're at it". It passed without problem.
There are 30 or 32 small rivets to remove the cover and inner support. I used a Dremel tool with a cutting disc to slot the top of the rivet head. Then I carefully chiseled off the head and small punched them out.
There are 16 rivets to remove just to see the inner support free like this.
Then it was time for hot, soapy water to remove 35+ years worth of crap (literally: some classy mouse chose my Vette to nest behind the dash). The OEM foam on large flapper had deteriorated so much it fell away to the touch. The adhesive was not so quick: used a gasket scraper to get most off. Any rivet holes that looked too big from removing old rivets were cleaned & filled in using standard 2-part resin/hardner from a Bondo brand kit I had. Redrilled to 1/8th size.
After the fiberglass housing was washed and dried, I painted it with Rustoleum Hi-Performance enamel in semi-gloss black.
The plastic vent pieces I painted with Krylon Fusion in satin black, as it's designed for plastic.
After quick wash and dry, the metal pieces went into the blast cabinet, using 70 grit aluminum oxide to remove rust. Another wash and dry later, I sprayed them with Duplicolor engine enamel cast coat aluminum because I like the color. Being heat resistant doesn't hurt, I suppose.
The Dr. Rebuild kit includes gaskets and a pkg of correct rivets. Following the directions, I used black weatherstipping adhesive to glue the new gaskets in place. One rectangular gasket needed a slice length-wise and also uses staples (wire supplied in kit: cut to fit) to hold in place.
I didn't have the correct OEM-style rivet tools and not planning a NCRS-level restore so I used my trusty Craftsman rivet tool with a pkg of 1/8" x 1/4" long aluminum rivets to reassemble the support and cover.
Riveted the support, used some black RTV to reseal small air-gaps, checked that flapper operation was free and all gaskets positioned correctly, then riveted-fastened cover back in place.
I reused the OEM tubes seal because it was in good shape instead of the one in kit.
Assembled all the pieces and remounted to firewall.
Piece of cake with room to work. You had the the challenge of repairing a functional ride so your repair has equal integrity, as it was done with the clock being watched.
Hope that helps anyone who's crazy enough to break down one of these heater boxes in a non-ac application; it's not so bad afterall.
Later Guys...
Glenn
09-11-2009, 02:35 PM
#27
Race Director

 Very nice job Dustup

 09-11-2009, 05:45 PM
#29
Terrorizing Orange Cones
Thanks for the kind words. This forum has helped me immensely in lots of ways on my project and I'm pleased to return a bit of that with this piece from the car.
If I think someone might find value in other parts I'm correcting, I'll be happy to do what I can. I've taken a bunch of pictures!
 10-01-2009, 05:00 PM
#30
Burning Brakes

Is there a large gasket that goes around the whole distributor/heater core box? If so, where does one get it? (Have a link?)
Thanks.
10-01-2009, 05:20 PM
#31
Le Mans Master
Thread Starter
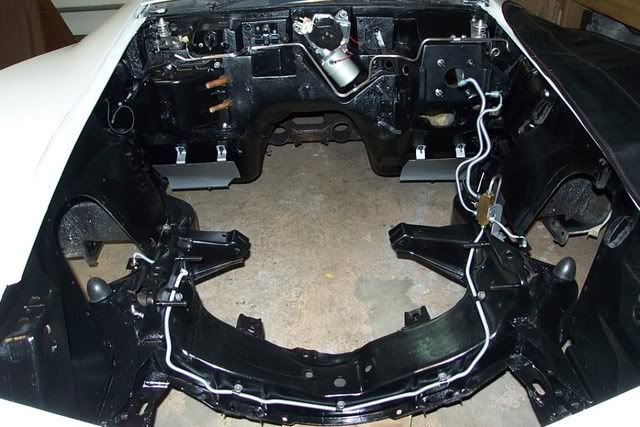
Another thing, when you are pulling the core on the left side, push the tubes inward at the same time. It will help it rotate as you pull on the left. The wire hook I made really helped.
Glenn
Last edited by GD70; 10-01-2009 at 05:23 PM.
10-01-2009, 05:29 PM
#32
Burning Brakes
No, there's a groove around the perimeter that the sealer bead sets into. I used black RTV sealer, but the old stuff I cleaned out looked like the putty stuff like the 3M caulking strips, but it was grey. You can see the groove in the pic.
Another thing, when you are pulling the core on the left side, push the tubes inward at the same time. It will help it rotate as you pull on the left. The wire hook I made really helped.
Glenn
Another thing, when you are pulling the core on the left side, push the tubes inward at the same time. It will help it rotate as you pull on the left. The wire hook I made really helped.
Glenn
Is your superb helper for hire?
 10-02-2009, 05:10 PM
#33
Racer

Member Since: Apr 2004
Posts: 370
Likes: 0
Received 0 Likes
on
0 Posts
New England Events Coordinator

I have to change out the coolant and also plan to replace the heater hoses from the engine to tank, tank to heater core. Can anyone tell me the hose sizes (ID)?
10-02-2009, 05:46 PM
#34
Le Mans Master
Thread Starter
10-02-2009, 07:57 PM
#35
Burning Brakes
10-03-2009, 05:05 PM
#37
Melting Slicks
Right on, i wish mine would of been from the engine compartment. Had to pull half the interior apart to get it out. Thank God i wont have to do it again.
10-03-2009, 06:08 PM
#38
Le Mans Master
Thread Starter
Glenn
07-31-2010, 11:11 AM
#40

beatiful job,and after seeing all the work you did,it makes me want to by-pass my core on my 68 with ac. is it as easy as disconnecting the hoses at the firewall and connecting the two hoses together with a pipe sleeved in between? thank you tom,,,again,beatiful job on core fix.