


Rebuilding '69 headlight assembly
Pro


Joined: Nov 2005
Posts: 609
Likes: 0
From: Ontario
I found that if you leave the linkage off when installing them, they aren't too bad to get in place. Then reinstall the linkage.
The real PITA was adjusting the headlight door positions after they were installed. Take your time.
Dave

Team Owner


Joined: Jul 2004
Posts: 40,448
Likes: 793
From: Redondo Beach, California
Rebuild one, before you dissassemble the other. If you take them both apart, by the time you put them together, you can forget how the mechanism goes back together. Luckily I have two C3's so in reassembling my 68 assembly, I could go look at the 70s.
When I take my 70s apart, I plan on getting some epoxy putty and pushing it around the threaded rods used to adjust the brackets in the assembly. I'll grease the threads with silicon grease, and before the epoxy fully hardens it, I'll remove ithe several putty plugs. This is to retain the factory adjustment dimensions. It's a bear to readjust it from scratch. It's a simple mechanism in a way, but reasonably sophisticated. (It's self locking feature when the headlights go up, and unlocking feature when teh vacuum cans give a pull.
When I take my 70s apart, I plan on getting some epoxy putty and pushing it around the threaded rods used to adjust the brackets in the assembly. I'll grease the threads with silicon grease, and before the epoxy fully hardens it, I'll remove ithe several putty plugs. This is to retain the factory adjustment dimensions. It's a bear to readjust it from scratch. It's a simple mechanism in a way, but reasonably sophisticated. (It's self locking feature when the headlights go up, and unlocking feature when teh vacuum cans give a pull.
Thread Starter
Pro

Joined: Jun 2006
Posts: 575
Likes: 3
From: Tampa / Ft. Myers FL
I plan on wrapping everything up, and I have plenty of room to put it back together with the body off now so hopefully it'll go smoothly. Just found the seams that attach the fender to the wheel well broken, so now i have that to look forward to fixing.
Corvette Stories
The Best of Corvette for Corvette Enthusiasts

Corvette & Porsche 911: How Two Icons Conquered the Last 25 Years
Joe Kucinski
2027 Chevrolet Silverado 1500 First Look: Everything You NEED to Know!
Michael S. Palmer
5 Best & 5 Worst Corvette Daily Drivers
Joe Kucinski
The Headlights of Every Corvette Generation Explained
Joe Kucinski
5 Best & 5 Most Overrated Corvette Track Packages of All Time!
Joe Kucinski
Every 2027 Corvette Engine Explained
Joe Kucinski
Designer Imagines A Corvette That Looks More Like a Corvette Than the Corvette
Verdad Gallardo
10 Ugly Corvettes That We Still Kinda Love
Joe Kucinski
Top 10 Most Expensive Corvettes Ever Sold on Bring A Trailer
Brett Foote
Thread Starter
Pro
Joined: Jun 2006
Posts: 575
Likes: 3
From: Tampa / Ft. Myers FL
Rebuild one, before you dissassemble the other. If you take them both apart, by the time you put them together, you can forget how the mechanism goes back together. Luckily I have two C3's so in reassembling my 68 assembly, I could go look at the 70s.
When I take my 70s apart, I plan on getting some epoxy putty and pushing it around the threaded rods used to adjust the brackets in the assembly. I'll grease the threads with silicon grease, and before the epoxy fully hardens it, I'll remove ithe several putty plugs. This is to retain the factory adjustment dimensions. It's a bear to readjust it from scratch. It's a simple mechanism in a way, but reasonably sophisticated. (It's self locking feature when the headlights go up, and unlocking feature when teh vacuum cans give a pull.
When I take my 70s apart, I plan on getting some epoxy putty and pushing it around the threaded rods used to adjust the brackets in the assembly. I'll grease the threads with silicon grease, and before the epoxy fully hardens it, I'll remove ithe several putty plugs. This is to retain the factory adjustment dimensions. It's a bear to readjust it from scratch. It's a simple mechanism in a way, but reasonably sophisticated. (It's self locking feature when the headlights go up, and unlocking feature when teh vacuum cans give a pull.
Le Mans Master

Joined: Jan 2007
Posts: 5,485
Likes: 7
From: Peekskill NY


Thread Starter
Pro
Joined: Jun 2006
Posts: 575
Likes: 3
From: Tampa / Ft. Myers FL
Then I went to work with the wire wheel on my bench grinder and the sand blaster. Then put my new powder coat gun to work. I used the satin black powder that came with the kit I purchased from Eastwood to hopefully match my frame that is getting the same treatment from Vansteel on a larger scale.
There were a couple of things to look out for: the large cast aluminum bracket that holds everything together had a small crack in the corner but I was able to get that welded (so give all the parts a good going over). The next issue was the size of that bracket, it just barely fit into the oven (the dedicated powder coat oven) so be careful putting it in. The last issue I had with the rebuild (so far) was not being able to powder coat the underside of the ‘lid’ since it was painted like the body and shows on the top. I (and others I talked to) didn’t think the existing paint would take the oven temps. I don’t plan on repainting the entire car anytime soon so I just used rattle can satin black on the underside of that piece. I’m pleased with the results so far and plan on finishing up the other side this week end.
Good luck and make sure you take (and post) lots of pictures, they help loads when reassembling. Also as 68/70Vette recommended, do one at a time so you have the other for reference.
Drifting

Joined: Aug 2005
Posts: 1,289
Likes: 3
From: East Waterboro Maine
I didn't find the process all that bad. I totally agree to do one at a time though, the reassembly process if a lot easier if you have one still assembled as a reference. Also, if you have the AIM handy I belive there are some specs in there for reassembly tolerances, torques, and the like.
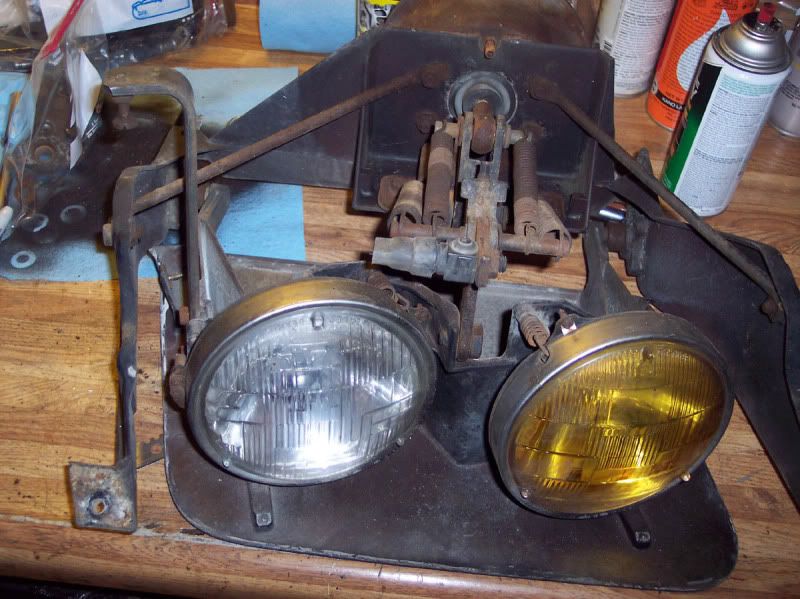
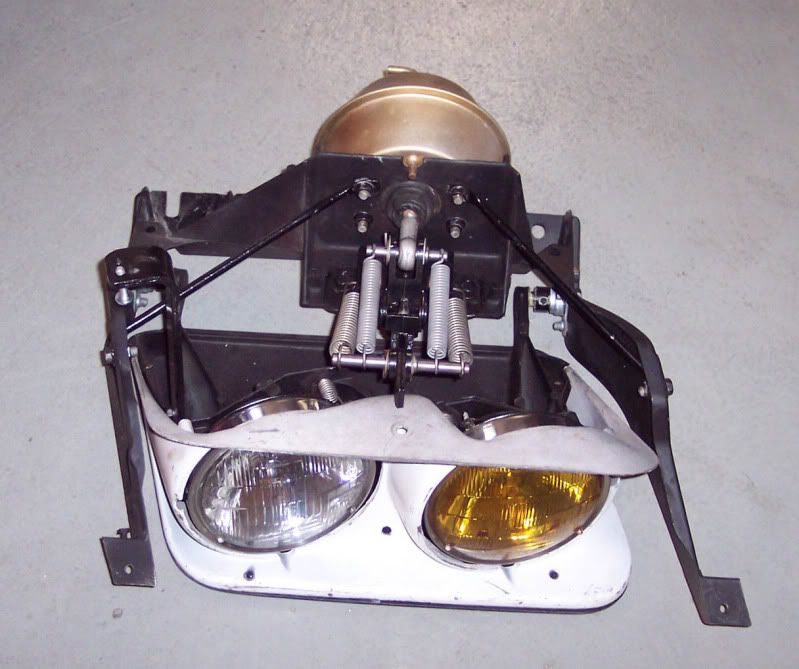
Mine before:

And after:

I documented most of the process here: http://www.corvette-restoration.com/...estoration.htm
I'm not sure I like the gray I used around the headlamp rings/tubs, and I may change it later.
Good luck!
Mine before:
And after:
I documented most of the process here: http://www.corvette-restoration.com/...estoration.htm
I'm not sure I like the gray I used around the headlamp rings/tubs, and I may change it later.
Good luck!
Safety Car

Joined: Aug 2001
Posts: 4,883
Likes: 11
From: North Easton Mass
I rebuilt just the actuators over the winter, and if you make a mark and count the number of turns on the rod end as you disassemble the actuator the adjustment should be correct when you put it back together. I'm sure there are many other adjustments necessary when you remove the whole assembly. It's hard to find a hole on a C3 that isn't slotted for adjustment. 
Rick B.
Rick B.