


1981 Front Spoiler Missing

Thread Starter
3rd Gear

Joined: Apr 2010
Posts: 3
Likes: 0
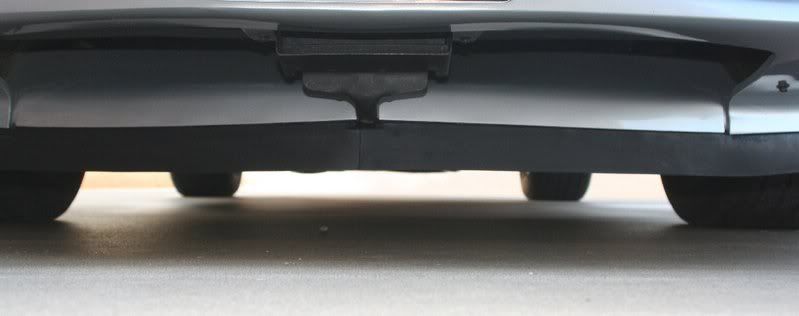
Someone please help me with this. I bought a 1981 Corvette and the middle section of the front spoiler is missing....it is not an aftermarket
bumper and I've looked at various sites trying to find the part that is missing. You can look and see that there has to be a piece missing in order to complete the front spoiler. Has anyone had this problem or know what I'm talking about???
bumper and I've looked at various sites trying to find the part that is missing. You can look and see that there has to be a piece missing in order to complete the front spoiler. Has anyone had this problem or know what I'm talking about???
Burning Brakes

Joined: May 2008
Posts: 1,116
Likes: 5
From: Middleburg Florida
Someone please help me with this. I bought a 1981 Corvette and the middle section of the front spoiler is missing....it is not an aftermarket
bumper and I've looked at various sites trying to find the part that is missing. You can look and see that there has to be a piece missing in order to complete the front spoiler. Has anyone had this problem or know what I'm talking about???
bumper and I've looked at various sites trying to find the part that is missing. You can look and see that there has to be a piece missing in order to complete the front spoiler. Has anyone had this problem or know what I'm talking about???
http://www.ecklers.com/product.asp?p...0&dept_id=1430
If so, you'll need these too (one for each side):
http://www.ecklers.com/product.asp?p...7&dept_id=1435
Your car won't cool correctly without the center section....
Thread Starter
3rd Gear
Joined: Apr 2010
Posts: 3
Likes: 0
I appreciate the reply but that is not the part...this is why I've been having such a hard time. I have that piece, I believe it's called a valance that bolts to the radiator, and the 2 air dam pieces. The air dams bolt to the front spoiler going all the ways across. What I'm missing is the middle spoiler piece, right below the license plate. If you look at any corvette like mine you can see that the front spoiler is not one full piece but that the bumper is one piece and that this is a separate piece.
Racer

Joined: Nov 2007
Posts: 318
Likes: 3
From: kuwait
Someone please help me with this. I bought a 1981 Corvette and the middle section of the front spoiler is missing....it is not an aftermarket
bumper and I've looked at various sites trying to find the part that is missing. You can look and see that there has to be a piece missing in order to complete the front spoiler. Has anyone had this problem or know what I'm talking about???
bumper and I've looked at various sites trying to find the part that is missing. You can look and see that there has to be a piece missing in order to complete the front spoiler. Has anyone had this problem or know what I'm talking about???

Le Mans Master

Joined: Jun 2007
Posts: 7,666
Likes: 1
From: Where it's always hot as Hell-South Louisiana.
St. Jude Donor '07-'08-'09-'10-'11-'12-'13
Thread Starter
3rd Gear
Joined: Apr 2010
Posts: 3
Likes: 0
Yes mine looks like yours except I just have a hole because I have not attached my air dams like it looks you have. I have a picture of mine but this the first time I have used this forum and when I try and attach it asks for a URL, not a file so not sure how to attach my photo. As it sits now there is nothing holding the sides of my front spoiler together so I'm sure it's just moving around when I drive the car...how do I attch a photo??
Corvette Stories
The Best of Corvette for Corvette Enthusiasts

Top 10 Most Expensive Corvettes Ever Sold on Bring A Trailer
Brett Foote
10 Things Every Corvette Owner Needs (2026 Edition)
Michael S. Palmer
8 Most "Only Corvette Owners Understand" Quirks and Problems
Pouria Savadkouei
10 Reasons the C6 Z06 is Still A Performance Benchmark After 20 Years
Joe Kucinski
How Much Horsepower Every Corvette Engine "LOST" in 1972
Joe Kucinski
Top 10 DOs and DON'Ts for Protecting Your Convertible Top!
Michael S. Palmer
Top 10 Most Explosive Corvettes Ever Made: Power-to-Weight Ratio Ranked!
Joe Kucinski
150 hp to 1,250 hp: Every Corvette Generation Compared by the Specs That Matter
Joe Kucinski
8 Coolest Corvette Pace Cars (and Replicas) of All Time
Verdad GallardoRace Director

Joined: Aug 2007
Posts: 10,977
Likes: 19
From: Canboro Ontario
Yes mine looks like yours except I just have a hole because I have not attached my air dams like it looks you have. I have a picture of mine but this the first time I have used this forum and when I try and attach it asks for a URL, not a file so not sure how to attach my photo. As it sits now there is nothing holding the sides of my front spoiler together so I'm sure it's just moving around when I drive the car...how do I attch a photo??
Go to the help forum, and you will see a sticky, at the top, it will give you a few options on posted pics, depending on what you have available.
Racer
Joined: Nov 2007
Posts: 318
Likes: 3
From: kuwait

8th Gear
Joined: Sep 2003
Posts: 8
Likes: 0
From: TX
I have a similar problem in my 81 corvette. My problem is that I don't know how the air dam goes installed in the corvette. Can somebody post pics showing how this thing goes installed? I spent over 300 bucks on this (air dam & spoiler) and I think I installed it wrong. The air dam in my car is already cracked. I've tried to find pics showing installation for this, or a set of instructions to help me with it and found nothing. I have never personally seen a car like mine with this installed. Any help will be appreciated.
Melting Slicks


Joined: Apr 1999
Posts: 2,521
Likes: 4
From: Windham, NH
Here is what my 82 looks like after I repaired & modified it. It was pretty bent up when I got the car so I cut it off, straightened and reinforced the heck out of it. I then made it so that it could be unbolted if I ever got brain fade and ran into a curb with it.


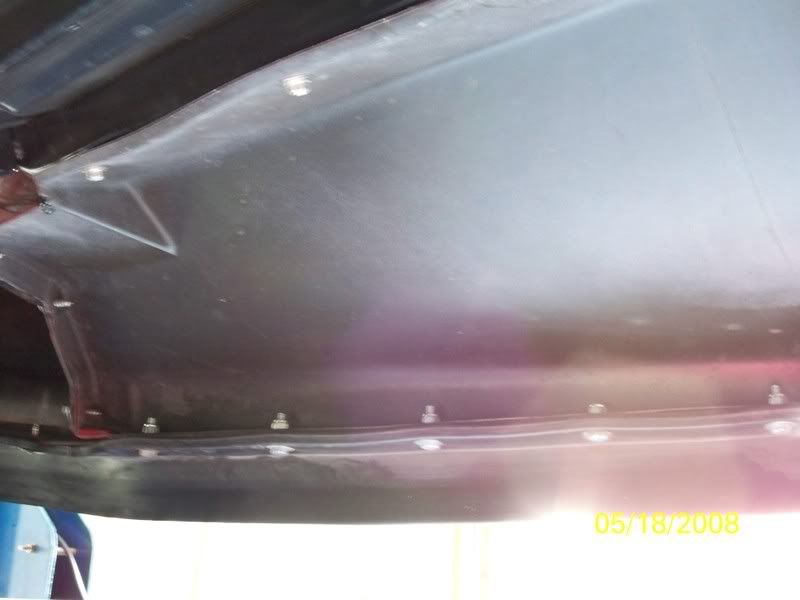
Here are a couple of pictures I took of an 80 that came into my shop for spoiler repairs!!


The owner SWORE he didn't have overheating problems with this car at highway speeds!!
Here are a couple of pictures I took of an 80 that came into my shop for spoiler repairs!!
The owner SWORE he didn't have overheating problems with this car at highway speeds!!
Last edited by Jim Martley2; Jul 8, 2010 at 09:28 AM.
Team Owner


Joined: Jun 2000
Posts: 38,923
Likes: 1,482
From: Southbound
Cruise-In II Veteran

80 shown; 81-82 will be similar. The assembly instruction manual shows the installation.

8th Gear
Joined: Sep 2003
Posts: 8
Likes: 0
From: TX
Here is what my 82 looks like after I repaired & modified it. It was pretty bent up when I got the car so I cut it off, straightened and reinforced the heck out of it. I then made it so that it could be unbolted if I ever got brain fade and ran into a curb with it.
Here are a couple of pictures I took of an 80 that came into my shop for spoiler repairs!!
The owner SWORE he didn't have overheating problems with this car at highway speeds!!
Here are a couple of pictures I took of an 80 that came into my shop for spoiler repairs!!
The owner SWORE he didn't have overheating problems with this car at highway speeds!!
Instructor
Joined: Dec 2010
Posts: 169
Likes: 1
From: Merritt Island Florida
I had to replace the 'air dam' and rubber spoiler on my 82, the center piece you are refering to is not a seperate assembly that can be purchased (I tried) - it is part of the steel bumper (welded on). Mine was rusted and mangled beyond recognition. I found this same post / pictures and made a piece to hold the air dam up in the center, welded it to the steel bumper. I did not try to duplicate the original, it's too strange looking and fragile in my opinion.
Carl
Carl


Melting Slicks
Joined: Apr 1999
Posts: 2,521
Likes: 4
From: Windham, NH
The repair to the silver car was strictly labor. The spoiler was not functionaly damaged and the owner didn't care how it looked. It took me about 2 hours to heat and jack the bracketry back into position with a small hydraulic jack.
Racer
Joined: May 2008
Posts: 327
Likes: 2
From: Livermore California
I have a similar problem in my 81 corvette. My problem is that I don't know how the air dam goes installed in the corvette. Can somebody post pics showing how this thing goes installed? I spent over 300 bucks on this (air dam & spoiler) and I think I installed it wrong. The air dam in my car is already cracked. I've tried to find pics showing installation for this, or a set of instructions to help me with it and found nothing. I have never personally seen a car like mine with this installed. Any help will be appreciated.

my 1980 from the side is the 'storage hook', note the welded horizontal tab that extends thru the air dam between the lips. the air dam simply rests (floats) on this. the dam (originally) floated when hitting a curb (by design).

from the back: if you hit a driveway hard enough, the lips of the air dam 'pop' up and you get a "hair-lip" splitter (ugly). i fixed mine a week after purchase by adding an 1/8" thk x 1" wide aluminum bar wrapped with a piece of foam under the horizontal tab using the lip screws to hold in place. i have hit it a couple times softly, but still works after 31 years (haven't broke it yet ...Knock, knock, knock).

this piece is probably part of the "extension asm" (part #5 in diagram) as it rocks the car pretty hard when you scrape it up front. an easy solution is to bend up a piece of aluminum to simulate the missing horzontal tab that goes thru the air dam above the lips. you can drill thru the bottom of the bracket if you have enough material, and you don't have to take the car apart.
good luck on whatever you do.
Last edited by C3-PO; Aug 29, 2011 at 10:30 PM.
Instructor
Joined: Mar 2010
Posts: 105
Likes: 0
I had pictures before, but they somehow disappeared, so working off of memory.
Put car on jackstands. Transfer the holes from the bottom of your radiator support to the top lip of your air baffle. Ensure proper alignment with support, and the two sides of the baffle because you will also be putting 3 holes and bolts through the sides.
Once you've measured twice and drilled the 4 holes, bolt the baffle to the radiator support using proper hardware. Drill 3 holes through the left side of the baffle and attach to the left angular side ( I have no idea what it's called, but it's in c31980's picture). Do same to right side. If you spent extra time on the alignment, the connections will go smooth and you won't have to mess with forcing anything. Mine went on pretty good.
So with the baffle installed (4x bolts top, 3x bolts right, 3x bolts left), now you want to attach the spoilers for which there are two.
IIRC, I started wrapping the left spoiler from the bottom left of the car, starting first with the tapered side, drilling and bolting one by one until I ran out of rubber. Then I did the same thing with the right spoiler, starting with the tapered side, using the holes already in the fiberglass as guides for my drill. You may need some additional support because of the poor condition that fiberglass may be in.
Once you have both spoilers installed, you will notice some overlap in rubber at the bottom middle of your air baffle. Trim the rubber until you are pleased with the look.
Now you are done, unless you wanted it painted to match your cars base coat. You paint the air baffle first, then go through install instructions. Otherwise, you're basically done. Don't take dips or potholes too quick, or you'll be replacing it again. Took me half an afternoon of fiddling with it, as well as referring to the ASM and CF for pictures.
I have a similar problem in my 81 corvette. My problem is that I don't know how the air dam goes installed in the corvette. Can somebody post pics showing how this thing goes installed? I spent over 300 bucks on this (air dam & spoiler) and I think I installed it wrong. The air dam in my car is already cracked. I've tried to find pics showing installation for this, or a set of instructions to help me with it and found nothing. I have never personally seen a car like mine with this installed. Any help will be appreciated.