


'73 tach drive problems

Thread Starter
Racer


Joined: Aug 2005
Posts: 442
Likes: 0
From: Fairbanks Alaska
Ok guys,
What have I missed? My '73 tach has never worked since I purchased the car. This morning I pulled the distributor and hooked my drill to the tach cable, the tach worked fine. Then I turned the distributor shaft and the output end of the tach drive turned. I reassembled everything and the tach still doesn't work. I took it all apart again and swapped the gear from my '71 distributor, reassembled everything and still no tach. What's next? Any ideas?
Jim

Team Owner


Joined: Aug 1999
Posts: 30,995
Likes: 99
From: Ontario
Ok guys,
What have I missed? My '73 tach has never worked since I purchased the car. This morning I pulled the distributor and hooked my drill to the tach cable, the tach worked fine. Then I turned the distributor shaft and the output end of the tach drive turned. I reassembled everything and the tach still doesn't work. I took it all apart again and swapped the gear from my '71 distributor, reassembled everything and still no tach. What's next? Any ideas?
Jim
What have I missed? My '73 tach has never worked since I purchased the car. This morning I pulled the distributor and hooked my drill to the tach cable, the tach worked fine. Then I turned the distributor shaft and the output end of the tach drive turned. I reassembled everything and the tach still doesn't work. I took it all apart again and swapped the gear from my '71 distributor, reassembled everything and still no tach. What's next? Any ideas?
Jim
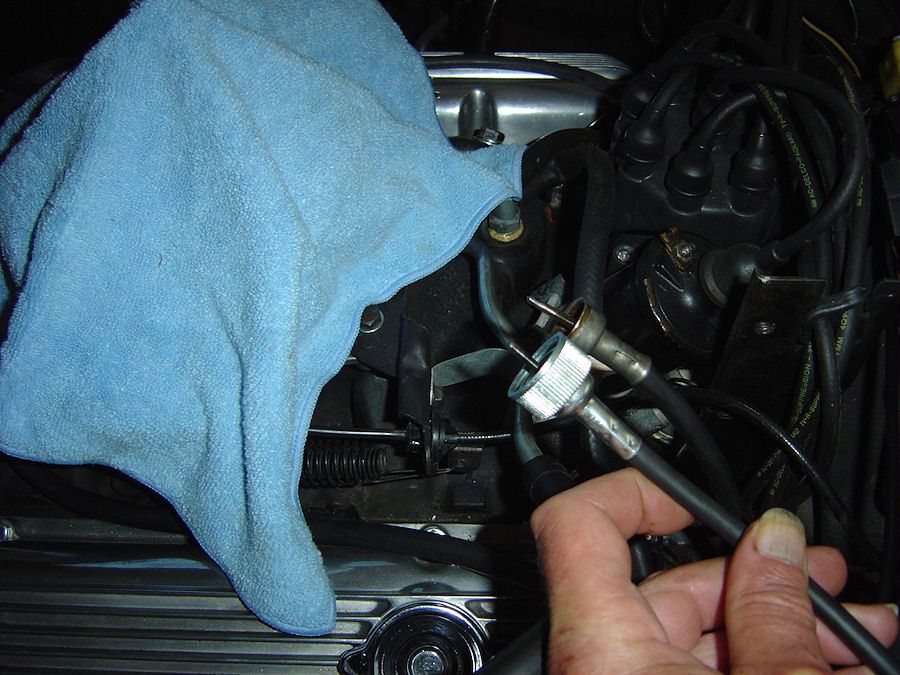
The end of the tach cable is rounded off. It will not grip the drive. Old rounded on top and new on bottom.
Last edited by Paul L; Sep 5, 2010 at 07:41 PM.
Thread Starter
Racer
Joined: Aug 2005
Posts: 442
Likes: 0
From: Fairbanks Alaska
Hi Paul,
I looked the cable over and it is still square, not rounded. I did find that if I pull the cable out(an extra ~3/16" or so) before re-attaching to to the distributor everything is fine for a little while, then it quits again. I found an old post about a similar problem, the poster used part of a match stick(at the tach end) to push the inner drive cable towards the distributor, it worked for him. It is worth a try!
Thanks,
Jim
Thread Starter
Racer
Joined: Aug 2005
Posts: 442
Likes: 0
From: Fairbanks Alaska
Tim,
I am not sure that replacing the cable will fix the problem as the cable looks fine and is not rounded. The car just turned 42k on the odometer. It hasn't seen a lot of use in its life. If it comes down to parts replacement I will replace the cable and gear to be sure.
Thanks,
Jim
I am not sure that replacing the cable will fix the problem as the cable looks fine and is not rounded. The car just turned 42k on the odometer. It hasn't seen a lot of use in its life. If it comes down to parts replacement I will replace the cable and gear to be sure.
Thanks,
Jim
Melting Slicks

Joined: Aug 2004
Posts: 2,220
Likes: 6
From: www.Z16.org North/West Pennsylvania
Tim,
I am not sure that replacing the cable will fix the problem as the cable looks fine and is not rounded. The car just turned 42k on the odometer. It hasn't seen a lot of use in its life. If it comes down to parts replacement I will replace the cable and gear to be sure.
Thanks,
Jim
I am not sure that replacing the cable will fix the problem as the cable looks fine and is not rounded. The car just turned 42k on the odometer. It hasn't seen a lot of use in its life. If it comes down to parts replacement I will replace the cable and gear to be sure.
Thanks,
Jim
Corvette Stories
The Best of Corvette for Corvette Enthusiasts

Top 10 Most Expensive Corvettes Ever Sold on Bring A Trailer
Brett Foote
10 Things Every Corvette Owner Needs (2026 Edition)
Michael S. Palmer
8 Most "Only Corvette Owners Understand" Quirks and Problems
Pouria Savadkouei
10 Reasons the C6 Z06 is Still A Performance Benchmark After 20 Years
Joe Kucinski
How Much Horsepower Every Corvette Engine "LOST" in 1972
Joe Kucinski
Top 10 DOs and DON'Ts for Protecting Your Convertible Top!
Michael S. Palmer
Top 10 Most Explosive Corvettes Ever Made: Power-to-Weight Ratio Ranked!
Joe Kucinski
150 hp to 1,250 hp: Every Corvette Generation Compared by the Specs That Matter
Joe Kucinski
8 Coolest Corvette Pace Cars (and Replicas) of All Time
Verdad Gallardo
Team Owner
Joined: Aug 1999
Posts: 30,995
Likes: 99
From: Ontario
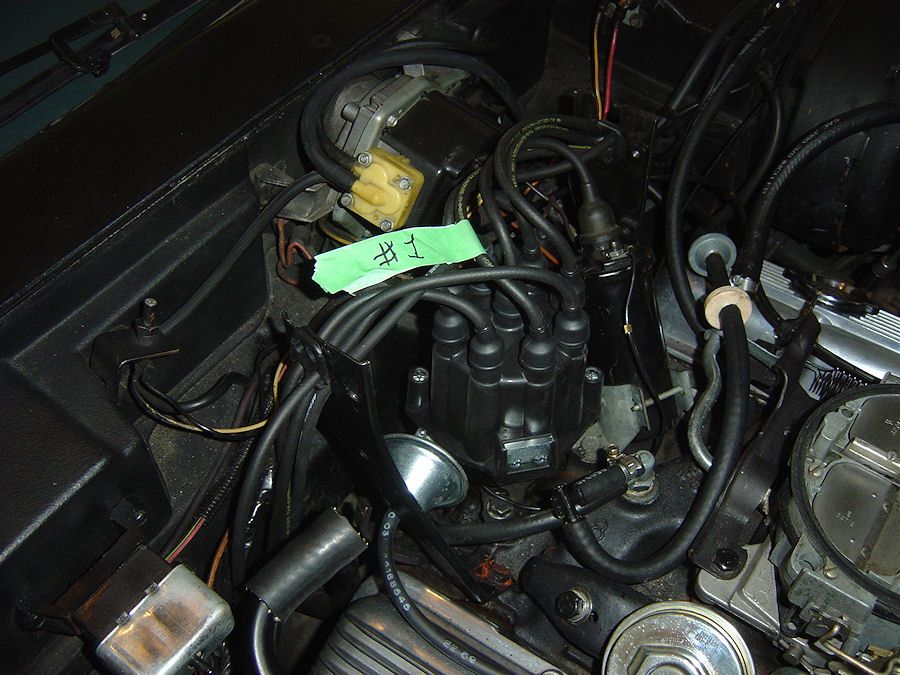
Have you done this modification so the tach cable has a straight route into the distributor without kinks? Some people think the 90* adaptor is the solution. It is not.


This text is copyright to Lars Grimsrud and goes with the first diagrammatic pic above. The other pics are mine.
Alternate C3 Distributor Installation Orientation
Due to the relationship between the distributor tach drive cable and the firewall on the C3 Corvette (1968 – 1974), GM issued a Service Bulletin allowing an alternate distributor installed orientation in order to straighten out the tach drive cable and to promote longer cable life.
The distributor orientation shown in the above photos (not shown) installs the distributor so that the vacuum advance control unit pokes out in front of the distributor shielding at about a 7:00 o’clock position as seen from the front of the engine. In order to straighten out the cable and still retain the shielding, GM allowed the distributor housing to be rotated clockwise 45 degrees. This rotation pokes the vacuum advance out from behind the shielding, pointing it towards the rear flange of the passenger-side valve cover at about the 9:00 o’clock position as seen from the front of the engine. This orientation straightens out the tach drive cable. When doing this, the spark plug wires were all shifted 1 tower counter-clockwise in the cap, so that the plug wires retained their same relative positions to the engine/vehicle (#1 wire was placed in the previous #2 cap location, thus retaining the #1 wire as the forward, passenger-side plug wire). To do this, you do not need to pull the distributor: Simply shift the wires over 1 tower as shown, rotate the distributor 45 degrees, and re-check engine timing with a timing light.
It is recommended that C3 distributor installations be done according to the Service Bulletin Alternate Orientation in order to increase cable life and to simplify cable & distributor installation.
Last edited by Paul L; Sep 6, 2010 at 03:54 PM.
Thread Starter
Racer
Joined: Aug 2005
Posts: 442
Likes: 0
From: Fairbanks Alaska
Great post Paul!
My distributor is almost clocked that far around, within a few degrees or so. Still no luck. I am ordering a new cable tomorrow. I can't see anything wrong with the existing cable so I will start throwing money at it!
I checked the distributor cross gear and main gear, they are fine and do not slip.
The cable end looks fine (still).
While I am waiting for parts I will clock the distributor the rest of the way and maybe I'll get lucky.
Thanks everyone!
Jim
Le Mans Master


Joined: Oct 2006
Posts: 7,123
Likes: 433
From: Gladstone MO
C3 of Year Finalist (appearance mods) 2019
If you pull on the cable (so the inner cable is moved all the distance it can) one way or the other, and the tach works for a bit, the inner cable is too short. On the upper (speedo) end, there's a square drive just like on the distributor end and a plastic "button" that is the stop for the cable. If that button is worn or has slipped, the cable, because of the way it's wrapped and the direction of rotation, walk it's way back to where it was.
The wear could be either in the housing or on that button.
The wear could be either in the housing or on that button.
Team Owner
Joined: Aug 1999
Posts: 30,995
Likes: 99
From: Ontario
If you pull on the cable (so the inner cable is moved all the distance it can) one way or the other, and the tach works for a bit, the inner cable is too short. On the upper (speedo) end, there's a square drive just like on the distributor end and a plastic "button" that is the stop for the cable. If that button is worn or has slipped, the cable, because of the way it's wrapped and the direction of rotation, walk it's way back to where it was.
The wear could be either in the housing or on that button.
The wear could be either in the housing or on that button.
New nylon version shown along with disintegrated bronze version that brought me to a halt three weeks ago.

Last edited by Paul L; Sep 7, 2010 at 07:39 PM.

Burning Brakes

Joined: Dec 2007
Posts: 889
Likes: 0
Yes - it is done on my 74'
Have you done this modification so the tach cable has a straight route into the distributor without kinks? Some people think the 90* adaptor is the solution. It is not.
Alternate C3 Distributor Installation Orientation
Due to the relationship between the distributor tach drive cable and the firewall on the C3 Corvette (1968 � 1974), GM issued a Service Bulletin allowing an alternate distributor installed orientation in order to straighten out the tach drive cable and to promote longer cable life.
The distributor orientation shown in the above photos (not shown) installs the distributor so that the vacuum advance control unit pokes out in front of the distributor shielding at about a 7:00 o�clock position as seen from the front of the engine. In order to straighten out the cable and still retain the shielding, GM allowed the distributor housing to be rotated clockwise 45 degrees. This rotation pokes the vacuum advance out from behind the shielding, pointing it towards the rear flange of the passenger-side valve cover at about the 9:00 o�clock position as seen from the front of the engine. This orientation straightens out the tach drive cable. When doing this, the spark plug wires were all shifted 1 tower counter-clockwise in the cap, so that the plug wires retained their same relative positions to the engine/vehicle (#1 wire was placed in the previous #2 cap location, thus retaining the #1 wire as the forward, passenger-side plug wire). To do this, you do not need to pull the distributor: Simply shift the wires over 1 tower as shown, rotate the distributor 45 degrees, and re-check engine timing with a timing light.
It is recommended that C3 distributor installations be done according to the Service Bulletin Alternate Orientation in order to increase cable life and to simplify cable & distributor installation.
Thread Starter
Racer
Joined: Aug 2005
Posts: 442
Likes: 0
From: Fairbanks Alaska
Maybe I misunderstood something. I hooked my speedo cable to my tach and now my gas mileage is terrible. Can you explain that again?
I fixed the problem last night. First I rechecked all of my work; The cable end is nice and square. The tach still works with my cordless drill driving the cable. The output of the tach drive still turns when the engine runs. The tachometer still wouldn't work when reassembled. I decided to grind the bronze coupling face on the tach drive to make the cable effectively "longer". I ground the outboard face until about 2/3rd's of the screwdriver style groove was gone. Everything works like it should now. If I have problems down the road I can always replace the cable and bronze adapter if needed.
Thanks for all of the good suggestions!
Jim
Team Owner
Joined: Aug 1999
Posts: 30,995
Likes: 99
From: Ontario
Maybe I misunderstood something. I hooked my speedo cable to my tach and now my gas mileage is terrible. Can you explain that again?
I fixed the problem last night. First I rechecked all of my work; The cable end is nice and square. The tach still works with my cordless drill driving the cable. The output of the tach drive still turns when the engine runs. The tachometer still wouldn't work when reassembled. I decided to grind the bronze coupling face on the tach drive to make the cable effectively "longer". I ground the outboard face until about 2/3rd's of the screwdriver style groove was gone. Everything works like it should now. If I have problems down the road I can always replace the cable and bronze adapter if needed.
Thanks for all of the good suggestions!
Jim
I fixed the problem last night. First I rechecked all of my work; The cable end is nice and square. The tach still works with my cordless drill driving the cable. The output of the tach drive still turns when the engine runs. The tachometer still wouldn't work when reassembled. I decided to grind the bronze coupling face on the tach drive to make the cable effectively "longer". I ground the outboard face until about 2/3rd's of the screwdriver style groove was gone. Everything works like it should now. If I have problems down the road I can always replace the cable and bronze adapter if needed.
Thanks for all of the good suggestions!
Jim
I'm glad things worked out for you. The nylon or bronze button serves the same purpose. But I admire your innovation.
Thread Starter
Racer
Joined: Aug 2005
Posts: 442
Likes: 0
From: Fairbanks Alaska
If you pull on the cable (so the inner cable is moved all the distance it can) one way or the other, and the tach works for a bit, the inner cable is too short. On the upper (speedo) end, there's a square drive just like on the distributor end and a plastic "button" that is the stop for the cable. If that button is worn or has slipped, the cable, because of the way it's wrapped and the direction of rotation, walk it's way back to where it was.
The wear could be either in the housing or on that button.
The wear could be either in the housing or on that button.
I think that TimAT is talking about the thrust button on the dashboard end of things. If this button fails, the cable can walk away from the tach drive and disengage from the drive. I realize that the button on your distributor cross shaft failed which stopped your tach. My tach drive button is intact, I am not sure about the button in the tach itself. I will make sure to use the bronze version in the future to prevent the trouble you had. In summary, there are two thrust buttons on the assembly one on the tach end, one on the distributor end of the cable.
Thanks,
Jim
Team Owner
Joined: Aug 1999
Posts: 30,995
Likes: 99
From: Ontario
Paul,
I think that TimAT is talking about the thrust button on the dashboard end of things. If this button fails, the cable can walk away from the tach drive and disengage from the drive. I realize that the button on your distributor cross shaft failed which stopped your tach. My tach drive button is intact, I am not sure about the button in the tach itself. I will make sure to use the bronze version in the future to prevent the trouble you had. In summary, there are two thrust buttons on the assembly one on the tach end, one on the distributor end of the cable.
Thanks,
Jim