


'72 door switch wiring
Thread Starter
Melting Slicks


Joined: Oct 2010
Posts: 2,276
Likes: 337
From: "ɹǝpunuʍop", Adelaide, South Australia
tried to replace the switches in the door jambs and the door adjar ones
they undid ok, but i could not get enough movement in the wire to remove them from the body to get to the wire
what do i have to do, remove the kick trim panels/speakers to access the wires?
what is behind the panel in the wheel arch?
also how do the wires attach too the small white part on the switch?
thanks

Melting Slicks


Joined: Apr 2007
Posts: 3,189
Likes: 111
From: Tolland CT
tried to replace the switches in the door jambs and the door adjar ones
they undid ok, but i could not get enough movement in the wire to remove them from the body to get to the wire
what do i have to do, remove the kick trim panels/speakers to access the wires?
what is behind the panel in the wheel arch?
also how do the wires attach too the small white part on the switch?
thanks
they undid ok, but i could not get enough movement in the wire to remove them from the body to get to the wire
what do i have to do, remove the kick trim panels/speakers to access the wires?
what is behind the panel in the wheel arch?
also how do the wires attach too the small white part on the switch?
thanks
I can speak from experience with my 70, think 72 is probably the same.
Removing the kick panels is pretty easy. That would give you plenty of access. Removing the rear quarter trim panel may give you insight into why the wiring is tight but won't give you direct access to the backside of the switch.
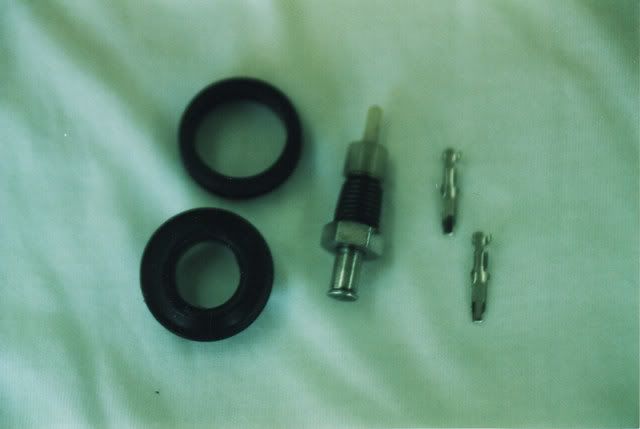
On the early models, the switch contact is part of the wiring. The contact is held in place by a tang on the contact which pops out when the contact is seated in the white plastic piece. I've seen the contacts being sold by vendors should your's become damaged during removal.
Last edited by BBCorv70; Apr 3, 2011 at 10:29 AM.
Team Owner


Joined: Sep 2006
Posts: 31,281
Likes: 4,372
From: Westminster Maryland
Hi rr,
BB's info is right on.
Here's a picture of the 'tangs' he mentions. Some people have had luck getting the originals out without damaging them. I've always broken them.
Regards,
Alan
This is the rear switch.
BB's info is right on.
Here's a picture of the 'tangs' he mentions. Some people have had luck getting the originals out without damaging them. I've always broken them.
Regards,
Alan
This is the rear switch.
Melting Slicks
Joined: Apr 2007
Posts: 3,189
Likes: 111
From: Tolland CT
http://www.parts123.com/parts123/yb....Z5Z5Z50000050G
Thread Starter
Melting Slicks
Joined: Oct 2010
Posts: 2,276
Likes: 337
From: "ɹǝpunuʍop", Adelaide, South Australia
if i undo the thread they all only pull out about 1/2"
just enough to see the white part
am missing the pass side adjar switch alltogether
will check the front switches when i do the speakers for the new radio

just enough to see the white part
am missing the pass side adjar switch alltogether
will check the front switches when i do the speakers for the new radio
Melting Slicks
Joined: Apr 2007
Posts: 3,189
Likes: 111
From: Tolland CT
The tangs are compressed when pushing the contact into the slot on the white plastic, part of the switch. They will pop out when the contact is in place, preventing the contact from pulling out of the plastic.
It may be possible to remove the originals if a pin of some sort can be found to push down into the slot, compressing the tang so the contact may be pulled out.
It may be possible to remove the originals if a pin of some sort can be found to push down into the slot, compressing the tang so the contact may be pulled out.

Le Mans Master


Joined: Nov 2004
Posts: 7,850
Likes: 142
From: Tampa, Fl.
Hope this helps.
Regards,
Chas
Last edited by Chuck72; Apr 3, 2011 at 11:01 PM.
Corvette Stories
The Best of Corvette for Corvette Enthusiasts

Top 10 Most Expensive Corvettes Ever Sold on Bring A Trailer
Brett Foote
10 Things Every Corvette Owner Needs (2026 Edition)
Michael S. Palmer
8 Most "Only Corvette Owners Understand" Quirks and Problems
Pouria Savadkouei
10 Reasons the C6 Z06 is Still A Performance Benchmark After 20 Years
Joe Kucinski
How Much Horsepower Every Corvette Engine "LOST" in 1972
Joe Kucinski
Top 10 DOs and DON'Ts for Protecting Your Convertible Top!
Michael S. Palmer
Top 10 Most Explosive Corvettes Ever Made: Power-to-Weight Ratio Ranked!
Joe Kucinski
150 hp to 1,250 hp: Every Corvette Generation Compared by the Specs That Matter
Joe Kucinski
8 Coolest Corvette Pace Cars (and Replicas) of All Time
Verdad GallardoInstructor


Joined: Sep 2004
Posts: 182
Likes: 0
From: Brentwood TN
I'm installing a new rear wiring harness with new door ajar switches. The old door switches were replacement units and didn't have the "fish hook" wire terminals. I initially inserted the hook to the inside but it didn't catch like I thought it should. After breaking off a couple of the new wire terminals - I determined that I must be doing something wrong.
How do the terminals go in the plastic end ? does the hook go to the outside or inside ? does the hook go all the way thru ?
How do the terminals go in the plastic end ? does the hook go to the outside or inside ? does the hook go all the way thru ?
Le Mans Master
Joined: Nov 2004
Posts: 7,850
Likes: 142
From: Tampa, Fl.
I'm installing a new rear wiring harness with new door ajar switches. The old door switches were replacement units and didn't have the "fish hook" wire terminals. I initially inserted the hook to the inside but it didn't catch like I thought it should. After breaking off a couple of the new wire terminals - I determined that I must be doing something wrong.
How do the terminals go in the plastic end ? does the hook go to the outside or inside ? does the hook go all the way thru ?
How do the terminals go in the plastic end ? does the hook go to the outside or inside ? does the hook go all the way thru ?
If you can, carefully remove the other side and carefully examine it.
I'm currently 600 miles from my car, so I cannot look.
Regards,
Chuck
Team Owner
Joined: Sep 2006
Posts: 31,281
Likes: 4,372
From: Westminster Maryland
Hi,
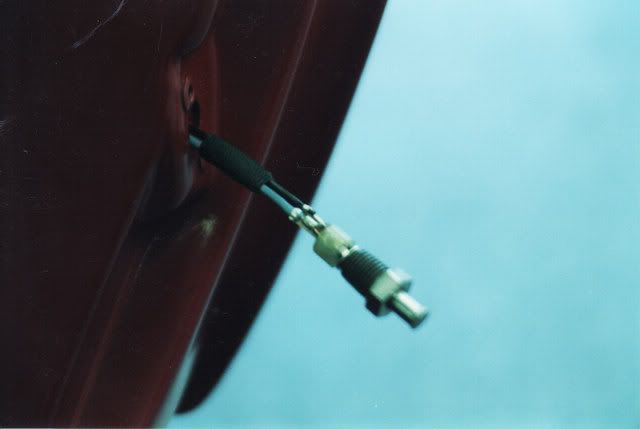
Once the 'tangs' is crimped onto the wires they can only go into the switch in one way. The 'hook' holds the tang from 'backing' out of the switch.
Regards,
Alan
This is the door ajar switch ready to go back in place.
Once the 'tangs' is crimped onto the wires they can only go into the switch in one way. The 'hook' holds the tang from 'backing' out of the switch.
Regards,
Alan
This is the door ajar switch ready to go back in place.
Intermediate
Joined: Oct 2003
Posts: 31
Likes: 0
From: Alexandria VA
Evening, all. Like Frank, I have purchased a new rear wiring harness, and plan on replacing all the door ajar switches. Upon trying to remove them by unscrewing them, I get to the point where I feel like I might damage the opening/threading. It appears that the last time the car was painted (>10 years ago), the door switch got painted in the depressed/shut position (perhaps why it doesn't work). Is there a secret to removing the switches (I don't care if I break them, but I don't want to damage the threading that I'll need for the new parts)? As always, thank you.
Vr,
Craig
Vr,
Craig
Instructor
Joined: Sep 2004
Posts: 182
Likes: 0
From: Brentwood TN
My switch unscrewed pretty easily - i would tape a piece of wire to the old wires so when you pull the old wires into the passenger compartment you can then tape the new wires to the piece of wire to snake them back through the switch hole.

Team Owner
Joined: Sep 2006
Posts: 31,281
Likes: 4,372
From: Westminster Maryland
Hi r,
No, it doesn't matter how/where the tangs slip into the switch body.
If you look at the switch carefully and push on the plunger with your finger you'll see how it works.
The plunger just has to have contact with the 'tangs' while it's 'out' (door open), and then have that contact with them broken when pushed in (door closed).
Regards,
Alan
Last edited by Alan 71; Feb 11, 2016 at 07:37 AM.