


1nstalling 69 rear letter emblems
Team Owner


Joined: Jan 2006
Posts: 37,637
Likes: 3,118
From: Crossville TN
Are the holes already drilled? If not, that's the hard part. You need a template and some 'blue' painter's tape (to keep from chipping your paint when you drill). Measure at least 5 times....drill once. There is enough room to reach up there with one hand while sticking in the letters with the other.
P.S. Don't overtighten the nuts!!!
P.S. Don't overtighten the nuts!!!
Cruising

Joined: Oct 2006
Posts: 13
Likes: 0
From: La Palma California
When I replaced mine on my 72 last year I removed the license plate bezel for access. This gave me a lot more room to reach in through there. Didn't need to drop the spare tire carrier. I also used the original nuts that to me seemed to be much better than what came with the new letters.

Melting Slicks


Joined: Apr 2007
Posts: 3,189
Likes: 111
From: Tolland CT
Where do you find a template? I looked for one once, talked to a few vendors. Nobody had any idea. The placement of the studs varies from letter to letter. Tough to make a template from scratch. A local shop had an early C3 with no visible damage to the rear, made a template using wide masking tape applied to the back panel to transfer the pattern.
Corvette Stories
The Best of Corvette for Corvette Enthusiasts

Top 10 Most Expensive Corvettes Ever Sold on Bring A Trailer
Brett Foote
10 Things Every Corvette Owner Needs (2026 Edition)
Michael S. Palmer
8 Most "Only Corvette Owners Understand" Quirks and Problems
Pouria Savadkouei
10 Reasons the C6 Z06 is Still A Performance Benchmark After 20 Years
Joe Kucinski
How Much Horsepower Every Corvette Engine "LOST" in 1972
Joe Kucinski
Top 10 DOs and DON'Ts for Protecting Your Convertible Top!
Michael S. Palmer
Top 10 Most Explosive Corvettes Ever Made: Power-to-Weight Ratio Ranked!
Joe Kucinski
150 hp to 1,250 hp: Every Corvette Generation Compared by the Specs That Matter
Joe Kucinski
8 Coolest Corvette Pace Cars (and Replicas) of All Time
Verdad GallardoTeam Owner
Joined: Jan 2006
Posts: 37,637
Likes: 3,118
From: Crossville TN
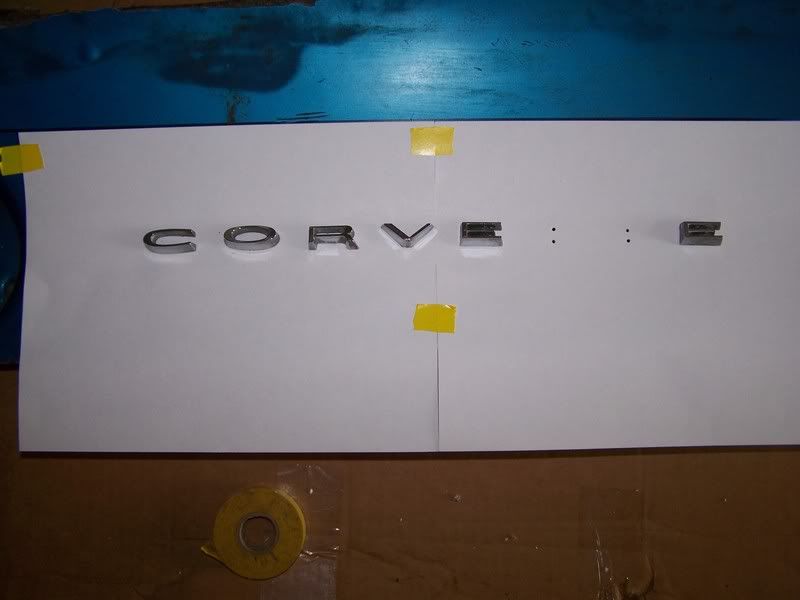
The best way to make a template is to lay the letters out on a piece of cardboard first (not corrogated cardboard). If I remember correctly, there is approximately the same 'open' space between each consecutive pair of letters and the complete word "Corvette" is about the same width as the license plate recess. The height of the letters is exactly in-line with the center of the tail lights (center of letters on same line as center of the lamps).
The aftermarket letter 'pins' may not be in the same locations as the original stock letters; so, it would be best to make your own template.
Draw a long horizontal line that will be the alignment line for the height of the letters and with the centers of the lamps. Mark off the selected width of the word "CORVETTE" on that line. Now start placing the letters on the line so that they have about the right spacing and fill that width. When you get it to look right, just press each letter down firmly enough to put impressions in the cardboard. Later, you can put a piece of tracing paper over it to pick up those indentations and the alignment line. Don't forget to put a piece of blue painter's tape over your paint before you start drilling holes. It would be best to start with a smaller drill and then test to see if those letter positions will be OK. If you need to make very minor adjustment, you still can when you make final hole drill. Lastly, pull the tape off your paint very slowly so you don't pull any chips from the hole edges.
I would think that a high speed Dremel would be better for that job than a cordless hand drill. The Dremel is lighter and easier to tell when it is perpendicular to the work surface. And, the higher speed should reduce the risk of chipping, I would think.
Maybe others will have some additional...or better...suggestions. Good luck!
Le Mans Master


Joined: Jun 2005
Posts: 5,447
Likes: 3
From: Syracuse NY
I've made a few of these for members over the years and would be happy tp make another if needed.
There is another member that can send you a file that you can print out to make your own template too, but I can't remember who it was. You could do a search though.
There is another member that can send you a file that you can print out to make your own template too, but I can't remember who it was. You could do a search though.
Team Owner
Joined: Jan 2006
Posts: 37,637
Likes: 3,118
From: Crossville TN
Someone else's template will work...if you have used letters made by the same company. If you do get another template, place your letters on the template to check out positioning, before you start any drilling.
1969/1971/2021 Coupes


Joined: Jan 2008
Posts: 2,212
Likes: 80
From: Port Huron MI
St. Jude Donor '09-'10-'11-'12-'13-'14-'15
I've got the templates DZRick was referring to. I've posted them so you can see whast they look like. If you PM me with an email address, I'll send them to you so you can print them on 8.5x11 and have actual template sizes to work with.
Terry


Terry