


 Thats the way to do it.


Spring Compressor

Instructor


Joined: Nov 2009
Posts: 225
Likes: 1
St. Jude Donor '12
I assume you are talking about the front springs. When I replaced all the bushings and ball joints on my 73 resto project and started the reassembly I just put the spring in place, ran a piece of all thread through the shock mounting holes with a steel plate on each end and started tightening the nut, compressing the spring enough to mount the ball joints. Once you have mounted the spindle with the ball joints remove the all thread and install the shock. Hope this helps.
Le Mans Master


Joined: Apr 2007
Posts: 7,353
Likes: 72
From: Graceland in a Not Correctly Restored Stingray
For safely compressing front coils, the tool you're looking for is one of these from K-D...
...and take care to use it correctly. You're dealing with a bunch on energy.
...and take care to use it correctly. You're dealing with a bunch on energy.
Burning Brakes


Joined: Jul 2009
Posts: 912
Likes: 47
From: Kansas City MO
Hey Danny,
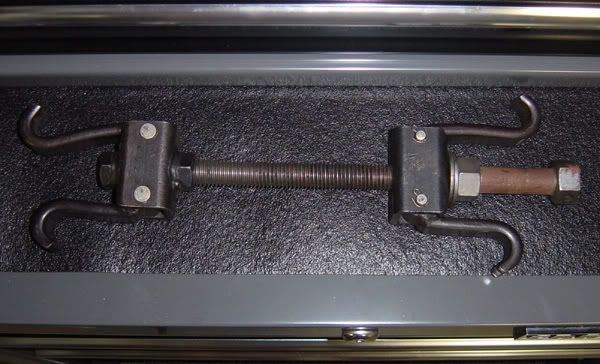
Below are some photos of the spring compressor I purchased. I am assuming you are looking for one for the front coil springs? Anyway, I purchased this one from Advance Auto Parts. I believe I paid about $35 for it. What I ended up doing is removed the non-threaded claws (one is threaded, the other is not). I then found a large washer to install at the top of the threaded rod. From there, I inserted the threaded rod through the top where the shock would bolt to. Prior to sliding the rod all the way through, I inserted the coil spring and then fished in the claws with the threaded part and connected to the coil spring. From there, I slowly tightened the rod to start compressing the coil. The tricky part was to get the coil somewhat compressed, but loose enough to move it over to the lower control arm pocket. Once the spring was seated in the pocket and oriented correctly, I began to jack up on the lower control arm while tightening the threaded rod from the spring compressor at the same time. It was a little tricky to do at first, but once I really figured out a good sequence of jacking the control arm and tightening the rod, it actually worked out really well. The first side probably took me about 30 minutes, but the other side went much qucker. The last photo will kind of give you an idea how the compressor was inserted and used to compress the coil spring. Maybe this was more info than you were looking for, but will possibly be helpful for others reading this post...


Below are some photos of the spring compressor I purchased. I am assuming you are looking for one for the front coil springs? Anyway, I purchased this one from Advance Auto Parts. I believe I paid about $35 for it. What I ended up doing is removed the non-threaded claws (one is threaded, the other is not). I then found a large washer to install at the top of the threaded rod. From there, I inserted the threaded rod through the top where the shock would bolt to. Prior to sliding the rod all the way through, I inserted the coil spring and then fished in the claws with the threaded part and connected to the coil spring. From there, I slowly tightened the rod to start compressing the coil. The tricky part was to get the coil somewhat compressed, but loose enough to move it over to the lower control arm pocket. Once the spring was seated in the pocket and oriented correctly, I began to jack up on the lower control arm while tightening the threaded rod from the spring compressor at the same time. It was a little tricky to do at first, but once I really figured out a good sequence of jacking the control arm and tightening the rod, it actually worked out really well. The first side probably took me about 30 minutes, but the other side went much qucker. The last photo will kind of give you an idea how the compressor was inserted and used to compress the coil spring. Maybe this was more info than you were looking for, but will possibly be helpful for others reading this post...
Corvette Stories
The Best of Corvette for Corvette Enthusiasts

150 hp to 1,250 hp: Every Corvette Generation Compared by the Specs That Matter
Joe Kucinski
8 Coolest Corvette Pace Cars (and Replicas) of All Time
Verdad Gallardo
Top 10 Corvette Engines RANKED by Peak Torque (70+ Years of Muscle!)
Joe Kucinski
Corvette ZR1X Will Be Pacing the Indy 500, And Could Probably Race, Too!
Verdad Gallardo
Top 10 Corvettes Coming to Mecum Indy 2026!
Brett Foote
Top 10 C9 Corvette MUST-HAVES to Fix These C8 Generation Flaws!
Michael S. Palmer
10 Revolutionary 'Corvette Firsts' Most People Don't Know
Joe Kucinski
5 Reasons to Upgrade to an LS6-Powered Corvette; 5 Reasons to Stay LT2
Michael S. Palmer
2027 Corvette vs The World: Every C8 vs Its Closest Competitor
Joe Kucinski
Thread Starter
Pro


Joined: Sep 2006
Posts: 547
Likes: 13
From: Carlstadt NJ
Hey Danny,
Below are some photos of the spring compressor I purchased. I am assuming you are looking for one for the front coil springs? Anyway, I purchased this one from Advance Auto Parts. I believe I paid about $35 for it. What I ended up doing is removed the non-threaded claws (one is threaded, the other is not). I then found a large washer to install at the top of the threaded rod. From there, I inserted the threaded rod through the top where the shock would bolt to. Prior to sliding the rod all the way through, I inserted the coil spring and then fished in the claws with the threaded part and connected to the coil spring. From there, I slowly tightened the rod to start compressing the coil. The tricky part was to get the coil somewhat compressed, but loose enough to move it over to the lower control arm pocket. Once the spring was seated in the pocket and oriented correctly, I began to jack up on the lower control arm while tightening the threaded rod from the spring compressor at the same time. It was a little tricky to do at first, but once I really figured out a good sequence of jacking the control arm and tightening the rod, it actually worked out really well. The first side probably took me about 30 minutes, but the other side went much qucker. The last photo will kind of give you an idea how the compressor was inserted and used to compress the coil spring. Maybe this was more info than you were looking for, but will possibly be helpful for others reading this post...
Below are some photos of the spring compressor I purchased. I am assuming you are looking for one for the front coil springs? Anyway, I purchased this one from Advance Auto Parts. I believe I paid about $35 for it. What I ended up doing is removed the non-threaded claws (one is threaded, the other is not). I then found a large washer to install at the top of the threaded rod. From there, I inserted the threaded rod through the top where the shock would bolt to. Prior to sliding the rod all the way through, I inserted the coil spring and then fished in the claws with the threaded part and connected to the coil spring. From there, I slowly tightened the rod to start compressing the coil. The tricky part was to get the coil somewhat compressed, but loose enough to move it over to the lower control arm pocket. Once the spring was seated in the pocket and oriented correctly, I began to jack up on the lower control arm while tightening the threaded rod from the spring compressor at the same time. It was a little tricky to do at first, but once I really figured out a good sequence of jacking the control arm and tightening the rod, it actually worked out really well. The first side probably took me about 30 minutes, but the other side went much qucker. The last photo will kind of give you an idea how the compressor was inserted and used to compress the coil spring. Maybe this was more info than you were looking for, but will possibly be helpful for others reading this post...
Thanks,
Danny
Burning Brakes
Joined: Jul 2009
Posts: 912
Likes: 47
From: Kansas City MO
Removing your old springs should be a breeze using this method. Compress the spring, remove spindle from ball joints, drop down (or completely remove) lower control arm, and then slowly release the tension on the coil spring compressor. Going back together will take a little longer...
PS: For some added sense of security/safety, you can always use a ratchet strap and wrap around the control arms and slowly release as you let off the tension of the compressed coil spring.
PS: For some added sense of security/safety, you can always use a ratchet strap and wrap around the control arms and slowly release as you let off the tension of the compressed coil spring.
Last edited by spdrcr29; Jun 14, 2012 at 12:14 AM.
Le Mans Master
Joined: Aug 2010
Posts: 9,272
Likes: 17
http://willcoxcorvette.com/repairand...lp.php?hID=296
this doesnt require anything but removing the shock.
this doesnt require anything but removing the shock.
Last edited by oldalaskaman; Jun 14, 2012 at 12:44 PM.
Le Mans Master
Joined: Nov 2006
Posts: 5,262
Likes: 283
From: I'd like to propose a toast... to internal combustion and wind in the face.
I have used coil spring compressors in the past, but for me using a piece of "all-thread" installed in place of the shock absorber is by far the easiest and safest method. I was amazed at how easy compressing the spring was just by using a normal wrench. This method does require removing the the lower "a-frame" but I feel it's worth this step.
See post #79 from my '64 thread:
http://forums.corvetteforum.com/c1-a...ressure-4.html
See post #79 from my '64 thread:
http://forums.corvetteforum.com/c1-a...ressure-4.html
Burning Brakes
Joined: Dec 2008
Posts: 971
Likes: 45
From: Middlesex NJ
I hate messing with spring compressors. I haven't had one that hasn't skipped off.
This is the design I have used on the corvette several times and has not skipped off.
http://www.google.com/products/catal...d=0CKIBEPMCMAE
The following is the best design I have ever seen and works great and is safe. Works well on 55 chevys which have enormously long springs.
http://www.classicchevy.com/coil-spring-compressor.html
Use plenty of never seize on the threads and between the washers that are used as simple bearing to keep it smooth.
Last edited by mysixtynine; Jun 14, 2012 at 11:27 AM.
Le Mans Master
Joined: Aug 2010
Posts: 9,272
Likes: 17
http://api.viglink.com/api/click?for...13397268248555
this is the same as the wilcox tech, but when I used the wilcox version and used a leftover spring bolt from my c4 and a left over piece of 3/8" steel, it didnt cost me anything and still got the job done ...safely.
this is the same as the wilcox tech, but when I used the wilcox version and used a leftover spring bolt from my c4 and a left over piece of 3/8" steel, it didnt cost me anything and still got the job done ...safely.

Melting Slicks

Joined: Apr 1999
Posts: 2,010
Likes: 3
From: Moon Twp. PA USA
I guess I am an accident waiting to happen. I use the same method as I did 50-55 years ago.
I raise the car up to a good height, remove the shock absorber, put a hydraulic floor jack under the lower control arm, unbolt the spindle from the lower ball joint, and slowly lower the jack. If the car was jacked up far enough, initially, the lower control arm, along with the coil spring, will swing down so it can be removed. Installation is the reverse of removal. You can chain the coils together, for safety, before you lower the jack.
I survived, these many years, using this method, in a commercial garage, working on a dirt track late model modified, and at home.
Melting Slicks
Joined: Mar 2008
Posts: 2,023
Likes: 6
From: Austin Tx
I guess I am an accident waiting to happen. I use the same method as I did 50-55 years ago.
I raise the car up to a good height, remove the shock absorber, put a hydraulic floor jack under the lower control arm, unbolt the spindle from the lower ball joint, and slowly lower the jack. If the car was jacked up far enough, initially, the lower control arm, along with the coil spring, will swing down so it can be removed. Installation is the reverse of removal. You can chain the coils together, for safety, before you lower the jack.
I survived, these many years, using this method, in a commercial garage, working on a dirt track late model modified, and at home.
I raise the car up to a good height, remove the shock absorber, put a hydraulic floor jack under the lower control arm, unbolt the spindle from the lower ball joint, and slowly lower the jack. If the car was jacked up far enough, initially, the lower control arm, along with the coil spring, will swing down so it can be removed. Installation is the reverse of removal. You can chain the coils together, for safety, before you lower the jack.
I survived, these many years, using this method, in a commercial garage, working on a dirt track late model modified, and at home.
That's when I went out and got the same compressor as spdrcr29. I ran the compressor bolt up thru the upper hole for the shock, and compressed the spring up into the upper pocket. This easily allowed me to get the spring seated correctly in the pocket. With the spring compressed into the upper pocket, the lower arm easily swung up with the spindle on it, and allowed me to connect the upper ball joint.
After spending MANY hours trying to get the first side on, after coming up with this solution, the second spring was in in 10 minutes.