

Sequence for Assembly and Paint...


Thread Starter
Instructor


Joined: Feb 2010
Posts: 150
Likes: 8
From: Pelham Alabama
Trying to get everyone's opinion on how to proceed with my 1969 Coupe body to get the doors gaps set and it ready for paint and re-mounting on the chassis. This is where I'm currently at...
The body is off of the chassis and I'm getting ready to do rocker channel replacements as the channels were literally almost non-existant (A-pillar and B-pillar bottoms are already prepped). The doors are off and the front nose is off. I cut the 1" strip on the back of the front nose piece (by the windshield wipers) about 6 inches in from both front fenders so that I had a reference for re-alignment. Unfortunately this limits my placement of the nose piece to change the front door gaps by moving the nose. Shims for the body to frame were toast so I have no reference for shimming to get the door gaps set. This is what I "think" I need to do and I'm looking for some opinions.
This is what I'm planning.
1. With the body in the air... Weld the new rocker at the bottom of the A-pillar (door hinge pillar) and leave the B-pillar loose. This will be with the big fiberglass panel over the back of the B-pillar at the #3 body mount bolt in the rear wheel well removed so that I can work.
2. Set the body with the B-Pillars loose on the chassis and mount the doors using an arbitrary number of shims on the the body mounts.
3. Set the nose back on the body and affix with screws to the bonding strips to hold in place at the back and use the radiator mount bolts in the front to hold the front of the nose up.
4. Check the front door gaps and slide the doors forward if necessary to get the front gaps looking good.
5. Move the rocker channel backwards or forward at the B-pillar to set good rear door gaps.
Furthermore... Should I take the body off of my beautiful spotless completed chassis for paint once the doors gaps are set and place it on a wooden body dolly for painting? I was thinking about just bolting everything down once the door gaps are set so that the sanding of the high build primer doesn't create weird body lines once everything gets set back on the chassis? I will just die if I get overspray all over everything.
Comments??? Recommendations???
Last edited by sumcollegekid; Jan 1, 2013 at 08:29 PM.


Team Owner


Joined: Sep 2006
Posts: 31,274
Likes: 4,366
From: Westminster Maryland
Hi tp,
Yes, I was able to get it all off.
The only tricky place was around a couple of the body mounts. #'s 2 & 3.
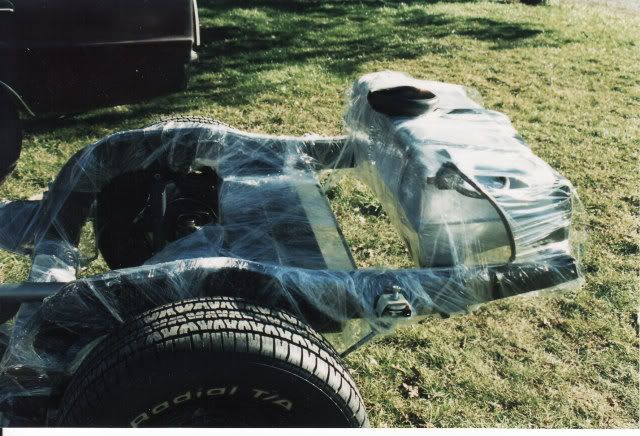
I had a little too much plastic wrap over the mounts and the birdcage channel trapped it. It was a little work but came out.
I bought 2 rolls of plastic at the office store that people who do lots of shipping use. One about 4" wide, and one about 12" wide.
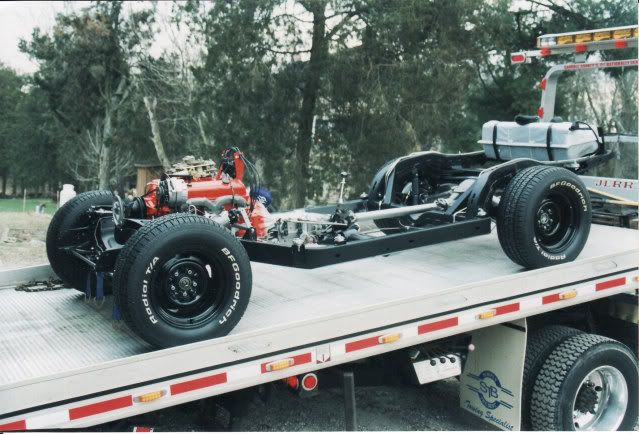
The only tricky part is to wrap it so you can still ROLL the chassis around. The frame and engine/trans are easy... the suspension takes the time.
If you'll notice in the 4th picture a large sheet of plastic was draped over the chassis before the body was placed on the chassis. This helps too. I spent about 1 day unwrapping it and cleaning up the few places that needed it. There was no overspray anywhere, but there was some sanding 'smutz' a few places.
The fellow who painted my car was adamant about it being on the chassis when he sprayed it. I realize there are different opinions about that.
Also, since I was trying to duplicate a St.Louis paint job, TO SOME DEGREE, I wanted the jams to be shot first and then the hood and doors to be pushed closed so just a little overspray would get on the jambs.
I realize that's not what most people people do.
Regards,
Alan
Yes, I was able to get it all off.
The only tricky place was around a couple of the body mounts. #'s 2 & 3.
I had a little too much plastic wrap over the mounts and the birdcage channel trapped it. It was a little work but came out.
I bought 2 rolls of plastic at the office store that people who do lots of shipping use. One about 4" wide, and one about 12" wide.
The only tricky part is to wrap it so you can still ROLL the chassis around. The frame and engine/trans are easy... the suspension takes the time.
If you'll notice in the 4th picture a large sheet of plastic was draped over the chassis before the body was placed on the chassis. This helps too. I spent about 1 day unwrapping it and cleaning up the few places that needed it. There was no overspray anywhere, but there was some sanding 'smutz' a few places.
The fellow who painted my car was adamant about it being on the chassis when he sprayed it. I realize there are different opinions about that.
Also, since I was trying to duplicate a St.Louis paint job, TO SOME DEGREE, I wanted the jams to be shot first and then the hood and doors to be pushed closed so just a little overspray would get on the jambs.
I realize that's not what most people people do.
Regards,
Alan
Melting Slicks


Joined: Jun 2006
Posts: 2,071
Likes: 147
From: S Nevada
Interesting idea Alan. After spending all that time and money powder coating the chassis, I too was wondering about keeping the overspray to a minimum. I'm dropping the body back on next week. Ill assemble/adjust fit, then remove trim for final paint. I may explore the wrap idea.


