


Engine Rebuild Newbie
Thread Starter
Senior Member


Joined: Jan 2008
Posts: 12,146
Likes: 2,038
From: Easton, PA
St. Jude Donor '10
I wanted to learn about the GM 350 engine and after hurting my arm when working on Sparty I had to give it up and Gordon took charge of the engine rebuild for me. Now it is time for me to learn from a donor engine I bought and retrieved yesterday in UpState New York. That thread can be found in the C3 Parts wanted area. Here is the link if you want to look back on the purchase data. http://forums.corvetteforum.com/c3-p...play-with.html
What I want to do here is begin to document this journey of a newbie tearing down, and hopefully, building back up a 350GM engine. I will photograph and document each step along the way so as to know what was on this engine and what is good, bad, ugly or otherwise for me to consider in the build. It will all be new to me, so advice along the way will always be welcomed.
First you will see four shots of the engine on my engine stand and they still have the transport legs on the engine. Those are off now.


I also wanted to capture the engine pad data to understand what this may have come from in it's history. Mystery started when I documented but could not find the pad data "K0303031" anywhere in my Corvette books.

I cleaned up the pad a bit better and it revealed that in fact the pad is stamped "K0303C3T" which means little more than the previous number did, but so it goes. The VIN is also a mystery to me. The number is "181203542" in that it is only 9 digits long ?????

I'll do some digging but if you have ideas please through them out here please.
More soon...and thanks for watching.
David Howard
What I want to do here is begin to document this journey of a newbie tearing down, and hopefully, building back up a 350GM engine. I will photograph and document each step along the way so as to know what was on this engine and what is good, bad, ugly or otherwise for me to consider in the build. It will all be new to me, so advice along the way will always be welcomed.
First you will see four shots of the engine on my engine stand and they still have the transport legs on the engine. Those are off now.
I also wanted to capture the engine pad data to understand what this may have come from in it's history. Mystery started when I documented but could not find the pad data "K0303031" anywhere in my Corvette books.
I cleaned up the pad a bit better and it revealed that in fact the pad is stamped "K0303C3T" which means little more than the previous number did, but so it goes. The VIN is also a mystery to me. The number is "181203542" in that it is only 9 digits long ?????
I'll do some digging but if you have ideas please through them out here please.
More soon...and thanks for watching.
David Howard
Last edited by AllC34Me; Mar 10, 2013 at 09:18 AM.
Thread Starter
Senior Member
Joined: Jan 2008
Posts: 12,146
Likes: 2,038
From: Easton, PA
St. Jude Donor '10
"K0303C3T"
K= St. Catherines Ontario plant site.
"0303" = March 3rd.
"C3T" = 1978 Camaro Engine, however, one site shares that the C3T code means Export, Uncertain Usage...Fun.
was able to retrieve this information from decoding GM engine block web site which you can also use at: http://www.nastyz28.com/gm-chevy-cod...s-suffix-1.php
Next up is sorting out that VIN or serial number, then moving on to more fun. I may have to find some a Camaro forum to sort this one out...any suggestions would be welcomed.
Back soon...
David Howard
Last edited by AllC34Me; Mar 10, 2013 at 09:34 AM.
Thread Starter
Senior Member
Joined: Jan 2008
Posts: 12,146
Likes: 2,038
From: Easton, PA
St. Jude Donor '10
Engine is painted blue, however, when I removed the Moroso valve covers I found the engine block under the valve covers to be painted Orange. Just adds fun to the mystery. Engine heads numbers look like "482824" but research says that number never existed, rather these are "462624" heads and you can find all kinds of information on how much these heads are not liked. A/27 and A/18 codes on the heads are not known yet, will keep digging.
Valve covers off reveals orange paint.

Head pictures:


Valve covers off reveals orange paint.
Head pictures:
Team Owner


Joined: Sep 2006
Posts: 31,200
Likes: 4,287
From: Westminster Maryland
Hi C3,
Some of your pictures show the 'casting clock' too.
I believe for the block the screw/pointer in the center indicates the hour of the shift, while the screw/pointer next to the clock points to the shift.
Here's an example of a block casting.
This block is dated December 31, 1970. The shift is indicated 'T', for twilight , and the hour of the shift is the 7th.
So.... the foundry was working New Year's eve.
What's yours tell you?
Regards,
Alan
Thread Starter
Senior Member
Joined: Jan 2008
Posts: 12,146
Likes: 2,038
From: Easton, PA
St. Jude Donor '10
Hi Alan, good to hear from you and thank you for your information.
My block isn't speaking to me yet but I hope it will be in the very near future. Right now I am trying to remove items and document them as I remove them, then see what I have in the total picture to work with on this engine. I removed the Holly Carburator but have not located the numbers on it yet, stay tuned.
I attempted to remove the intake manifold but ran into a couple of issues preventing the success removal. First, the Holly Carb was mounted to a raised plate mounted to the intake. Two of the mounting screws came out easily but the other two are giving me fits. I have PB Blaster on them now and will strike them and then see if I can get them loose. There are also two bolts that are different sizes than the 9/16" mounting bolts on the rest of the intake. I am working to free those up as well, but thus far, no success.
These are the screws giving me fits.


And this is the bolt giving me fits too.

This is the Holly Carb removed from the engine, more to follow on this one.

Intake manifold is 346249

Date code is K114

As soon as I can get the riser plate (???) off of the manifold, and the manifold off of the engine I will clean them up and report out any additional findings.
I will inspect the Holly Carb tomorrow and seee what I can learn about it. Until then have a good evening and more will be reported soon.
Best regards,
David
My block isn't speaking to me yet but I hope it will be in the very near future.
Right now I am trying to remove items and document them as I remove them, then see what I have in the total picture to work with on this engine. I removed the Holly Carburator but have not located the numbers on it yet, stay tuned.I attempted to remove the intake manifold but ran into a couple of issues preventing the success removal. First, the Holly Carb was mounted to a raised plate mounted to the intake. Two of the mounting screws came out easily but the other two are giving me fits. I have PB Blaster on them now and will strike them and then see if I can get them loose. There are also two bolts that are different sizes than the 9/16" mounting bolts on the rest of the intake. I am working to free those up as well, but thus far, no success.
These are the screws giving me fits.
And this is the bolt giving me fits too.
This is the Holly Carb removed from the engine, more to follow on this one.
Intake manifold is 346249
Date code is K114
As soon as I can get the riser plate (???) off of the manifold, and the manifold off of the engine I will clean them up and report out any additional findings.
I will inspect the Holly Carb tomorrow and seee what I can learn about it. Until then have a good evening and more will be reported soon.
Best regards,
David
Thread Starter
Senior Member
Joined: Jan 2008
Posts: 12,146
Likes: 2,038
From: Easton, PA
St. Jude Donor '10
Holly Carburetor Data Is As Follows:
List# 8004
Date Code 2227
Holley Web site called this List 8004 or R8004 at Holley H4-4160 Carb.
Built in August, 1977.
Funny that Holley said it would have been used on 1975 and 1976 GMC Motor Homes. I find that just downright funny. But it might explain why the engine pad has the C3T code on it which was GM Export Undefined Use. Heck, might have been a motorhome engine at one point in its life.
Anyway, here are the pictures. This Carb will head for the shelf and will not be reused for this build. Have a use for it, let me know.


Best regards,
David
List# 8004
Date Code 2227
Holley Web site called this List 8004 or R8004 at Holley H4-4160 Carb.
Built in August, 1977.
Funny that Holley said it would have been used on 1975 and 1976 GMC Motor Homes. I find that just downright funny. But it might explain why the engine pad has the C3T code on it which was GM Export Undefined Use. Heck, might have been a motorhome engine at one point in its life.
Anyway, here are the pictures. This Carb will head for the shelf and will not be reused for this build. Have a use for it, let me know.
Best regards,
David
Thread Starter
Senior Member
Joined: Jan 2008
Posts: 12,146
Likes: 2,038
From: Easton, PA
St. Jude Donor '10
Engine tear down, day two...Pictures tell the story...goal today was to get the intake removed and the heads removed, then document and see what I have to work with...
Intake was a challenge but it is removed now and sitting on my bench.


Water pump had spiders nest in behind it but it too is removed now and sitting on my bench.


Once the intake was off the engine I noticed something strange in the area of the lift rods...I'll show you this on the second posting....stay tuned.
Intake was a challenge but it is removed now and sitting on my bench.
Water pump had spiders nest in behind it but it too is removed now and sitting on my bench.
Once the intake was off the engine I noticed something strange in the area of the lift rods...I'll show you this on the second posting....stay tuned.
Thread Starter
Senior Member
Joined: Jan 2008
Posts: 12,146
Likes: 2,038
From: Easton, PA
St. Jude Donor '10
Once the intake manifold was removed I took a few pictures of the lifter assembly to see how they had worn over time. More than one of the lift rods was showing signs of being warped, one rod was very easy to spot as having had a bad day. Needless to say these got a real workout in this engine.


Time to remove the heads and see what kind of mess might be sitting down in the cylinder bays...so lets get to it...
Time to remove the heads and see what kind of mess might be sitting down in the cylinder bays...so lets get to it...
Corvette Stories
The Best of Corvette for Corvette Enthusiasts

150 hp to 1,250 hp: Every Corvette Generation Compared by the Specs That Matter
Joe Kucinski
8 Coolest Corvette Pace Cars (and Replicas) of All Time
Verdad Gallardo
Top 10 Corvette Engines RANKED by Peak Torque (70+ Years of Muscle!)
Joe Kucinski
Corvette ZR1X Will Be Pacing the Indy 500, And Could Probably Race, Too!
Verdad Gallardo
Top 10 Corvettes Coming to Mecum Indy 2026!
Brett Foote
Top 10 C9 Corvette MUST-HAVES to Fix These C8 Generation Flaws!
Michael S. Palmer
10 Revolutionary 'Corvette Firsts' Most People Don't Know
Joe Kucinski
5 Reasons to Upgrade to an LS6-Powered Corvette; 5 Reasons to Stay LT2
Michael S. Palmer
2027 Corvette vs The World: Every C8 vs Its Closest Competitor
Joe Kucinski
Thread Starter
Senior Member
Joined: Jan 2008
Posts: 12,146
Likes: 2,038
From: Easton, PA
St. Jude Donor '10
The heads came off very easily with only minor issues. They are now resting on the floor next to the engine stand.

Cylinder opening on the driver side showed build up of grease and oil...we'll get these out in due time.

Cylinder opening on the passenger side showed the same type of build up of grease and oil, again, we'll get these out in due time.

I need to confirm the sequence best to follow from this point forward. Then I will make a plan and continue my disassembly process.

In the meantime I have parts on the bench I need to review, document and then put out of the way. I don't anticipate much chance of reusing any of these parts on the rebuild.


So that is as far as I got today, now I need to do a little more investigation and then make a plan for digging in deeper. Been fun so far.
Thanks for watching.
David
Cylinder opening on the driver side showed build up of grease and oil...we'll get these out in due time.
Cylinder opening on the passenger side showed the same type of build up of grease and oil, again, we'll get these out in due time.
I need to confirm the sequence best to follow from this point forward. Then I will make a plan and continue my disassembly process.
In the meantime I have parts on the bench I need to review, document and then put out of the way. I don't anticipate much chance of reusing any of these parts on the rebuild.
So that is as far as I got today, now I need to do a little more investigation and then make a plan for digging in deeper. Been fun so far.
Thanks for watching.
David


Drifting


Joined: Oct 2012
Posts: 1,524
Likes: 61
From: Medina Ohio
Good Job.
Next few steps of tear down would be to pull out the lifters from their bores. Remove balancer, timing cover, chain, and pull the cam out.
Next, spin the motor upside down on the stand (Drain oil first!) and remove the oil pan. You will then be at the final point of taking the rod caps off and removing the pistons with the rods connected. Then, remove the crank main caps and lift it out. You will then be to a bare block.
Thread Starter
Senior Member
Joined: Jan 2008
Posts: 12,146
Likes: 2,038
From: Easton, PA
St. Jude Donor '10
Thank you for your comments.
I removed the lifters last night and left them sitting on the block so I could look them over, but they are worn and will be replaced.

Next up, and my current progress stopper, is the engine balancer. I don't have the right tool for this job so I will have to locate one before pressing onward.

Engine is sitting over a drip pan now to catch any excess oil that will come out, so I am ready for it. Can't wait to proceed onward.
In the meantime I thought I might as well look up my water pump removed from the engine. It is the Corvette 330813.


Date code on the water pump is A279 which I believe makes it a January 27, 1979 water pump. Date doesn't really matter but condition does. Anyone have any thoughts on rebuilding one of these bad boys???

My search for a harmonic balancer puller begins...stay tuned and thanks for watching.
David Howard
I removed the lifters last night and left them sitting on the block so I could look them over, but they are worn and will be replaced.
Next up, and my current progress stopper, is the engine balancer. I don't have the right tool for this job so I will have to locate one before pressing onward.
Engine is sitting over a drip pan now to catch any excess oil that will come out, so I am ready for it. Can't wait to proceed onward.
In the meantime I thought I might as well look up my water pump removed from the engine. It is the Corvette 330813.
Date code on the water pump is A279 which I believe makes it a January 27, 1979 water pump. Date doesn't really matter but condition does. Anyone have any thoughts on rebuilding one of these bad boys???
My search for a harmonic balancer puller begins...stay tuned and thanks for watching.
David Howard


Thread Starter
Senior Member
Joined: Jan 2008
Posts: 12,146
Likes: 2,038
From: Easton, PA
St. Jude Donor '10
The title says it all...


When the harmonic balancer is removed I will follow the sequence shown above. Nicely laid out for me, so thank you for that.
Best regards,
David
When the harmonic balancer is removed I will follow the sequence shown above. Nicely laid out for me, so thank you for that.
Best regards,
David
Thread Starter
Senior Member
Joined: Jan 2008
Posts: 12,146
Likes: 2,038
From: Easton, PA
St. Jude Donor '10
I flipped engine over and let it drain into my drain pan...while draining I took a couple of pictures to show the condition of the pan, then another inside the pan for my records.


Then I started taking pictures of the internal oil pump to capture that data as well before digging into any aspect of the crankshaft, etc.


I wanted to catch all part numbers I could see on the various components so I started shooting pictures and writing down numbers for later research.
Then I started taking pictures of the internal oil pump to capture that data as well before digging into any aspect of the crankshaft, etc.
I wanted to catch all part numbers I could see on the various components so I started shooting pictures and writing down numbers for later research.
Thread Starter
Senior Member
Joined: Jan 2008
Posts: 12,146
Likes: 2,038
From: Easton, PA
St. Jude Donor '10
Can you ever have too many pictures??? I guess not, that is why I take so many of them, for later reference...so here is the crank area in detail.


And then some pictures of part numbers for research...in the next post.
And then some pictures of part numbers for research...in the next post.
Thread Starter
Senior Member
Joined: Jan 2008
Posts: 12,146
Likes: 2,038
From: Easton, PA
St. Jude Donor '10
Part numbers for research, which I will do tonight and if I discover anything new from this I will add it to the posting. So, as they say, stay tuned and I will be back to you soon.
Thank you to all.
David
3932442??? Or 8932442???

KF 2363??? or KF 2368??? or KF 2369???

GM37

5D K

Hard to see here but it is 5E K

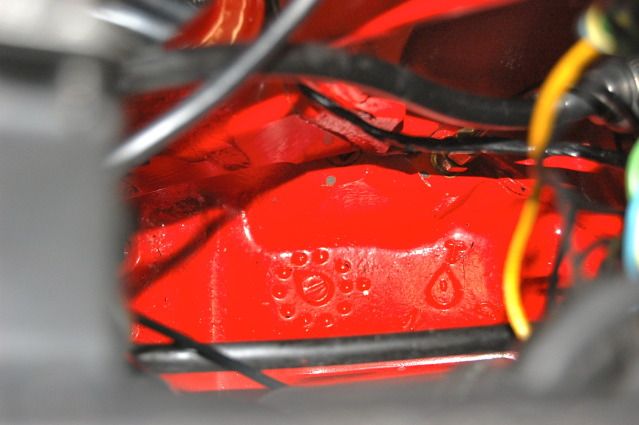
Engine Block Date code 8 A 20
Other symbols on the block:
A1 D N
Looks to be about 3 O'Clock. Not sure am or pm though.

So that is what I have for now, time to do some research.
Wrenching will wait until tomorrow when I have the harmonic balancer puller...
I am having a ball, I hope you are enjoying it as well...
Have a good evening.
David Howard
Thank you to all.
David
3932442??? Or 8932442???
KF 2363??? or KF 2368??? or KF 2369???
GM37
5D K
Hard to see here but it is 5E K
Engine Block Date code 8 A 20
Other symbols on the block:
A1 D N
Looks to be about 3 O'Clock. Not sure am or pm though.
So that is what I have for now, time to do some research.
Wrenching will wait until tomorrow when I have the harmonic balancer puller...
I am having a ball, I hope you are enjoying it as well...
Have a good evening.
David Howard

Thread Starter
Senior Member
Joined: Jan 2008
Posts: 12,146
Likes: 2,038
From: Easton, PA
St. Jude Donor '10
Thanks for any and all help...
Best regards,
David