When you click on links to various merchants on this site and make a purchase, this can result in this site earning a commission. Affiliate programs and affiliations include, but are not limited to, the eBay Partner Network.
Started the removal of the factory 350 today, as it finally cooled off and no family visits scheduled until December.
A good start as the sun rose;
Everything was disconnecting/coming out fine, until it was time to remove the radiator shroud. What a Bitch! It was hanging up right there, on the Left Upper A-Arm Shaft.
But after a lot of force and not giving up, it came out. Can't remember it going in that hard.
All disconnected, ready for the chains & crane.
But since it's almost 3 (my quitting time), I'm done for the day. Good progress and nothing broken.
More to follow.
Steve
Are you putting in another engine, or rebuilding this one?
Are you putting in another engine, or rebuilding this one?
Imariver,
Both!
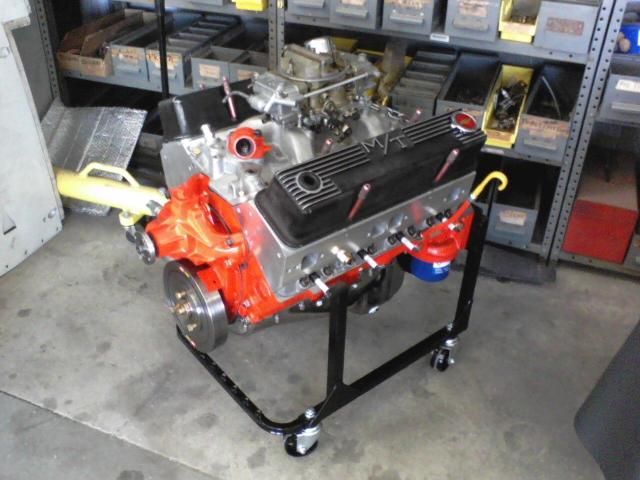
That 190 HP engine is the one that came with the car when it was made in St. Louis. 67 thousand miles are on it and it consumes a little oil. I will rebuild it, but after that, it's going in storage and staying with the car. That's because I want to install this:
It's a SB 4-Bolt Main from a '76 C-10 with a Skip White 383 kit. I documented the build of this engine somewhere here, but I can't find the thread on it right now. Was a hoot putting it together: now's the time to see how I really did.
I have just reinstalled my engine in my 73 about 2 weeks ago.
From the trouble I have removing it, I found that the easiest way
is to remove the radiator as a unit. I had to replace my radiator and
when I reinstalled the engine, I then installed the radiator and shroud as one.
Made it up then after engine and trans in, I then installed the shroud and
radiator as one.
Just three bolts on each side and two on the bottom mounts the
radiator support.
I can sure believe you on that! I will go ahead and remove the radiator, assemble the shroud onto it, and put it back in as one after the engine is in. It'll give me more room anyway with it outta there.
Not a hijack- but what kind of bushing is that, is it cracked, what's smeared over the surface?
Mike,
A little story about that.
I had a local Corvette shop (been in business a long time) install the bushings and torque down the ends for me. They talked me into their genuine bushings, recommending I throw mine (new, aftermarket, & came with the project) away. Knowing nothing about it, I let them put theirs on, all around. "Yours have a history of backing out the end cap. You'll just be doing this again. We've never had any of ours do that in all my years here. Never." And of course they were expensive.
After 4 months, I took the car in for some little stuff. The manager checked the car over and pointed out to me more work had to be done. "Your forward upper A-arm bushing is backing out the cap. You'll have to take care of that." I left the car with him, and when I got home, looked up the receipt, and took it back to him, showing that it was he and his bushings that backed out. He was honestly speechless after he found his copy of the receipt/work order.
Anyway, what you see there Mike is his work, or re-work, of that bushing. Maybe it's Lubriplate.
After I unbolted the converter, I believed the engine side mounts had to come off the block first, as the engine could not be brought high enough so as to clear the bottom frame and not put too much angular stress on the back portion of the engine-transmission mating surfaces.
And some of those bolts were hard to reach.
The forward Mount-to-Block bolts were easy. The one on the left was even missing.
And the forward Mount-to-Block bolt could be reached easy.
But the rear and center Mount-to-Block bolts were a problem.
I found it necessary to remove the Exhaust Manifolds to get a wrench or socket torque on them.
But once the front mounts were free and lift applied to the block, the last two rear bolts came out and it started to separate.
Forward and up, little by little, and out it came.
Bolted the engine stand jig to it first.
That Hoist Leveler is worth every penny, making fore & aft block adjustments a breeze.
Left now with this.
Next comes the cleaning of the engine bay, replace the converter (with a new seal), and perhaps the engine to transmission mating, if everything goes well. Otherwise, that can happen on day four.
I just left the motor mounts on my engine when I removed it and had no problem. Anyway, if I were you, I would attach the mount to the engine
and torque the bolts before I installed the engine. I also had my
trans rebuilt and when I got it back, I took the engine off of my stand and with it on the hoist, I attached the trans to the engine while the trans was in the back of my truck. It made it easy to mate the trans and torque the
3 bolts with the weight of the trans on the tailgate. With the auto cross member removable, it is easy to install the engine and trans together.
I had the same type of engine leveler as in your photo and just adjusted the angle as I went in with the engine and it sat right down on the motor
mount on the frame. I also used a jack to lift the back of the trans and when the engine was in the mount, just reattached the cross member.
I also installed the starter, fuel pump, alternator, and exhaust manifold
before installing the engine. It made it easy to mount and torque without
having to crawl around under the frame.
I know this is long, but thought I would let you know how I did mine.
This is the engine before install minus the exhaust pipe, fan, and air breather.
The GM book says "Remove the starter.", and I wondered "Why?". That mother is heavy, and working on your back? Not easy. And apparently Not Necessary. It's going on the block before engine installation.
I wasn't sure the angle required to raise the bottom half of the motor mount out of the frame was safe for the engine's rear. I guess now it is. New Motor Mounts going on the block first.
And now then, Yes, I'll install the exhaust manifolds too while the engine is off. I've actually got a set of huge headers, but that's a project for a later time.
That Fuel Pump looked awfully close to the aft Upper A-Arm shaft end. That's why I removed it before pulling the engine. And yeah, I know installing that thing is 10 times harder than removing it with the engine in. Was for me anyway, a few month's ago.
No doubt about it; the more I can install on that block while it's out, the better!
Installed the Starter, Engine Mounts, Water Pump, and Sparkplug Heat Shields on the 383 today.
No. That's my Bud Light Tool Box.
Cleaned up the engine bay and R&R'd the Torque Converter.
The stock '73 Torque Converter: After pulling it out, I was able to drain almost 2 quarts of ATF out of it.
However, the replacement TQ is much smaller, and I could only get about 28 oz. into it. I will expect to add some ATF once it starts and warms up a bit. Once the TQ's notches were indexed with it's transmission tangs, it seated fully in.
Engine going in Monday. I don't work the weekends.
Exasperated. Or in other words, Really Pissed Off!
I spent a big portion of the day prepping and then installing the 383 into this '73 with a TH400.
Got the engine settled on it's front mounts, and all the rear Trans Case to Block bolts started, but the gap there wasn't closing easily, and I was putting some pretty good torque on them. Didn't seem right.
This Converter is a lot smaller in diameter than the one I replaced. The old one had tapped holes in 3 "pads" that accepted the Flexplate
bolts. This new one didn't. Instead, it has a 3-winged plate with untapped oblong holes, for bolt and nut attachment.
I backed out all Engine-to-Trans bolts, and rotated the converter so as to line up it's holes to the flexplate holes:
The flexplate's holes range outside of the Converter's oblong holes. Man, was I pissed!
But once I figured out the flex plate had a different and correct pattern for the converter, all was well.
I am absolutely sure the new converter is seated properly into the transmission, with the tangs and slots engaged correctly.
But what I am guilty of: I took the manufacturer's word on fitment and not comparing both flexplates and converters with the old before installing.
At any rate, I am rewarded with having to remove the engine, compare parts, and see what's AFU.
After reseating the converter to where it should seat, I can proceed.
After dropping the new motor in
and attaching/hooking all back into place Monday,
I approached the car this morning at sunrise for it's initial cam break-in run and test drive.
After checking all fluid levels, the engine/car performed flawlessly!
The test drive was something in itself as well. This kit was balanced so well; at stop signs, you cannot even tell the engine is running! Absolutely NO vibration of any magnitude perceived. Just incredible.
Oh, I'm tempted to see what this engine will do as far as real power is concerned, but I'd better wait a few hundred miles first.
Have to thank my Guard Cats for watchin' the house while I toiled away at the "shop".
You can never have enough good "Guard Cats"
Lot's of good tid-bits of info in this thread. I have never pulled an engine out of any vehicle before, so all this info will come in handy.
My L-48 has over 116K miles on it's original engine, so it's due for an up-grade.