
Painting dash parts
 01-05-2015, 07:12 PM
#1
Instructor

Thread Starter
Got all my metal dash parts sanded, primed and painted. Looking forward to removing the tape and letting the chrome shine.
Question do I need to use clear coat over the finished product or go with out it?
Thoughts?
Question do I need to use clear coat over the finished product or go with out it?
Thoughts?

 01-06-2015, 02:06 AM
#3
Nam Labrat


Member Since: Sep 2013
Location: New Orleans Loo-z-anna
Posts: 33,899
Received 4,179 Likes
on
2,739 Posts


 01-06-2015, 09:31 AM
#5
Instructor
Thread Starter
JD78,
I searched the forum and came up with many different answers on the correct color and which manufacture to use. I ended up using Krylon black satin. Here are the steps I took:
1. used paint remove to remove old paint
2. hand sanded rough areas with #600 sandpaper
3. taped off all chrome that I wanted exposed including recessed gauge
areas
4. 3 coats of primer
5. 3 to 4 light coats of Krylon satin (purchased at Walmart)
6. left setting under flood lamps for several hours (just seemed like a
good thing to do)
Will post pictures of finished product soon.
01-06-2015, 09:46 AM
#6
Drifting

Hi LRB,
Your interior trim parts look great.
Id be interested in how you taped off the trim / chrome.
I have my heater / AC controller out and I'm getting ready to paint some of the parts today or tomorrow.
I was going to first try to paint the part then use a razor blade to remove the paint from the trim, but if taping the trim ends up with better results then I would go that route.
 01-06-2015, 10:25 AM
#8
Instructor
Thread Starter
Thanks GPGG70,
It did take a while to put the tape on, but I was concerned with scratching the paint off the chrome or using paint remover.
I just took some painters tape and a xacto knife or precision knife and covered everything that I wanted to keep chrome by covering it with tape and trimming as needed. I did everything except for the letters and I will need to scrap them.
It took me about an hour, but I think it was well worth the time. I even taped the recessed edges of the gauges for a different look.
 01-06-2015, 01:01 PM
#10
Team Owner

Member Since: Sep 2006
Location: Westminster Maryland
Posts: 30,173
Likes: 0
Received 2,878 Likes
on
2,515 Posts

Hi LRB,
Very Nice Results.
If I may I'll add that it's good to not get too much build up of paint on the parts.
Originally the parts were painted without the use of any primer.
The original Krylon #1613 is lacquer, as the original paint was, and seems to adhere to the chrome plating quite well without primer.
Regards,
Alan
01-06-2015, 01:06 PM
#11
Instructor
Thread Starter
Thanks Alan 71,
I hope I did not put too much paint on. The paint I used was not lacquer and I wanted to make sure I got a smooth finish. I am happen with the results, just hopes it holds up. That is why I was thinking to add a clear coat over it.
I hope I did not put too much paint on. The paint I used was not lacquer and I wanted to make sure I got a smooth finish. I am happen with the results, just hopes it holds up. That is why I was thinking to add a clear coat over it.
01-06-2015, 04:56 PM
#13
Burning Brakes


I took a dremmel with a wire wheel to the lettering and other raised areas to remove the paint and the chrome shined through, it also polished up the chrome nicely the only downside is the very small wire slivers so be really carefull of where you do it. I still get the occasional sliver from a piece of stainless in my sock.

 01-06-2015, 08:53 PM
#14
Nam Labrat
Member Since: Sep 2013
Location: New Orleans Loo-z-anna
Posts: 33,899
Received 4,179 Likes
on
2,739 Posts
I took a dremmel with a wire wheel to the lettering and other raised areas to remove the paint and the chrome shined through, it also polished up the chrome nicely the only downside is the very small wire slivers so be really carefull of where you do it. I still get the occasional sliver from a piece of stainless in my sock.
 01-06-2015, 11:45 PM
#15
Drifting
A lot of great ideas here in this thread. Guess I need to fire up the old drimmel drill.
I do have an old gauge cluster and center moldings to practice on. Will work on the letters first.
I do have an old gauge cluster and center moldings to practice on. Will work on the letters first.
01-07-2015, 10:53 AM
#16
Instructor
Thread Starter
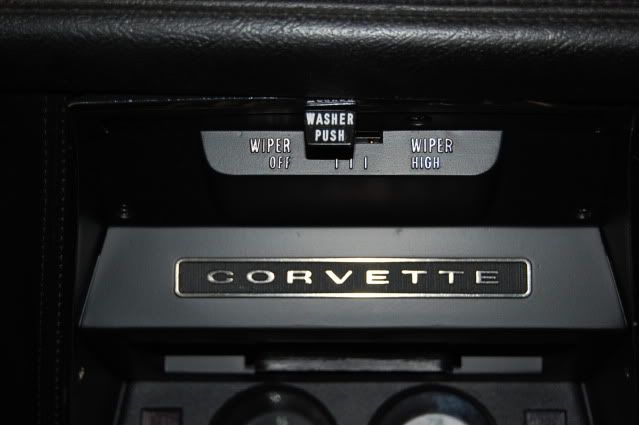
For my lettering I lightly scraped with an xacto knife and then used a silver sharpie (another secret I learned on this forum) to detail the letters. It is not perfect, but looks a lot better than they did before I started.
01-07-2015, 12:21 PM
#17
Team Owner
Member Since: Sep 2006
Location: Westminster Maryland
Posts: 30,173
Likes: 0
Received 2,878 Likes
on
2,515 Posts
Hi,
I still feel that using a blade from an x-acto set is a good method.
I use #11, #19, and #24 blades.
I think using tape leads to too much paint build up right at the taped edge. I find you end up being able to see the paint edge where the tape was removed.
It takes a little practice at first but when you learn just how long to wait after spraying it's pretty straight forward method.
Using Krylon #1613 (not #51613) makes it a bit easier because since the paint is lacquer you can see when it 'flashes' and you know that in 2 or 3 minutes it'll be ok to begin slicing the paint.
If you do it too soon the paint won't lift up off the chrome in stable clean 'strings'. If you wait too long the paint will have dried too much and will want to chip along the edge between the chrome and paint.
Regards,
Alan
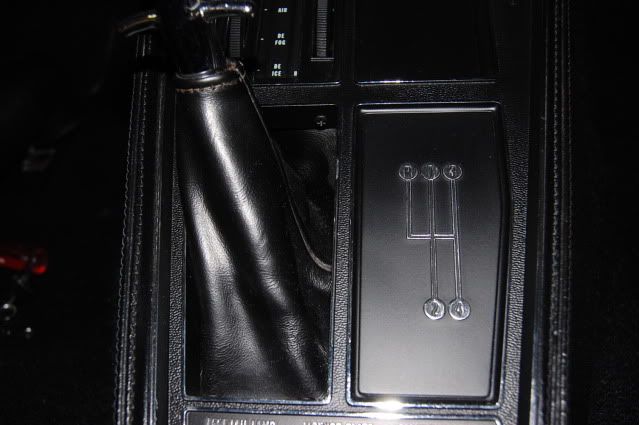
The logo and shift pattern were done with a blade too.
I still feel that using a blade from an x-acto set is a good method.
I use #11, #19, and #24 blades.
I think using tape leads to too much paint build up right at the taped edge. I find you end up being able to see the paint edge where the tape was removed.
It takes a little practice at first but when you learn just how long to wait after spraying it's pretty straight forward method.
Using Krylon #1613 (not #51613) makes it a bit easier because since the paint is lacquer you can see when it 'flashes' and you know that in 2 or 3 minutes it'll be ok to begin slicing the paint.
If you do it too soon the paint won't lift up off the chrome in stable clean 'strings'. If you wait too long the paint will have dried too much and will want to chip along the edge between the chrome and paint.
Regards,
Alan
The logo and shift pattern were done with a blade too.
01-07-2015, 12:43 PM
#18
Drifting
Hi,
I still feel that using a blade from an x-acto set is a good method.
I use #11, #19, and #24 blades.
I think using tape leads to too much paint build up right at the taped edge. I find you end up being able to see the paint edge where the tape was removed.
It takes a little practice at first but when you learn just how long to wait after spraying it's pretty straight forward method.
Using Krylon #1613 (not #51613) makes it a bit easier because since the paint is lacquer you can see when it 'flashes' and you know that in 2 or 3 minutes it'll be ok to begin slicing the paint.
If you do it too soon the paint won't lift up off the chrome in stable clean 'strings'. If you wait too long the paint will have dried too much and will want to chip along the edge between the chrome and paint.
Regards,
Alan
The logo and shift pattern were done with a blade too.
Mr. LRB, that looks great as well.
I'm going to have to go to the hardware store and buy an x-acto knife kit. I'm sure it will make a big difference. I'm currently using a box cutter utility knife.
A magnifying glass on a stand might help also.
Yesterday I did have the heater / AC controller face plate finished then looked at the final paint job and was not happy with the outcome.
Striped off the paint and starting over again. Going to change the paint I used as well. It's not kyrlon lacquer, but its what I'm going with. If I get finished tonight I'll send a pic.
Thanks for the information Guys.
01-07-2015, 01:34 PM
#19
Team Owner
Member Since: Jun 2000
Location: Southbound
Posts: 38,928
Likes: 0
Received 1,469 Likes
on
1,248 Posts
Cruise-In II Veteran
 01-07-2015, 03:34 PM
#20
Team Owner
Member Since: Sep 2006
Location: Westminster Maryland
Posts: 30,173
Likes: 0
Received 2,878 Likes
on
2,515 Posts
Hi,
The #11 blade which is most common is good for some places on the bezels�.. but the long tip makes it easier to accidentally nick the paint as you're slicing.
The #s 19 & 24 are a shorter angle and easier to control.
Good Luck!
Regards,
Alan
The #11 blade which is most common is good for some places on the bezels�.. but the long tip makes it easier to accidentally nick the paint as you're slicing.
The #s 19 & 24 are a shorter angle and easier to control.
Good Luck!
Regards,
Alan