


Time For More Forum Help!!!
Thread Starter
Burning Brakes


Joined: Aug 2011
Posts: 983
Likes: 35
From: Redding California
Let me start by thanking everyone here on the forum for years of answered questions as I journey along my first C3 resurrection. I bought this 68 coupe disassembled and it has been the most challenging "puzzle" I've ever encountered. The rolling chassis is finished and I'm done with all major body work and want to put the body back on the chassis to assemble and fine tune the fitment since I haven't seen it together. I plan on wrapping the chassis in some sort of plastic to protect it during the painting. BUT... before I put the body back on I wanted to hear from the forum on what should and/or shouldn't be put on before the body goes on. The body is just a shell... I mean BARE!!! The heater/air conditioning box isn't even on it at this point. Should the radiator and support be put in first? Any wiring? I'd love to get every little piece of advise I could get as I prepare to do this. Especially the "I wish I'd have done 'X' before I put the body back on" kind of things. Thanks in advance, Jason. Oh... and stayed tuned for a fun new game of "What the hell is this?" Complete with pictures as I go through these boxes of parts that are supposed to go back on my car somewhere
2026 Loser of the Year


Joined: Sep 2013
Posts: 36,597
Likes: 7,046
From: New Or-leens Loo-z-anna
Sounds like a ton (and a half) of fun to me!
I'm a rookie rebuilding my first '68 (mostly in "reverse order" of how it should be done...LOL!)....
I'd say suspension/brakes/brake lines/fuel lines/battery cables/chassis wiring harnesses/E-brake cables/fuel tank/engine & transmission if available before the body is set in place.
Post pics as you progress.

Safety Car


Joined: Jun 2013
Posts: 4,399
Likes: 793
Let me start by thanking everyone here on the forum for years of answered questions as I journey along my first C3 resurrection. I bought this 68 coupe disassembled and it has been the most challenging "puzzle" I've ever encountered. The rolling chassis is finished and I'm done with all major body work and want to put the body back on the chassis to assemble and fine tune the fitment since I haven't seen it together. I plan on wrapping the chassis in some sort of plastic to protect it during the painting. BUT... before I put the body back on I wanted to hear from the forum on what should and/or shouldn't be put on before the body goes on. The body is just a shell... I mean BARE!!! The heater/air conditioning box isn't even on it at this point. Should the radiator and support be put in first? Any wiring? I'd love to get every little piece of advise I could get as I prepare to do this. Especially the "I wish I'd have done 'X' before I put the body back on" kind of things. Thanks in advance, Jason. Oh... and stayed tuned for a fun new game of "What the hell is this?" Complete with pictures as I go through these boxes of parts that are supposed to go back on my car somewhere
r
Team Owner


Joined: Sep 2006
Posts: 31,274
Likes: 4,366
From: Westminster Maryland
Hi 13,
You can really assemble as much or as little of the body as you wish.
The sequence I chose had nothing but the core support on the body but as much as I could think of on the frame.
As you prepare to put the body on remember the insulation blanket over the transmission, the foam collar just forward of the blanket, (did 68s have them?), and the foam seals just in front of the #2 body mounts.
The only things you really can't reach with the body on are the long fuel and brake lines. So make sure they're just as you want them.
Here are a couple of pictures.
Maybe they'll remind you of something to put on or take off.
Good Luck!
Regards,
Alan
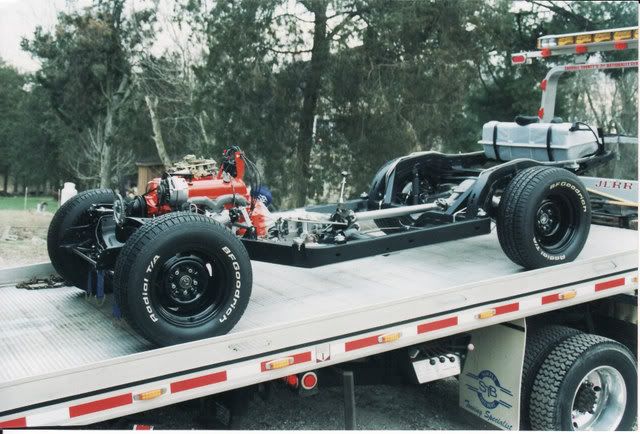
The completed chassis arriving to meet up with the body again.
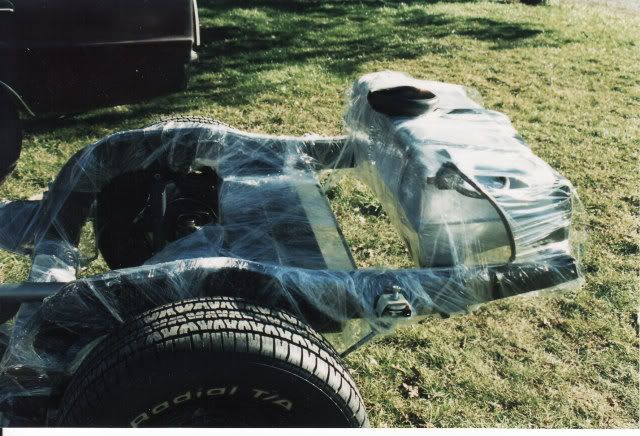
The chassis being wrapped.

Empty body being lowered on to chassis. Notice additional 12'x20' sheet of plastic.
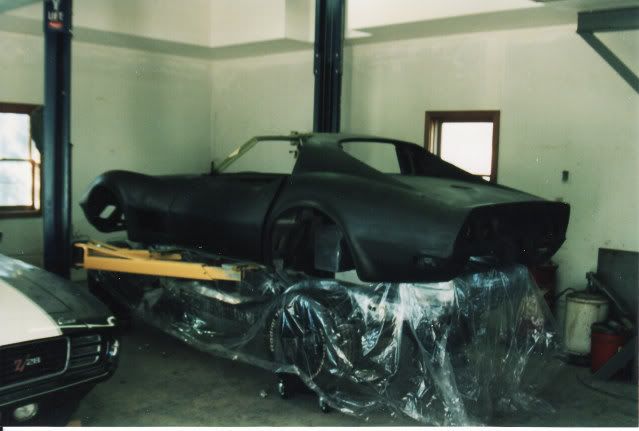
View of body coming down.

You can really assemble as much or as little of the body as you wish.
The sequence I chose had nothing but the core support on the body but as much as I could think of on the frame.
As you prepare to put the body on remember the insulation blanket over the transmission, the foam collar just forward of the blanket, (did 68s have them?), and the foam seals just in front of the #2 body mounts.
The only things you really can't reach with the body on are the long fuel and brake lines. So make sure they're just as you want them.
Here are a couple of pictures.
Maybe they'll remind you of something to put on or take off.
Good Luck!
Regards,
Alan
The completed chassis arriving to meet up with the body again.
The chassis being wrapped.
Empty body being lowered on to chassis. Notice additional 12'x20' sheet of plastic.
View of body coming down.
Safety Car
Joined: Jun 2013
Posts: 4,399
Likes: 793
Hi 13,
You can really assemble as much or as little of the body as you wish.
The sequence I chose had nothing but the core support on the body but as much as I could think of on the frame.
As you prepare to put the body on remember the insulation blanket over the transmission, the foam collar just forward of the blanket, (did 68s have them?), and the foam seals just in front of the #2 body mounts.
The only things you really can't reach with the body on are the long fuel and brake lines. So make sure they're just as you want them.
Here are a couple of pictures.
Maybe they'll remind you of something to put on or take off.
Good Luck!
Regards,
Alan
The completed chassis arriving to meet up with the body again.
The chassis being wrapped.
Empty body being lowered on to chassis. Notice additional 12'x20' sheet of plastic.
View of body coming down.
r

Melting Slicks


Joined: Apr 2007
Posts: 3,189
Likes: 111
From: Tolland CT
I'd suggest installing the shifter, linkage, and tunnel insulation before dropping the body. You have open access to all you need with the body off including the slot in the shifter to insert the tool for alignment. If you wait until after the body is lowered, installing the shifter is a miserable job (assuming 4 speed). The tunnel insulation would need to be installed prior to installing the shifter unless you plan to cut a slot to get around the shifter. If you have an automatic, this may not be such an issue. 

Safety Car


Joined: Dec 1999
Posts: 3,602
Likes: 837
From: PA
I'd suggest installing the shifter, linkage, and tunnel insulation before dropping the body. You have open access to all you need with the body off including the slot in the shifter to insert the tool for alignment. If you wait until after the body is lowered, installing the shifter is a miserable job (assuming 4 speed). The tunnel insulation would need to be installed prior to installing the shifter unless you plan to cut a slot to get around the shifter. If you have an automatic, this may not be such an issue.
I'd also make sure the positive battery cable is installed as well.
Alan,
Not to get too far off topic, but is that John M.'s shop in your photos?
Nice photo documentation as always!
Regards,
Stan Falenski
Corvette Stories
The Best of Corvette for Corvette Enthusiasts

Top 10 Most Expensive Corvettes Ever Sold on Bring A Trailer
Brett Foote
10 Things Every Corvette Owner Needs (2026 Edition)
Michael S. Palmer
8 Most "Only Corvette Owners Understand" Quirks and Problems
Pouria Savadkouei
10 Reasons the C6 Z06 is Still A Performance Benchmark After 20 Years
Joe Kucinski
How Much Horsepower Every Corvette Engine "LOST" in 1972
Joe Kucinski
Top 10 DOs and DON'Ts for Protecting Your Convertible Top!
Michael S. Palmer
Top 10 Most Explosive Corvettes Ever Made: Power-to-Weight Ratio Ranked!
Joe Kucinski
150 hp to 1,250 hp: Every Corvette Generation Compared by the Specs That Matter
Joe Kucinski
8 Coolest Corvette Pace Cars (and Replicas) of All Time
Verdad GallardoTeam Owner
Joined: Sep 2006
Posts: 31,274
Likes: 4,366
From: Westminster Maryland
Hi Stan,
Yes that's John's shop.
My car was in pretty nice company back then.
John had that RS you see, and a 67 427 Convertible (I'm not sure how much of it was real), and a Nova L79, both parked next to the RS.
He use to kid that they were his 'retirement account'.
Regards,
Alan
Yes that's John's shop.
My car was in pretty nice company back then.
John had that RS you see, and a 67 427 Convertible (I'm not sure how much of it was real), and a Nova L79, both parked next to the RS.
He use to kid that they were his 'retirement account'.
Regards,
Alan
Safety Car
Joined: Dec 1999
Posts: 3,602
Likes: 837
From: PA
Alan,
Look familiar?

John and Mike assisted me in getting the body back on the LS-6 at John's shop.
Back on topic, if the engine is already installed in the chassis, take off the fan and pulleys and install the radiator/shroud with the body. Much easier to do than try to install later (the radiator is easy, the shroud, not so much).
Regards,
Stan
Look familiar?
John and Mike assisted me in getting the body back on the LS-6 at John's shop.
Back on topic, if the engine is already installed in the chassis, take off the fan and pulleys and install the radiator/shroud with the body. Much easier to do than try to install later (the radiator is easy, the shroud, not so much).
Regards,
Stan
Team Owner
Joined: Sep 2006
Posts: 31,274
Likes: 4,366
From: Westminster Maryland
Hi dmax,
I'm afraid it wouldn't be much of a book. It would be very limited�.. nothing about convertibles, big blocks, or options like a/c, p/s, p/b, automatic, etc., so wouldn't be very useful.
When I began there were no digital cameras so the picture selection is quite 'thin'. About 750.
LOTS of pictures the last 5 years, but of just specific things. About 5500.
If I was starting now it would be different.
Regards,
Alan
Last edited by Alan 71; Feb 24, 2015 at 01:32 PM.
Thread Starter
Burning Brakes
Joined: Aug 2011
Posts: 983
Likes: 35
From: Redding California
Many great suggestions so far. Thank you. It's an automatic car so I'm safe from the linkage fiasco. I'll take a look at the AIM about your suggestion Rowdy. But, just for clarification (I've never seen my car together...), does the radiator/shroud get installed on the chassis or is it installed on the body somehow and lowered onto the chassis with the body? Alan... great pictures as always. Do you have any close ups of the outer grille areas just below where the lower portion of the bumper would be? I did some repairs in those areas a while back and I noticed in one of your pictures that there's a little "gap" (for a lack of a better term) just below the front bumper and at the top of where the grille moldings would terminate.
Melting Slicks

Joined: Nov 2010
Posts: 3,363
Likes: 32
From: Bowtie, Pennsyltucky
St. Jude Donor '13-'14-'15,'21
I didn't install the cable for the ignition/shifter interlock and the reverse light switch on my 4-speed car, and what would have been a half-hour job on a bare chassis, turned into a real pita with the body on.
Safety Car
Joined: Dec 1999
Posts: 3,602
Likes: 837
From: PA
I'll take a look at the AIM about your suggestion Rowdy. But, just for clarification (I've never seen my car together...), does the radiator/shroud get installed on the chassis or is it installed on the body somehow and lowered onto the chassis with the body? Alan... great pictures as always. Do you have any close ups of the outer grille areas just below where the lower portion of the bumper would be? I did some repairs in those areas a while back and I noticed in one of your pictures that there's a little "gap" (for a lack of a better term) just below the front bumper and at the top of where the grille moldings would terminate.
One other point... Make sure that the bolts for the upper forward control arm bushings are in place and screwed in most of the way. You may not be able to install them once the fan shroud is in place.
If the gap you are referring to is in the center of where the bumper mounts, that is where the support bracket meets the bumper for mounting purposes. If you are talking about something else, I need further explanation.
Regards,
Stan
Safety Car
Joined: Dec 1999
Posts: 3,602
Likes: 837
From: PA
If you have a four speed car, get everything done in this area before the body goes back on. Make sure the actual transmission rods are rough adjusted, have the interlock cable in place with all retainers and cotter pin installed, hook up the back up switch and install those little hair pin clips.
As Mick71 and BBCorv70 have already said, quick and easy to do out in the open, but will drive you nuts if you have to do it with the body back on the car.
Regards,
Stan
Team Owner
Joined: Sep 2006
Posts: 31,274
Likes: 4,366
From: Westminster Maryland
Hi,
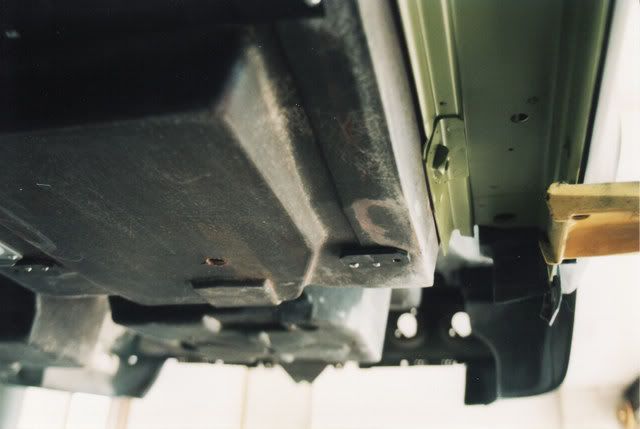
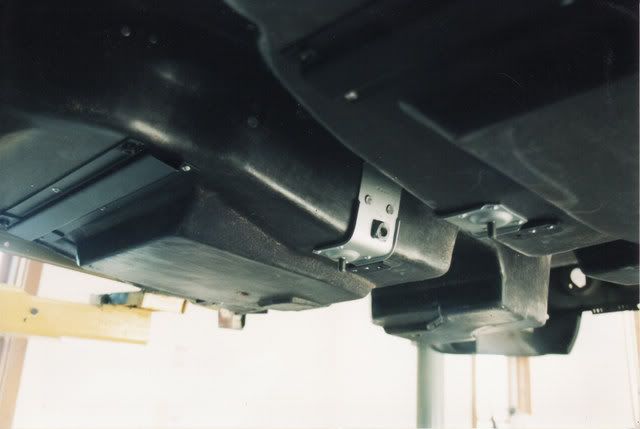
Maybe either of these 'gaps'?
Regards,
Alan
Upper outer corner of opening for grill.
Same both left & right.

Lower inner corner of opening for grill. The gap allows the bumperette to mount snugly against the grill opening in order for it to align with the bottom trim on the grill itself.
The picture is taken from inside the lower right side valance opening looking forward and toward the center of the car.

Maybe either of these 'gaps'?
Regards,
Alan
Upper outer corner of opening for grill.
Same both left & right.
Lower inner corner of opening for grill. The gap allows the bumperette to mount snugly against the grill opening in order for it to align with the bottom trim on the grill itself.
The picture is taken from inside the lower right side valance opening looking forward and toward the center of the car.
Thread Starter
Burning Brakes
Joined: Aug 2011
Posts: 983
Likes: 35
From: Redding California
I believe it's the top photo I was wondering about. What's that little cut out that's just below the bumper for? I was going to glass over it thinking it got damaged years ago.
Melting Slicks


Joined: Jul 2001
Posts: 2,609
Likes: 12
From: Massapequa Park NY
On other item to install before dropping the body is the positive battery cable.
Jim