When you click on links to various merchants on this site and make a purchase, this can result in this site earning a commission. Affiliate programs and affiliations include, but are not limited to, the eBay Partner Network.
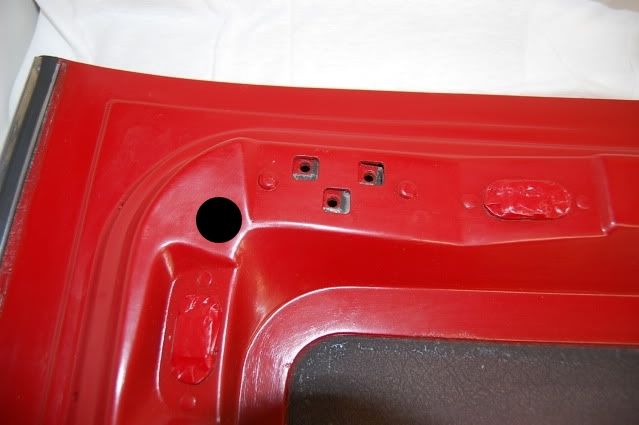
I guess these pieces aren't normally taken apart. I've separated the two halves of my passenger side T-Top.
The internal parts (strips of metal the rivets attach to and the headliner clips screw into, & the brackets used to hold the threaded plates for the centering spades and guide pin) are rusted badly - one has detached and was floating around loose inside the T-Top with all the other rust that had collected over the years.
I can't find anyone that supplies these pieces. Nor can I find any information in any of my books they show these parts.
Any suggestions before I start making my own?
Pass Side T-Top, Lower part. Note the missing bracket in the inner front corner.
Pass Side T-Top, outer front corner. Most of the original internal parts are rusted away.
I would try a WTB ad for a complete t top with good parts. people seem to wind up with a one only more times than you might think.
FWIW, I also had the problem of several of these nuts being rusted to un-usability. I ground open the holes so I could remove them and ground down the base of a stainless T-Nut to slide into the hole I had opened up and used my trim to position them. Filled everything with JB Weld and everything worked fine.
With your success to the underside, I'm sure that you could either clean-up the brackets you removed (or fabricate new ones) and use modified T-Nuts and rivet them back in place. This would preserve the original design that allowed these fasteners to float in their cavities.
Last edited by Rotonda; Mar 19, 2015 at 06:19 AM.
Reason: addition
Thanks for the quick responses.
Tried cleanup - nearly rusted through. Buying new materials to make my own clips and fasten them with rivets - just like original. Even the judges won't know... as long as the re-gluing process goes well.
Just pulled out the T-Tops today and heard the hardware and rust rattling around on the inside. We thought there was no way to take the thing apart until we saw your post. YAY!
What did you use to separate the two parts? It looks like you used a hack saw blade. Any tips will be appreciated. What glue did you use to reattach?
Separating the two pieces requires a little guts and some patience. If there is an opening at the front, outside corner (this is where mine had started to separate), you can start with a hacksaw blade, and work your way partway around in both directions. Then use a 1" wide wood chisel on the inside glued joint. Break the seal, and work your way all the way around the T-Top. When using the chisel, there will be times when it sounds like you're breaking something, but it's just the fiberglass joint separating.
Once I replaced the rusted parts (I hand-crafted the parts using stainless steel I bought at my local ACE Hardware store) and rivets, I used a special fiberglass cement designed for gluing fiberglass panels together - comes in a caulk tube - 10 ounce size. Work quickly as this stuff sets up fast.
Clamp the pieces together so they can't slide around.
You need to make sure they are glued back in the same location they came from, so take notes on your disassembly. The bottom part at the rear and inside edges on my T-Tops were set inside the upper part by 3/16" to 1/4"
We have all the guts we need and hopefully all the skills. My husband is a mechanical engineer and I'm a cabinetmaker so the tools are no problem either.
Thanks for your detailed description. We are going to tackle it today. We'll let you know how it goes
Hi eg,
I certainly wouldn't un-bond the two parts of the roof panel just to get the things you hear rattling around out.
A well place hole drilled in a corner for instance makes getting the rattle out just a 5 minute job.
Regards,
Alan
Here's were I drilled mine. I didn't fill the hole because the roof panel soft trim covers the hole.
Unfortunately for us there was not one metal component in either top which was not completely rusted. Some of them had rusted through to the point that they weren't where they needed to be any more (rattling sound) My engineer/machinist husband will need to re make every part.
We got it off but we did a tiny bit of damage to the top section. I told him not to worry because we have lots of glass work to do on the whole body.
Did you know that the frame is made of fiberglass as well? We thought it was metal. Learn something new every day.
Hi eg,
I certainly wouldn't un-bond the two parts of the roof panel just to get the things you hear rattling around out.
A well place hole drilled in a corner for instance makes getting the rattle out just a 5 minute job.
I read in another thread on similar topic, that one member simply squirted some glue into a small hole, and whatever was rattling around inside got bonded. Another says he used an expanding foam to stop the little bits inside from rattling.
I have one little piece moving inside one of my tops, and am considering one of these methods.
I just started to get to the t-top restoration after a frame off complete birdcage refurbishment on my 1968 coupe. The best way to permanently address these rusted hardware bits is to separate the panels and make the new bits I went ahead and ordered �floating� cage nuts and will use these to replace the rusted hardware. As for separating the panels, using a heat gun to compromise the original adhesive and slowly work your way around the top panel preserves the two pieces without damage. Once the hardware components are repaired or replaced, then coat with your favorite rust preventative paint and join the two panels with 3M 8115 two part adhesive. As an added bonus, place a sheet of dynamat on the underside of the t-top between the vinyl cover and the top to reduce sound and heat�. All good
I just started to get to the t-top restoration after a frame off complete birdcage refurbishment on my 1968 coupe. The best way to permanently address these rusted hardware bits is to separate the panels and make the new bits I went ahead and ordered �floating� cage nuts and will use these to replace the rusted hardware. As for separating the panels, using a heat gun to compromise the original adhesive and slowly work your way around the top panel preserves the two pieces without damage. Once the hardware components are repaired or replaced, then coat with your favorite rust preventative paint and join the two panels with 3M 8115 two part adhesive. As an added bonus, place a sheet of dynamat on the underside of the t-top between the vinyl cover and the top to reduce sound and heat�. All good
FWIW You placed your 1st post in the Forum on a thread that hasn't seen the light of day in over 7 years. Welcome BTW