When you click on links to various merchants on this site and make a purchase, this can result in this site earning a commission. Affiliate programs and affiliations include, but are not limited to, the eBay Partner Network.
So after some long talks with the wife, we both came to the conclusion that it would be better to start the long road to restoration, and build the car exactly the way I want, as opposed to punting it at a huge loss, and starting over....especially given the likelyhood of undetected issues in even the best of C3s.
All that being said, the plan for now is to push forward with getting the body prepped to come off the frame. Ive been talking with forum member DUB, who has a shop down in Charlotte. My plan for this winter is to get the body 90% of the way to being ready to lift, and then trailer the entire car down to his place where he'll remove the body bolts, lift the body, and address any/all bird cage issues. After thats taken care of, he'll drop the body back on the original frame, and Ill bring it back home, lift it off again, put it on a dolly in storage, and begin to address the rolling chassis. I only have a 1 car garage, so Ill be working on 1 half at a time.
Outside of that, I have a lot of ideas as to what Id like to do, but no definite plans. This is going to be a long, slow process with progress being limited by time and funds but Im not going to skimp....even if that means halting progress for a few months while I save up some additional cash for whatever widget I think best suits the car. This definitely isn't going to be an NCRS type restoration but more of an updating with the general appearance of originality (mostly).
Anyway, feel free to comment, voice you opinions, tell me Im an idiot (nothing my wife hasn't told me already), etc. Here are the pics from the initial progress of last weekend:
First of all, every project needs an assistant.....
First real issue.....how do you get the main instrument cluster out? I dropped the two bolts supporting the steering column, but it still doesn't drop enough to easily pull it out. Do you actually have to remove the steering column? (not that it matters, it needs to come out anyway)
Some previous handiwork....yes that chunk is held on with gorilla glue. Hopefully DUB can address the two chewed up corners from the painfully misaligned convertible top while its in his care.
Lastly, the #4 body mount cages....they actually don't look awful from the top, the bottom however is a different story. Since Im not going for originality, Ill probably drill out the corroded rivets, replace the cages, and bolt them into place. If someone has a better method, Im all ears.
Well don't you have your hands full. Make sure you get the AIM manual for that year car. It helps in seeing where stuff is and how it goes back on. Bag & tag everything. Take pictures like you are doing. We all like that plus you can see how things were before you removed it. I learned that THE HARD WAY! So here you go. Knowing what I know of how Dub works it should come back to you just fine.
ZIO
ZIO
Any car can be rebuilt with enough time and money. Your project really does not look that bad, I have seen way worse (mainly my own project).
Good luck, just realize that once you start you have to finish. It really will be hard to get rid off once you tear it apart. People don't like to buy projects that are half done unless it is at a steep discount.
Hi FN30,
Having EVERYTHING disconnected from the back of the driver's dash pad is necessary in order to 'angle' it enough to slip it out with the steering column still in place but dropped. Having the 2 bolts at the firewall removed helps the column drop a little further… have you loosened those?
Be very meticulous about bagging and labeling fasteners…. having to figure them out when you begin reassembly can be awfully frustrating.
I'm pleased to read that you've settled on this route.
It sounds like you have a thought-out plan that should get you through the pit falls that are part of dealing dealing with rust without falling completely in the holes and getting lost.
This should make a VERY nice 69 convertible based on some of the things I remember you've mentioned that you have in mind for it!
Good Luck!
Regards,
Alan
SAVE EVERYTHING and take 5 times the photos you think you should!
Inevitably when you start putting things back together you'll look for a picture to show you how something went together in detail and what you want to see is 1/2" to the left of what's in the picture the picture!
Any idea of approximate cost to get car where you are happy?
When done what do you think value of car will be?
Only asking cause I saw your sale post, you were asking 19.5k I believe, could you have sold car for 15k then add whatever restoration cost would be and buy one for that price? Saving you time and labor.
You made the same choice I would have. I think your project is quite doable with this forum, persistence and some coins. Plus you learn a lot, get tremendous satisfaction when complete.
On your steering column, please check Jim Shea's steering papers, I think you do not want to let the steering column just hang from the firewall unsupported. Also as suggested above, AIM would be helpful.
Pulling the steering column out is the way to go, double ck AIM, first support the steering column, remove 3 bolts to the adjustor bracket, unplug the harmonica, remove the cable on the swing arm inside the engine compartment (prevents starting in gear, I think), 2 bolts on the inside floor, and loosen up the rag joint and pull it out. Opens up all kinds of room and lessens the possibility of pulling on an old dash panel and cracking it.
...even if that means halting progress for a few months while I save up some additional cash for whatever widget I think best suits the car...
I have found that I can work for several months on my restoration without spending a dime (100+ hours easily). Once you have tools like a wire wheel, sand paper, fiberglass mat, resin, paint, VPA, etc..., you can go on and on...
Some days it seems like I am the only one here not tearing into their vette..
I mean I have started looking at the parts I want to order..but that's it.
Gary
Any idea of approximate cost to get car where you are happy?
When done what do you think value of car will be?
Only asking cause I saw your sale post, you were asking 19.5k I believe, could you have sold car for 15k then add whatever restoration cost would be and buy one for that price? Saving you time and labor.
Good luck on your project... You'll be glad you went this route in the long run. I'd recommend getting a digital camera (not your cell phone) and have that handy at all times during disassembly. Take plenty of photos, different angles of the same thing, and plenty during each step of disassembly. Download them into your computer often. Get your hands on a service manual and parts manual with exploded views and refer to them any time you disassemble. You'll be glad you did when it comes time to put everything back together and you have thousands of photos to help refresh your memory in a year from now.
Thanks guys, I appreciate all the input. So far, the interior at least has come apart relatively easily....although I question whoever did the previous interior restoration as their choice of fasteners was far from uniform.
As far as expense goes, the difference between purchase price and value at this point is a sunk cost. The cost to repair/build the car will, in the end, far exceed the value. That being said, I'm building this one to my taste as I looked long and hard for this specific car...which in the end, was one of the overriding factors in deciding not to sell.
I have no intention of repainting the car, at least not during this build. The paint is far from perfect, but there are no major issues (short of the ones pictured above), and this car is going to see a lot of milage when its finished, so I don't see the point at this time in investing the additional 15K for proper strip and paint job. Some day in the distant future perhaps.
I have an AIM on order, and look forward to getting painfully familiar with that publication as I go. Im new to the C3 restoration world, but have become very familiar with old car restoration in the past two years....
This is my daily driver...1972 Suburban C20 2WD that I spent a year rebuilding. The body and interior are all original, but every mechanical or electrical subsystem is brand new, including a 6.0L LS motor, 4L65E transmission, 4 wheel disc brakes, vintage A/C, etc, etc. Its my only car besides the vette, so it gets driven every day, rain or shine.
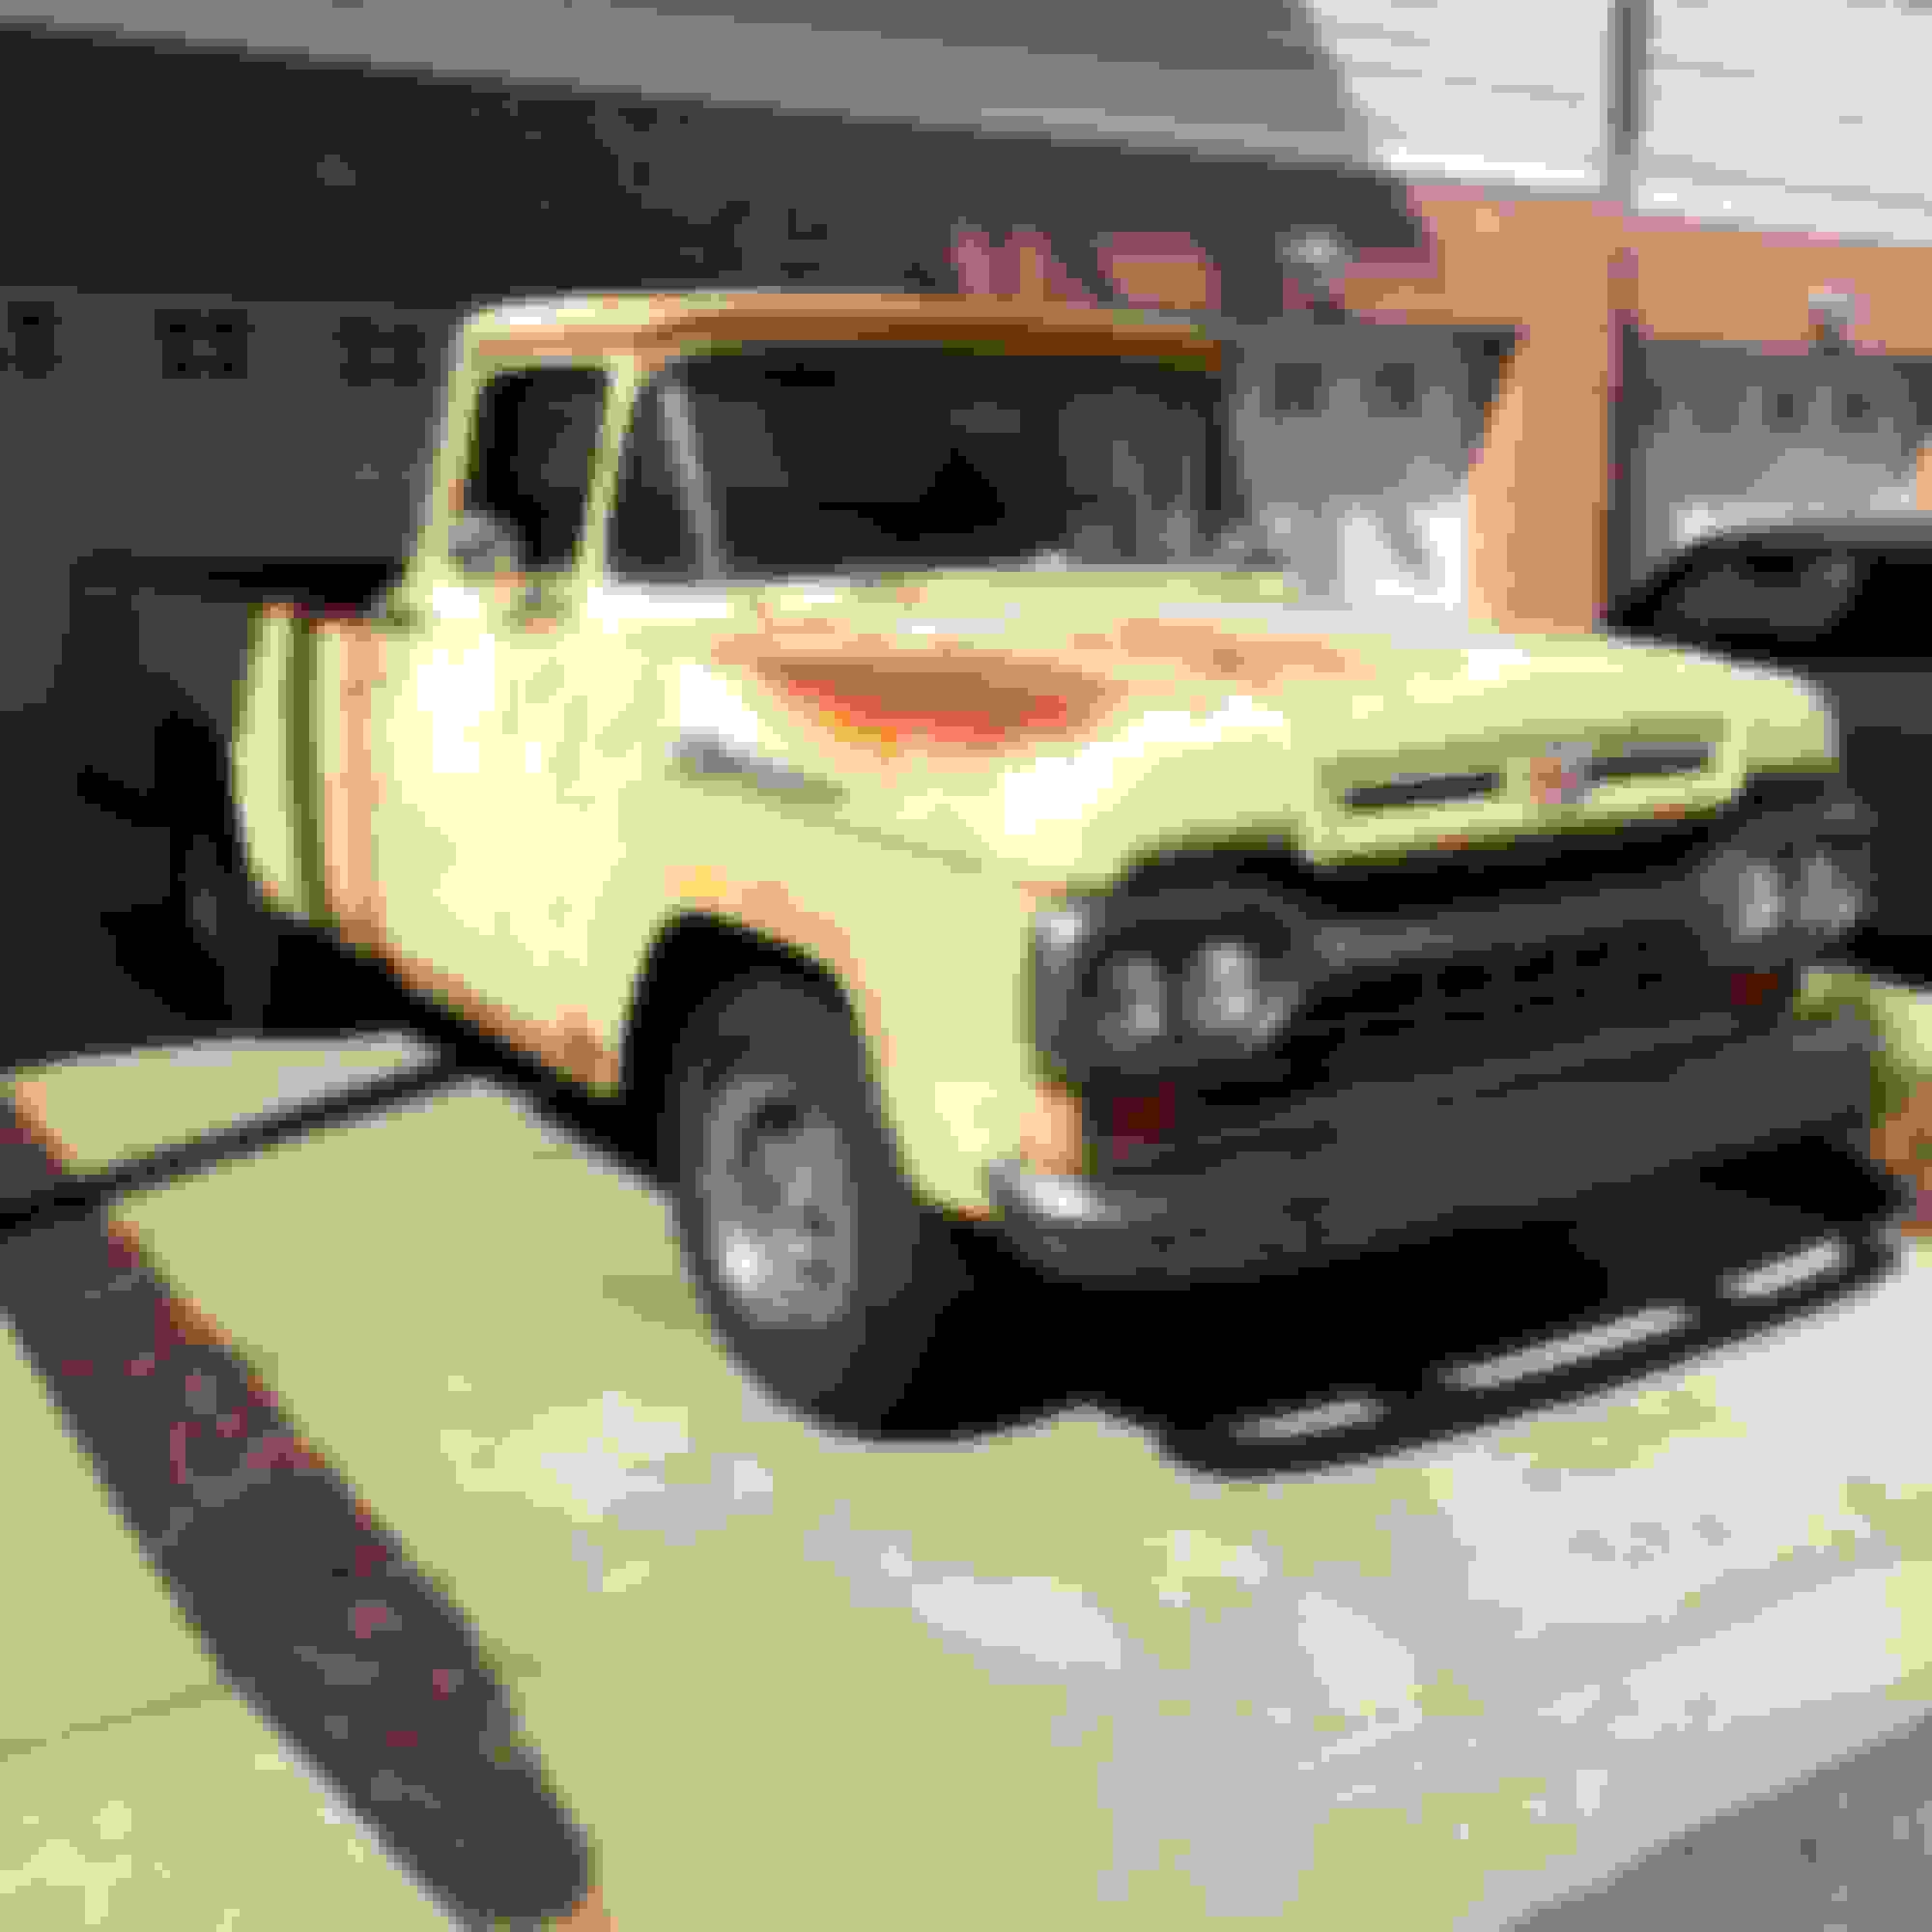
And this 1960 F100 we just finished for the family of a friend of mine. He unfortunately died in a helicopter crash off the VA coast in January of 2014. The truck had been in his family since new, and he had just started working on it with his boys the year prior. So a group of us from work started a fund, raised a bunch of money, and completely overhauled everything under the skin, but left the exterior. Original inline 6 was rebuilt, as was the 3 speed on the column, new wiring, converted from generator to alternator, gas tank moved from the cab to under the bed, all new interior, 4 wheel power disc brakes, it even has hidden blue tooth and USB port for iPhone charging.
Anyway, having read all of your build threads, I have no doubt this Vette will be far more complicated, time consuming, and frustrating than the two trucks combined, but at the end of the day, Ill end up with my perfect '69, and as I've learned with the Suburban, there is nothing more satisfying than driving a car that you build with your own hands.
Hi FN30,
Having EVERYTHING disconnected from the back of the driver's dash pad is necessary in order to 'angle' it enough to slip it out with the steering column still in place but dropped. Having the 2 bolts at the firewall removed helps the column drop a little further� have you loosened those?
Be very meticulous about bagging and labeling fasteners�. having to figure them out when you begin reassembly can be awfully frustrating.
I'm pleased to read that you've settled on this route.
It sounds like you have a thought-out plan that should get you through the pit falls that are part of dealing dealing with rust without falling completely in the holes and getting lost.
This should make a VERY nice 69 convertible based on some of the things I remember you've mentioned that you have in mind for it!
Good Luck!
Regards,
Alan
SAVE EVERYTHING and take 5 times the photos you think you should!
Inevitably when you start putting things back together you'll look for a picture to show you how something went together in detail and what you want to see is 1/2" to the left of what's in the picture the picture!

 12-03-2015, 05:43 PM