When you click on links to various merchants on this site and make a purchase, this can result in this site earning a commission. Affiliate programs and affiliations include, but are not limited to, the eBay Partner Network.
So now the vette is running halfway decent, has enough power to get around, but I"ve been noticing fairly consistent wet spots in the garage under the rear end:
Yep, turned out to be the pinion seal leaking. Plus my side yokes had alot of play in them, so I decided "guess I"ll learn how a differential works!". I had some email help from a guy who works on diffs for a living and he very kindly answered more than a few of my questions.
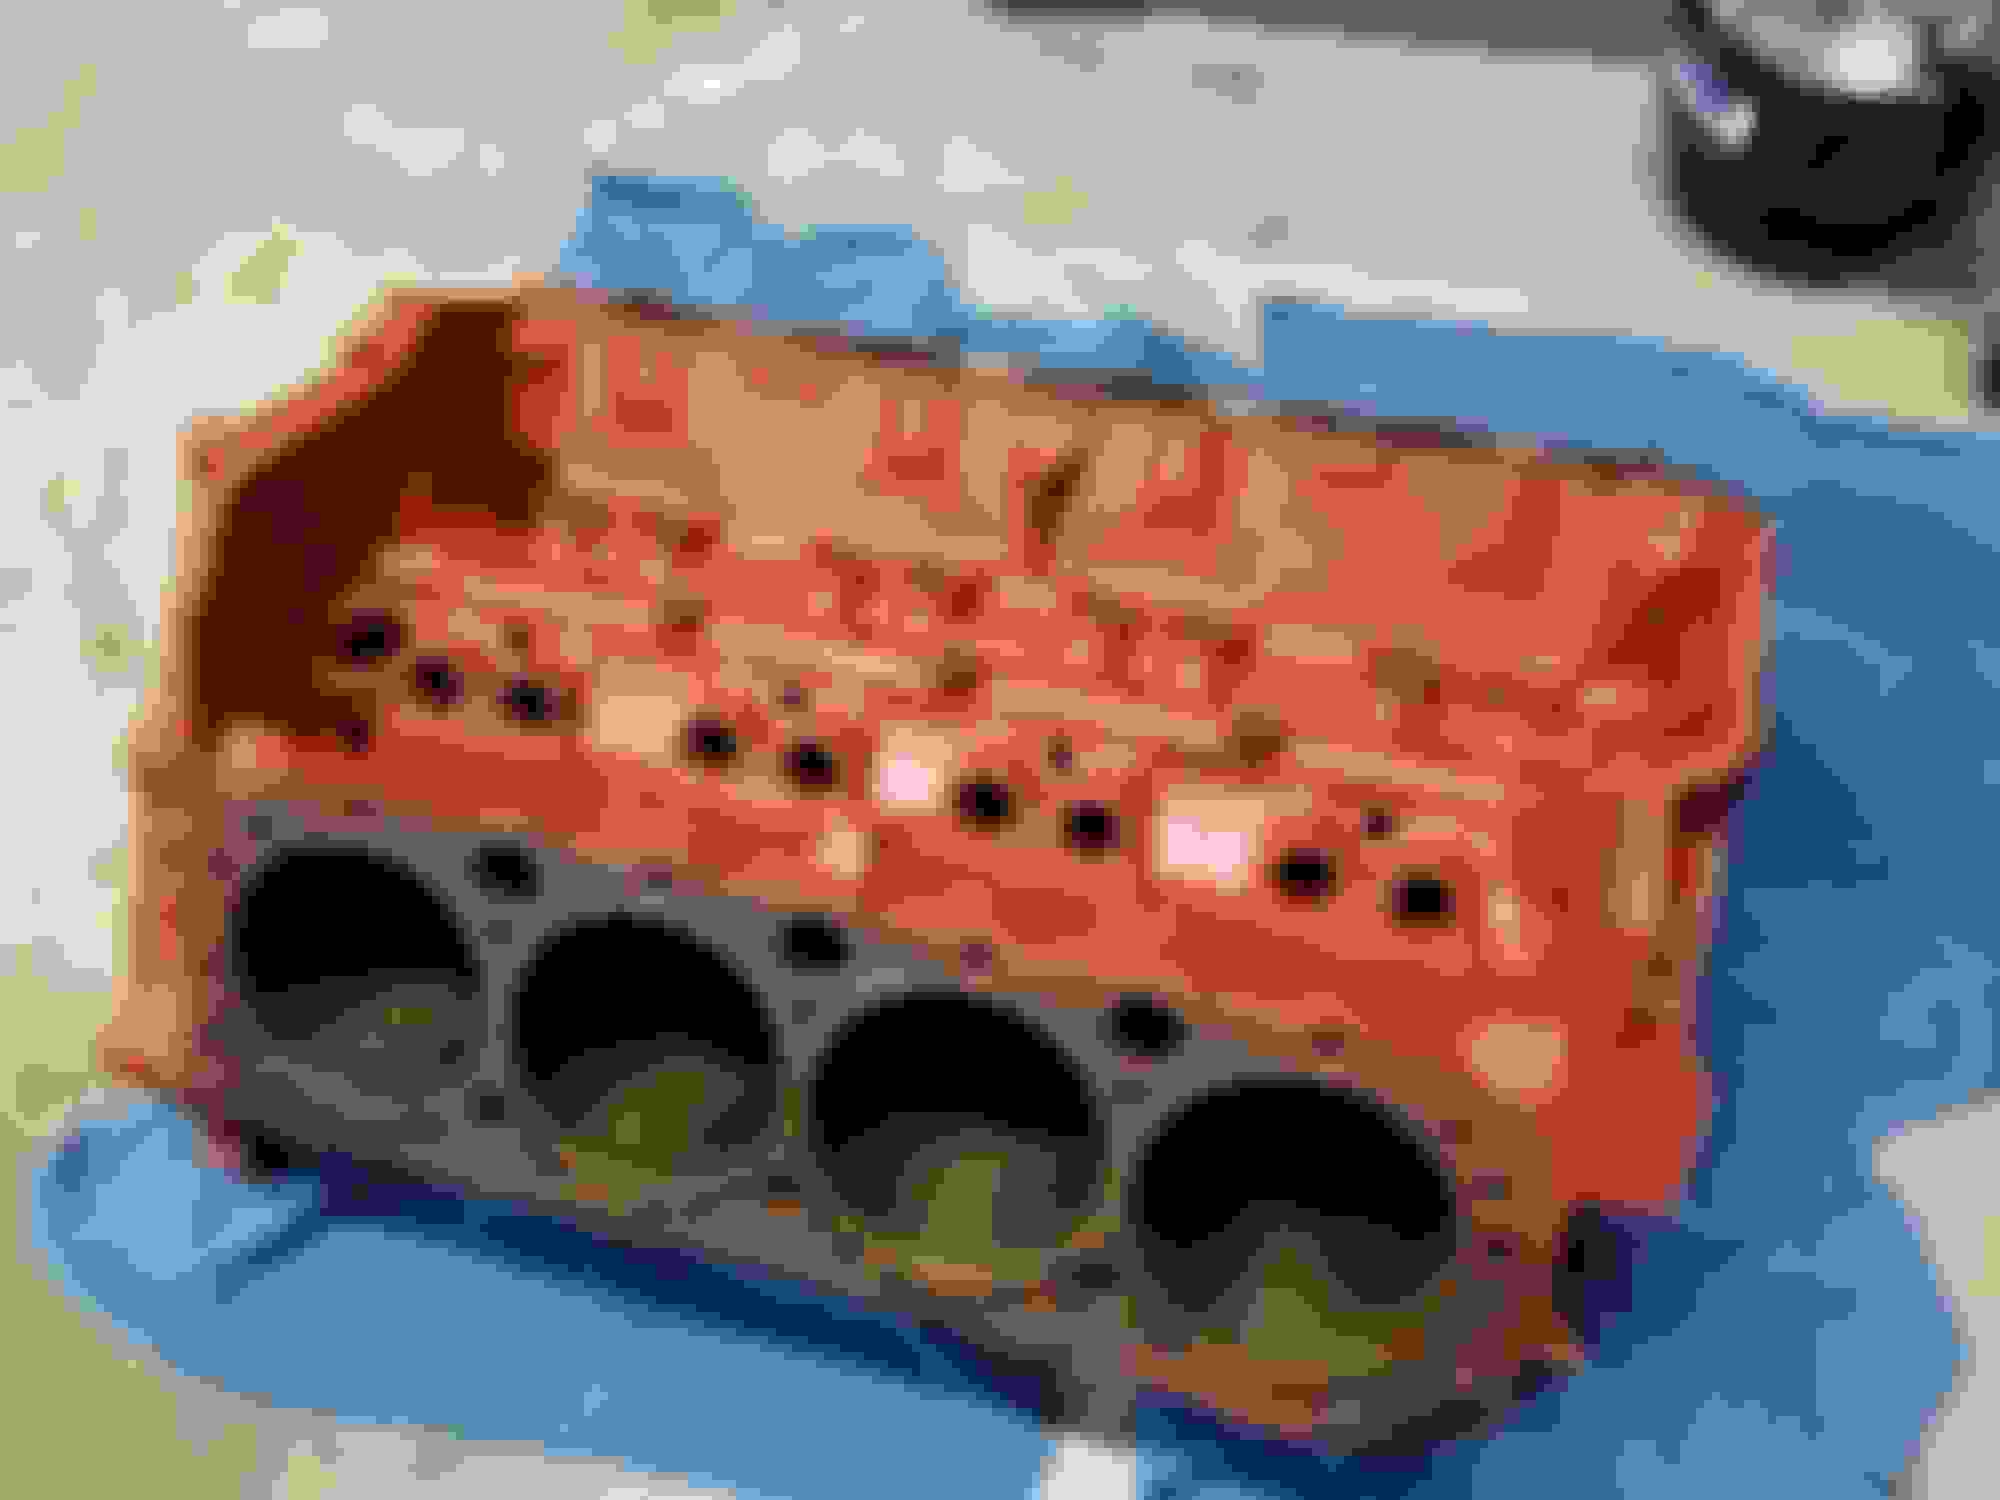
Got the diff out and cover off
The ring gear teeth actually look pretty decent
Replaced the ring gear bolts with ARP bolts for a little extra security
No real metal shavings or anything, my diff is actually in decent shape!
upgraded all the u-joints to 1350 Spicers and HD caps on the new side yokes so the rear end can handle a bit of extra power
Diff back in the car!
I have dreaded the day I would have to remove a differential and work on it, but it ended up not being that bad! Honestly anyone with a little bit of mechanical skill and a little bit of research could do the work I did. I'm sure ACTUALLY replacing the ring and pinion and shimming them and all that is harder though. Hopefully won't ever have to do that. But at least now I have a little security that my rear end is a little stronger than stock.
I forgot to take pictures of this, but obviously I DID change the pinion and both side yoke seals while the diff was out.
Great project, nice to read, I'm in the process of mounting my new diff in my car, nice to see someone elses project
Thanks! Yeah it's not nearly as hard as you'd think huh? I ended up putting the diff on a 2x4 on a floor jack and jacking it into position so I could bolt it in. Good luck with yours!
It�s awesome to own, work on and drive the cars of our childhood dreams...
Love the side pipes! Well done.
Thanks!
Yeah it's kind of a dream come true for me. It's a pain in the butt 90% of the time, but everytime I fire it up and hear that cammed motor rumble... it's all worth it
After getting the diff back in, I took a bit of a break from working on the vette for a couple months. My wife had some pretty major medical expenses and I had to miss alot of work to help take care of her. So the Vette wasn't even started for a while, and I was afraid I was going to have to sell it to pay bills. But thankfully, we made it through (or are still making it through) that financial difficulty and the vette is still around! In the meantime, my budget build got even more budget during that time and I did a bit of junkyarding for parts!
Nom nom, gravel
Any guesses what this use to be?
Another kind of fun experience during this time, my brother rented a C7 Z06 for a day for us to have some fun with. He has been a long time car enthusiast as well and him and I have always had a bit of a competition to see who owned the faster car.
Let me tell you, that C7 Z06 was an eye opener. The insane amount of power in that thing, I wouldn't trust most of the people I know to be able to drive that thing WOT without crashing it. But man it was a good time... and I knew right there that someway, somehow, my C3 was going to have at least 500hp to play with. It was just so much fun...
remember those things are driven by a computer so you dont kill yourself as soon as you turn the key. Glad you had some fun
Oh absolutely, you could actually FEEL it redirecting you to keep you going in a straight line under full throttle. It was a strange feeling, and it makes you feel like a much better driver than you are. It was pretty cool to feel the tail stepping out and then just easily coming back into line with no effort from me. I totally get the appeal of the C7 now, but when I hopped back in my old C3 a day later, I enjoyed the experience a lot more. The C7 may be a road rocket that I can start every day and fly down the street in, but the C3 I actually have to DRIVE. I have to pay attention.
Not to mention, I love the sound of my crackling and banging cammed gen 1 small block more than the scream of that LS.
Either way, mad respect for the new Z06, it is one heck of a car!
Just read this whole thread, and I have to say, I'm impressed with the progress you've made so far. Gotta love a 4 speed 79; I sure love driving mine!
Thanks! I appreciate it. Yeah it is a blast to drive!
Starting to collect parts to upgrade the front suspension, the car is actually a fairly good driver until you hit a twisty road that has bumps in it. Then I end up white knuckled on the steering wheel haha.
When I first got the car, the original oyster carpet was shredded and moldy and gross. My wife had no real desire to drive the car with how nasty the interior was.
I've never really wanted the oyster interior for my car, I much prefer black. So I decided to start the process of converting to black. First thing I did was switch out the seats for C5 corvette seats. These things are comfortable as heck! Had to weld up some brackets to mount them to the floor. They weigh a TINY bit less than the clamshell seats once you remove the motors from them.
Next I stripped all the carpet and deadening out of the interior and sprayed down a couple coats of a heat/sound deadening spray:
Also, note the "beautiful" wiring job that bubba did with that head unit. The previous owner was a bit of a hack with his wiring. And I hate the head unit. I never listen to the stereo in the car, so I will probably remove it soon.
After that, I put down a layer of Reflectix (heat reflecting foil/foam material from Lowe's) a cheaper alternative to car-specific heat blockers. I have pictures of this somewhere, but I can't find them off hand, so if anyone is interested let me know and I"ll dig them up.
I then spent a few hours fitting the carpet. I used 3M adhesive spray in the areas that needed it to keep the carpet down. Sorry I didn't get like any pictures of the process, once I got going I just kept working till it was done.
Here's how the interior looks with C5 Seats, black carpet, and still the original oyster dash, steering wheel, and door panels:
This is how the interior still is. It may look a little funny in pictures, but it's actually not bad in person. I plan to put on an aftermarket black leather steering wheel, and most likely dye the door panels and dash in the near future, but I got distracted by some weight savings mods (I'll detail those in the next post).
Sorry It's been so long since I updated. Life got hectic.
So what I haven't posted on yet: weight loss.
One of the big goals for this car was to get it down to a more respectable weight. For anyone not "in-the-know", saving weight on a car improves almost every aspect of it. A lighter car stops quicker, accelerates faster, handles better, gets better gas mileage, and is easier on driveline components.
I realize that some people will disagree with some of the weight savings I've done, some think it not worth it, and while I agree for a daily driver it wouldn't be worth it, this car has always been a toy to me. Something to drive for fun, not for safety or comfort.
With that said, the weight savings I've done so far:
Aluminum heads (Brodix Ik200)
Aluminum Intake
C5 seats (Motors and tracks removed, bolted to floor)
Composite rear springs
Spare tire and carrier removed
Aluminum Wheels
Rear bumper support removed (52 lbs)
Front bumper support removed (40 lbs)
Air conditioning compressor and Condenser removed
Obviously the aluminum heads and intake were a performance improvement as well as taking a significant chunk of weight off the front of the car.
The C5 seats were more for the look and comfort, though they did save a few pounds per seat.
I had never used the AC in my car, and I had removed it when I was changing my cam last year and never put it back in.
The two slightly controversial ones are the bumper supports. If you don't know what I'm talking about, I'll put a couple pictures of mine in below. You can look up "Beejay's Weightloss Mods" for more info, or PM me if you have questions.
Rear bumper cover off, bumper support already removed in this picture
Here's the bumper support, this lump is HEAVY
Aluminum bracket installed and drilled to mount headlights and bumper cover back on. Surprisingly strong !
This is the front support/ vacuum reservoir. I am now running my headlights off of engine vacuum. Ignore the ugly cut lines, I decided to just Sawzall it out and leave the radiator support brackets. I then bolted the old brackets back on (after removing them from vacuum tank). So the front end is just as stiff and stable as before, minus 40 pounds.
The other thing I've been doing is testing out a Vic Jr. intake instead of my Performer RPM. That may sound like a total mismatch for my motor. The Performer RPM is considered pretty much the best dual plane for a street driven motor, and it's drilled for a Qjet so it needs no adapter. The Vic. jr. is a single plane (not very street friendly for a 350) and is drilled for a square bore carb so I have to use a carb adapter.
However, with my Brodix IK200 heads, the intake port is so big (Fel pro 1206) that the Performer RPM ports don't cover it well. There's a large amount of unused port, and if it weren't for the intake gasket, there would be a small gap visible between the top of the head ports and intake port, not good for flow! The Performer RPM can't be ported out big enough to match my ports on my heads, the Vic. Jr. was already ported out to a 1206 intake (thanks Jebby!).
So I figured "what the heck"! The intake swap was more annoying than I expected since it doesn't have as many vacuum ports as I need and I had a couple stripped bolts to take care of, but I finally fired it up this weekend. I'm still tuning on it a bit, but here's first impressions:
Low end feels identical. I was expecting a huge loss in torque, but I really can't tell.
It idles just as good as before, 800 RPM, ncie and choppy with my Lunati 268 cam.
Up to about 3,500 RPM it feels just like the Performer RPM, however....
from 3,500 or 4,000 on up to 6,000.... HOLY COW! Those small intake ports must have been choking that motor. I thought it had some grunt before, but it is even better now!
So am I saying you should switch to a single plane? HECK NO!
But in my situation, using heads that are too big for my combo by most peoples measure, it apparently needed the better flowing intake to take advantage of the bigger intake port size (at least that's what my bro science is telling me). My brother also drove my car before and after the intake swap to "verify" my findings and he agreed completely that it picked up a chunk of power up top.
get a vic with a 4500 flange. easier airflow thru the adaptor. pricier adaptor, but...
For the moment I'm using the Vic. Jr. I have because it was cheap and already ported to a 1206 gasket (which is what I needed). I got an aluminum 3/4" adapter and did some light porting to make it match the spreadbore a little better. Works good so far so I can't complain.
Was browsing craigslist for deals (as I do every week) and saw something that looked interesting. An old circle track racer was selling off a ton of his stuff, and he had a late model 350 block, factory roller, one piece rear main seal, fresh .030 bore and all machine work done for crazy cheap. Couldn't pass it up.
Looks like the Vette is getting a full roller 383...
The plan is to build up the shortblock when I have the time and money (hopefully in a month or two) and then move the Brodix IK200 heads, Vic. Jr. intake, and Quadrajet over to the 383 and then sell my 350 short block to help recoup costs.
I was on the lookout for a project car early in 2016...I grew up in the 90s, and the cars that appealed to me were mostly imports...I started thinking, what car draws my eye more than anything else, and I realized it's always the old C3 corvettes.
That's much how I decided to buy a C3. I had bought an 81 280ZX and was planning on restoring when I started thinking "If I could have any car in the world what would it be?" and I came up with a short list of 3 cars, 69 Corvette, 60 Impala, 69 Charger. I started looking for 69 Chargers but my budget was 18,000 with another 10,000 set aside for repairs and rusty beat up 69 chargers with no drivetrain were asking 10K or better and nice ones were 35-50k. Similarly I couldn't find any 60 Impala's that fit in my range. I eventually decided on a 79 Corvette as I decided I couldn't live with the interior in the 69.
I know you said your car doesn't have great paint, but it sure looks nice in the pictures, especially with the pace car spoilers!
Awesome! It's a good feeling to actually own a dream car right?
And yeah, the paint isn't TERRIBLE but if you get up close there are some bubbles, some spider webs, quite a few big chips, and even some spots where it is peeling a tiny bit. Enough that I would like to paint it someday. But I'm more interested in performance.... and paint doesn't make it go any faster haha.