


PSlow's '72 Restomod Project
Thread Starter
Burning Brakes

Joined: Sep 2017
Posts: 1,219
Likes: 365
From: Tolland CT

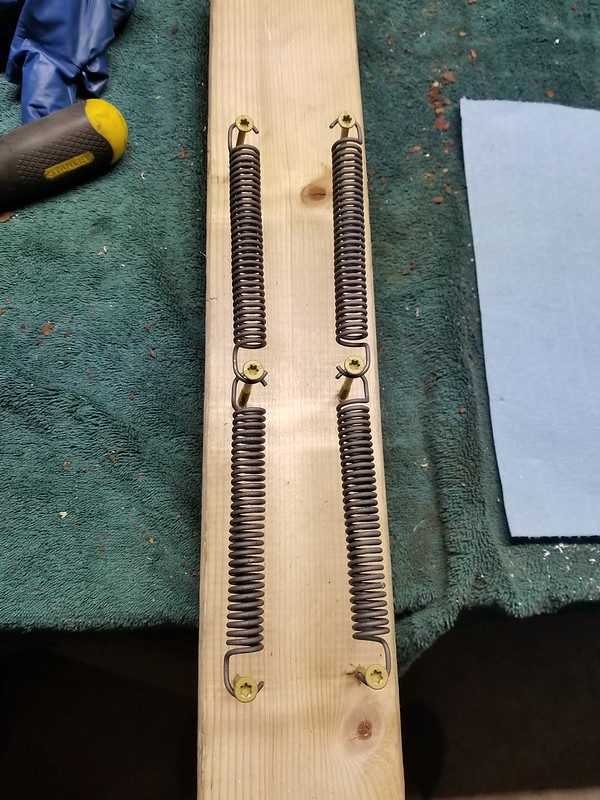
I did the usual powder coating thing.

Coated and waiting for the oven...

Have I mentioned that I LOVE being able to powder coat my own stuff??!?
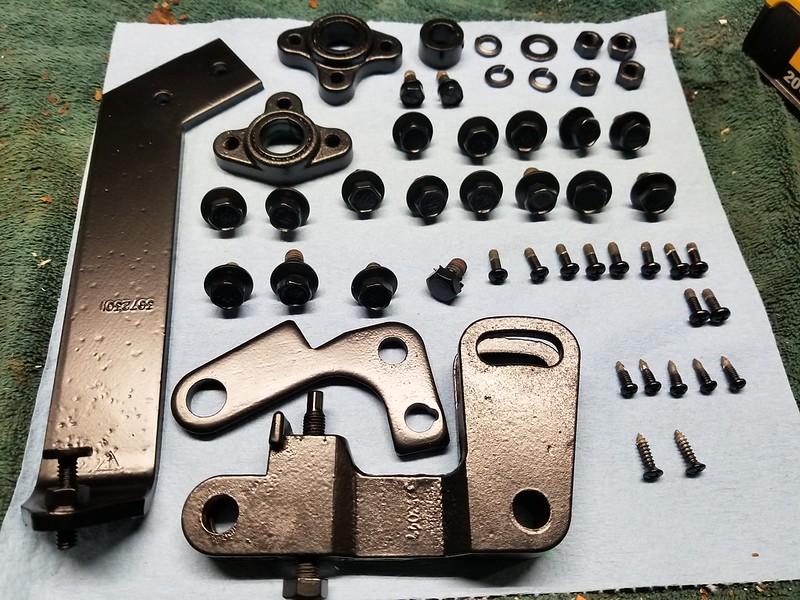
So durable and yet it keeps all the details. The coating is typically only a few mil thick.
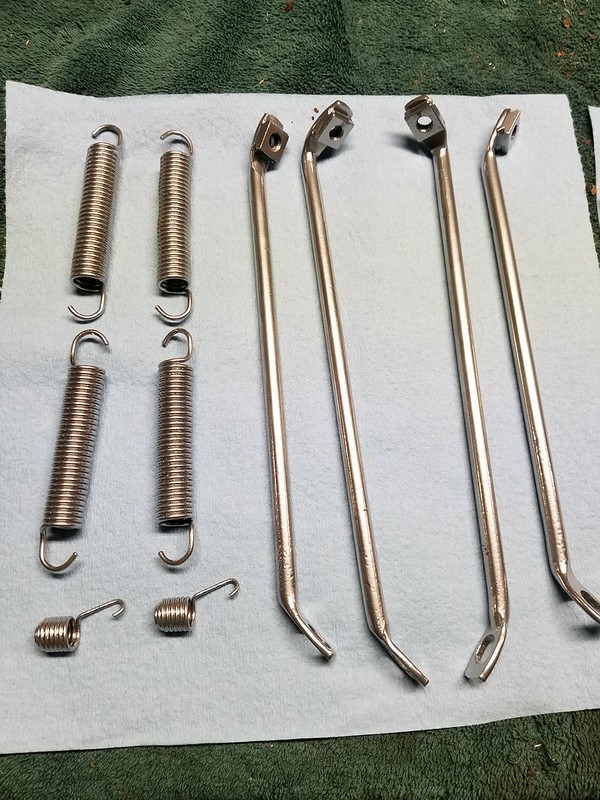
I apologize to the NCRS folks. I had to change powder to coat the springs 'polished aluminum' when I realized that I missed coating the headlight support rods...so they get the same coating as the springs. It should give some nice contrast there anyway.
While the parts were in the oven I decided to try to get the second exhaust manifold off since I was already out there. This one went a lot faster using the same 'elite' tactic that I used on the last one.
A whole bunch of parts showed up...I have to unbox this stuff and see what I've got...

Safety Car


Joined: Jun 2013
Posts: 4,399
Likes: 793
I wonder if I can collect royalties off of that? =) I think the new hardware will be installed into me before I get to play with any new hardware myself
I did the usual powder coating thing.
Coated and waiting for the oven...
Have I mentioned that I LOVE being able to powder coat my own stuff??!?
So durable and yet it keeps all the details. The coating is typically only a few mil thick.
I apologize to the NCRS folks. I had to change powder to coat the springs 'polished aluminum' when I realized that I missed coating the headlight support rods...so they get the same coating as the springs. It should give some nice contrast there anyway.
While the parts were in the oven I decided to try to get the second exhaust manifold off since I was already out there. This one went a lot faster using the same 'elite' tactic that I used on the last one.
A whole bunch of parts showed up...I have to unbox this stuff and see what I've got...

Thread Starter
Burning Brakes
Joined: Sep 2017
Posts: 1,219
Likes: 365
From: Tolland CT
Got a few nice items but sadly no progress today. My son (the one in the pictures) had surgery today so I was at the hospital all day. Now I have a bunch of shipping to get done so the car will have to wait.
Melting Slicks


Joined: Jan 2002
Posts: 2,076
Likes: 1,192
Le Mans Master


Joined: May 2003
Posts: 8,878
Likes: 3,556
From: Fernandina Beach FL
2023 Restomod of the Year finalist
2020 C3 of the Year Winner - Modified
I guess since you are doing electric headlight conversion- you've figured the outer fatter springs won't be needed...
Godspeed on your son's recovery- and you to.
Richard
Thread Starter
Burning Brakes
Joined: Sep 2017
Posts: 1,219
Likes: 365
From: Tolland CT
Thanks KR, he is resting comfortably. He injured his knee playing football back in September but the swelling never went away. MRIs turned up nothing so they thought it might be Rhumatoid Athritis so they went in to remove some extra tissue, drain the knee, and biopsy to test for RA. Turns out while they were in there they found a tear in his meniscus which could easily account for everything so we are hoping that is all that it is.
He is a freshman in high school; 15yrs old, 6' and 203lbs so they immediately put him in as their nose guard. Kind of funny watching him literally walk through the opposition. They won every game he played and after he was injured they lost every game they played. Maybe we will get lucky and have a future NFL player on our hands.
Yep, which is a good thing too because two of them snapped.
And thank you. We both appreciate the well wishes.
He is a freshman in high school; 15yrs old, 6' and 203lbs so they immediately put him in as their nose guard. Kind of funny watching him literally walk through the opposition. They won every game he played and after he was injured they lost every game they played.
Maybe we will get lucky and have a future NFL player on our hands.And thank you. We both appreciate the well wishes.
Thread Starter
Burning Brakes
Joined: Sep 2017
Posts: 1,219
Likes: 365
From: Tolland CT
I did some more work on the headlight assembly. I started to put the left side back together (the right is still in one piece so that I had something to reference) but wasn't able to get as far as I would have liked. I am waiting on my new sealed beams to arrive.
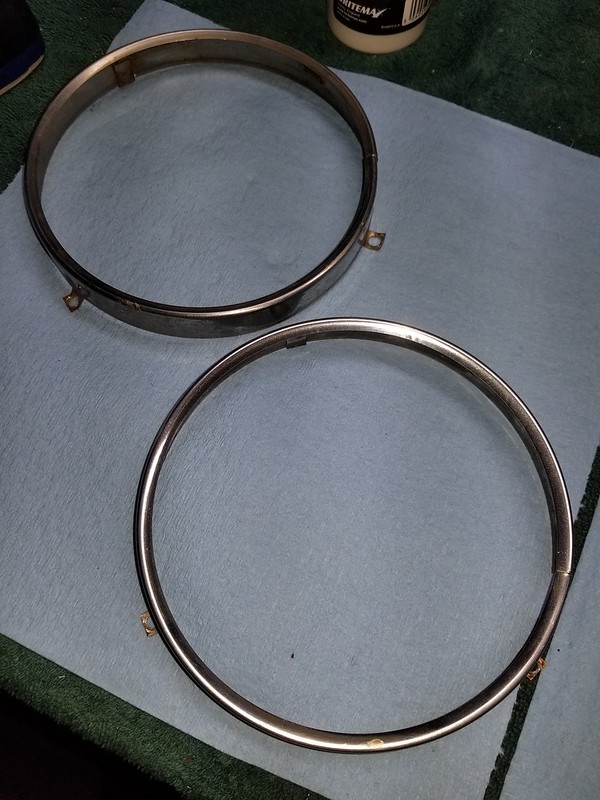
I did take a bit of time and got my metal polish out and onto the headlight rings. Quite the difference. I went after this with a metal polishing compound and a buffing wheel on my dremel followed up by a metal shine and protectant.
One down, one to go...

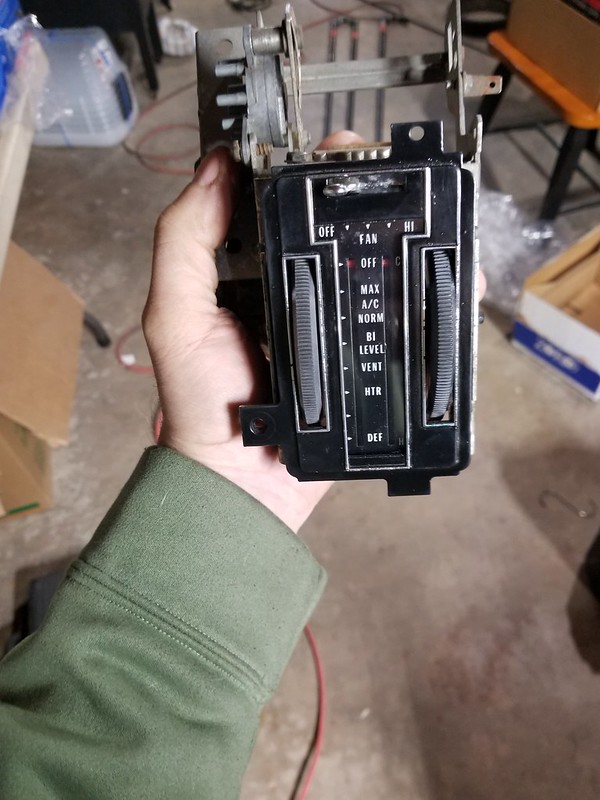
Next up out of the box of parts is the heater-A/C control. Apparently I forgot to take a 'before' picture but take my word, it looked nasty. Here it is all disassembled for cleaning and refinishing.
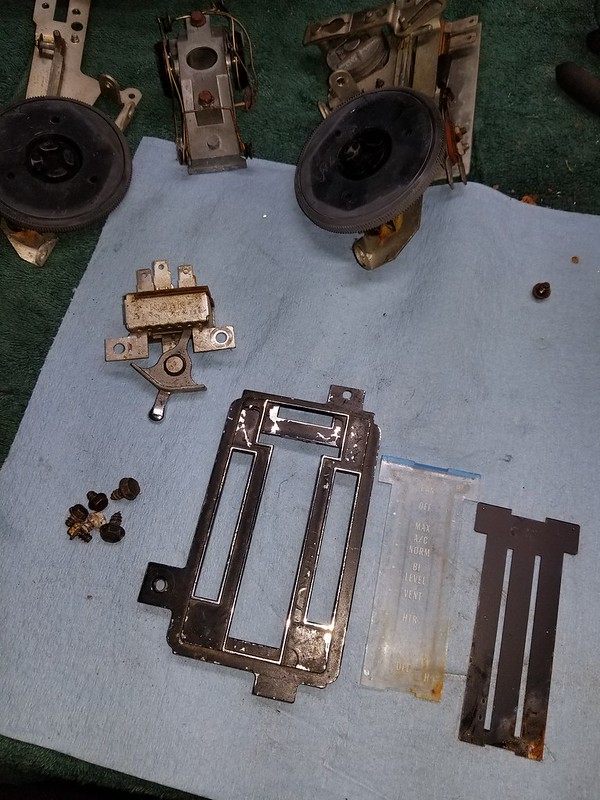
Some lacquer thinner and a stiff toothbrush got rid of all that ugly black paint that was sort of on the face plate. In this picture you can really see how scratched and dull the clear lens is.
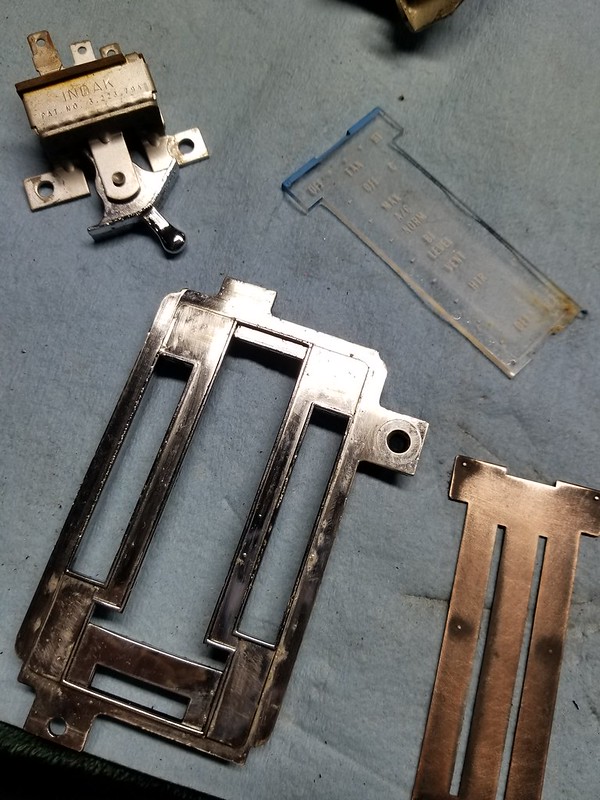
Some plastic scratch removing compound followed by a polishing compound and once again using the buffing wheel on my Dremel got this thing pretty spiffy looking. A word of caution to anyone trying this at home: it is very easy to overheat the plastic when doing this which will either warp, distort, or in a worst case burn/melt it. Take care to make sure that the compound is always wet and to move rapidly with medium pressure to let the heat dissipate.

Some more OCD...err, attention to detail pictures. They say that it is easy to do a job to 90% and the last 10% of the work takes 90% of the time. Clearly whomever coined that phrase must have restored car parts.
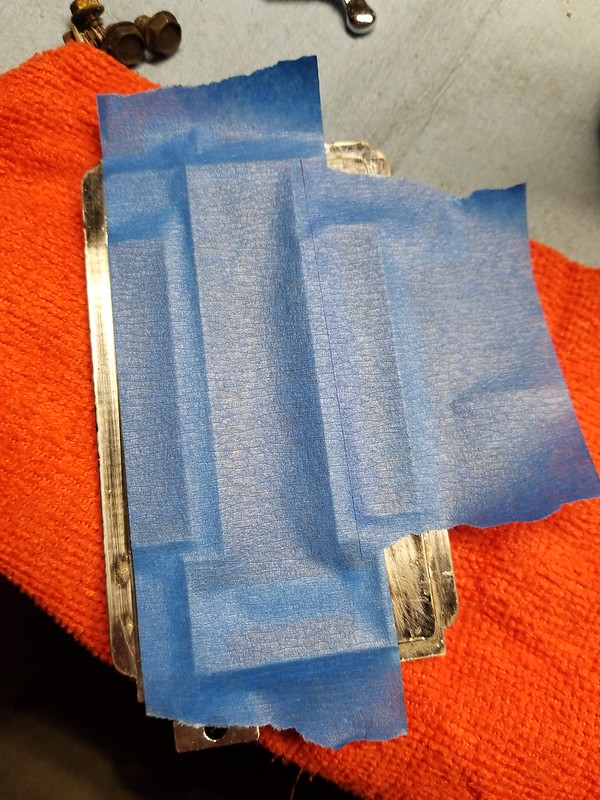
The key to making this work is to ensure that the tape has very firm adhesion to the part. Clean it with rubbing alcohol or acetone prior to putting the tape on. The second part to making this work is a new, extremely sharp razor blade or hobby knife. This allows it to cut the tape rather than pull or tear it.
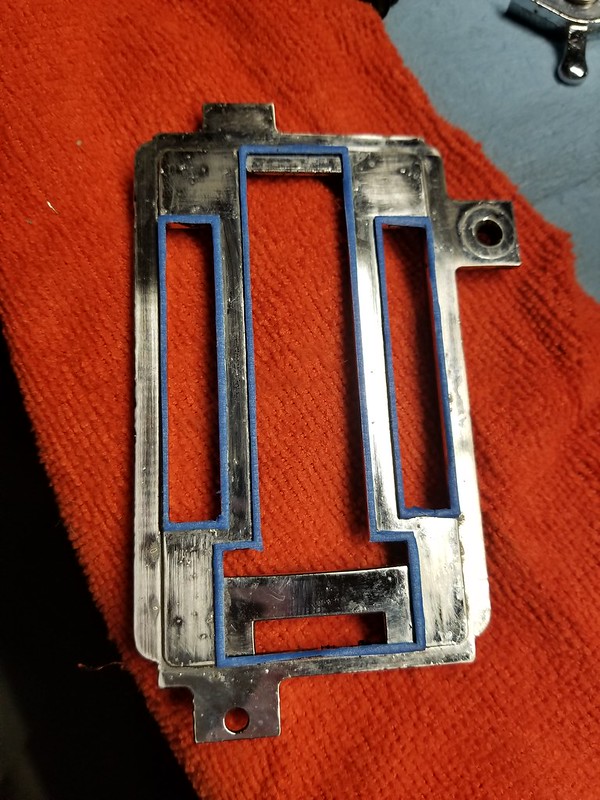
After that it was a light coat of self-etching primer followed by a couple of coats of satin black. I also removed the paint from the pointers and applied a fluorescent orange-red that closely matched the original. After the parts were dry it was re-assembled. I did not take any pictures of that process but there is a guide on Willcox that is fantastic.
For some reason this picture came out very poorly. There is already dust on the part but trust me when I say that it looks a lot better in person.
I did take a bit of time and got my metal polish out and onto the headlight rings. Quite the difference. I went after this with a metal polishing compound and a buffing wheel on my dremel followed up by a metal shine and protectant.
One down, one to go...
Next up out of the box of parts is the heater-A/C control. Apparently I forgot to take a 'before' picture but take my word, it looked nasty. Here it is all disassembled for cleaning and refinishing.
Some lacquer thinner and a stiff toothbrush got rid of all that ugly black paint that was sort of on the face plate. In this picture you can really see how scratched and dull the clear lens is.
Some plastic scratch removing compound followed by a polishing compound and once again using the buffing wheel on my Dremel got this thing pretty spiffy looking. A word of caution to anyone trying this at home: it is very easy to overheat the plastic when doing this which will either warp, distort, or in a worst case burn/melt it. Take care to make sure that the compound is always wet and to move rapidly with medium pressure to let the heat dissipate.
Some more OCD...err, attention to detail pictures. They say that it is easy to do a job to 90% and the last 10% of the work takes 90% of the time. Clearly whomever coined that phrase must have restored car parts.
The key to making this work is to ensure that the tape has very firm adhesion to the part. Clean it with rubbing alcohol or acetone prior to putting the tape on. The second part to making this work is a new, extremely sharp razor blade or hobby knife. This allows it to cut the tape rather than pull or tear it.
After that it was a light coat of self-etching primer followed by a couple of coats of satin black. I also removed the paint from the pointers and applied a fluorescent orange-red that closely matched the original. After the parts were dry it was re-assembled. I did not take any pictures of that process but there is a guide on Willcox that is fantastic.
For some reason this picture came out very poorly. There is already dust on the part but trust me when I say that it looks a lot better in person.
Corvette Stories
The Best of Corvette for Corvette Enthusiasts

Every 2027 Corvette Engine Explained
Joe Kucinski
Designer Imagines A Corvette That Looks More Like a Corvette Than the Corvette
Verdad Gallardo
10 Ugly Corvettes That We Still Kinda Love
Joe Kucinski
Top 10 Most Expensive Corvettes Ever Sold on Bring A Trailer
Brett Foote
10 Things Every Corvette Owner Needs (2026 Edition)
Michael S. Palmer
8 Most "Only Corvette Owners Understand" Quirks and Problems
Pouria Savadkouei
10 Reasons the C6 Z06 is Still A Performance Benchmark After 20 Years
Joe Kucinski
How Much Horsepower Every Corvette Engine "LOST" in 1972
Joe Kucinski
Top 10 DOs and DON'Ts for Protecting Your Convertible Top!
Michael S. PalmerDrifting

Joined: Mar 2013
Posts: 1,926
Likes: 304
From: Lansing MI
Thread Starter
Burning Brakes
Joined: Sep 2017
Posts: 1,219
Likes: 365
From: Tolland CT
Had a productive day at the local scrap yard. I picked up two motors for the headlight conversion and a CS144 alternator for $65.
A little bit of cleaning up and they should be good as new!
Thread Starter
Burning Brakes
Joined: Sep 2017
Posts: 1,219
Likes: 365
From: Tolland CT
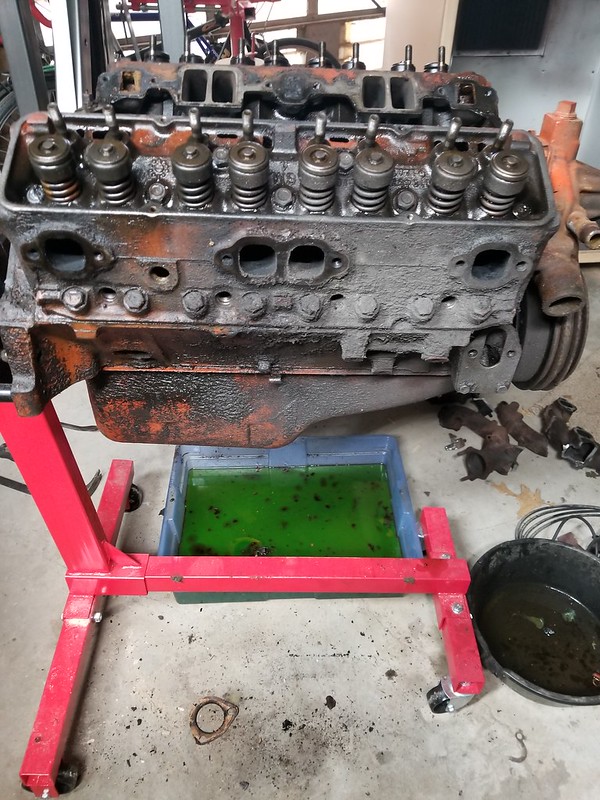
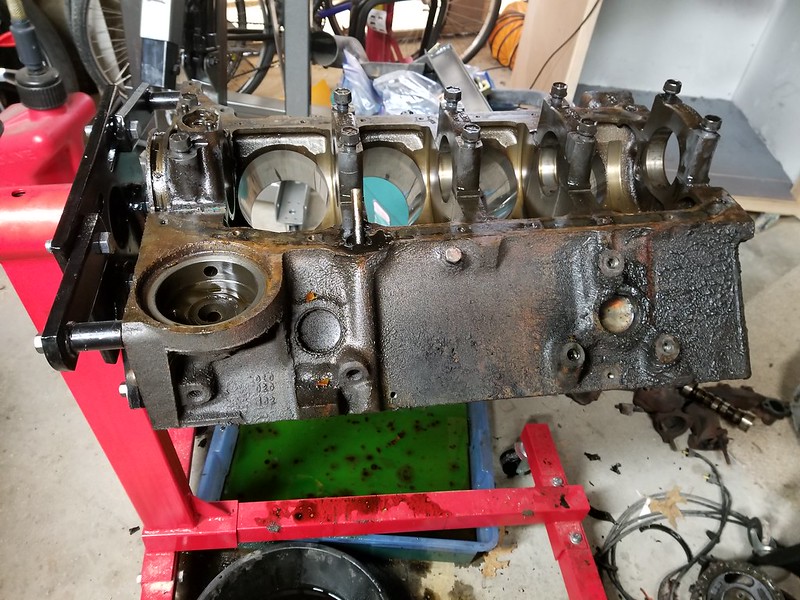
Posting up some pictures of the engine disassembly. I am really wondering if these are the original pistons. I will make a separate post so people actually see it =)
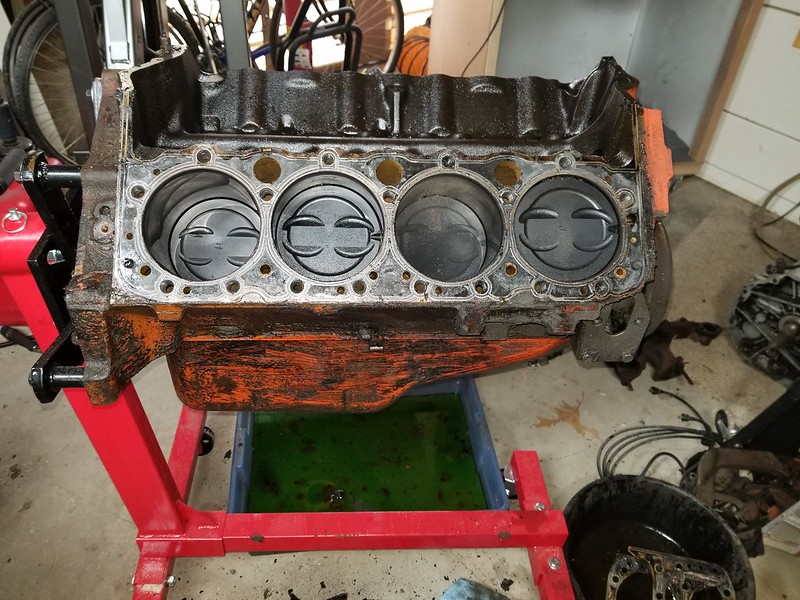
The bores don't look terrible.
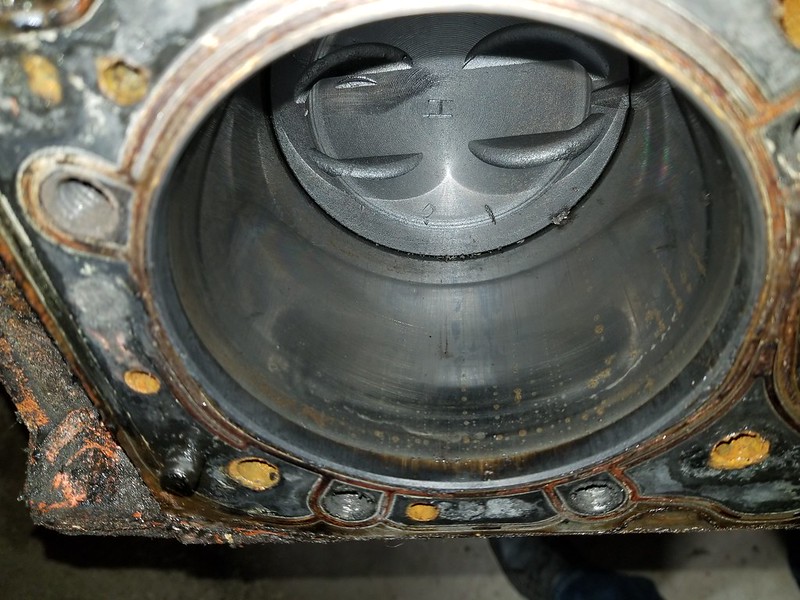
These don't look like pistons with 58k miles on them...
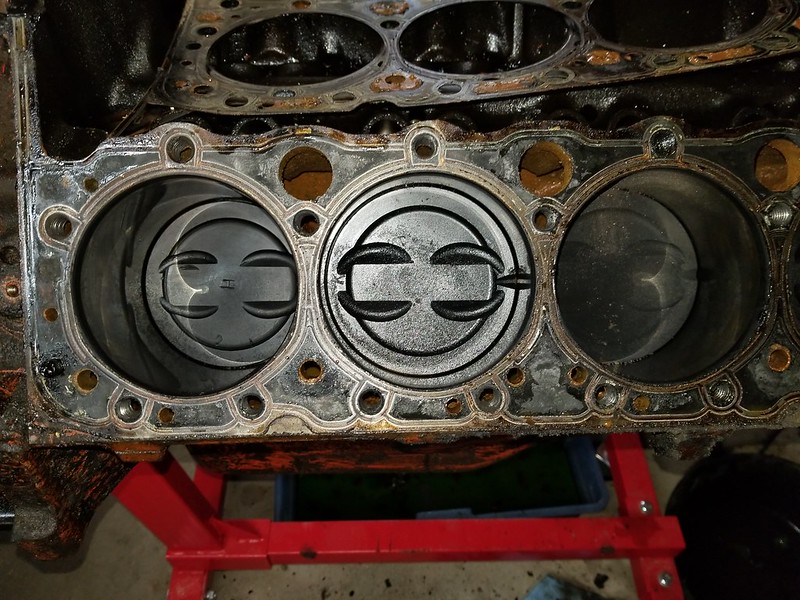
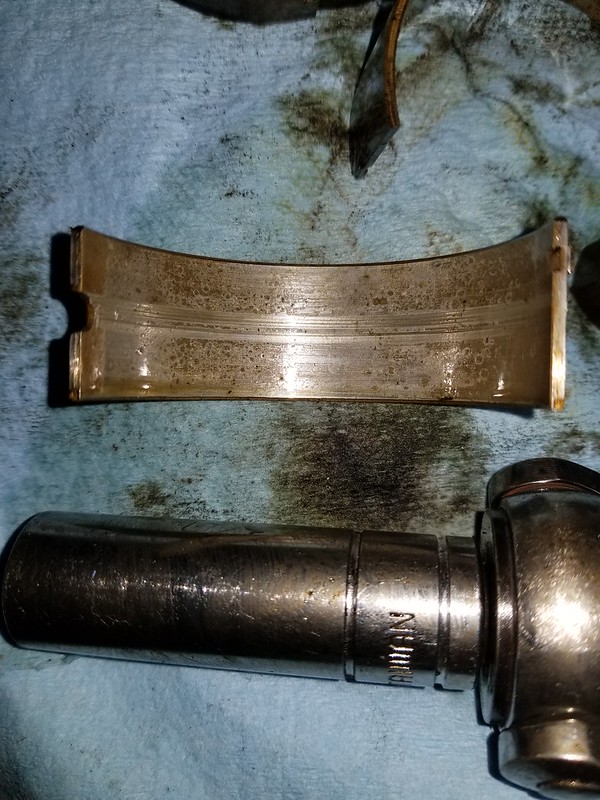
The head gasket is a steel shim only. Unsure what was used from the factory on the low-po 200hp model but I would guess this is not it.

The bores don't look terrible.
These don't look like pistons with 58k miles on them...
The head gasket is a steel shim only. Unsure what was used from the factory on the low-po 200hp model but I would guess this is not it.
Thread Starter
Burning Brakes
Joined: Sep 2017
Posts: 1,219
Likes: 365
From: Tolland CT
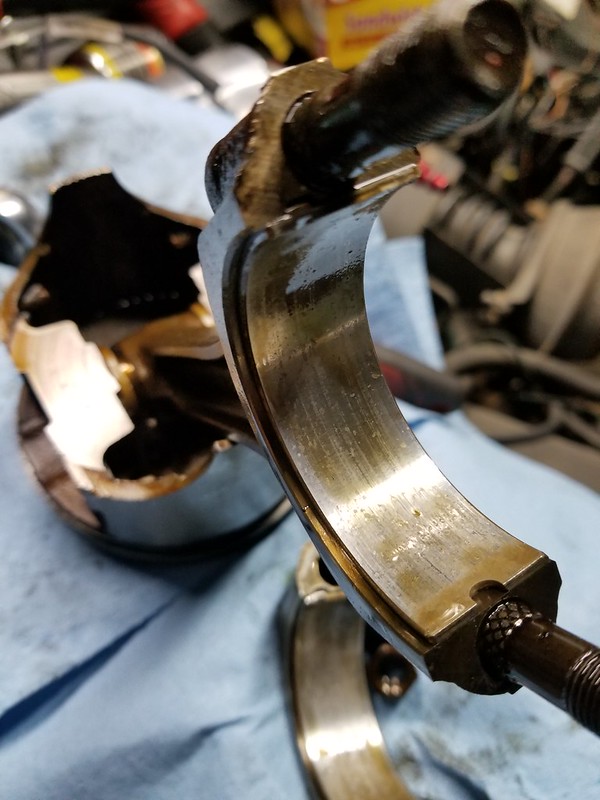
Got a little weirdness going on with the bearing here...not sure if that is just from sitting or if there was some issue. The entire engine is being rebuilt so I am not going to dwell on it.

2026 Loser of the Year


Joined: Sep 2013
Posts: 36,607
Likes: 7,053
From: New Or-leens Loo-z-anna
WOW! .0017" thick head "gasket". (I did use .030 copper head gaskets on a 1994 350 c.i.d/there was a noticeable improvement).....
Somebody wanted to increase the compression ratio! You are doing great....pace those hands in this weather.
Somebody wanted to increase the compression ratio! You are doing great....pace those hands in this weather.
Thread Starter
Burning Brakes
Joined: Sep 2017
Posts: 1,219
Likes: 365
From: Tolland CT
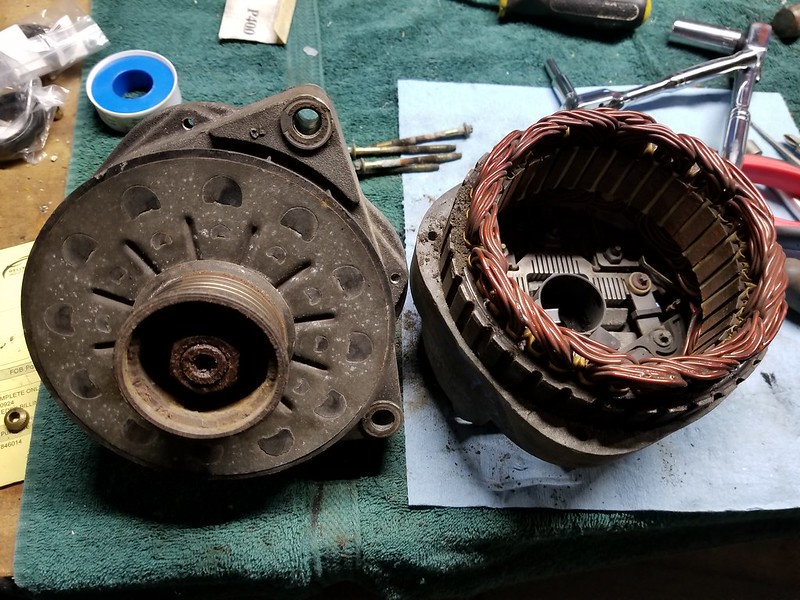
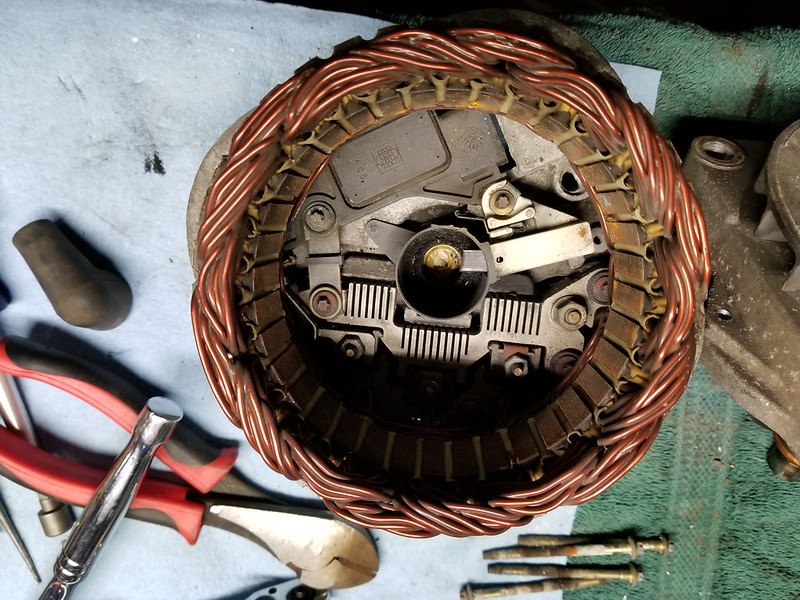
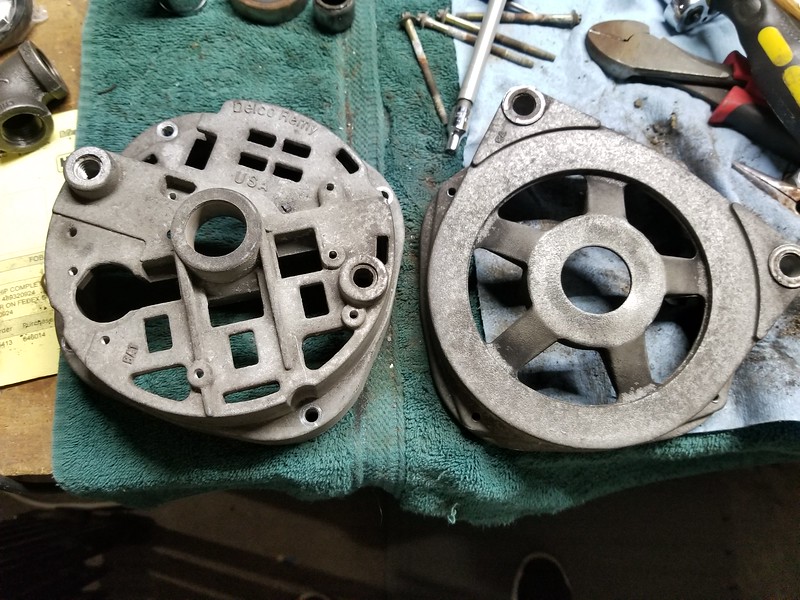
Well I had plans yesterday so I wasn't able to get out to my garage. By the time I got home it was late but I felt like I had to do something so I started the rebuild on my junkyard CS144 alternator.
It spins freely and other than some oxidation and dirt, the internals look very good. Still, a rebuild kit is cheap insurance plus I want to powder coat the case which means that replacing the bearings is a requirement anyway...
This morning I got up and was itching to get out to the garage. The temps were a bit milder today (30's) so I figured that I could spend an hour or two out there and finish stripping the engine so that I can get it off to the machine shop.
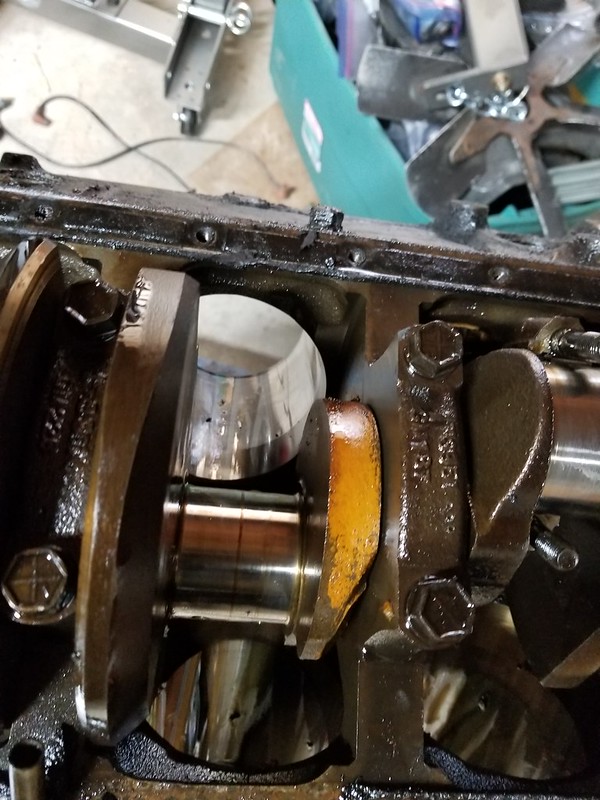
You can see that this rod bearing had some issues going on. There was clearly something causing those two wear marks in the center but equally as concerning are the little 'bubble' looking marks. This is a tell-tale sign of an engine that has been sitting for a long time. Engine oil can become acidic over time and that is what we are seeing here.
You can also see some form of corrosion on this part of the crankshaft. A keen eye will note the 3 dimples that I put into the main bearing cap. This is so we can be sure to put the cap back in the proper place.
And here she sits, ready to make the trip to the machine shop. It is sad that Chevrolet put 2 bolt blocks into these cars but I guess it is what it is.
It is always interesting to take apart an engine and what I have seen further confirms that someone had gone into it at some point in the past. There were large gobs of orange RTV dried to the inside of the front timing cover, as well as on the fuel pump shaft. Also the oil pickup screen was full of bits of hard plastic.
I thought at first that it was the coupler for the oil pump shaft which was missing chunks and disintegrated as soon as I touched it but there was far too much in there for that to be all of it. Even though this engine was running when I bought the car it would not have remained so for long. I am glad that I decided to tear into this right away.
This afternoon I will try to take off the rear wheels so that I can get access to the #3 body mounts and begin soaking all of them in PB Blaster.
It spins freely and other than some oxidation and dirt, the internals look very good. Still, a rebuild kit is cheap insurance plus I want to powder coat the case which means that replacing the bearings is a requirement anyway...
This morning I got up and was itching to get out to the garage. The temps were a bit milder today (30's) so I figured that I could spend an hour or two out there and finish stripping the engine so that I can get it off to the machine shop.
You can see that this rod bearing had some issues going on. There was clearly something causing those two wear marks in the center but equally as concerning are the little 'bubble' looking marks. This is a tell-tale sign of an engine that has been sitting for a long time. Engine oil can become acidic over time and that is what we are seeing here.
You can also see some form of corrosion on this part of the crankshaft. A keen eye will note the 3 dimples that I put into the main bearing cap. This is so we can be sure to put the cap back in the proper place.
And here she sits, ready to make the trip to the machine shop. It is sad that Chevrolet put 2 bolt blocks into these cars but I guess it is what it is.
It is always interesting to take apart an engine and what I have seen further confirms that someone had gone into it at some point in the past. There were large gobs of orange RTV dried to the inside of the front timing cover, as well as on the fuel pump shaft. Also the oil pickup screen was full of bits of hard plastic.
I thought at first that it was the coupler for the oil pump shaft which was missing chunks and disintegrated as soon as I touched it but there was far too much in there for that to be all of it. Even though this engine was running when I bought the car it would not have remained so for long. I am glad that I decided to tear into this right away.
This afternoon I will try to take off the rear wheels so that I can get access to the #3 body mounts and begin soaking all of them in PB Blaster.
Last edited by PainfullySlow; Jan 22, 2018 at 01:23 PM.

Pro

Joined: Jan 2011
Posts: 586
Likes: 10
From: Alexandria VA
Very nice work in very short period of time. Some of things you're doing with the interior parts is providing me with many intellectual tools that I will use later when I start that part of my project.
I will be following this thread and look forward to more intel as you progress.
BTW, have you thought about building yourself a heater for the garage...looks like you have the skill set to do it.
I will be following this thread and look forward to more intel as you progress.
BTW, have you thought about building yourself a heater for the garage...looks like you have the skill set to do it.
Burning Brakes
Joined: Feb 2017
Posts: 1,054
Likes: 212
From: Kissimmee Florida
Quite a few years ago I bought a salamander for my 20 x 50 shop ! It's a 125000 btu heater ! Uses fuel oil or kerosene and make mu shop toasty ! Warm enough I can paint in it like last Thursday when I got up it was 20 ! And that was here in Florida!
Love the stuff your doing !
Love the stuff your doing !
Thread Starter
Burning Brakes
Joined: Sep 2017
Posts: 1,219
Likes: 365
From: Tolland CT
Very nice work in very short period of time. Some of things you're doing with the interior parts is providing me with many intellectual tools that I will use later when I start that part of my project.
I will be following this thread and look forward to more intel as you progress.
BTW, have you thought about building yourself a heater for the garage...looks like you have the skill set to do it.
I will be following this thread and look forward to more intel as you progress.
BTW, have you thought about building yourself a heater for the garage...looks like you have the skill set to do it.
As for heat, it is my intention to put in a propane stationary unit however it is un-insulated and tons of drafts so any heat that I make quickly goes right out the roof/air gaps.
I will seal it up and insulate it during the warmer months for next winter.
Quite a few years ago I bought a salamander for my 20 x 50 shop ! It's a 125000 btu heater ! Uses fuel oil or kerosene and make mu shop toasty ! Warm enough I can paint in it like last Thursday when I got up it was 20 ! And that was here in Florida!
Love the stuff your doing !
Love the stuff your doing !
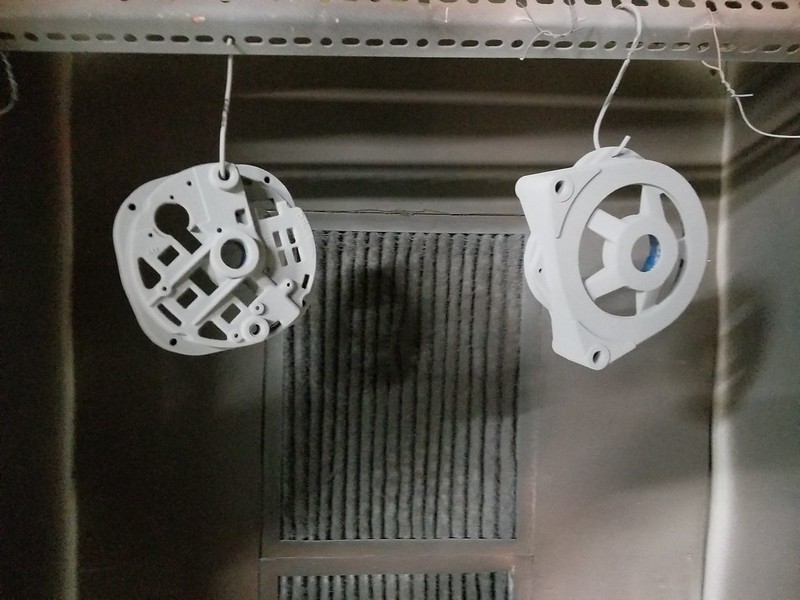
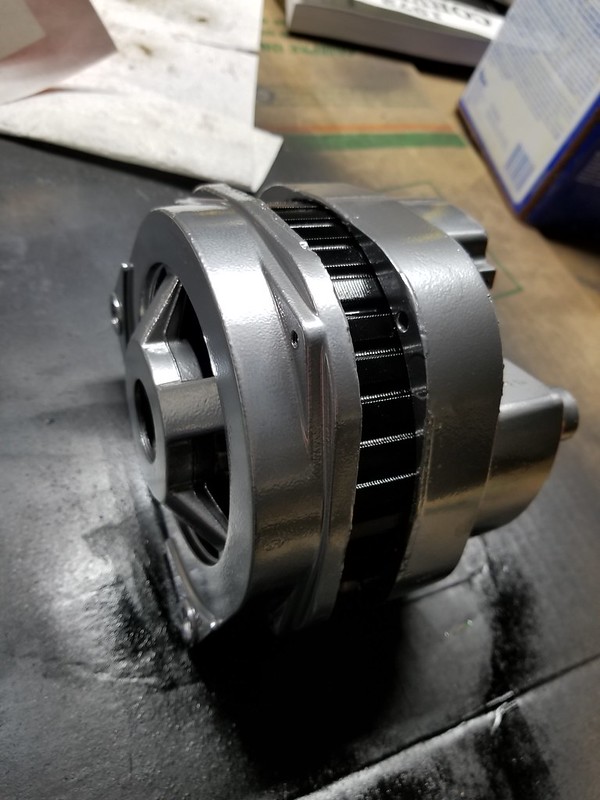
Anyway, last night was kind of slow. I am waiting on the parts for the alternator rebuild but I figured that I could at least finish the housings.
I am sure you are familiar with the process now: blast, phosphate, powder coat.
Before
During
and after...
I have a bunch of doctors visits today so not sure what I will get done but we will see. I will also be dropping off the block to the machine shop today as well.
Thread Starter
Burning Brakes
Joined: Sep 2017
Posts: 1,219
Likes: 365
From: Tolland CT
These showed up recently. I am still torn because I love the RX8 seats that I recovered but in the end, safety won out. Since the car is lacking all the modern safety equipment I wanted to go with a seat that I could install a 4pt harness. Additionally the RX8 requires a modification to the center console which I just did not want to deal with at this time. I will keep them as a backup if for whatever reason I decide that I do not like the new ones, I will have something that I can drop in pretty quickly.
I did some digging, read lots of reviews and talked to a few people. In the end I went with these Cipher seats. Not the top of the line for sure but for the price they are outstanding. They fit my budget and I got them at a price that simply could not be beat. Apparently no one likes the black with orange but it fits my orange/black theme perfectly so I got them for a steal.
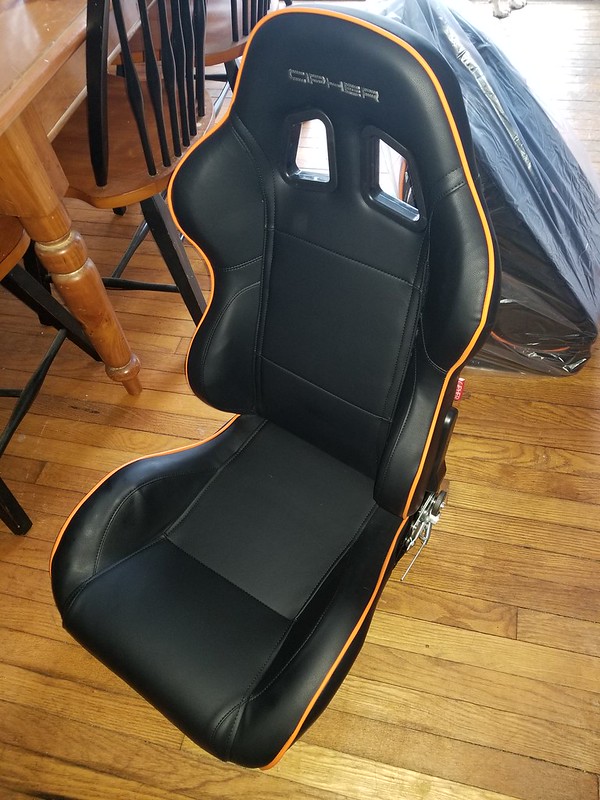
I went over every inch of these things and I have to say there is not a single stitch out of place. I am super impressed with the workmanship on these.
I did some digging, read lots of reviews and talked to a few people. In the end I went with these Cipher seats. Not the top of the line for sure but for the price they are outstanding. They fit my budget and I got them at a price that simply could not be beat. Apparently no one likes the black with orange but it fits my orange/black theme perfectly so I got them for a steal.
I went over every inch of these things and I have to say there is not a single stitch out of place. I am super impressed with the workmanship on these.
Burning Brakes
Joined: Feb 2017
Posts: 1,054
Likes: 212
From: Kissimmee Florida
These showed up recently. I am still torn because I love the RX8 seats that I recovered but in the end, safety won out. Since the car is lacking all the modern safety equipment I wanted to go with a seat that I could install a 4pt harness. Additionally the RX8 requires a modification to the center console which I just did not want to deal with at this time. I will keep them as a backup if for whatever reason I decide that I do not like the new ones, I will have something that I can drop in pretty quickly.
I did some digging, read lots of reviews and talked to a few people. In the end I went with these Cipher seats. Not the top of the line for sure but for the price they are outstanding. They fit my budget and I got them at a price that simply could not be beat. Apparently no one likes the black with orange but it fits my orange/black theme perfectly so I got them for a steal.
I went over every inch of these things and I have to say there is not a single stitch out of place. I am super impressed with the workmanship on these.
