
Auxiliary Hardtop Question
 01-12-2018, 02:42 PM
#1
Drifting

Thread Starter

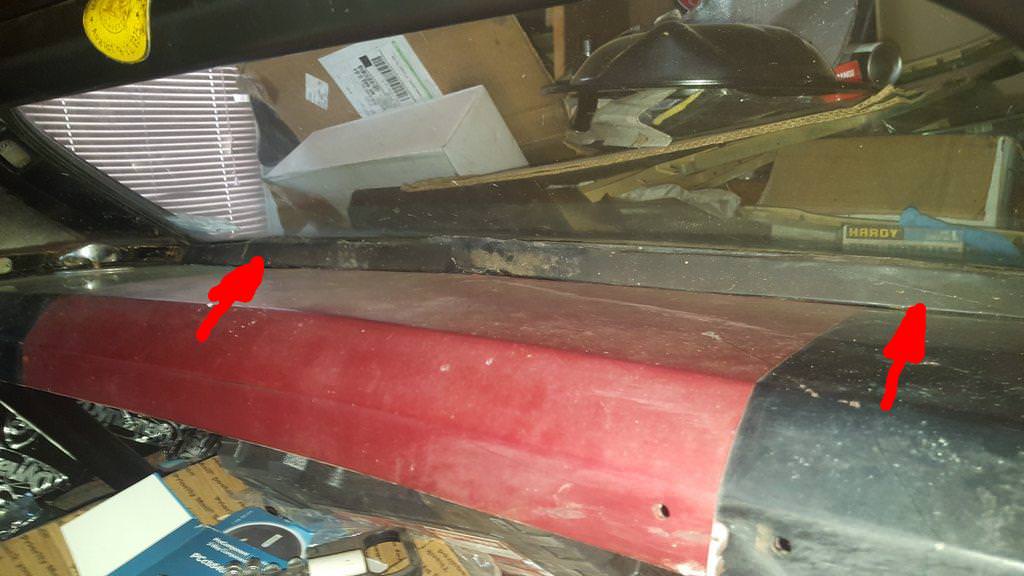
Hey guys, I started cleaning up my hardtop headliner the other night and have a question that I can't find an answer to. I got the 3 main pieces removed, cleaned and dyed to a different color. Everything looks great, except I also have a piece of vinyl trim along the bottom of the rear window that is not in good condition. I can't seem to find a replacement piece for this trim on the vendor websites. Has anyone come across this trim before?
The trim piece has 2 red arrows pointing at it.
The trim piece has 2 red arrows pointing at it.
 01-12-2018, 06:33 PM
#2
Race Director


I have a hard top and can take a look. If my memory is serving me correctly..I do not think there is anything that goes there other than that area being painted a matte, semi gloss or satin black....OR...possibly painted to match the interior headliner color. I still think is was black.
I know (IF I am also correct) the headliner replacements are three pieces. So...if something should be there...they would offer it.
DUB
I know (IF I am also correct) the headliner replacements are three pieces. So...if something should be there...they would offer it.
DUB
Last edited by DUB; 01-12-2018 at 06:34 PM.
01-12-2018, 06:47 PM
#3
Drifting
Thread Starter
Interesting Dub. I was curious if this was a custom insert that somebody had made at some point. The headliner was dated November of '67, so its a very very early C3 hardtop. I wonder if this was something chevy made originally and nixed mid '68
01-12-2018, 06:50 PM
#4
Melting Slicks


Hey guys, I started cleaning up my hardtop headliner the other night and have a question that I can't find an answer to. I got the 3 main pieces removed, cleaned and dyed to a different color. Everything looks great, except I also have a piece of vinyl trim along the bottom of the rear window that is not in good condition. I can't seem to find a replacement piece for this trim on the vendor websites. Has anyone come across this trim before?
The trim piece has 2 red arrows pointing at it.

The trim piece has 2 red arrows pointing at it.
I don't see the screws in yours so perhaps someone fabricated a homemade replacement?
Not sure if it's part of the hardtop or the headliner assembly.
Last edited by Hammerhead Fred; 01-12-2018 at 06:51 PM.
01-12-2018, 08:14 PM
#5
Drifting
Thread Starter
Alright so... I just removed this piece of trim and it has GM part number 3919689 on it. Can't really find any info online...
Last edited by chazde3; 01-12-2018 at 08:34 PM.
01-12-2018, 09:23 PM
#6
Racer


 01-12-2018, 11:55 PM
#8


I have that number on my April built car. Attached are a couple of photos of it. It is just a plastic piece with 4 studs wrapped in vinyl. There is a indentation molded into the middle to form what looks like and attempt to create a handle area.
It is hard to see from the picture but the rectangular washers are actually very thin shim stock. There are 5 of them stacked on each other to form the washer.
I also had a Dec 68 built 69 with a hardtop and I know that piece was attached the same way with studs. The washers however were a single thicker piece of metal. I don't remember of the rest of it's construction.
Going to be a hard find. A one year 68 piece (what isn't on a 68) but, it appears as if maybe some later years could be substituted.
John
Last edited by JC68; 01-13-2018 at 12:51 AM.
01-13-2018, 12:44 AM
#10
Drifting
Thread Starter
Thanks John! Nice to see a little more info on this. Interesting that your studs attach into a slotted cutout. Mine are drilled holes and I had no shims, but that doesn't surprise me. Considering mine has holes instead of slots.
I'm a little surprised to come across an item not reproduced for our cars. I know they are out there, but most stuff is reproduced now.
I decided I'd give rebuilding this piece a shot. I removed the vinyl and spent some time with a wire brush and goof off removing the residue. The fiberglass is in good shape minus one stud breaking. I will dremel out the stud and epoxy in a new one. I'm going to try and find a foam backed marine vinyl that will closely match the original material. This is a small piece, so it shouldn't stick out if the material is off some. We'll see how it works out.
01-13-2018, 12:10 PM
#11
Drifting


My 68 has a MY72 hardtop. Bottom features a plastic vynil patterned trim held on with four screws with nuts.


Last edited by midigike; 01-13-2018 at 12:55 PM.
01-15-2018, 10:58 AM
#12
Melting Slicks

REMOVE.
01-15-2018, 11:22 AM
#13
Drifting
Thread Starter
I actually fixed mine up and recovered it in marine vinyl. I'll be adding the pictures of it to my car's build thread
02-12-2018, 11:24 AM
#14
Racer

I just started cleaning up my hardtop on my '69 vette. Had the same piece which was covered with the same material as the headliner and attached the same way as shown in JC68's post. I do think it's cool to see the date referenced underneath the hard top liner once removed - mine was 9-9-69.
Now a different question since this thread talks about removal of the headliner - My headliner prior to removal fit very nicely, but I had to remove to clean out the rest of the worn parts. Now when I go to fit the three segments back into the "velcro" pieces, I cannot get a strong hold. I've searched the forum for this and found a few posts but nothing really helpful - anyone here have any advice?
Now a different question since this thread talks about removal of the headliner - My headliner prior to removal fit very nicely, but I had to remove to clean out the rest of the worn parts. Now when I go to fit the three segments back into the "velcro" pieces, I cannot get a strong hold. I've searched the forum for this and found a few posts but nothing really helpful - anyone here have any advice?
02-12-2018, 06:22 PM
#15
Race Director
Now a different question since this thread talks about removal of the headliner - My headliner prior to removal fit very nicely, but I had to remove to clean out the rest of the worn parts. Now when I go to fit the three segments back into the "velcro" pieces, I cannot get a strong hold. I've searched the forum for this and found a few posts but nothing really helpful - anyone here have any advice?
So...if it is distorted due to getting moist and taking a new shape...thus causing the plastic 'velcro' pads to not take bite.
I DO KNOW that GM did use weatherstrip glue on the same designed 'velcro' pads on the headliner for the T-ops.
So...it is up to you that IF you feel that the 'velcro' pad is SOLIDLY attached to your headliner...you might consider it.
BUT...doing this will ONLY WORK if the 'velcro' pads are attached to the fiberboard and will not pull shirtsleeves off IF the headliner is under stress when it is installed.
That is the chance you take.
On a very few rare situations. I wetted out the headliner in key areas and got it to take shape...but that took a bit of time....and using a friends bake booth at his body shop aided in getting the headliner dry much much faster than allowing it to air dry.
DUB
The following users liked this post:
doorgunner (02-12-2018)
03-26-2018, 04:33 PM
#16
Pro

I rebuilt a '74 Vert that had been stored for 20 years. The door panels had warped due to moisture while being stored and not mounted on the doors. They were made from the same fiberboard material as the hardtop inside panels.
To get them to fit the doors again I used a heat gun on the backside moving constantly along the area I wanted to bend to shape. I was able to get them into shape and installed them without any damage to the inside. You might try this on the headliner.
Later this summer I am going to try to rebuild my hardtop on the '68 and will have to use this method as my top part hangs down around the center latch.