When you click on links to various merchants on this site and make a purchase, this can result in this site earning a commission. Affiliate programs and affiliations include, but are not limited to, the eBay Partner Network.
My LH and RH DOOR SWITCH do not turn off the courtesy lights, I have a wiring concern, because this has been changed.
The thread written WHITE that comes from TRANSISTORIZED was connected to the R door switch, obviously it does not go to this place, it goes on the ampoules of courtesy.
on the connectors i
1 brown thread
1 white wire
1 blue thread
- After 20 sc the lamps go out.
- Light switch is ok
Can you help me understand the pattern please?
Thanks a lot for your help.
d�sol� mon anglais est traduit par google.
-----------------------------------------------------------
Mes LH et RH DOOR SWITCH n'�teignent pas les lampes de courtoisies, j'ai un souci de cablage, car cela a �t� modifi�.
Le fil �crit WHITE qui vient depuis TRANSISTORIZED �tait branch� sur le contacteur de porte, visiblement il ne vas pas � cet endroit, il va sur les ampoules de courtoisie.
Sur mes connecteurs j'ai:
1 fil marron
1 fil blanc
1 fil beu
- Au bout de 20 sc les lampes s'�teignent.
- L'interrupteur des feux fonctionne.
The way I read the diagram the white goes to the door switch (both as a matter of fact) and then each switch is grounded. Switches show that with door closed circuit open. The lights should stay on for 20 seconds and then go out after you close door which you say they do.??
Je ne sais pas sur quelle Corvette vous etes entrain de travailler.
Maintenant, pour eviter la confusion, au lieu d'utiliser "the courtesy door switch", on utilise the "pin switch."
Le fil blanc est la masse (le neutre) utilise entre "the pin switch" et les lampes d'interieur (courtesy lamps). Le LH (gauche) pin switch est a 3 contacts. Le RH pin switch (droite) est a 2 contacts. Le LH pin switch est aussi pour l'alarme.
Est ce que tu peux enlever les deux fil blancs du transistor et les connecter directement pour savoir si le transistor fonctionne ou pas?
If you connect the two white wire together and you have a faulty transistor unit then the light should turn off when both doors are closed. If the lights stay on then the white wire to the door switches is grounded somewhere.
henrikse
I tried to hook up like that, but it does not work. I went to see another corvette when I press the contactors the shorty lamps cut immediately.
Antz81
I ordered a new transistor but that obviously does not work, so I sent it back and wait for another one.
bmotojoe
I tested the two white wires of the transistor together and yes the lights come on.After 20sc the lamps are cut off.
Right and left side i have 3 wire contactors so 1 brown 1 blue 1 white.
So I have a thread that is useless, the brown I think?
---------------------- henrikse
J'ai essay� de brancher comme cela, mais cela ne fonctionne pas. Je suis all� voir sur une autre corvette et quand j'appuie sur les contacteurs les courtesy lamps se coupent imm�diatement.
Antz81
J'ai command� un transistor neuf mais qui ne fonctionne visiblement pas, je l'ai donc renvoy� et en attends un autre.
bmotojoe
J'ai tester les deux fils blanc du transistor ensemble et oui les lampes s'allument. Au bout de 20sc les lampes se coupent.
Cot� droit et gauche j'ai un contacteur 3 fils, donc 1 brun 1 bleu 1 blanc. J'ai donc un fil qui ne sert � rien, le marron je pense ?
------
I think something is being lost in translation here.
The brown wire on the door switches is used as part of an unrelated circuit. All wires on the door switches are connected to ground when the door is opened.
I think something is being lost in translation here.
The brown wire on the door switches is used as part of an unrelated circuit. All wires on the door switches are connected to ground when the door is opened.
This is a very simple circuit.
Joining the white wires as shown in POST #4...will cause the interior light to go OFF when the doors are closed...BUT..that all depends IF the door jamb switches are actually moving and breaking the contact. You can have bad door jamb switches.
When joining or jumping the two white wires in the connector for the timer controller...it does not need to be plugged into the timer controller because you are by-passing it entirely.
the door switches are new
Yes I thought for both white son, I will do the test tomorrow
------------------
les switch des portes sont neuf
Oui j'ai pens� pour les deux fils blanc, je vais faire le test demain
J'ai fait les tests suivants:
J'ai d�branch� la temporisation et connect� les fils blancs ensemble et les switch door sont ok, les lampes de courtoisies sont off quand je ferme les portes.
J'attend un nouveau transistor
-----------------------
Hello.
I did the following tests:
I unplugged the timer and connected the white wires together and the switch door are ok, the vourtesy lights are off when I close the doors.
I'm waiting for a new transistor
j'ai un neuf mais qui ne fonctionne pas, j'ai renvoy� et j'attend un autre, j'esp�re que oui
-------
I have a new one but that does not work. I sent back and I wait for another, I hope so
I continue my wiring while waiting for the new transistor.
The brown / white wire coming from the pump has been cut, it goes directly to the relay instead of going through the fuse box!
Is it dangerous for the wire to be connected like that?
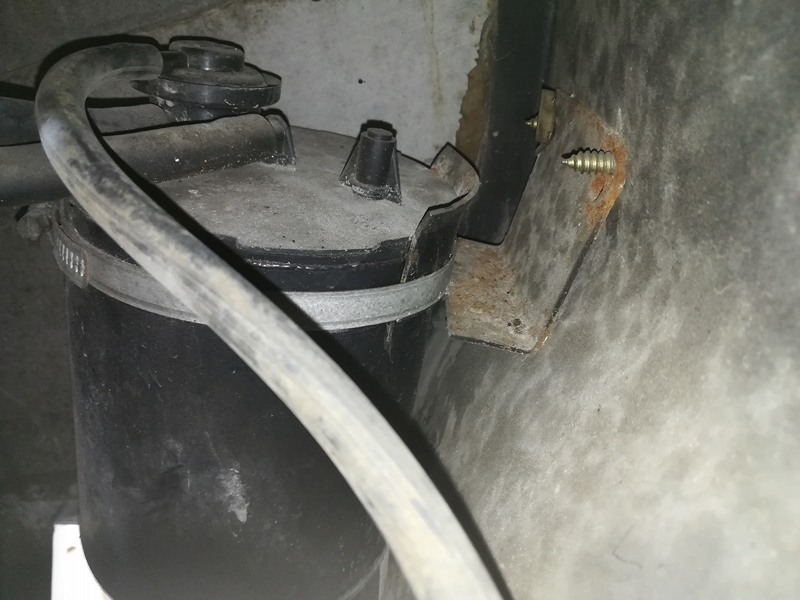
Does anyone know if a hose is coming in here?
I have a jar that sends air hoses to the engine, which is fixed on the left wheel well, below the master vac, I do not know if it is in its place because I can not place my jar of ice wash properly.
If you have a diagram of the positioning of the jar I am a taker, because the one I had not being the right model and was HS, I ordered a new one.
Thank you
----------------
Je continue mon cablage en attendant le nouveau transistor.
Le fil marron/blanc qui vient de la pompe a �t� coup�, il va directement au relais au lieu de passer par la boite � fusible !
Est-ce dangereux que le fil soit connect� comme ��?
Est-ce que quelqu'un sait si un tuyau vient se connecter ici ?
J'ai un bocal qui renvoi des durites d'air au moteur, qui est fix� sur le passage de roue gauche, en dessous du master vac, je ne sais pas si elle est � sa place, car je n'arrive pas � placer mon bocal de lave glace correctement.
Si vous avez un sch�ma du positionnement du bocal je suis preneur, car celui que j'avais n'�tant pas le bon mod�le et �tait HS, j'en ai command� un neuf.
The brown / white wire coming from the pump has been cut, it goes directly to the relay instead of going through the fuse box!
Is it dangerous for the wire to be connected like that?
I do not know what you are talking about. Is this above question regarding the photo below???? I do not know what you mean by 'pump'.
Does anyone know if a hose is coming in here?
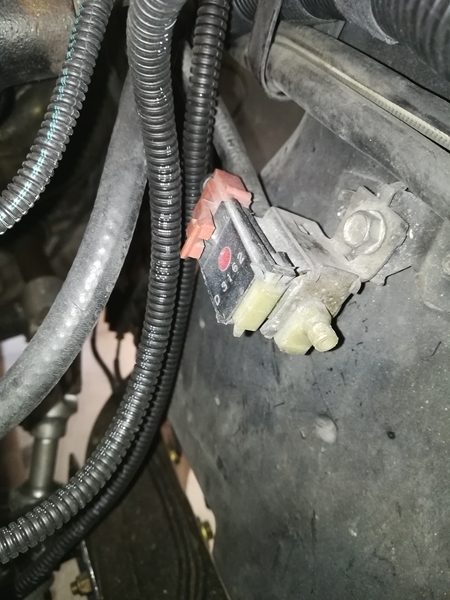
YES...the photo above is your PURGE SOLENOID. It is part of your emission system. It should have two hoses going to it...if my memory serves me correctly
I have a jar that sends air hoses to the engine, which is fixed on the left wheel well, below the master vac, I do not know if it is in its place because I can not place my jar of ice wash properly.
This is called a 'charcoal canister'. It is also a part of your emission system and also pulls vapors from you fuel tank and burns them. YES...normally this charcoal canister is mounted in a special bracket. I know that it is incorrectly mounted. Which is why your windshield washer bottle cannot be installed.
If you have a diagram of the positioning of the jar I am a taker, because the one I had not being the right model and was HS, I ordered a new one.
Sorry DUB;
They cut off these two brown and white threads and connected together
D�sol� DUB;
Ils ont coup� ces deux fils marrons et blanc et ont reli� ensemble.
--------------------
where is located this number 120 pieces towards the red arrow ?
ou est situ�e cette pieces num�ro 120 vers la fl�che rouge ?
YES...the photo above is your PURGE SOLENOID. It is part of your emission system. It should have two hoses going to it...if my memory serves me correctly
Ok, thank you I will see to buy the technical documentation, I may have a picture
Ok, merci je vais voir pour acheter la documentation technique, j'aurai peut �tre une photo
This is called a 'charcoal canister'. It is also a part of your emission system and also pulls vapors from you fuel tank and burns them. YES...normally this charcoal canister is mounted in a special bracket. I know that it is incorrectly mounted. Which is why your windshield washer bottle cannot be installed.
Ok, I'll go see another corvette.
Ok, je vais aller voir sur une autre corvette.
Sorry DUB;
They cut off these two brown and white threads and connected together
D�sol� DUB;
Ils ont coup� ces deux fils marrons et blanc et ont reli� ensemble.
That is a very strange think to do as the wires are joined together at the connection S120. Also this means that the relay for the fuel pump is not switching the pump, instead it is relying on the oil pressure switch to run the pump. I would reconnect it the way the diagram shows it to be.
--------------------
where is located this number 120 pieces towards the red arrow ?
ou est situ�e cette pieces num�ro 120 vers la fl�che rouge ?
The number 120 is the fuel pump. It is located in the fuel tank.
Fuel pump:
the brown and white wire that comes from the fuel pump is cut, it goes directly from the fuel pump to the relay.
It does not go through the fuse box v
The windshield washer its ok, cool.
--------------------------
Pompe � essence
le fil marron et blanc qui vient de la pompe � essence est coup�, il va directement de la pompe � essence au relais.
Il ne passe pas par la boite � fusibles
The charcoal filter is ok.
I'm still waiting for my transistor for the courtesy lamps.
On image # 3, this is the sensor that controls the cover flap, can you tell if the red and black wire goes well on the bottom connector and the ground wire on the blue connector?
Sorry I made a mistake by cutting the wires to clean again.
-----------------
Le filtre � charbon est ok.
j'attend toujours mon transistor pour les lampes de courtoisie.
Sur l'image n�3, il s'agit de la sonde qui commande le volet du capot, pouvez vous dire si le fil rouge et noir vas bien sur le connecteur du bas et le fil de masse sur le connecteur bleu ?
D�sol� j'ai fait une erreur en coupant les fils pour refaire au propre
there is a red and black thread and a black thread.
we do not see the red and black wire because it is on the car
-------------------
il y a un fil rouge et noir et un fil noir.
on ne vois pas la fil rouge et noir car il est sur la voiture