


My Rack Conversion
Team Owner


Joined: Jul 1999
Posts: 65,492
Likes: 230
From: Orange Park Florida
2. centering the rack means the left hand side of the rack would be sticking way out into the left wheel well and would interfere with the tire.[/QUOTE]
Keith, that last sentance I think is rong, as I RECALL, my rack is offset maybe one inch to the driver's side....so to try clearing my old original set of headers, still no go, so when the engine went back in I was forced to switch headers....no biggie....150 bux and case closed...
but the drivers end does not interfear with the tire, hits frame, due to 17x9/5 '92 vette rims with 255/50/17 rubber on there, but NOT the rack...course my rack is somewhat higher up, and tipped forward from the typical steeroids location and I cut a 1.5 inch high crescent out of the engine mount in rear to allow for steering input clearance...I have a SB, so not too cncerned over strength...and sure enuff, it's fine for allmost 4 years now....knock on wood....
GENE
Thread Starter
Racer

Joined: May 2005
Posts: 470
Likes: 1
From: Amelia Ohio
mrvette,
I'm suprised you were able to get your rack up so much higher. I measured mine, haven't install motor yet but it gives me 1/2" clearance from oil pan. I couldn't imagine doing the fabrication I did with the engine in, but the advantage would be to get it in as tight as you did. Got any pics?
Chris
I'm suprised you were able to get your rack up so much higher. I measured mine, haven't install motor yet but it gives me 1/2" clearance from oil pan. I couldn't imagine doing the fabrication I did with the engine in, but the advantage would be to get it in as tight as you did. Got any pics?
Chris
Race Director


Joined: Nov 2000
Posts: 11,872
Likes: 12
From: Waterloo ontario Canada
Originally Posted by ZD75blue
Norval:
The 16mm bolt for the heim joints, is it a shoulder bolt? Or are we running the threads right through the heim?
Thanks

The 16mm bolt for the heim joints, is it a shoulder bolt? Or are we running the threads right through the heim?
Thanks
You will not find a short 16 mm bolt without threads all the way to the head, pick a longer one and cut to length.
I don't like running threads inside the rod end.
Burning Brakes


Joined: Jul 2001
Posts: 1,038
Likes: 3
From: Clinton IL
I am picking up my rack assembly this afternoon from a 97 GA with the Sport/Performance tuned suspension. I also obtain a half a dozen different Steering U-joints from various vehicles.
The entire stock power steering is now removed as well as the motor and trans. Should give me plenty of room to work it out.
I am still a bit confused and intimidated by the task of running the measurements out to seek the most appropriate location for my brackets, but looking forward to the challenge.
Would any of you that have done this be willing to share your phone number with me in a p.m. so I could follow up a bit?
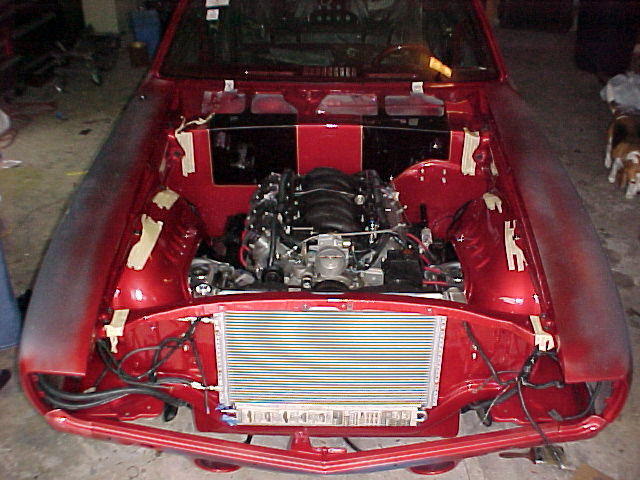
I am ultra shaving my firewall right now including building a trick cover for the wiper motor. I intend to go from the base/clear smooth painted firewall and inner fender I have now to textured bedliner spray and clear. Once this is complete and the clutch is installed on the motor I am ready to reassemble. So, the rack is an integrated part of the whole process.
Thanks!
Chris
The entire stock power steering is now removed as well as the motor and trans. Should give me plenty of room to work it out.
I am still a bit confused and intimidated by the task of running the measurements out to seek the most appropriate location for my brackets, but looking forward to the challenge.
Would any of you that have done this be willing to share your phone number with me in a p.m. so I could follow up a bit?
I am ultra shaving my firewall right now including building a trick cover for the wiper motor. I intend to go from the base/clear smooth painted firewall and inner fender I have now to textured bedliner spray and clear. Once this is complete and the clutch is installed on the motor I am ready to reassemble. So, the rack is an integrated part of the whole process.
Thanks!
Chris
Burning Brakes
Joined: Jul 2001
Posts: 1,038
Likes: 3
From: Clinton IL
For those of you that have shared your phone number, I really appreciate it. I am very close to launching this as I got the firewall and engine bay repainted this weekend and finally got the engine and trans bolted back and waiting to go in.
It appears from what I can see that initially mounting the rack has more to do with getting it to fit well against the frame with good access to the steering input than it does aligning the tie rods. It appears from what I see that aligning the tie rods to the correct specs is a function of the adapater plate from the rack to the tie rods.
So, I will start by getting the rack securely mounted so that is is even and square from side to side.
I have a variety of U joints from some other cars to set up the steering shaft connection.
Corvette Stories
The Best of Corvette for Corvette Enthusiasts

Every 2027 Corvette Engine Explained
Joe Kucinski
Designer Imagines A Corvette That Looks More Like a Corvette Than the Corvette
Verdad Gallardo
10 Ugly Corvettes That We Still Kinda Love
Joe Kucinski
Top 10 Most Expensive Corvettes Ever Sold on Bring A Trailer
Brett Foote
10 Things Every Corvette Owner Needs (2026 Edition)
Michael S. Palmer
8 Most "Only Corvette Owners Understand" Quirks and Problems
Pouria Savadkouei
10 Reasons the C6 Z06 is Still A Performance Benchmark After 20 Years
Joe Kucinski
How Much Horsepower Every Corvette Engine "LOST" in 1972
Joe Kucinski
Top 10 DOs and DON'Ts for Protecting Your Convertible Top!
Michael S. PalmerLe Mans Master


Joined: Sep 2000
Posts: 9,078
Likes: 7
From: DFW TX
Cruise-In VII Veteran
St. Jude Donor '07
Originally Posted by hosspowerinc
What kind of cars did you get the joints off of? I would like to use some junkyard stuff since the new ones cost way too much.

Burning Brakes
Joined: Jul 2001
Posts: 1,038
Likes: 3
From: Clinton IL
Originally Posted by hosspowerinc
What kind of cars did you get the joints off of? I would like to use some junkyard stuff since the new ones cost way too much.
My buddy works for Chevy as a master tech. Right now they are doing massive replacements on Silverado/Tahoe, etc. for noise/popping in the U joint assembly. It is a nice high quality set of U joints with a slip yoke in the middle. If you visit your local Chevy Dealer you will find them in buckets in the parts room and around the shop. The new style trucks use a full rack & pinion system.
The problem is the grease works its way out on the slip yoke causing it to bind a bit. For a long time they would just re-grease it. Now they are replacing them. Had it happen to my 04 Silverado late last year.
The slip yoke isn't a problem since I am setting it to a certain length and then locking it down via a tack weld or bolt/pin. I could also just replace the slip yoke shaft with a solid shaft.
Long story short, there are thousands of them out there for the getting once they have cleared the warranty department and are ready for the scrap heap.
I will have to modify the end of my steering column shaft or the U-joint to connect. Haven't gotten there yet. Right now the other end fits perfect on the rack.

Drifting


Joined: May 2001
Posts: 1,651
Likes: 13
From: Holly MI
69Myway,
Do you know what type of joint the GM truck joints are? I am about at the same point you are. I spent an hour or two at the junkyard on Sat pulling off the U shaped mounting brackets for the rack. (By the way, anyone in Michigan, I now know where a used rack is sitting in a junkyard already disconnected.) Anyway, I looked at GM trucks and Vans, but the joints weren't right. I have pretty much resigned myself to buying the Borgeson joints from Summit/Jegs. Both joints and a section of the correct DD shaft will be about $200. I can't see any way possible to mount the rack high enough to go with only two joints with the big block.
Ken
Burning Brakes
Joined: Jul 2001
Posts: 1,038
Likes: 3
From: Clinton IL
Originally Posted by bb69
69Myway,
Do you know what type of joint the GM truck joints are? I am about at the same point you are. I spent an hour or two at the junkyard on Sat pulling off the U shaped mounting brackets for the rack. (By the way, anyone in Michigan, I now know where a used rack is sitting in a junkyard already disconnected.) Anyway, I looked at GM trucks and Vans, but the joints weren't right. I have pretty much resigned myself to buying the Borgeson joints from Summit/Jegs. Both joints and a section of the correct DD shaft will be about $200. I can't see any way possible to mount the rack high enough to go with only two joints with the big block.
Ken
Do you know what type of joint the GM truck joints are? I am about at the same point you are. I spent an hour or two at the junkyard on Sat pulling off the U shaped mounting brackets for the rack. (By the way, anyone in Michigan, I now know where a used rack is sitting in a junkyard already disconnected.) Anyway, I looked at GM trucks and Vans, but the joints weren't right. I have pretty much resigned myself to buying the Borgeson joints from Summit/Jegs. Both joints and a section of the correct DD shaft will be about $200. I can't see any way possible to mount the rack high enough to go with only two joints with the big block.
Ken
I did a Steeroid on my 69 Camaro using a 1981 Vette column. Had some fun with it because I cut the entire column short by about 2.5" and got the main housing to hide up inside the firewall leaving only the shaft exposed on the engine side. I then modified the tip of the shaft to slip fit the joints supplied with the Steeroid kit. I am using this same approach on the Vette, although I don't intend to have to shorten the column housing.
Drifting
Joined: May 2001
Posts: 1,651
Likes: 13
From: Holly MI
I'd really like to see what you come up with. A may also stop by the local GM dealer to see what they say. I have colapsed my column as far as it will go, and it's now between 3-4 inches sticking out of the firewall between the lower column and actual splines. I have the rack pushed up until the lines are basically touching the pan. I haven't measured the angle with a protractor, but it's definitly more than the 35 degrees that Borgeson says their joint will handle.
By the way, nice choice in cars. I also have a 69 Camaro I'm trying to put back together. How did you like the rack conversion in it?
Ken
By the way, nice choice in cars. I also have a 69 Camaro I'm trying to put back together. How did you like the rack conversion in it?
Ken
Burning Brakes
Joined: Jul 2001
Posts: 1,038
Likes: 3
From: Clinton IL
Thanks Ken,
I love the Rack in the Camaro. It is from a Grand Prix. You can see more on my website, but here are the detailed pictures from www.mcspeed.homestead.com
You can see in this final picture how the steering shaft come out of the firewall and slips right into the U-joint assembly.
If getting another inch or so would help on the angle, cutting the column is not that big of a deal. I measured and cut a couple of inches out, then slid the bottom part back in place and welded it on. I was able to retain the same bearing housing, etc. with no problems.
Burning Brakes
Joined: Jul 2001
Posts: 1,038
Likes: 3
From: Clinton IL
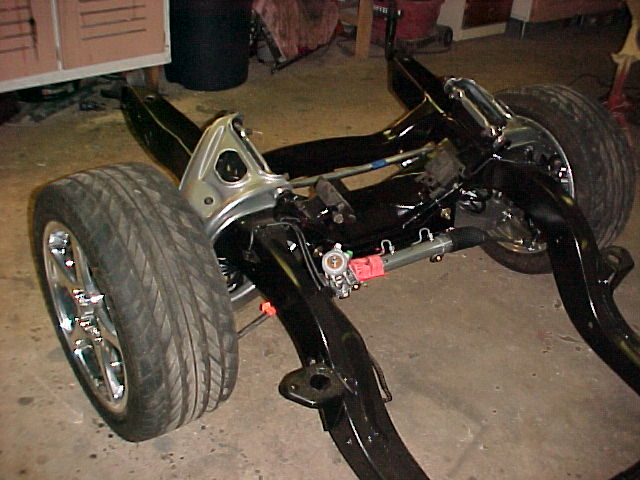
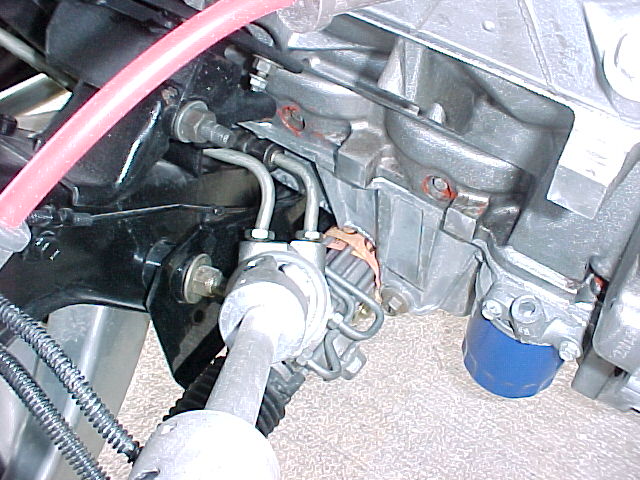
Here is what I have so far.
Notice the input shaft with two U-joints. I told you wrong earlier. This is not one of the late model full size truck shafts, it is a late model Impala shaft. There is no binding in either direction. I may have to dent the header a tad once the engine is in.
What do you think so far?
http://mcspeed.homestead.com/Rackinstall.html
Thread Starter
Racer
Joined: May 2005
Posts: 470
Likes: 1
From: Amelia Ohio
Chris,
Sorry to cut you off, I was in Knoxville for my sons baseball tourney and took a wrong turn. Anyway your looking good but I'm with BB69. How does the rotation feel and what is your plan for the tie rods?
Chris
Sorry to cut you off, I was in Knoxville for my sons baseball tourney and took a wrong turn. Anyway your looking good but I'm with BB69. How does the rotation feel and what is your plan for the tie rods?
Chris
Burning Brakes
Joined: Jul 2001
Posts: 1,038
Likes: 3
From: Clinton IL
Originally Posted by bb69
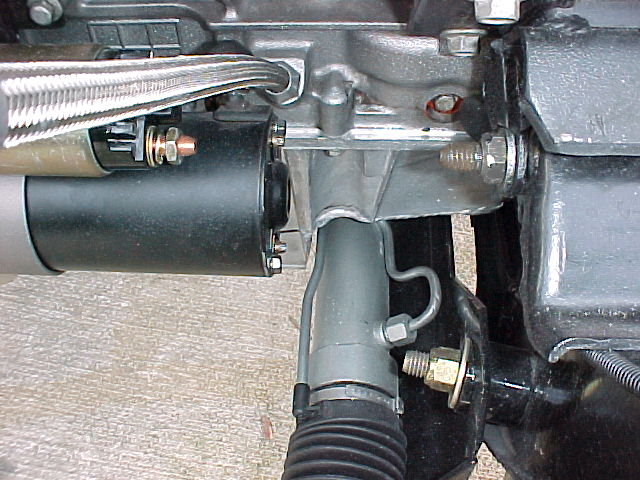
Have you tried rotating the steering column yet? It looks like that upper u-joint is at a pretty big angle. Did the splines fit, or did you modify them?
Ken
Ken
I have loaded it up the best I can being apart like this and it does not bind (turning with the steering wheel). The picture makes it look pretty severe, but the two sides of the upper joint never touch and rotate very smooth.
All I had to do was grind a flat spot on each side of the stock corvette column shaft for it to slip over. There is a locking bolt on the upper u joint that cinches it down tight.
Right now I am playing with the stock grand am tie rods. If I get a second passenger side tie rod to use on the driver side and lengthen the adjuster nuts by 2" on both sides, it looks like I can run that. My wheel hits the lock position on the VB&P lower control arms before the rack runs out of turning radius (being offset in the frame).
I can't get back to it until the end of this week. More updates then.


Burning Brakes
Joined: Jul 2001
Posts: 1,038
Likes: 3
From: Clinton IL
Originally Posted by evalu8r
Chris,
Sorry to cut you off, I was in Knoxville for my sons baseball tourney and took a wrong turn. Anyway your looking good but I'm with BB69. How does the rotation feel and what is your plan for the tie rods?
Chris
Sorry to cut you off, I was in Knoxville for my sons baseball tourney and took a wrong turn. Anyway your looking good but I'm with BB69. How does the rotation feel and what is your plan for the tie rods?
Chris
No problem. I appreciate all your help so far.
I am really going to give the pair of right hand ga tie rods a shot and see what I can come up with. I will run a bump steer test on it as soon as I can get them hooked up. It is much easier with the VB&P mono spring because I can just disconnect it and then run the travel up and down measuring the bump steer while on the jack stands.

