


More Clutch Woes...
Thread Starter
Racer


Joined: Oct 2001
Posts: 385
Likes: 3
From: Lincoln CA
Here is where this started...
My first Clutch fiasco post
So, less than 500 miles on a near complete "restoration" and the Centerforce (gold) clutch was slipping under low rpm, high gear loads.
So I pulled it out and installed a McLeod Disk, PP, and TOB.
PN's:
360820 (PP ?)
260873 (Clutch disk ?)
16010 (TOB)
The "old" TOB was longer then the new one, and I figured that might have been the problem in the first case. The old TOB might have been too long and was not allowing the PP springs to relax entirely, thus never allowing the clutch to clamp fully, allowing slippage.
So, now, all back together. The clutch pedal rod coming through the firewall seems to be bent as well. The adjustment is ALL the way at the bottom and I am now FINALLY getting full release. But you have to damned near push it through the floor (as in, something isn't right) for it to fully release.
Turns out before I didn't have the clutch fork in the right position. It was not on the TOB correctly, NOR on the clutch fork pivot ball correctly.
Here are some pics, hopefully someone can point me in the right direction.
This shows the adjustment I am at that gives full release, but like I said, you have to STAND on the pedal and it has to be pressed THROUGH the carpet.

Same thing, different angle.

This shows where the clutch fork is positioned at the current adjustment.

My first Clutch fiasco post
So, less than 500 miles on a near complete "restoration" and the Centerforce (gold) clutch was slipping under low rpm, high gear loads.
So I pulled it out and installed a McLeod Disk, PP, and TOB.
PN's:
360820 (PP ?)
260873 (Clutch disk ?)
16010 (TOB)
The "old" TOB was longer then the new one, and I figured that might have been the problem in the first case. The old TOB might have been too long and was not allowing the PP springs to relax entirely, thus never allowing the clutch to clamp fully, allowing slippage.
So, now, all back together. The clutch pedal rod coming through the firewall seems to be bent as well. The adjustment is ALL the way at the bottom and I am now FINALLY getting full release. But you have to damned near push it through the floor (as in, something isn't right) for it to fully release.
Turns out before I didn't have the clutch fork in the right position. It was not on the TOB correctly, NOR on the clutch fork pivot ball correctly.
Here are some pics, hopefully someone can point me in the right direction.
This shows the adjustment I am at that gives full release, but like I said, you have to STAND on the pedal and it has to be pressed THROUGH the carpet.
Same thing, different angle.
This shows where the clutch fork is positioned at the current adjustment.
Thread Starter
Racer
Joined: Oct 2001
Posts: 385
Likes: 3
From: Lincoln CA
With the Z-bar lever removed, here is the rear movement of the clutch fork.

With the Z-bar lever removed, here is the foward movement of the clutch fork.

You can also sorta see the TOB and PP in here, along with the clutch fork pivot ball.
With the Z-bar lever removed, here is the foward movement of the clutch fork.
You can also sorta see the TOB and PP in here, along with the clutch fork pivot ball.
Thread Starter
Racer
Joined: Oct 2001
Posts: 385
Likes: 3
From: Lincoln CA
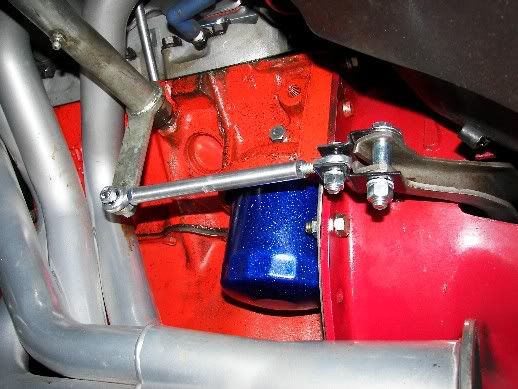
Here is a different angle of the clutch fork, pivot ball and TOB.

Here is the stupid bracket that has given me hours of frustration. Thanks to GMPP for not providing a bellcrank boss on these motors... At least they started putting mechanical fuel pump bosses in them.

Here is the stupid bracket that has given me hours of frustration. Thanks to GMPP for not providing a bellcrank boss on these motors... At least they started putting mechanical fuel pump bosses in them.
Melting Slicks


Joined: Mar 2005
Posts: 2,095
Likes: 299
From: Midlothian VA
The clutch pedal rod has a factory bend in it.
It appears, from your photo, that yours looks correct with just such a slight bend.
Your clutch pedal return spring should be attached, at the firewall, to a small hole just beneath the firewall rod boot.
Last time I had a adjustment that far out on the clutch rod it was due to having machined the flywheel too many times. The thinner the flywheel the farther down the rod you must go.
Race Director


Joined: Jan 2000
Posts: 13,018
Likes: 2,262
From: Corsicana, Tx
2020 C2 of the Year - Modified Winner
2020 Corvette of the Year (performance mods)
C2 of Year Winner (performance mods) 2019
2017 C2 of Year Finalist
Great pics..that helps....
You have a couple of issues it looks like. First thing you are going to need to do most likely is to install either a longer or an adjustable pivot ball for the throwout arm.
You want to get the arm/TOB relationship to resemble pic # 5 when the pedal is released. You should have the arm as far forward as possible without hitting hole in bellhousing and minimal movement of arm to contact pressure plate. The bearing should have just enough clearance to clear...maybe 3/16"-1/4" from pressure plae when at rest. You can do this with a longer stud to move arm forward, or you can use a different TOB. Years ago there 3 bearings comoonly available..a short, medium and a long one. Nowadays you only find the short and long. So that's where the adjsutable throwout bearing comes in.
There is another way..for approx $50 you can get an 'adjustable" TOB from Mcleod. It's pretty neat because is has little slip collar spacers that allow you to make it anything you want. I have one in my car.
Either way, when you get arm moved forward at rest, you will be able to move adjuster nuts back up arm.
But it also looks like your arm is flexing big time right where threads meet the link from pedal to crosshaft. Have someone push it and you watch it as they do it..I bet it is flexing and it only takes a little bit to eat upp tons of travel. It's possible your throwout arm is contacting the back of bellhousing opening and is bottoming out without releasing clutch and then bending linkage. Again....getting it all moved forward as described above will take care of that too.
It also looks like one of the clips on the throwout arm is not seated properly over the stud.
You will have to do something with that pedal link that is flexing...once it starts that it will continue. A low buck way that really helps is to slip a piece of 3/8" metal gas tubing over it and use a jam nut to tighten it back up against the shank part right past threads. That will seriously reinforce that section...just leave enough room for adjustment nuts.
Or you can go to Speed Direct heim Joint linkage..but you will still need to address the stud/bearing issue first.
Hope all this helps,
JIM
Thread Starter
Racer
Joined: Oct 2001
Posts: 385
Likes: 3
From: Lincoln CA
Originally Posted by Hammerhead Fred
The clutch pedal rod has a factory bend in it.
It appears, from your photo, that yours looks correct with just such a slight bend.
Your clutch pedal return spring should be attached, at the firewall, to a small hole just beneath the firewall rod boot.
Last time I had a adjustment that far out on the clutch rod it was due to having machined the flywheel too many times. The thinner the flywheel the farther down the rod you must go.
It appears, from your photo, that yours looks correct with just such a slight bend.
Your clutch pedal return spring should be attached, at the firewall, to a small hole just beneath the firewall rod boot.
Last time I had a adjustment that far out on the clutch rod it was due to having machined the flywheel too many times. The thinner the flywheel the farther down the rod you must go.
I can't seem to find a hole anywhere on the firewall for the clutch return spring... I just replaced the clutch pedal firewall boot too and didn't see anything there.
Thread Starter
Racer
Joined: Oct 2001
Posts: 385
Likes: 3
From: Lincoln CA
Originally Posted by 427Hotrod
Great pics..that helps....
You have a couple of issues it looks like. First thing you are going to need to do most likely is to install either a longer or an adjustable pivot ball for the throwout arm.
You have a couple of issues it looks like. First thing you are going to need to do most likely is to install either a longer or an adjustable pivot ball for the throwout arm.
Originally Posted by 427Hotrod
You want to get the arm/TOB relationship to resemble pic # 5 when the pedal is released. You should have the arm as far forward as possible without hitting hole in bellhousing and minimal movement of arm to contact pressure plate. The bearing should have just enough clearance to clear...maybe 3/16"-1/4" from pressure plae when at rest. You can do this with a longer stud to move arm forward, or you can use a different TOB. Years ago there 3 bearings comoonly available..a short, medium and a long one. Nowadays you only find the short and long. So that's where the adjsutable throwout bearing comes in.
Originally Posted by 427Hotrod
There is another way..for approx $50 you can get an 'adjustable" TOB from Mcleod. It's pretty neat because is has little slip collar spacers that allow you to make it anything you want. I have one in my car.
Originally Posted by 427Hotrod
Either way, when you get arm moved forward at rest, you will be able to move adjuster nuts back up arm.
Originally Posted by 427Hotrod
But it also looks like your arm is flexing big time right where threads meet the link from pedal to crosshaft. Have someone push it and you watch it as they do it..I bet it is flexing and it only takes a little bit to eat upp tons of travel. It's possible your throwout arm is contacting the back of bellhousing opening and is bottoming out without releasing clutch and then bending linkage. Again....getting it all moved forward as described above will take care of that too.
Originally Posted by 427Hotrod
It also looks like one of the clips on the throwout arm is not seated properly over the stud.
Originally Posted by 427Hotrod
You will have to do something with that pedal link that is flexing...once it starts that it will continue. A low buck way that really helps is to slip a piece of 3/8" metal gas tubing over it and use a jam nut to tighten it back up against the shank part right past threads. That will seriously reinforce that section...just leave enough room for adjustment nuts.
Originally Posted by 427Hotrod
Or you can go to Speed Direct heim Joint linkage..but you will still need to address the stud/bearing issue first.
Originally Posted by 427Hotrod
Hope all this helps,
JIM
JIM
Oh, I'm not sure you have any idea how much this helps. SO very thankful!
Corvette Stories
The Best of Corvette for Corvette Enthusiasts

Top 10 Most Expensive Corvettes Ever Sold on Bring A Trailer
Brett Foote
10 Things Every Corvette Owner Needs (2026 Edition)
Michael S. Palmer
8 Most "Only Corvette Owners Understand" Quirks and Problems
Pouria Savadkouei
10 Reasons the C6 Z06 is Still A Performance Benchmark After 20 Years
Joe Kucinski
How Much Horsepower Every Corvette Engine "LOST" in 1972
Joe Kucinski
Top 10 DOs and DON'Ts for Protecting Your Convertible Top!
Michael S. Palmer
Top 10 Most Explosive Corvettes Ever Made: Power-to-Weight Ratio Ranked!
Joe Kucinski
150 hp to 1,250 hp: Every Corvette Generation Compared by the Specs That Matter
Joe Kucinski
8 Coolest Corvette Pace Cars (and Replicas) of All Time
Verdad GallardoRacer
Joined: Aug 2000
Posts: 434
Likes: 3
From: Cleveland Ohio
With most aftermarket clutch setups most people have installed a longer bar between the clutch fork and the Z-bar. This will allow you the to be able to adjust the pedal to allow for full range of movement of the clutch pedal and fork.
I am guessing your clutch pedal inside the car is not all the way up.
I am guessing your clutch pedal inside the car is not all the way up.
Thread Starter
Racer
Joined: Oct 2001
Posts: 385
Likes: 3
From: Lincoln CA
Originally Posted by 76stingracer
With most aftermarket clutch setups most people have installed a longer bar between the clutch fork and the Z-bar. This will allow you the to be able to adjust the pedal to allow for full range of movement of the clutch pedal and fork.
I am guessing your clutch pedal inside the car is not all the way up.
I am guessing your clutch pedal inside the car is not all the way up.
I did just purchase a "Moroso" bar that goes between the Z-bar and the clutch fork, but when trying to thread the new "nut" onto it (the piece that threads on and then goes through the hole in the Z-bar and held in place with a "pin") the threads didn't seem to work.
So I ran a thread repair tool/tap through the "nut" and it went through like butter. Then I choose the same thread size/count and ran a repair die over it with lube and it chewed the hell out of the threads...
Funny thing is, the "nut" would hand thread on about 5 or 6 threads and then I could turn it another 1-1.5 threads with a pair of pliers and then it would seize. So, somehow the threads farther up were not right. Either way I have the Speed Direct Linkage on it's way.
What do you mean that my clutch pedal is probably not up all the way? The pedal should be about even with the brake pedal, right?
Race Director
Joined: Dec 1999
Posts: 19,610
Likes: 778
From: Forked River NJ
Originally Posted by ZO SIC
What do you mean that my clutch pedal is probably not up all the way? The pedal should be about even with the brake pedal, right?

Team Owner

Joined: Jul 2004
Posts: 40,412
Likes: 792
From: Redondo Beach, California
I've read the several comments about the Speed Direct heim joint linkage. When you're at the point of placing the Zbar to clutch fork connecting rod, would it just be a good idea to install the Speed Direct even if you don't know if you need it? In other words, would this be good insurance to help solve a later problem that might crop up? Whenever possible I'd like to try to eliminate problems up front. I'm at the juncture where I soon will be checking out my shifter linkage and clutch functions. I really hope I don't have problems.
Thanks
Thanks
Burning Brakes


Joined: Aug 2002
Posts: 1,146
Likes: 10
From: Scottsboro Alabama
Originally Posted by 68/70Vette
I've read the several comments about the Speed Direct heim joint linkage. When you're at the point of placing the Zbar to clutch fork connecting rod, would it just be a good idea to install the Speed Direct even if you don't know if you need it? In other words, would this be good insurance to help solve a later problem that might crop up? Whenever possible I'd like to try to eliminate problems up front. I'm at the juncture where I soon will be checking out my shifter linkage and clutch functions. I really hope I don't have problems.
Thanks
Thanks
The Speeddirect clutch linkage is well worth installing. No slop and very smooth! Much better than stock new linkage, I recommend anyone with stock linkage to change to the SD linkage. You will like it!

Thread Starter
Racer
Joined: Oct 2001
Posts: 385
Likes: 3
From: Lincoln CA
Ok, found these two parts on Summit.
Lakewood PN-15501 for $16.95
and
Mr Gasket PN-3855G for $13.95
Both should work? Any reason to pick the Lakewood over the cheaper Mr. Gasket? I normally stay away from the "cheaper" hi-po parts, but something like this, I have no idea.
And can I adjust these pivot ***** with the trans installed?
Lakewood PN-15501 for $16.95
and
Mr Gasket PN-3855G for $13.95
Both should work? Any reason to pick the Lakewood over the cheaper Mr. Gasket? I normally stay away from the "cheaper" hi-po parts, but something like this, I have no idea.
And can I adjust these pivot ***** with the trans installed?
Race Director
Joined: Jan 2000
Posts: 13,018
Likes: 2,262
From: Corsicana, Tx
2020 C2 of the Year - Modified Winner
2020 Corvette of the Year (performance mods)
C2 of Year Winner (performance mods) 2019
2017 C2 of Year Finalist
Ok, let's see...
Either stud will work, and no you most likely won't be able to adjust them while it's all together. You will have to get trans back several inches to get stud out. You adjust it to right length and lock it with locknut...then install the assy. Once I had mine set I welded the nut to hold it. It was a real PITA when it came loose once. At least use red loctite to hold nut.
There are generally 2 lengths of studs available,,,again there used to be 3. Now we have to use an adjustable one to get something inbetween.
Is that a Borg/Beck clutch or diaphragm or raised diaphragm type clutch you have now? The regular diaphragm usually takes a long bearing, the raised and Borg/Beck type usually take a short one..but often need an adjustable stud. But you can juggle long and short and adjustable studs to get what you need for angles. You have a short stud in there now...it doesn't take much to change things a lot.
The throwout bearing has to be assembled before installation in whatever configuration you need. Can't change it without pulling it all out again.
Ask for Les at Mcleod directly....better than the main Tech Line. Still tough sometimes.
The arm I'm talking about is the threaded adjuster rod coming out of firewall that is hooked to pedal on one end and crosshaft on the other. If you look closely at the area right where threads end up on the shaft, you can see it is bent slightly. I bet it flexes there when depressed. That can happen when you have angles all wrong. It either needs to be straightened and re-inforced with tube idea I mentioned, or wait for the SD linkage..it will take care of the issue.
My lo buck solution is to slip a piece of 3/8" metal tubing over the threaded area where you adjust and tap it all the way back up shaft until it hits the shank. It will only be 1" or so long with a 3/8" nut on the "outside" to tighten it back up against the shank area. Then you stick the next 3/8" nut on, install the little block/stud assy and the next nut. Just need to make sure there is room to adjust linkage by moving nuts and block up and down shaft. If not, you have to shorten tube and do it again.
But again. SD linkage will repalce all this.
JIM
Thread Starter
Racer
Joined: Oct 2001
Posts: 385
Likes: 3
From: Lincoln CA
Does anyone have pics of the SD linkage installed?
Does it replace the rod that comes through the firewall? If so, does it fit through the stock grommet, or does that require trimming?
Great, so I get to pull the trans a number of times to adjust the pivot ball... It looks like the threaded end of the pivot ball has a slot for a screwdriver, so I was hoping I could access the jam nut through the clutch fork opening in the bellhousing and adjust the length of the pivot ball with a screwdriver through the "bushing" that mounts in the bellhousing. Sounds like that is wishfull thinking.
Thank you VERY much for all the help so far.
I believe this clutch is a normal diaphragm clutch, but it could be the raised diaphram. I called McLeod, told them what engine/trans/year I had and they sold me those parts. PN's above I think.
Race Director
Joined: Dec 1999
Posts: 19,610
Likes: 778
From: Forked River NJ
Here is a picture of the lower links. The upper rod is also replaced. I made a spacer as you can see because when you tighten it down on the clutch fork it crushes the fork. The spacer prevents this and you can really tighten it up.
Racer
Joined: Aug 2000
Posts: 434
Likes: 3
From: Cleveland Ohio
Originally Posted by Gordonm
No. My clutch pedal is up higher than the brake. Pull the clutch pedal all the way up against the stop inside the car. The spring should hold it against the stop. You should feel the TO bearing contact the clutch about 1 inch down from all the way released.
 Bingo. This is how it should be concerning the pedal.
 Disconnect the linkage between the Z-bar and the clutch fork and allow the spring to move the pedal all the way up. Now move the adjustable pivot somewhere in the center of the adjustment that is available.
Now take a look at the distance where the bar you took out between the Z and the fork is. This will give you an approximate length for the rod. Should need about a 1 - 2 inches longer bar.
Race Director

Joined: Sep 1999
Posts: 11,361
Likes: 383
From: Plano TX
As Jim said: Adjustable ball stud is what you need. The bellhousing must come out. Install the adjustable stud so that the top of the stud is 4.75" from the front face of the bellhousing. Once you have it adjusted, weld the nut as it WILL come loose otherwise no matter how much you tighten it.
Race Director
Joined: Sep 1999
Posts: 11,361
Likes: 383
From: Plano TX
Originally Posted by 76stingracer
Now take a look at the distance where the bar you took out between the Z and the fork is. This will give you an approximate length for the rod. Should need about a 1 - 2 inches longer bar.