


 I love my side pipes, makes it look like a Vette should and the sound is great too!
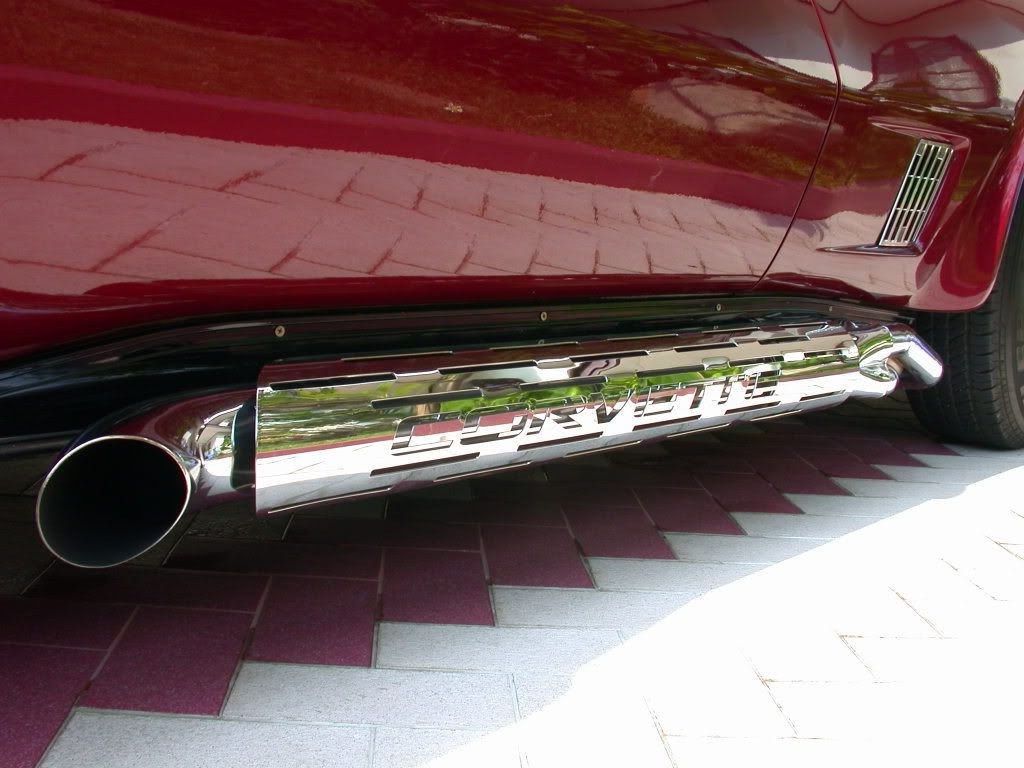

My sidepipe installation experience
Thread Starter
Instructor


Joined: Jan 2005
Posts: 101
Likes: 0
From: Ocean Gate, New Jersey
Sidepipes � installation experience:
1. The installation is not complicated or unusually difficult � but it takes a fair amount of time and requires adjustments for some unanticipated problems.
2. Several rocker panel molding screws were rusted and/or stripped � I needed to drill out several of the screws.
3. Raised car 18 inches as discussed on the Forum (Hooker recommends 36 inches) � the only difficulty I had was that the Temperature Switch was in the way when I attempted to install the driver side header. I had to unscrew the switch and find a way to catch the leaking antifreeze � I used a bucket & funnel to catch most of it.
4. 12mm bolts are provided to attach the new headers � I could only get a ratchet wrench on one and had to use an open ended crescent wrench on all of the others � a quarter turn at a time!
5. I took the opportunity to sand the exposed section of the frame, apply rust reformer/primer and paint the section with Rust-oleum satin black. I intend to recondition any exposed metal as I am able � without a total frame-off restoration until some future time.
6. The sidepipe mounting bracket assembly instructions drawing is wrong � it neglected to identify the second rubber washer or its placement. I called the Holly technical support line and they confirmed that the drawing is incorrect.
7. The installation instructions are poorly written and indicated that the rocker panel molding should be �replaced, but not tightened� before installing the sidepipes. �Not tightened� would seem to imply that the screws should be inserted � but this is impossible since the rocker panel molding covers the mounting bolts. They need to be placed in position where they will eventually be attached but you will need to assemble the mounting bolts, washers, rubber grommets and nuts before inserting the screws and attaching the rocker panels � tricky business.
8. The mounting bracket is designed to slip into a slot in the frame of the car but it could easily fall into the frame during assembly of the 2 rubber washers, metal washer, lock washer, side pipe bracket and lock nut. I wrapped a thin piece of wire around the innermost thread on the bracket so that I could maintain some control of it during the assembly. I also asked Holly technical support about this and their only advice was �be careful�.
9. �Ouch� it only took a couple of driving experiences before I carelessly let my leg touch the sidepipe as I was exiting the car. A week has passed and I am still treating what appears to be a 2nd degree burn.
10. It is all worth it � I love the sound of the �Maxi-flow� mufflers and the way the car looks with sidepipes.
Team Owner


Joined: Jul 1999
Posts: 65,492
Likes: 230
From: Orange Park Florida
NO question about it, sidepipes look GRAND, just gotta love em....the only issues I have are noise next to my ear....and the leg burn issue....
I feel there has to be some sort of solution to both problems, and am surprised that after what? 40 years since the show car anyway, that someone has not come up with a definitive final solution to the above two issues.....
GENE
I feel there has to be some sort of solution to both problems, and am surprised that after what? 40 years since the show car anyway, that someone has not come up with a definitive final solution to the above two issues.....
GENE
Thread Starter
Instructor
Joined: Jan 2005
Posts: 101
Likes: 0
From: Ocean Gate, New Jersey
Originally Posted by James B
What did you do about the rear valence? did you fill it in or are you just going to leave it be untill a later date.
Melting Slicks

Joined: Oct 2004
Posts: 2,662
Likes: 8
From: Knoxville Tennessee
I installed slotted shields to keep from burning my legs. They are for Cobra sidepipes but fit nicely. They get mildly warm but never hot. I didn't think I would like the looks of them but everyone seems to think they look good. As for the noise; it is sometimes annoying at low speeds, but at highway speeds it is all but nonexistant.
Bernie
Bernie
Corvette Stories
The Best of Corvette for Corvette Enthusiasts

8 Coolest Corvette Pace Cars (and Replicas) of All Time
Verdad Gallardo
Top 10 Corvette Engines RANKED by Peak Torque (70+ Years of Muscle!)
Joe Kucinski
Corvette ZR1X Will Be Pacing the Indy 500, And Could Probably Race, Too!
Verdad Gallardo
Top 10 Corvettes Coming to Mecum Indy 2026!
Brett Foote
Top 10 C9 Corvette MUST-HAVES to Fix These C8 Generation Flaws!
Michael S. Palmer
10 Revolutionary 'Corvette Firsts' Most People Don't Know
Joe Kucinski
5 Reasons to Upgrade to an LS6-Powered Corvette; 5 Reasons to Stay LT2
Michael S. Palmer
2027 Corvette vs The World: Every C8 vs Its Closest Competitor
Joe Kucinski
10 Most Common Corvette Problems of the Last 20 Years!
Joe Kucinski
Drifting


Joined: Oct 2005
Posts: 1,257
Likes: 4
From: North Carolina
The Side Pipes look AWESOME!! How about a sound clip,... I really want to add a set to my 82 but I can't find a set for a reasonable price in nice condition, I was also worried about the sound... My dads got the hooker sidepipes on his vette,... They look great but too weak sounding.
Good Install,
Dan
Good Install,
Dan


Le Mans Master

Joined: Jan 2004
Posts: 8,295
Likes: 30
From: one night in Bangkok you are never lonely
Originally Posted by Xakk
Speaking of sidepipe covers Dean, how goes the licensing process? How long before every Forum member is running around with Stingray covers? 
www.steelshields.com