


My homemade ring compresser
Thread Starter
Race Director


Joined: Nov 2000
Posts: 11,872
Likes: 12
From: Waterloo ontario Canada
I installed my pistons this weekend in my new 540. I really hate the band type ring compresser because I always wonder if a ring caught and broke. Nearly every piston leaves me wondering. I tried ordering a new tapered sleeve but a 4.500 sleeve is backordered and it could be weeks so I decided to make my own.
I took about a 5 inch long by 6 inch diameter chunk of aluminum and wittled one out on the lathe making the small end about .002 less then the cylinder bore and the big end larger then the rings so I could start the piston easy.
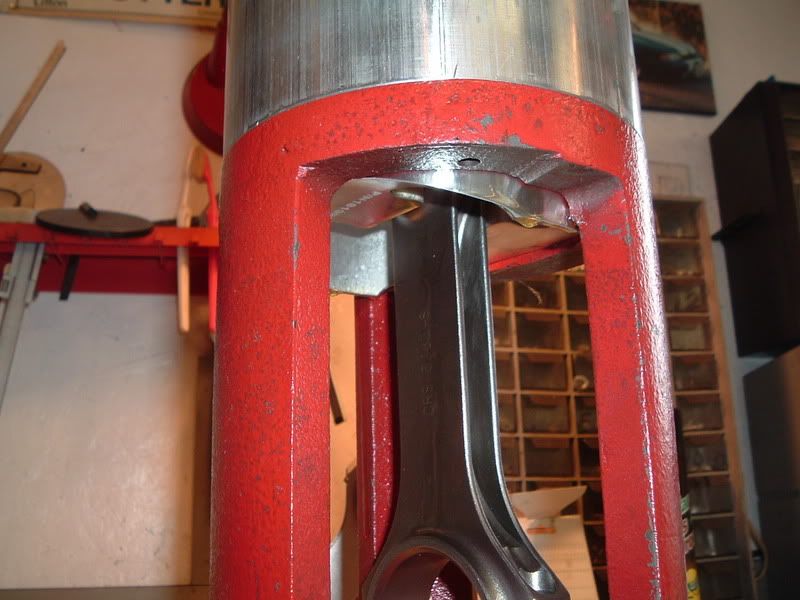
I also decided that I needed something to rest the tool on while the rod hangs down so I started with a very heavy wall pipe, turned the ends so it was flat and square and then milled slots in the side for easy rod access.
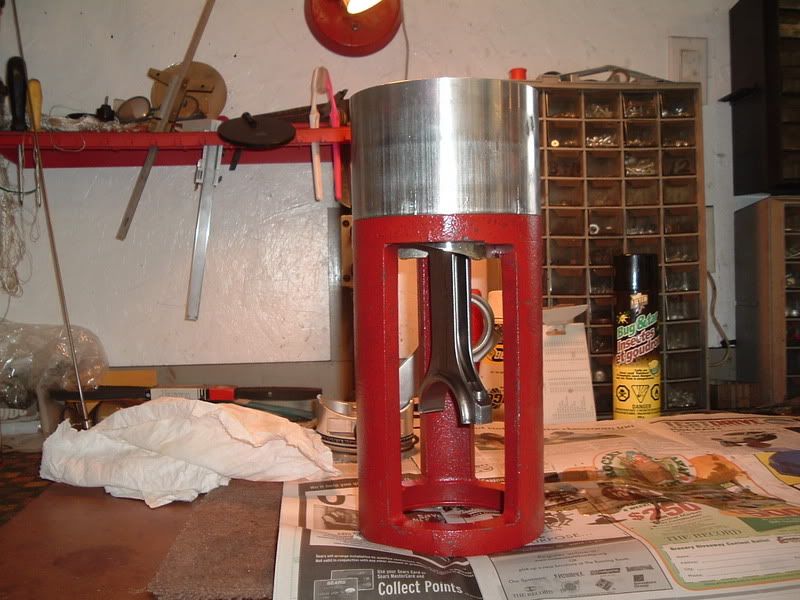
I lube the piston with engine oil, the sleeve and then just start the piston in the sleeve, guide the rod to keep it square and gently push the piston down, no fuss and everything just slides down the bore until a good part is hanging out the bottom.
I then lift the unit off the red holder, install the bearing, lube everything really well, I use BG assembly lube and lots and lots of engine oil
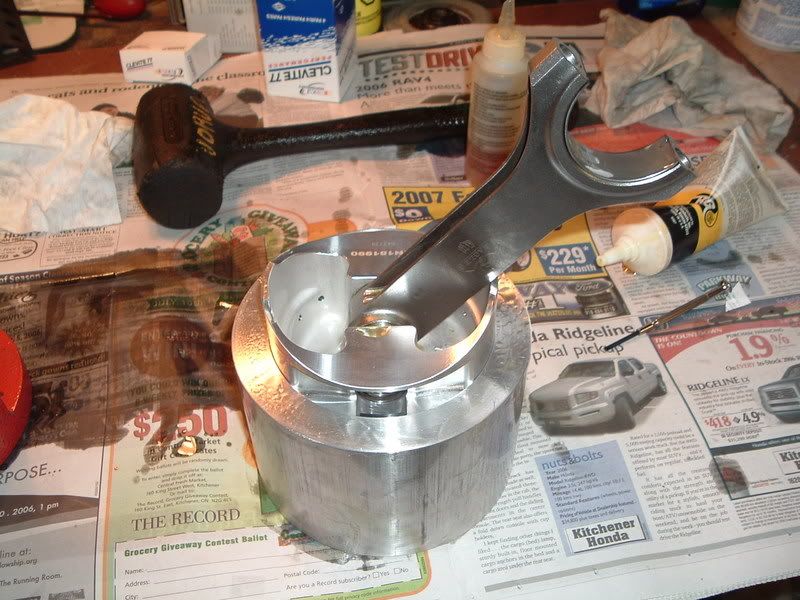
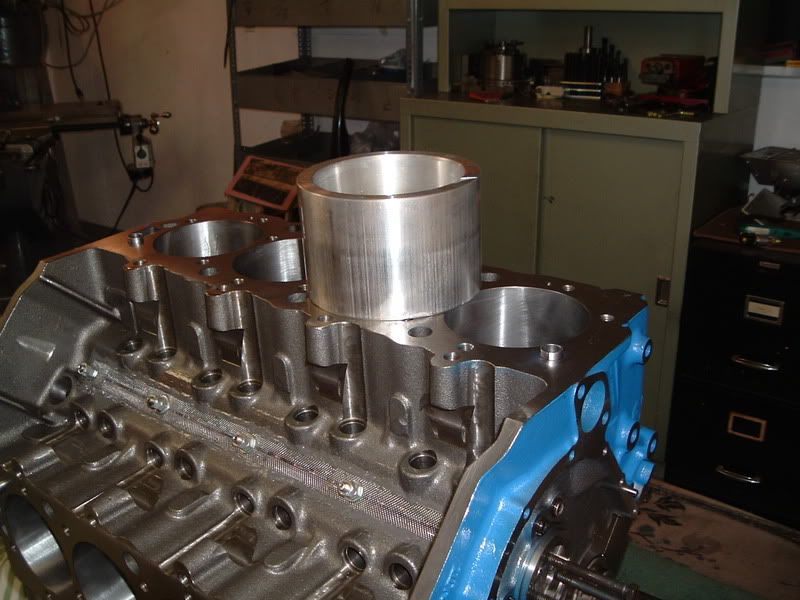
I then just place the assembly on the block, reach under neath , I do have the crank turned down. Anyway I hold the rod and with a plastic hammer push the piston home, I do NOT hold the aluminum sleeve, the piston guides the alignment and the piston effortlessly passes down into the bore. No fuss about weather a ring hung up, just a smooth transition into the block.
I really think this is the way to go. After years of using the wrap around ring compressor this is the only way I will go in the future
I took about a 5 inch long by 6 inch diameter chunk of aluminum and wittled one out on the lathe making the small end about .002 less then the cylinder bore and the big end larger then the rings so I could start the piston easy.
I also decided that I needed something to rest the tool on while the rod hangs down so I started with a very heavy wall pipe, turned the ends so it was flat and square and then milled slots in the side for easy rod access.
I lube the piston with engine oil, the sleeve and then just start the piston in the sleeve, guide the rod to keep it square and gently push the piston down, no fuss and everything just slides down the bore until a good part is hanging out the bottom.
I then lift the unit off the red holder, install the bearing, lube everything really well, I use BG assembly lube and lots and lots of engine oil
I then just place the assembly on the block, reach under neath , I do have the crank turned down. Anyway I hold the rod and with a plastic hammer push the piston home, I do NOT hold the aluminum sleeve, the piston guides the alignment and the piston effortlessly passes down into the bore. No fuss about weather a ring hung up, just a smooth transition into the block.
I really think this is the way to go. After years of using the wrap around ring compressor this is the only way I will go in the future
Racer

Joined: Mar 2006
Posts: 309
Likes: 0
From: Ocean City MD
Great idea, seems like you are spending more timing making tools to build your engine than actually building your engine.
For installing pistons I use a Snap On tool. It works great. It uses different bands and a locking plier. Quick and easy.
For installing pistons I use a Snap On tool. It works great. It uses different bands and a locking plier. Quick and easy.
Thread Starter
Race Director
Joined: Nov 2000
Posts: 11,872
Likes: 12
From: Waterloo ontario Canada
Originally Posted by windsoreight
Great idea, seems like you are spending more timing making tools to build your engine than actually building your engine.
For installing pistons I use a Snap On tool. It works great. It uses different bands and a locking plier. Quick and easy.
For installing pistons I use a Snap On tool. It works great. It uses different bands and a locking plier. Quick and easy.
The short block is completed and ready to install. I will pull the old motor in October.
I no longer have to wonder if I installed everything correct. With the sleeve everything went slow and easy and I know I didn't catch a ring.
Thread Starter
Race Director
Joined: Nov 2000
Posts: 11,872
Likes: 12
From: Waterloo ontario Canada
Originally Posted by Twin_Turbo
sweet 

Did you epoxy the screens ?
Did you epoxy the screens ?
I also installed the crane solid roller cam. 262/270 @ .050 duration and .631 lift

Corvette Stories
The Best of Corvette for Corvette Enthusiasts

Top 10 Most Expensive Corvettes Ever Sold on Bring A Trailer
Brett Foote
10 Things Every Corvette Owner Needs (2026 Edition)
Michael S. Palmer
8 Most "Only Corvette Owners Understand" Quirks and Problems
Pouria Savadkouei
10 Reasons the C6 Z06 is Still A Performance Benchmark After 20 Years
Joe Kucinski
How Much Horsepower Every Corvette Engine "LOST" in 1972
Joe Kucinski
Top 10 DOs and DON'Ts for Protecting Your Convertible Top!
Michael S. Palmer
Top 10 Most Explosive Corvettes Ever Made: Power-to-Weight Ratio Ranked!
Joe Kucinski
150 hp to 1,250 hp: Every Corvette Generation Compared by the Specs That Matter
Joe Kucinski
8 Coolest Corvette Pace Cars (and Replicas) of All Time
Verdad GallardoTeam Owner

Joined: Aug 2006
Posts: 24,125
Likes: 15
From: Columbia Missouri
For the machined style ring compressors, that you order...how to do measure what size you need? Say a SBC 400 bored +.020. I need to order mine soon as I'm building the motor this fall.
Thread Starter
Race Director
Joined: Nov 2000
Posts: 11,872
Likes: 12
From: Waterloo ontario Canada
Originally Posted by Durango_boy
For the machined style ring compressors, that you order...how to do measure what size you need? Say a SBC 400 bored +.020. I need to order mine soon as I'm building the motor this fall.
My bore was 4.500 so I made my tapered bore 4.498 for a .002 undersize so the rings would make sure not to touch the deck.
Team Owner
Joined: Aug 2006
Posts: 24,125
Likes: 15
From: Columbia Missouri
Originally Posted by norvalwilhelm
Each ring is dedicated to a bore size. If your bore is 4.00 plus .020 overbore then that is the size you order.
My bore was 4.500 so I made my tapered bore 4.498 for a .002 undersize so the rings would make sure not to touch the deck.
My bore was 4.500 so I made my tapered bore 4.498 for a .002 undersize so the rings would make sure not to touch the deck.
Oh okay, so a 400 has a bore of 4.00", and I add .020 and order the 4.020 sleeve. Cool.
Thread Starter
Race Director
Joined: Nov 2000
Posts: 11,872
Likes: 12
From: Waterloo ontario Canada
Originally Posted by Durango_boy
Oh okay, so a 400 has a bore of 4.00", and I add .020 and order the 4.020 sleeve. Cool.
Team Owner
Joined: Aug 2006
Posts: 24,125
Likes: 15
From: Columbia Missouri
Originally Posted by norvalwilhelm
NO I do not know the bore size of a 400 block. You need to check that and then add your overbore and order that size. I was just guessing.
I know, mine was an example since I hadn't measured the stock bore on the 400. It's already bored so I could just measure the over-bore.


 hahahaha
Race Director


Joined: Jan 2000
Posts: 13,019
Likes: 2,262
From: Corsicana, Tx
2020 C2 of the Year - Modified Winner
2020 Corvette of the Year (performance mods)
C2 of Year Winner (performance mods) 2019
2017 C2 of Year Finalist
Man...you keep me awake at nights thinking about all that cool stuff!!
Great job Norval!!
So what did you end up with for deck height etc? Did cam degree in OK?
What head gasket are you going to use?
What lifters did you decide on?
We are going to change that blue paint right???
JIM
Great job Norval!!
So what did you end up with for deck height etc? Did cam degree in OK?
What head gasket are you going to use?
What lifters did you decide on?
We are going to change that blue paint right???
JIM
Thread Starter
Race Director
Joined: Nov 2000
Posts: 11,872
Likes: 12
From: Waterloo ontario Canada
Originally Posted by 427Hotrod
Man...you keep me awake at nights thinking about all that cool stuff!!
Great job Norval!!
So what did you end up with for deck height etc? Did cam degree in OK?
What head gasket are you going to use?
What lifters did you decide on?
We are going to change that blue paint right???
JIM
Great job Norval!!
So what did you end up with for deck height etc? Did cam degree in OK?
What head gasket are you going to use?
What lifters did you decide on?
We are going to change that blue paint right???
JIM
I don't know deck height yet. I will not change it. I do not want any local shop touching the block. I really have little faith in most people's work. I spend a couple of hours Saturday and a couple of hours sunday installing the pistons. I take my time, work very maticulously setting where the ring gaps go, checking checking , lots and lots of oil and then careful gentle installing and torquing.
I wash the backs of all bearings and the rods with Laquer thinner, clean repeatedly.
It is time consuming to do it this way but I try not to rush any step. I use the ARP grease on the bolts and torque each one as I go.
The pistons were assigned holes so I make sure they get to their assigned holes.
As for deck height I just now it feels like .025 down the hole but I was getting tired of working on the motor and wanted to take the vet out for a long run in the afternoon.
I will check deck height later for my records, I keep maticulous records of everything in a file folder on my motor.
Degreeing the cam?? I would never go without degreeing but I have not yet chosen a timing chain set so that is another thing I always do.
I also don't have a spare set of lifters to use for degreeing.
My exisiting motor is sold and will come out in October, I should say the short block is sold and I will transfer the heads, intake, pan and blower over to the new motor.
Lifters?? I will see about Isky Red Zones but not sure if the price is way way too high. I believe about $540 AM. I would go $600 or so.
Blue. I really hate to destroy the nice paint job but I guess everyone but me hates it, I actually don't mind ford blue but everyone who sees it tells me to paint it.
I am in NO hurry for the block and prefer to work slowly, maticulously and do it right.
It will be a long good winter and I like to spread the work out.
I got a set of 3.55 gears that I will install. I hated the 4.11's, too much 1st and 2nd gear but I also feel the cam would prefer a little more cruising rpm.
My existing 236/244 @ .050 roller will chug down to 800 rpm in 5th overdrive at 35 or 40 without complaining.
Head Gasket. Felpro composite .040
With a blower I can adjust boost and it is better to run low compression and higher boost levels then the other way around.
The other nice thing is if I am coming on a long drive I can put the lowest of the low gas and it will actually cruise alot nicer then good gas in the tank. It loves low test but I run into pinging if pushed to high boost levels. On low test cruising at 80 or 90 it will pull down an easy 15mpg plus and run so cool NO fans are required for cooling.
Oil temp sits about 160-170 on the open road.
Jim on that private email I am really going to look into the oiling of the lifters. It bothers me.
Team Owner

Joined: Apr 1999
Posts: 21,953
Likes: 1,445
From: Reno Nevada
2024 C3 of the Year Finalist- Modified
Great exchange rate today for you.
1.00 USD United States Dollars = 1.11996 CAD
Canada Dollars
1 USD = 1.11996 CAD 1 CAD = 0.892888 USD
Norval, I would call Crane down in Florida. My pro lifters were at cost something like $370 instead of the list $550. It was also because of the returned cheaper model failed ones.
I've run the Pros in my 383 then my 427 and now back in my 383. I think the real key on these lifters is good oil pressure. I have about 40 hot at idle and it climbs to 60 by 3000 rpm. Once it get to @5000 and higher it's right on the bypass limited 80 psi. That's with this summers 10W-40
I have really close clearances from the edge of my rod and main bearings to the crank radius.
Thread Starter
Race Director
Joined: Nov 2000
Posts: 11,872
Likes: 12
From: Waterloo ontario Canada
Originally Posted by gkull
Great exchange rate today for you.
1.00 USD United States Dollars = 1.11996 CAD
Canada Dollars
1 USD = 1.11996 CAD 1 CAD = 0.892888 USD
Norval, I would call Crane down in Florida. My pro lifters were at cost something like $370 instead of the list $550. It was also because of the returned cheaper model failed ones.
I've run the Pros in my 383 then my 427 and now back in my 383. I think the real key on these lifters is good oil pressure. I have about 40 hot at idle and it climbs to 60 by 3000 rpm. Once it get to @5000 and higher it's right on the bypass limited 80 psi. That's with this summers 10W-40
I have really close clearances from the edge of my rod and main bearings to the crank radius.
1.00 USD United States Dollars = 1.11996 CAD
Canada Dollars
1 USD = 1.11996 CAD 1 CAD = 0.892888 USD
Norval, I would call Crane down in Florida. My pro lifters were at cost something like $370 instead of the list $550. It was also because of the returned cheaper model failed ones.
I've run the Pros in my 383 then my 427 and now back in my 383. I think the real key on these lifters is good oil pressure. I have about 40 hot at idle and it climbs to 60 by 3000 rpm. Once it get to @5000 and higher it's right on the bypass limited 80 psi. That's with this summers 10W-40
I have really close clearances from the edge of my rod and main bearings to the crank radius.
To order parts is not cheap. Yes we have free trade but they forgot to tell the guys at the boarder and all alone the route.
I just feel Isky Red Zones are the top of the line with 3 oiling holes, a larger heavier roller and axle but again the 3 pressure fed oil holes appeal to me.
I have run my run of the mill comp rollers since somewhere in the mid 90's without a problem but I just don't want to push my luck.
Shoe some horses and I can then get the Isky Red zones.
I will also look up the crane lifters and see what they say about them.
Take care George and get that 427 back in where it belongs
Race Director
Joined: Jan 2000
Posts: 13,019
Likes: 2,262
From: Corsicana, Tx
2020 C2 of the Year - Modified Winner
2020 Corvette of the Year (performance mods)
C2 of Year Winner (performance mods) 2019
2017 C2 of Year Finalist
BTW..on the Isky's there are a couple of oiling options. You want the street version of them. There is one version that has really big holes and it seems to cause lower oil pressure at idle than we want. Make sure they get the right ones.
JIM
JIM

Le Mans Master

Joined: Sep 2001
Posts: 7,739
Likes: 630
From: Unreconstructed, South Carolina
Originally Posted by Durango_boy
Oh okay, so a 400 has a bore of 4.00", and I add .020 and order the 4.020 sleeve. Cool.