


Headlight assembly removal question
Thread Starter
Pro


Joined: Jan 2006
Posts: 575
Likes: 0
From: Ventura California
Before I tackle this job, Can anyone tell me how the remove the headlight assemblies? The assemblies on my 70 are frozen in the closed position. I want to take them out as a comlete package if possible to rebuild them.
Racer

Joined: Jan 2007
Posts: 325
Likes: 0
From: Ocala FL
it's easiest with the front end up about a foot, grilles out for better access. 5 bolts hold the horseshoes in place. chances are they'll be rusty, so spray with WD30 ahead of time. Once you get 'em loose it's a twist /wiggle/ swear/ pray job to get them out the bottom.
Le Mans Master

Joined: Oct 2001
Posts: 5,943
Likes: 3
From: Wildwood IL
My advise is to pull the bucket assembly first, then pull the horseshoes by themselves. Remove actuator arm from headlight bucket linkage. Each assembly is held in by swivil bearings. Three bolts hold each bearing to the car. Each door pivot arm (goes inside bearing) has a collar that holds it centered...the collar has a set screw. Loosten screw, and slide collar. Should be able to wiggle out assembly.
You should really look at a detailed view of the headlight assemblies before you start. DocRebuild has a great one in his catalog. Other vendors might also.
Eddie

Team Owner


Joined: Jul 2004
Posts: 40,412
Likes: 792
From: Redondo Beach, California
You can still buy all new parts- all of the little rods, shafts, levers, bearings, etc. But after tearing the original mechanism apart, and replacing it with new components, getting it into adjustment so it works correctly can be very difficult/tedious.
Assuming your headlight assemblies have not been bothered with since they came from the factory, with only corrosion now preventing their operation, you should note all the original factory adjustments. Maybe spay paint on the original mechanism, so when you dismantle it you can see how far this part was screwed into that part. Another strategy would be to repair one at a time; i.e. repair the right headlamp assembly completely before starting on the left, etc.
The assembly, to me is a little of an engineering marvel. After you replace all the bits and pieces with new, it really looks nice.
Le Mans Master
Joined: Jun 2002
Posts: 8,339
Likes: 24
From: I can walk to MA
Really frozen ?
The linkage is designed with a knee to lock down unless the vacuum pulls it up.
This can be overridden by pulling on the knee linkage while
simultaneously trying to push the headlight up.
You may just need actuator/vacuum relay, or just a hose.
Mine came out, but much of the hardware was frozen and broke when
trying to loosen ... can of worms at best.
Good Luck
Thread Starter
Pro
Joined: Jan 2006
Posts: 575
Likes: 0
From: Ventura California
Unfortunately, It seems to be frozen. Everything else has been. That's what happens when you neglect and keep a car outside or in a cold barn for 16 years.
By linkage, are you talking about the linkage from the acutator? If I disconnect the linkage from the assembly, should it move freely (if really not frozen)? I have been working my way forward from the rear on this project (with some detours on the way). The wiper dooor was frozen, although I was able to get the linkage free there, and worked it out. They now work fine, but suspect the headlights are also frozen. Does anyone have a picture of the linkage? I have the Dr Rebuild catalog, but only shows a parts diagram.
By linkage, are you talking about the linkage from the acutator? If I disconnect the linkage from the assembly, should it move freely (if really not frozen)? I have been working my way forward from the rear on this project (with some detours on the way). The wiper dooor was frozen, although I was able to get the linkage free there, and worked it out. They now work fine, but suspect the headlights are also frozen. Does anyone have a picture of the linkage? I have the Dr Rebuild catalog, but only shows a parts diagram.
Pro
Joined: Aug 2005
Posts: 627
Likes: 1
From: Naperville IL
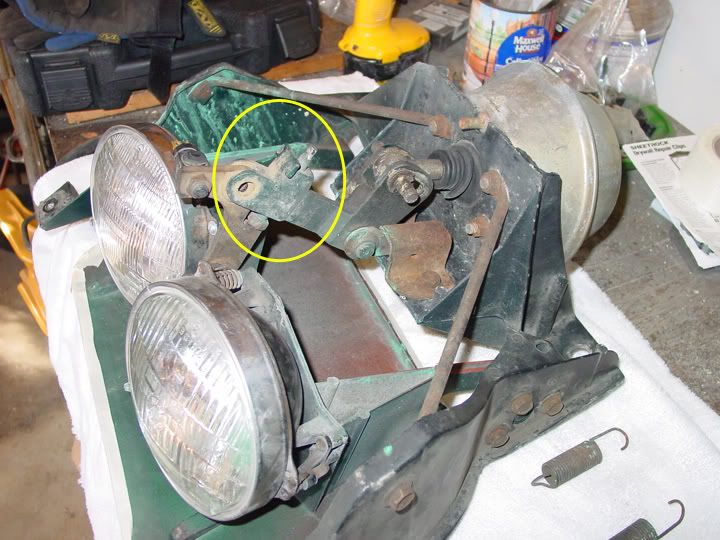
this is partially disassembled already, but it should give you an idea. the 3 bolts on the bottom right hold the rear pivots, there's one on the other side too. there is a long pin that goes through the hole where the circle is that the springs attatch to, and the black thing to the left of that is the switch that contacts the flat spot to the right when they are open. I actually pulled this one out to weld a crack in the housing, but i replaced all the bushings and regreased it while it was out. I was able to do all the bushings on the other side still on the car, although I did have the front bumper off at the time.
Corvette Stories
The Best of Corvette for Corvette Enthusiasts

Top 10 Most Expensive Corvettes Ever Sold on Bring A Trailer
Brett Foote
10 Things Every Corvette Owner Needs (2026 Edition)
Michael S. Palmer
8 Most "Only Corvette Owners Understand" Quirks and Problems
Pouria Savadkouei
10 Reasons the C6 Z06 is Still A Performance Benchmark After 20 Years
Joe Kucinski
How Much Horsepower Every Corvette Engine "LOST" in 1972
Joe Kucinski
Top 10 DOs and DON'Ts for Protecting Your Convertible Top!
Michael S. Palmer
Top 10 Most Explosive Corvettes Ever Made: Power-to-Weight Ratio Ranked!
Joe Kucinski
150 hp to 1,250 hp: Every Corvette Generation Compared by the Specs That Matter
Joe Kucinski