




Rear Main Seal Install

Thread Starter
Pro


Joined: Apr 2006
Posts: 647
Likes: 22
From: Norwalk CT and Boynton Beach FL
 Rear Main Seal Install
I have a 75 L-82 auto that drips a few drops of oil on the garage floor every time I take the car out for a spin. Everything is stock/original. I was thinking of replacing the oil pan gasket and the rear main seal. How difficult is it to replace the rear main seal and are there any tricks anyone can share (or warnings what not to do) to make the job go smoothly.
Thanks
Thanks
Burning Brakes

Joined: Apr 2004
Posts: 847
Likes: 0
From: Des Allemands LA
First of all make dead sure its the rear main and not a valve cover or oil sending unit dripping down the backof the block.
As far as the job goes for the rea main it just depends on how easy everything comes apart. Do yourself a huge favor and buy a one piece oilpan gasket to put it back together with. Also might not be a bad idea to change the oil pump but if you have good oil pressure now it may not be necessary. Also take the time to look in the bottom of the oil pan for any foreign material or "pasty" substances. Other than that follow the instructions in the shop manual and rear main seal. AND BE WARNED THERE IS A FRONT AND REAR SIDE TO THE REAR MAIN SEAL.
ltlevil
As far as the job goes for the rea main it just depends on how easy everything comes apart. Do yourself a huge favor and buy a one piece oilpan gasket to put it back together with. Also might not be a bad idea to change the oil pump but if you have good oil pressure now it may not be necessary. Also take the time to look in the bottom of the oil pan for any foreign material or "pasty" substances. Other than that follow the instructions in the shop manual and rear main seal. AND BE WARNED THERE IS A FRONT AND REAR SIDE TO THE REAR MAIN SEAL.
ltlevil

Team Owner

Joined: Aug 2006
Posts: 24,125
Likes: 15
From: Columbia Missouri
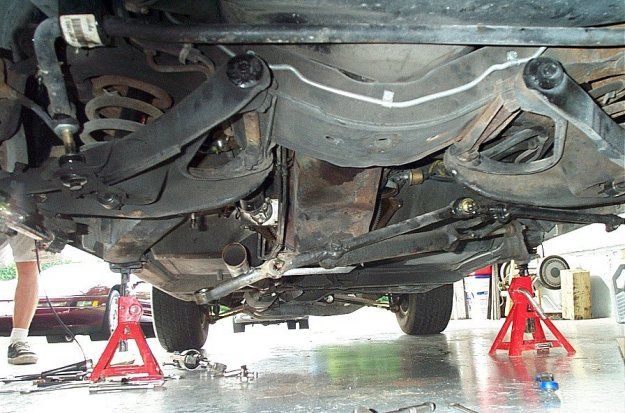
You'll have to drop the front suspension enough to get the pan down. Most just remove the two pitman arm bolts and lower that.
Drain and remove the pan. Clean it thoroughly and check to make sure it's square and level on a nice flat surface.
Remove the rear main cap, making sure you get the bearing with the cap so when it's reinstalled it's not out of place.
Gently and easily tap the cap half of the rear main seal out of the main, and replace it with a half of the fresh seal making sure you get the orientation correct.
Then, under the car, carefully tap the other half of the seal out from around the crank. Be VERY careful not to scar the main journal.
Lube the new seal up with some oil, and insert it. Once you get it started you will probably be able to push it up and around with just your fingers. Once it's close to fully inserted use the butt of a wooden handle to tap it into final position.
Reinstall your main cap, torquing the bolts to spec.
I would suggest buying a Fel Pro one piece rubber gasket. They are amazing;y easy to install and being that they are only one piece they make pan leaks a thing of the past.
Then reinstall the pan with the new gasket, torque the bolts to spec, and raise the suspension back up by reversing the pitman arm removal.
Finally, replace the oil filter, fill with oil, and start to test.
Drain and remove the pan. Clean it thoroughly and check to make sure it's square and level on a nice flat surface.
Remove the rear main cap, making sure you get the bearing with the cap so when it's reinstalled it's not out of place.
Gently and easily tap the cap half of the rear main seal out of the main, and replace it with a half of the fresh seal making sure you get the orientation correct.
Then, under the car, carefully tap the other half of the seal out from around the crank. Be VERY careful not to scar the main journal.
Lube the new seal up with some oil, and insert it. Once you get it started you will probably be able to push it up and around with just your fingers. Once it's close to fully inserted use the butt of a wooden handle to tap it into final position.
Reinstall your main cap, torquing the bolts to spec.
I would suggest buying a Fel Pro one piece rubber gasket. They are amazing;y easy to install and being that they are only one piece they make pan leaks a thing of the past.
Then reinstall the pan with the new gasket, torque the bolts to spec, and raise the suspension back up by reversing the pitman arm removal.
Finally, replace the oil filter, fill with oil, and start to test.
Last edited by Durango_Boy; Jul 8, 2007 at 07:55 PM.
Drifting

Joined: Mar 2006
Posts: 1,526
Likes: 2
From: Oak Ridge NC
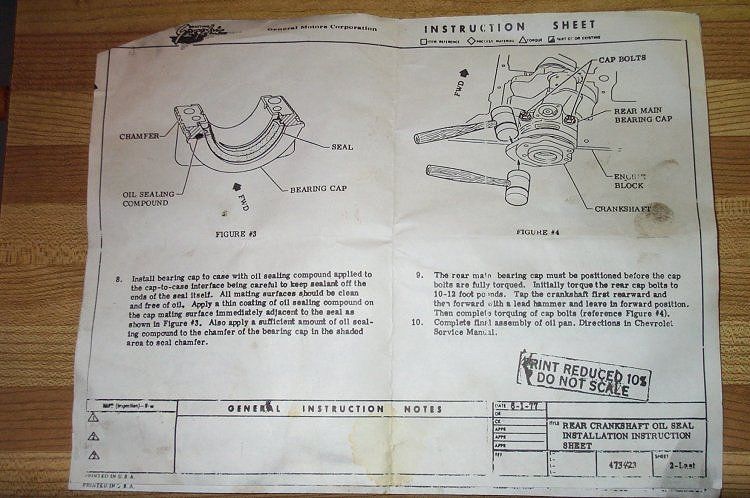
Before reinstalling your cap, read the directions that came with your seal. Or look in your shop manual. There is a requirement for a small amount of sealer on the bearing cap ends before you put it back on. If you don't follow the instructions, it will leak again....just my .02.

Melting Slicks


Joined: Feb 2003
Posts: 2,529
Likes: 27
From: Auburndale Florida
2025 C2 of the Year ('64-'66) Finalist - Unmodified
St. Jude Donor '03-'05-'06-'07-'09
Just a note, before removing the pan put the timing mark on 5:00 to 6:00 O'clock. The counter weights on the crank will be out of the way, giving you more clearance. Making removing and installing the pan easier.
Just pulled the pan on my 72 chasing an elusive oil leak and I used the Fel Pro 1 piece gasket. I would never go back to the old syle 4 piece set up. There are 2 models for SBC, one is thick and on is thin. Use the thin for 74 and back a nd the thick for 75 and up on Gen1's. Makes instalation a snap. Especially when you are under the car...best of luck
Just pulled the pan on my 72 chasing an elusive oil leak and I used the Fel Pro 1 piece gasket. I would never go back to the old syle 4 piece set up. There are 2 models for SBC, one is thick and on is thin. Use the thin for 74 and back a nd the thick for 75 and up on Gen1's. Makes instalation a snap. Especially when you are under the car...best of luck
Team Owner
Joined: Aug 2006
Posts: 24,125
Likes: 15
From: Columbia Missouri
Before reinstalling your cap, read the directions that came with your seal. Or look in your shop manual. There is a requirement for a small amount of sealer on the bearing cap ends before you put it back on. If you don't follow the instructions, it will leak again....just my .02.
Good call Smokey. I always forget to mention it, even though it's int eh directions and is an important step.
Melting Slicks
Joined: Oct 2006
Posts: 2,417
Likes: 336
From: Texas
i replaced the bearings and rear seal in my 79 L82 earlier this year, after replacing bearings, i tried to install the upper portion of rear seal. it was really tight, and wouldnt roll the rest of the way in, yes i oiled it.
i had to loosen the center and next to the rear main caps again to allow crank to drop just enough, and the seal went right in. watch that plastic coupling on oil pump drive shaft, its usually very brittle and breaks easily if it has alot of miles. one piece oil pan gasket is the way to go, so far no leaks. good luck
i had to loosen the center and next to the rear main caps again to allow crank to drop just enough, and the seal went right in. watch that plastic coupling on oil pump drive shaft, its usually very brittle and breaks easily if it has alot of miles. one piece oil pan gasket is the way to go, so far no leaks. good luck
Pro

Joined: Dec 2006
Posts: 582
Likes: 3
From: Glen Allen (Richmond) Virginia
i replaced the bearings and rear seal in my 79 L82 earlier this year, after replacing bearings, i tried to install the upper portion of rear seal. it was really tight, and wouldnt roll the rest of the way in, yes i oiled it.
i had to loosen the center and next to the rear main caps again to allow crank to drop just enough, and the seal went right in. watch that plastic coupling on oil pump drive shaft, its usually very brittle and breaks easily if it has alot of miles. one piece oil pan gasket is the way to go, so far no leaks. good luck
i had to loosen the center and next to the rear main caps again to allow crank to drop just enough, and the seal went right in. watch that plastic coupling on oil pump drive shaft, its usually very brittle and breaks easily if it has alot of miles. one piece oil pan gasket is the way to go, so far no leaks. good luck
Good point on the plastic coupling, I like the metal ones better.

Corvette Stories
The Best of Corvette for Corvette Enthusiasts

Top 10 Most Expensive Corvettes Ever Sold on Bring A Trailer
Brett Foote
10 Things Every Corvette Owner Needs (2026 Edition)
Michael S. Palmer
8 Most "Only Corvette Owners Understand" Quirks and Problems
Pouria Savadkouei
10 Reasons the C6 Z06 is Still A Performance Benchmark After 20 Years
Joe Kucinski
How Much Horsepower Every Corvette Engine "LOST" in 1972
Joe Kucinski
Top 10 DOs and DON'Ts for Protecting Your Convertible Top!
Michael S. Palmer
Top 10 Most Explosive Corvettes Ever Made: Power-to-Weight Ratio Ranked!
Joe Kucinski
150 hp to 1,250 hp: Every Corvette Generation Compared by the Specs That Matter
Joe Kucinski
8 Coolest Corvette Pace Cars (and Replicas) of All Time
Verdad Gallardo

Team Owner
Joined: Aug 1999
Posts: 30,995
Likes: 99
From: Ontario
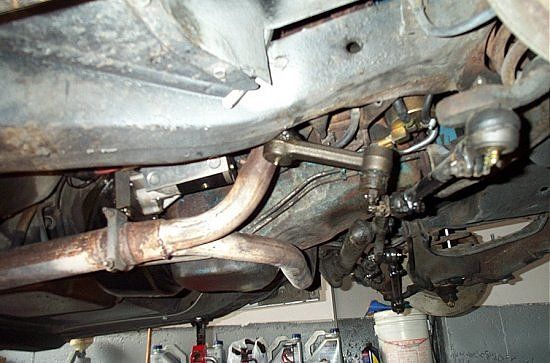
You will have to drop the front Y-pipe if you have factory exhaust with cat con. It can be a **** to get off.
Here are instructions re use of sealant.
As mentioned, there is a front and back to the seal. It can be installed backwards!

Here are instructions re use of sealant.
As mentioned, there is a front and back to the seal. It can be installed backwards!
Last edited by Paul L; Jul 9, 2007 at 07:45 AM.

Team Owner
Joined: Jul 2001
Posts: 182,997
Likes: 88
From: Lakeland, FL
Cruise-In IV-V-VI-VII-VIII Veteran
St. Jude Donor '03, '06, '17
Looking at this picture, I'm soooooo glad that I'm using sidepipes on all my C3's..
I installed my new rear main seal when the engine was on the stand, so it was a lot easier.. Used a little RTV where the seal pieces connect. Made sure that the seal lip was pointing in the correct direction (based on the instructions) and that was about it.
Safety Car


Joined: Jun 2004
Posts: 4,371
Likes: 223
From: Beecher Illinois
I thought I needed a rear seal in my 78SA. When I dropped the pan and saw how compressed the gasket was I elected to just change the gasket. No more leak. A week later I did my white79, again just the gasket. Guess I was lucky. And my L82s used the thin pan end seals. All PoopBoys had in one piece was the thick one. No way that was going to work. Used the old fashioned gaskets with blue rtv. That blue rtv matches the Chevy blue perfectly.
