


'71 Radio Install
Thread Starter
Burning Brakes


Joined: Aug 2006
Posts: 793
Likes: 11
From: Grafton MA
Tonight I pulled an old aftermarket 8-track out of my 71 and I'm attempting to put the correct radio back in the car. The 8-track radio did not turn on...don't know if the radio was dead or if there was a wiring problem. Anyway, after eliminating a bunch of taped wires that were hooked up to the 8-track, I found the two clusters of wires that plug right into the back of the original stereo. Are there any more wires that need to be hooked up? The radio doesn't come on...this radio is supposed to work but this is my first time trying it. I suspect it's not the radio but me missing something.
Thanks.
Thanks.
Drifting


Joined: Jan 2002
Posts: 1,606
Likes: 1
From: Las Cruces NM
There's a convector that should be behind the pass side lower dash panel. It looks like a heat sink with a smaller round module on it. It plugs into the pigtail off the factory radio.
Aside from that, it should just be the speakers, a ground wire, ignition on positive, and a positive wire for the backlighting.
C
Aside from that, it should just be the speakers, a ground wire, ignition on positive, and a positive wire for the backlighting.
C
Thread Starter
Burning Brakes
Joined: Aug 2006
Posts: 793
Likes: 11
From: Grafton MA
Thanks. Have any pictures? The convector is there and there are pigtails on the back of the radio that I have plugged in. Not sure where the other wires would plug into. I'm having trouble figuring it out from the picture in the AIM.
Thanks.
Thanks.

Le Mans Master

Joined: Jul 2006
Posts: 8,117
Likes: 104
From: charlotte north carolina
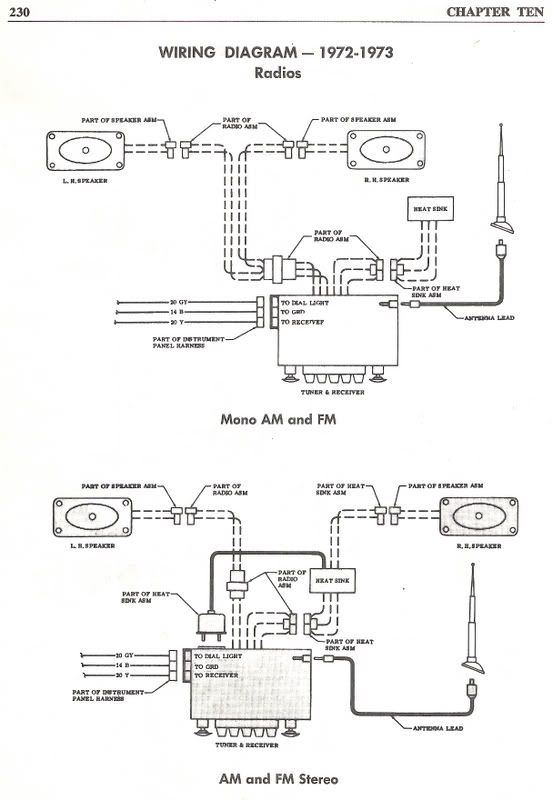
make sure that the convector (amplifier) is connected to the speakers. do not run the radio with the speakers disconnected. there are two connections at the radio, the power cord (three wire flat piece- grd, 12v for dial lights that's hot when dash lights are on, and constant 12v) and the convector, which is a pig tail. check the power cord for voltage, then check the speaker wiring. if that all looks ok, try to temporarily wire in a test set of speakers. you may have to remove the right side lower dash.
jeff
jeff
Thread Starter
Burning Brakes
Joined: Aug 2006
Posts: 793
Likes: 11
From: Grafton MA
First let me say thank you everyone for your help. I have the speakers and convector hooked up properly i think. I also see the plug for the antenna so i think i'm set there too. I believe the last piece I'm missing the connection to the left side of the radio. From the picture I can't tell if it's supposed to be one big plug that hooks up to the side of the radio or three smaller individual wires. The only other wire i see is a red one as you will see below.....
Where can i find the wire(s) that hook up to the side of the radio?
(pigtails and antenna wire that i haven't plugged in yet)
.JPG)
(red wire ???)
.JPG)
Where can i find the wire(s) that hook up to the side of the radio?
(pigtails and antenna wire that i haven't plugged in yet)
(red wire ???)
Corvette Stories
The Best of Corvette for Corvette Enthusiasts

Every 2027 Corvette Engine Explained
Joe Kucinski
Designer Imagines A Corvette That Looks More Like a Corvette Than the Corvette
Verdad Gallardo
10 Ugly Corvettes That We Still Kinda Love
Joe Kucinski
Top 10 Most Expensive Corvettes Ever Sold on Bring A Trailer
Brett Foote
10 Things Every Corvette Owner Needs (2026 Edition)
Michael S. Palmer
8 Most "Only Corvette Owners Understand" Quirks and Problems
Pouria Savadkouei
10 Reasons the C6 Z06 is Still A Performance Benchmark After 20 Years
Joe Kucinski
How Much Horsepower Every Corvette Engine "LOST" in 1972
Joe Kucinski
Top 10 DOs and DON'Ts for Protecting Your Convertible Top!
Michael S. Palmer


Drifting
Joined: Jan 2002
Posts: 1,606
Likes: 1
From: Las Cruces NM
I don't have any pics and I'm out of town right now. I don't think mine would help much since my harness was cut to install an aftermarket radio in there.
I just used a multimeter...a test light would work...to find the ignition on 12v, 12v for the backlighting, and a ground.
C
I just used a multimeter...a test light would work...to find the ignition on 12v, 12v for the backlighting, and a ground.
C
Thread Starter
Burning Brakes
Joined: Aug 2006
Posts: 793
Likes: 11
From: Grafton MA
I found what I was looking for, Bubba had the wires hid pretty well. I hooked it up and I never thought I'd be so happy to hear such a crappy sounding radio  .
.
Now i just need to wait for the JB weld to finish drying that i used to fix the cracked gauge bezel. While I had everything open i also put a quartz clock in and i'm painting the gauge bezel and wiper bezel. Should look pretty good when i'm all done. Glad to be rid of the ugly broken 8-track that was in there. Thanks everyone
. Now i just need to wait for the JB weld to finish drying that i used to fix the cracked gauge bezel. While I had everything open i also put a quartz clock in and i'm painting the gauge bezel and wiper bezel. Should look pretty good when i'm all done. Glad to be rid of the ugly broken 8-track that was in there. Thanks everyone


Thread Starter
Burning Brakes
Joined: Aug 2006
Posts: 793
Likes: 11
From: Grafton MA
I'll post a picture of it when it's done drying. I used the regular JB not the quick dry so I'm going to let it set overnight. I tried the quick dry stuff earlier today and it broke when i was stripping the paint (probably should have epoxied it after the paint was off). Anyway, it's stripped and drying now, i'm going to paint it tomorrow and put everything back together. If anyone else has repaired a broken instrument bezel I'd like to hear from you. It's not the easiest thing to glue together. I have a repro replacement but it doesn't look as good as the original IMO....subtle differneces like the thin radio lettering font. If I can't fix my original I'm going to have to decide if i want a cleaned up broken original on my car or a repro that cost me 75 bucks.
Race Director

Joined: May 2006
Posts: 16,528
Likes: 53
From: Dayton, Ohio
I'll post a picture of it when it's done drying. I used the regular JB not the quick dry so I'm going to let it set overnight. I tried the quick dry stuff earlier today and it broke when i was stripping the paint (probably should have epoxied it after the paint was off). Anyway, it's stripped and drying now, i'm going to paint it tomorrow and put everything back together. If anyone else has repaired a broken instrument bezel I'd like to hear from you. It's not the easiest thing to glue together. I have a repro replacement but it doesn't look as good as the original IMO....subtle differneces like the thin radio lettering font. If I can't fix my original I'm going to have to decide if i want a cleaned up broken original on my car or a repro that cost me 75 bucks.

Safety Car

Joined: May 2003
Posts: 3,814
Likes: 105
From: Dearborn Heights Michigan
I just had the radio repaired in my 70 and found both speakers in the upper dash were bad.
Suggest testing yours before putting everything back together.
It is a real PITA working on the radio.
Suggest testing yours before putting everything back together.
It is a real PITA working on the radio.
Intermediate

Joined: May 2005
Posts: 27
Likes: 0
From: Beaver Falls Pa
I now am waiting for Corvette Central to get the 10 OHM Delco speakers in. What ever you do, don't operate the radio for any extended length of time on speakers that are not 10 OHM.
Thread Starter
Burning Brakes
Joined: Aug 2006
Posts: 793
Likes: 11
From: Grafton MA
Alan here is a picture of the bezel I promised. Sorry it took so long...I decided to get new lenses before putting everything back together because everything else was so clean looking I decided I wanted crystal clear lenses instead of using my old foggy ones. The JB Weld wasn't strong enough to hold the cracked bezel together; it broke apart again before I even tried to put it back in the car. After stripping, priming and painting the bezel I decided it looked pretty good and don't car so much that is broken. I decided I would rather a clean (but broken) original instead of the repro i bought that wasn't 100% correct looking. Plus I saved myself 75 bucks and it will be easier to work with if i ever have to take the instrument cluster apart again.
The original radio looks much nicer than the 8track that was in there. It's also nice to have a working clock for a change. I wish I had taken some before pictures; the instrument bezel and wiper bezel were all scratched up and paint chipped off in several places. It's not perfect since the top part is cracked off but a big improvement and it looks much cleaner and good enough for me
BTW - I used Krylon semi-flat black. A tip for anyone else that is going to paint their bezel; make sure you use primer. The first time I didn't and it chipped every easily. I ended up stripping it a second time and using primer before applying the black.
.JPG)
The original radio looks much nicer than the 8track that was in there. It's also nice to have a working clock for a change. I wish I had taken some before pictures; the instrument bezel and wiper bezel were all scratched up and paint chipped off in several places. It's not perfect since the top part is cracked off but a big improvement and it looks much cleaner and good enough for me
BTW - I used Krylon semi-flat black. A tip for anyone else that is going to paint their bezel; make sure you use primer. The first time I didn't and it chipped every easily. I ended up stripping it a second time and using primer before applying the black.
Last edited by pwsusi; Nov 3, 2007 at 02:18 PM.
Thread Starter
Burning Brakes
Joined: Aug 2006
Posts: 793
Likes: 11
From: Grafton MA
The radio i recently installed is working great...however i took the car out in the dark and the radio back-light is not working. While driving i was pushing buttons to turn the station and the light came on briefly, but turned off again. I figured i must have a bad connection. I disconnected the plug with the three connectors that plugs into the side of the radio and found this (see pic)....the connector on gray wire (which according to the diagram is for lights) sits higher and i think this might be causing the problem. Does this look right? I tried using a pair of needle-nose pliers to pull it down and couldn't get it to move. I figured I'd post the question here before i break something.
.JPG)
Thanks,
Paul
Thanks,
Paul
Melting Slicks

Joined: May 2007
Posts: 3,246
Likes: 4
From: Bay Area CA
the grey should be the same as the yellow and the black. Also look at the connections on the stereo. Try pushing it back up from behind where the wire goes in with a small set of needle nose or a very small flat bladed screw driver. very carefully, not enough force to break anything and on the connector inself, not the wire.