


HEI Wiring ?????
Thread Starter
Pro


Joined: Jun 2008
Posts: 673
Likes: 2
From: Melbourne Victoria
Greetings All,
Well I got my new HEI "Dizzy"( CRT performance).
Install went well
I'm now wiring it in ("to a switched 12v source").
As my car is right hand drive, the wiring harness
is at best.. "rough" so finding a usable source from the fusebox is going to be difficult, BUT I found another source. On my firewall there is a silver box with
the word "START" written on it,it has a black
push button on it too.
It has never "worked"( I assume it's some sort of
remote start) but it has switched 12v source.
Actually the voltage is 11.7v when switched on
(without engine running) up to 13.2v when running.
My question is...
Would this be suitable to use as power for the "dizzy"??????
Thanks to everyone for their wealth of information,
(especially "Lars" on this subject)

GAV
Well I got my new HEI "Dizzy"( CRT performance).
Install went well
I'm now wiring it in ("to a switched 12v source").
As my car is right hand drive, the wiring harness
is at best.. "rough" so finding a usable source from the fusebox is going to be difficult, BUT I found another source. On my firewall there is a silver box with
the word "START" written on it,it has a black
push button on it too.
It has never "worked"( I assume it's some sort of
remote start) but it has switched 12v source.
Actually the voltage is 11.7v when switched on
(without engine running) up to 13.2v when running.
My question is...
Would this be suitable to use as power for the "dizzy"??????
Thanks to everyone for their wealth of information,
(especially "Lars" on this subject)
GAV
Thread Starter
Pro
Joined: Jun 2008
Posts: 673
Likes: 2
From: Melbourne Victoria

Drifting

Joined: Sep 2006
Posts: 1,259
Likes: 2
From: MS
That box with the start button on it was a seat belt/starter over-ride if the government mandated seat belt starter interlock failed (supposedly your car would not start unless you were behind the wheel with seat belts fastenend). It would be nice if you could rig that button to work as a theft deterrent to cut power to the distributor if you want while parked.
Thread Starter
Pro
Joined: Jun 2008
Posts: 673
Likes: 2
From: Melbourne Victoria
Wow wfo76,
You looking over my shoulder?????
I was doing just that (I've already got an immobiliser),
But you can never have enough protection Heh??
My other trick was a fake coil lead but now with the HEI
I dont have that anymore,
So I'm off to find a switch & somewhere to hide it.
CHEERS
GAVIN
You looking over my shoulder?????
I was doing just that (I've already got an immobiliser),
But you can never have enough protection Heh??
My other trick was a fake coil lead but now with the HEI
I dont have that anymore,
So I'm off to find a switch & somewhere to hide it.
CHEERS
GAVIN
Thread Starter
Pro
Joined: Jun 2008
Posts: 673
Likes: 2
From: Melbourne Victoria
WOOO HOOO,
It worked!!!!
New "dizzy" is in, the car started almost as soon as I turned the key.Now to check the leads,plug gaps &
timing.
One thing I've noticed is how close to my air filter the "dizzy" is now.
Time for a smoke & coffee.
Thanks again to eveyone,without your help things could have been alot tougher.
GAV
Drifting

Joined: Jul 2002
Posts: 1,944
Likes: 20
From: The only Corvettes in Highett Victoria
Hi Gav,
Got an HEI on my '74 coupe. Car came with a '75 HEI engine but of course the dizzy was an electric tach model. I managed to obtain a tach drive HEI from Vette Connections in Seaford and the car runs fine, as does the (mechanical) tach. I found a black (???) wire coming out of the firewall that had 12V constantly so used that.
Good luck with your car and a Happy Australia Day to you. Now I have to go to work until 2 p.m.
Regards from Down Under
aussiejohn
7 months to go
Thread Starter
Pro
Joined: Jun 2008
Posts: 673
Likes: 2
From: Melbourne Victoria

Okay, my Dizzy is in and working,
just gotta buy new leads now.
Dumb question time,
Does it matter which terminal post I use as No.1?,
as you can see the dizzy is sitting at an angle with
No.1 at 7-8 oclock.
I'm just curious because all the pics I've seen show
the dizzy sitting close to square with the firewall.
I know it's just a cosmetic thing but....I like to keep things neat.
Thanks all for your help & patience.
GAV
Corvette Stories
The Best of Corvette for Corvette Enthusiasts

Top 10 Most Expensive Corvettes Ever Sold on Bring A Trailer
Brett Foote
10 Things Every Corvette Owner Needs (2026 Edition)
Michael S. Palmer
8 Most "Only Corvette Owners Understand" Quirks and Problems
Pouria Savadkouei
10 Reasons the C6 Z06 is Still A Performance Benchmark After 20 Years
Joe Kucinski
How Much Horsepower Every Corvette Engine "LOST" in 1972
Joe Kucinski
Top 10 DOs and DON'Ts for Protecting Your Convertible Top!
Michael S. Palmer
Top 10 Most Explosive Corvettes Ever Made: Power-to-Weight Ratio Ranked!
Joe Kucinski
150 hp to 1,250 hp: Every Corvette Generation Compared by the Specs That Matter
Joe Kucinski
8 Coolest Corvette Pace Cars (and Replicas) of All Time
Verdad Gallardo
Drifting
Joined: Jul 2002
Posts: 1,944
Likes: 20
From: The only Corvettes in Highett Victoria
Gav,
Noonie is right, it doesn't matter where #1 is, as long as all leads reach the right plug. HOWEVER, with a tach drive dizzy, the cable MUST exit the dizzy at about 9 o'clock looking from behind, so that it makes just one 90 degree bend to go through the grommet in the firewall and into the tacho.
If you have it set so that the angle is greater or lesser than 90 degrees, you run the chance of kinking the inner cable and the most likely outcome is a truncated life expectancy of the inner cable. Forget aesthetics, make sure you don't place unnecessary wear on the inner cable or you'll get real friendly with your local Chevrolet dealer.
Not too many down Werribee way, last time I looked.
Regards from Down Under
aussiejohn
7 months to go

Instructor

Joined: Mar 2003
Posts: 217
Likes: 1
From: Buffalo MO
The # 1 plug wire on the dist cap is always the one closest to (pointing at) The #1 cylinder. (drivers side headlight)
here is a pic that might help ya.
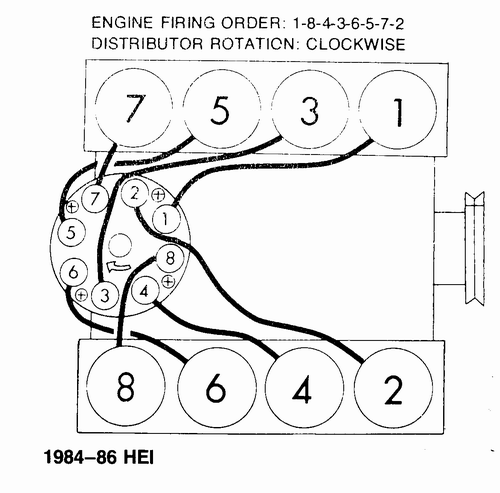
the raised top of the coil cover (where its marked latch) should be parallel with the firewall, square with the engine, so to speak.
this places your vacuum advance pointing in the correct position to allow you to neatly run the line forward to it's source, and puts the terminals on the cap far left, where the wires originate. this will also allow the proper route of your wires.
as for basic functionality and the required connections for operation, yes, you could put No. 1 where ever you wish, and it will run just fine. and, as long as no one pops the hood, no one would ever know.
but, straight is how it was intended to be, and like you mentioned, it just looks better.
for proper placement, you will have to remove the distributor, and then rotate the engine over until No. 1 is on TDC (top dead center). this is the point at which the piston is all the way at the "top" of its stroke, and on the compression stroke. (both valves closed). if you have the correct balancer and timing tab, the line on the balancer will be aligned with the 0 mark on the tab at this time. this alignment will occur 2x per cycle, therefore, it is important that you are on the compression stroke as stated above, and not on the exhaust stroke when you install the distributor.
now, when you drop the distributor in, the drive gear will mesh with the cam and rotate slightly as it is lowered into place. at the same time, the oil pump shaft has to fit up into the bottom of the gear. since the oil pump will only fit into place in 2 positions, most likely, it wont just drop right in. you will notice that the distributor will lack about 1/4" or so of sitting down on the intake. at this point, since you are in time, you can simply "tap" the starter switch, which will rotate the engine and the cam just a few degrees. do this just a lil at a time. and when the pump is in place, gravity will do the rest. she will fall right into place. if it fall into place and you are not satisfied with the placement of the rotor (pointing towards the No.1 cyl, drivers side front) or the housing, you can simply lift the distributor out of the cam gear, rotate the rotor CCW or CW one tooth, and try it again.
also, by doing this, you are going to ensure your timing tab and balancer match up properly. that way when you set your base timing and check your total advance you will be sure it is correct.
>>>soap box<<<
its kinda like when i see a headlight in upside down, or a set of directional wheels with the front ones pointed one way, and the rear pointed the other, or a steering wheel the isnt straight and centered, or people that dont replace the owners manual or fuse panel cover after they have them in there hands for the first time.
Does it really matter? not as long as the guy that owns the car is happy, i guess. after all, he bought and paid for it.
but, as ive been told, i am a bit **** about some of these things.
here is a pic that might help ya.
the raised top of the coil cover (where its marked latch) should be parallel with the firewall, square with the engine, so to speak.
this places your vacuum advance pointing in the correct position to allow you to neatly run the line forward to it's source, and puts the terminals on the cap far left, where the wires originate. this will also allow the proper route of your wires.
as for basic functionality and the required connections for operation, yes, you could put No. 1 where ever you wish, and it will run just fine. and, as long as no one pops the hood, no one would ever know.
but, straight is how it was intended to be, and like you mentioned, it just looks better.
for proper placement, you will have to remove the distributor, and then rotate the engine over until No. 1 is on TDC (top dead center). this is the point at which the piston is all the way at the "top" of its stroke, and on the compression stroke. (both valves closed). if you have the correct balancer and timing tab, the line on the balancer will be aligned with the 0 mark on the tab at this time. this alignment will occur 2x per cycle, therefore, it is important that you are on the compression stroke as stated above, and not on the exhaust stroke when you install the distributor.
now, when you drop the distributor in, the drive gear will mesh with the cam and rotate slightly as it is lowered into place. at the same time, the oil pump shaft has to fit up into the bottom of the gear. since the oil pump will only fit into place in 2 positions, most likely, it wont just drop right in. you will notice that the distributor will lack about 1/4" or so of sitting down on the intake. at this point, since you are in time, you can simply "tap" the starter switch, which will rotate the engine and the cam just a few degrees. do this just a lil at a time. and when the pump is in place, gravity will do the rest. she will fall right into place. if it fall into place and you are not satisfied with the placement of the rotor (pointing towards the No.1 cyl, drivers side front) or the housing, you can simply lift the distributor out of the cam gear, rotate the rotor CCW or CW one tooth, and try it again.
also, by doing this, you are going to ensure your timing tab and balancer match up properly. that way when you set your base timing and check your total advance you will be sure it is correct.
>>>soap box<<<
its kinda like when i see a headlight in upside down, or a set of directional wheels with the front ones pointed one way, and the rear pointed the other, or a steering wheel the isnt straight and centered, or people that dont replace the owners manual or fuse panel cover after they have them in there hands for the first time.
Does it really matter? not as long as the guy that owns the car is happy, i guess. after all, he bought and paid for it.
but, as ive been told, i am a bit **** about some of these things.
Thread Starter
Pro
Joined: Jun 2008
Posts: 673
Likes: 2
From: Melbourne Victoria
Well,we took the Vette out on the weekend,
Way better fuel economy,more power,starts easier- What a difference!!
Only 1 problem so far ( aussiejohn- YOU WERE RIGHT. )
The tach cable snapped.Oh well I'll just have to shift by ear for now.
With the right hand conversion it's very hard to get the tach cable routed correctly,
some experimenting will be required,
I'll keep you updated.
I'll also post some pics of the Show I attended.
CHEERS
GAV

Burning Brakes


Joined: Dec 2003
Posts: 1,004
Likes: 7
From: Adelaide South Australia
Well,we took the Vette out on the weekend,
Way better fuel economy,more power,starts easier- What a difference!!
Only 1 problem so far ( aussiejohn- YOU WERE RIGHT. )
The tach cable snapped.Oh well I'll just have to shift by ear for now.
With the right hand conversion it's very hard to get the tach cable routed correctly,
some experimenting will be required,
I'll keep you updated.
I'll also post some pics of the Show I attended.
CHEERS
GAV
Way better fuel economy,more power,starts easier- What a difference!!
Only 1 problem so far ( aussiejohn- YOU WERE RIGHT. )
The tach cable snapped.Oh well I'll just have to shift by ear for now.
With the right hand conversion it's very hard to get the tach cable routed correctly,
some experimenting will be required,
I'll keep you updated.
I'll also post some pics of the Show I attended.
CHEERS
GAV
Or get a longer tach cable to allow a greater bending radius so as to reduce the loading. That's what I did to eliminate a similar problem.
There is a 90* elbow available for the tach drive dizzy, but it does put extra strain on the internal tach drive gear...
Thread Starter
Pro
Joined: Jun 2008
Posts: 673
Likes: 2
From: Melbourne Victoria
It was suggested in an earlier post.... you can reclock your dizzy so that the tach takeoff on the body is in a better position to run to the right side due to your rhd conversion.
Or get a longer tach cable to allow a greater bending radius so as to reduce the loading. That's what I did to eliminate a similar problem.
There is a 90* elbow available for the tach drive dizzy, but it does put extra strain on the internal tach drive gear...
Or get a longer tach cable to allow a greater bending radius so as to reduce the loading. That's what I did to eliminate a similar problem.
There is a 90* elbow available for the tach drive dizzy, but it does put extra strain on the internal tach drive gear...
Where did you get the longer cable and what was it
off (all the ones I've seen are 22 inch).
Thanx
Gav
Melting Slicks


Joined: Apr 2001
Posts: 2,030
Likes: 363
From: Lubbock Texas
Well,we took the Vette out on the weekend,
Way better fuel economy,more power,starts easier- What a difference!!
Only 1 problem so far ( aussiejohn- YOU WERE RIGHT. )
The tach cable snapped.Oh well I'll just have to shift by ear for now.
With the right hand conversion it's very hard to get the tach cable routed correctly,
some experimenting will be required,
I'll keep you updated.
I'll also post some pics of the Show I attended.
CHEERS
GAV
Way better fuel economy,more power,starts easier- What a difference!!
Only 1 problem so far ( aussiejohn- YOU WERE RIGHT. )
The tach cable snapped.Oh well I'll just have to shift by ear for now.
With the right hand conversion it's very hard to get the tach cable routed correctly,
some experimenting will be required,
I'll keep you updated.
I'll also post some pics of the Show I attended.
CHEERS
GAV
DC