

turn signal wont cancel :(

Thread Starter
Racer


Joined: Apr 2007
Posts: 357
Likes: 0
From: Porters Lake Nova Scotia
i have done some searching within the forum and i cannot come up with much. The turn signal works in the car, but it will not cancel. Now i understand, that there is a cancelling cam within the turn signal mechanism itself, but it seems to be in tact. I am starting to wonder if it has to do with the springs on the sides of the column. I have a 1970 with t/t.
Le Mans Master


Joined: Oct 2006
Posts: 7,123
Likes: 433
From: Gladstone MO
C3 of Year Finalist (appearance mods) 2019
There is a left and a right cancel spring on the switch. They do break. The cancel cam is (simply) a round piece with a couple of lumps on it that catch the spring when the wheel is returned to center and pushes on the spring shutting the t/s off.
I'd bet GM still carries the springs- check your local dealer before paying more for shipping than the parts cost.
I'd bet GM still carries the springs- check your local dealer before paying more for shipping than the parts cost.

Former Vendor
Joined: Apr 2009
Posts: 766
Likes: 3
From: Charlotte North Carolina 704-394-5150
This is an easy fix with the right tools---abotu half an hour to find the problem if not less. Getting to the issue does require some special tools or extreme muscle if you do not have a lock plate suppressing tool.
When you remove the horn button by carefully prying it off. Remove the three phillips head screws that hold the upper horn contact to the column. Be CAREFUL when removing the upper horn contact because there is an extended leg off of the contact that comes in contact with a spring loaded protion of your horn circiut. Take it off very slowly and be careful around the spring loaded plunger. It can un-cage itself and parts can fly due to the black plastic locking fastener that is secured by pushing down on it and twisting it to release it from the groove in the lower horn contact. When the upper horn contact and shims (if any) removed you will see a sprocket looking bolt in the center. There will be two screws (unless one is lost) that secure the telescopic adjusting dial lever. This allows you rotate the lever so you can position your tele feature to your liking. Remove the two screws that are opposite sides of the "sprocket" looking bolt and do not loose the screws. At this time you are ready to remove the sprocket bolt with a large headed phillips head screwdriver. When it is removed the column should slide in and out easily. There should be ( if correct) a spacer that is under the telescopic dial lever. Is has three rasied stands casted into it joined by a thin casting of pot-metal in a circle. This needs to go back under the tele lever during re-assembly. the portion of the casting where the three stands joined by the thin pot metal ring. needs to be positioned so that the thin ring portion of the casting comes in contact with the steering wheel and the raised stands facing towardds you.. If you try to flip the spacer and install it after the tele dial lever is installed is creates a problem where it can break this spacer when you are steeing the tension for your tele feature and used like that over time due to the dial lever and casted spacer conflicting with each other.
Now remove the nut that secures the hub the the steering column shaft (it is the part the the steering wheel is screwed to). When the nut is removed there will be a notch in the shaft that you just removed the nut from. If your wheels are pointing straight forward, the notch will be at the 12'o'clock position. Now where the nut was coming in contact with the hub there will also be a notch. These two notches/grooves need to line up in order for the cancel feature of the turn signal to operate correctly. If they are not, that needs to be corrected. If they are in line and the notch / groove in the hub can sometimes be hard to see depending on how many people have attempted to repair issues inside the column without the correct tools, the issue is underneath. If they are off then the hub can be re-positioned and check to see if the turn signals cancel. If repositioning teh wheel corrects teh problem then the front end tie rods will need to be adjusted on an alignment machine to correct your steering wheel being off.
To remove the hub you will need a steereing wheel hub puller and make sure that the two bolts that are screwed into the hub go far enough into the hub to prevent the threads from being pulled out. When you have the hub off, there should be some slide on rubber spacers and plastic washers that are slid on the column shaft. Remove these. Now there is a probably yellowish-white plastic retainer that is clipped onto the "u" clip that is securing the lock plate. It will more than likely break due to being brittle due to age but with some care you may get lucky. It can still be purchased at GM and it is a cheap part. Now it will take an allen head set screw that you thread down the center hole of the column. when tightening it make sure that the shaft is pushed all the way down and the allen screw is tight. This prevents you column shaft from moving outwards when you are using the lock plate suppressor. Now using a lock plate suppressing tool. Thread it onto the end of the column shaft and begin tightening the nut so the lock plate will compress slightly. With the lock plate compresses, remove the "u" clip which is slid down thru the column shaft and secures the lock plate. Take careful attention of how is it removed because it can only be installed in one postion correctly and should be removed by sliding it straight up ( once again if your wheels are straight)
Once that is removed , and taking careful attention on how these parts are removed, using needle nose pliers pull off the lock plate and lower horn contact.
On the underside of the lower horn contact there will be a circular extension collar casted in the plastic. On the outer circumfrence of the circular area there are two extended tabs casted off of it. These are your cancel tabs for the turn signal. If they are there you are ok. Now look at the turn signal switch and you should see two springs that are clipped into the plastic portion of the switch. Somewhat at the top and bottom inner area of the switch. These springs are made so that a circular portion of the spring comes very close to the center shaft of the column. Make sure that they are caged and if not they need to be. If the plastic is broken that allows the springs to stay secure you will need a new turn signal switch. When everything is correct, when the turn signal lever if flipped the spring moves closer to the center shaft and thus allows the extended tabs from the lower horn contact to come in contact with it causing the turn sgnal to cancel. If for any reason the steering coupling has been replaced without using a GM part, the specific keyways are not correct in the aftermarket part and often times people re-position the hub causing the turn signals not to operate correctly. Also take a look at your front tie rod end assemblies. Checking to see if the exposed threads are about the same on each end of the assembly and are about even from one side of teh suspension to the other. If your car is correct, when the front wheels are straight, the inner tie rod end grease fittings should be slightly to the inside of the lower control arm inner bushings so that you can grease both of them with a grease gun without having to turn the wheels from side to side. Any questions just contact me and I will be glad to help. "DUB"

Le Mans Master

Joined: Jul 2000
Posts: 6,001
Likes: 113
From: Saginaw Michigan
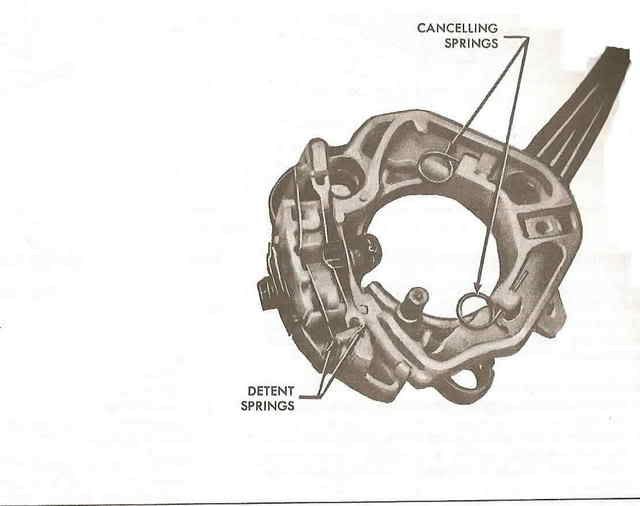
Here is a picture of the turn signal switch. You will note that there are two round cancelling springs. Check to see if one or both of them have become dislodged from the switch itself. The springs are available at most automotive stores.
Jim
Jim
Thread Starter
Racer
Joined: Apr 2007
Posts: 357
Likes: 0
From: Porters Lake Nova Scotia
ok the problem was that the turn signal springs were missing. I installed them, and now the signal switch will cnacel early on the left signal and wont camcel on the right? Is the cam 180 degrees in the wrong direction?
Former Vendor
Joined: Apr 2009
Posts: 766
Likes: 3
From: Charlotte North Carolina 704-394-5150
your hub and /or shaft are not positioned correctly. Did you check to make sure that the notch in the end of the column shaft, which should be at the 12 'o' clock position, if your wheels are pointing straight forward. If you rotate your column shaft so that the notch is at the 12 'o' clock position, or at the top. Forget abouot your wheels at this time. Now install yoour hub assembly and get the steering wheel straight. Your column is now correct. If the timing is off on your turn signal switch, look at my earlier post about youor tie rod end assemblies. If you have changed the steering coupling with an aftermarket unit , throw it away or return it and purchase it because I have found them not to be correct and causes your tie rod end assemblies to not be equal in adjustment lengths. I don't like it when one tie rod end assembly is really short and the other is extended out to far. I like them the same approximate length. You may require a front end tie rod end adjustment to correct your steering wheel when it is all over. keep us posted.
Last edited by grandmastercorvette; Apr 26, 2009 at 09:57 AM. Reason: add more info


