


Why?
Drifting

Joined: Apr 2006
Posts: 1,911
Likes: 2
From: gold coast queensland
use a razor blade scraper. get off the main junk . while you have you engine at this stage get your oil can and pour heaps of oil into your bores, lather them up. once you clean off the old head gasket material with the blade ( making sure not to gouge) keeping the blade straight then use emery paper. you need to sand it away so its a bright shiny metal again. perfectly clean and spotless. before you install your new gaskets use thinners or metho and a clean rag and clean it down completely. do it a few times ...... then you are mickey mouse and good to go.
dont forget to get one of your old head bolts and go through each female thread with it once or twice . it will clean them out and remove the old stud sealer. some people use a tap set to do this but i would never recommend it as it always removes some metal and as you will be retorquing your new aluminium heads too 55 lbs its not a good idea. just using an old head bolt will do the trick. do you have new head bolts and the torquing pattern ready for when you put your new heads on. i like to use GM stud sealer. its like honey and is the only sealer i ever use.
dont forget to get one of your old head bolts and go through each female thread with it once or twice . it will clean them out and remove the old stud sealer. some people use a tap set to do this but i would never recommend it as it always removes some metal and as you will be retorquing your new aluminium heads too 55 lbs its not a good idea. just using an old head bolt will do the trick. do you have new head bolts and the torquing pattern ready for when you put your new heads on. i like to use GM stud sealer. its like honey and is the only sealer i ever use.
Last edited by gingerbreadman1977; Jun 19, 2009 at 04:33 AM.
Thread Starter
Melting Slicks

Joined: May 2007
Posts: 3,246
Likes: 4
From: Bay Area CA
use a razor blade scraper. get off the main junk . while you have you engine at this stage get your oil can and pour heaps of oil into your bores, lather them up. once you clean off the old head gasket material with the blade ( making sure not to gouge) keeping the blade straight then use emery paper. you need to sand it away so its a bright shiny metal again. perfectly clean and spotless. before you install your new gaskets use thinners or metho and a clean rag and clean it down completely. do it a few times ...... then you are mickey mouse and good to go.
dont forget to get one of your old head bolts and go through each female thread with it once or twice . it will clean them out and remove the old stud sealer. some people use a tap set to do this but i would never recommend it as it always removes some metal and as you will be retorquing your new aluminium heads too 55 lbs its not a good idea. just using an old head bolt will do the trick. do you have new head bolts and the torquing pattern ready for when you put your new heads on. i like to use GM stud sealer. its like honey and is the only sealer i ever use.
dont forget to get one of your old head bolts and go through each female thread with it once or twice . it will clean them out and remove the old stud sealer. some people use a tap set to do this but i would never recommend it as it always removes some metal and as you will be retorquing your new aluminium heads too 55 lbs its not a good idea. just using an old head bolt will do the trick. do you have new head bolts and the torquing pattern ready for when you put your new heads on. i like to use GM stud sealer. its like honey and is the only sealer i ever use.

Drifting
Joined: Apr 2006
Posts: 1,911
Likes: 2
From: gold coast queensland
Ok, so a razor blade in one of those holders, the blade will still be at a slight angle to the block face because of the holder, is that OK? What is emery paper, i've heard of it, is it sand paper? if so, what grit? I plan to use 99% alcohol for the final wipe down, will this do? I have a thread chaser i bought for this job, a set new of ARP head bolts, and ARP thread sealer, pattern came with the heads, i used it to remove the old heads.
Yea, passenger side head was stuck on the inner dowel pin, rotated it a few times across the block surface, got that nasty junk into the bores. Planning on vacuuming it out, then using a Q-tip, save that for last.
Yea, passenger side head was stuck on the inner dowel pin, rotated it a few times across the block surface, got that nasty junk into the bores. Planning on vacuuming it out, then using a Q-tip, save that for last.
emery paper is a type of sandpaper yes ...minus the sand( it uses emery). it seems very rough when its new but wears down fast and keep using it till its almost smooth. emery is just another mineral thats not as abrasive as sand. its what should be used to clean a block surface. some people said use a wire brush but i wouldnt want to have bits of wire flying off and ending up in a motor somewhere as wire weels/brushes loose strands of wire like a dog looses hair. you want the top of that block to be like new shiny metal. i think emery paper is just emery and it comes in a roll with standard grit size...its feels like 80 grit when new which sounds harsh but its soft unlike sand paper.
Last edited by gingerbreadman1977; Jun 19, 2009 at 11:29 PM.
Thread Starter
Melting Slicks
Joined: May 2007
Posts: 3,246
Likes: 4
From: Bay Area CA
Got back to it Today. Yes a razor blade is the way to go, Yes it's a PITA, but i don't see any other way. 7 hours for this, 3.5 per side, threads chased. Be sure to pick up a thread chaser if your doing this job, well worth it. Sprayed a tiny bit of brake cleaner into each bolt hole before chasing them twice.
Before
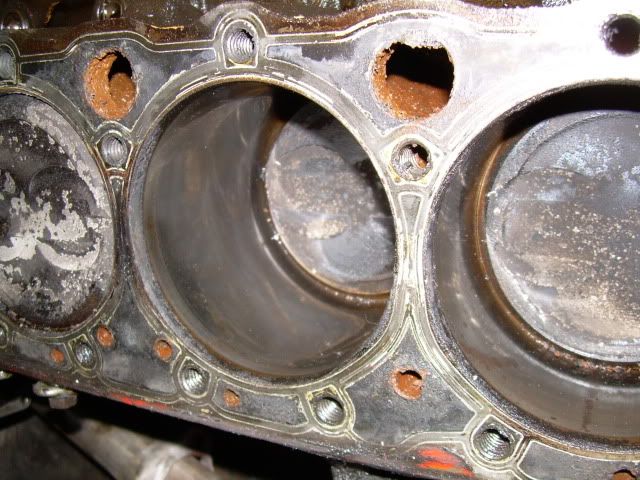
After


Before
After
Last edited by RunningMan373; Jun 23, 2009 at 02:44 AM.
Drifting
Joined: Apr 2006
Posts: 1,911
Likes: 2
From: gold coast queensland
looking much better runningman. your on the home straight now. looks like you can afford to sand a little more . its hard for me to tell in pictures but you shouldnt really be able to see much of the old gasket mark on the block. if you emery some more does the old head gasket outline dissappear or where those cast iron heads on there just too long and the mark will not fade?
pull that dipstick out , it will only get in the way when your putting on the new bling. re-silicon it back in last.
i love these kind of pics your doing.
pull that dipstick out , it will only get in the way when your putting on the new bling. re-silicon it back in last.
i love these kind of pics your doing.
Last edited by gingerbreadman1977; Jun 23, 2009 at 02:53 AM.
Corvette Stories
The Best of Corvette for Corvette Enthusiasts

150 hp to 1,250 hp: Every Corvette Generation Compared by the Specs That Matter
Joe Kucinski
8 Coolest Corvette Pace Cars (and Replicas) of All Time
Verdad Gallardo
Top 10 Corvette Engines RANKED by Peak Torque (70+ Years of Muscle!)
Joe Kucinski
Corvette ZR1X Will Be Pacing the Indy 500, And Could Probably Race, Too!
Verdad Gallardo
Top 10 Corvettes Coming to Mecum Indy 2026!
Brett Foote
Top 10 C9 Corvette MUST-HAVES to Fix These C8 Generation Flaws!
Michael S. Palmer
10 Revolutionary 'Corvette Firsts' Most People Don't Know
Joe Kucinski
5 Reasons to Upgrade to an LS6-Powered Corvette; 5 Reasons to Stay LT2
Michael S. Palmer
2027 Corvette vs The World: Every C8 vs Its Closest Competitor
Joe Kucinski
Thread Starter
Melting Slicks
Joined: May 2007
Posts: 3,246
Likes: 4
From: Bay Area CA
Thanks GB,, I'm not going to use the emery paper at all, the outlines are there but it's as smooth as glass. The most difficult part was removing the carbon & black iron oxide that had built up in some places  , but i'm satisfied with it, i think it will work fine. Razor blade was the only way to go Build up tomorrow.
, but i'm satisfied with it, i think it will work fine. Razor blade was the only way to go Build up tomorrow.
Drifting
Joined: Apr 2006
Posts: 1,911
Likes: 2
From: gold coast queensland
Thanks GB,, I'm not going to use the emery paper at all, the outlines are there but it's as smooth as glass. The most difficult part was removing the carbon & black iron oxide that had built up in some places , but i'm satisfied with it, i think it will work fine. Razor blade was the only way to go Build up tomorrow.
, but i'm satisfied with it, i think it will work fine. Razor blade was the only way to go Build up tomorrow.
Thread Starter
Melting Slicks
Joined: May 2007
Posts: 3,246
Likes: 4
From: Bay Area CA
I understand that, you'd have to see them in person, it's metal. Also, the new head gaskets have a very thin rubber like coating, they say don't worry about small imperfections. They'll be fine. thanks though

Burning Brakes


Joined: Aug 2005
Posts: 1,164
Likes: 1
From: Europe, France

Yes, don't try to remove these outlines, they shouldn't be an issue with the new head gasket.
Great job RunningMan373
Keep up the good work, we're waiting for new pictures...
Note : A ( powerful ) vacuum cleaner can help to remove the small debris in tiny threaded holes... Do not use compressed air !
Last edited by 73StreetRace; Jun 23, 2009 at 07:36 AM.

Melting Slicks


Joined: Apr 2005
Posts: 2,045
Likes: 4
From: Yorktown VA
NCM Sinkhole Donor
Just a thought. I did the same thing that you are doing, a top end rebuild (redid my heads while you are replacing yours). Four years later, I'm rebuilding the whole engine. The extra HP from the cam/heads/vlves/intake/etc were too much for the 30-year old rings. Wish I had rebuilt it the first time. Now I have to and I'm spending extra money to redo the heads again. Went with a different cam (wiped two lobes) and new flat pistons. You just might want to consider going ahead and rebuilding it.
Thread Starter
Melting Slicks
Joined: May 2007
Posts: 3,246
Likes: 4
From: Bay Area CA
Just a thought. I did the same thing that you are doing, a top end rebuild (redid my heads while you are replacing yours). Four years later, I'm rebuilding the whole engine. The extra HP from the cam/heads/vlves/intake/etc were too much for the 30-year old rings. Wish I had rebuilt it the first time. Now I have to and I'm spending extra money to redo the heads again. Went with a different cam (wiped two lobes) and new flat pistons. You just might want to consider going ahead and rebuilding it.
cam, timing chain, H/B and cover on. heads tomorrow. C. (forgot camera)


Drifting
Joined: Aug 2007
Posts: 1,838
Likes: 13
From: Kingman AZ
If the heads are 64 cc chambers should put you at 10:1. L 48 dish piston are good with the thinner gasket. Guessing 300 to 350 hp with the cam heads and header configuration...Are you gonna dyno when done?
Thread Starter
Melting Slicks
Joined: May 2007
Posts: 3,246
Likes: 4
From: Bay Area CA
Here's what I'm useing,, theses heads- 64cc chambers http://www.edelbrock.com/automotive_...e-street.shtml with this head gasket, http://www.summitracing.com/parts/MR...?part=MRG-1134 , i also have a .038 compressed thickness head gasket, I do not want to be above 9.5:1, gotta run this thing on 91 ron unleaded,, and opinions here on which head gasket to use, this would be very important. The bottom end is all stock L48, see pics. 