


HELP!! Need to replace tach cable in a '73

Thread Starter
Racer


Joined: Aug 1999
Posts: 414
Likes: 3
From: Mineral Ridge Ohio
I have done searches and looked in the Tech section, but still don't have the info I really need to replace my broken tach cable. I have already tried to reach up behind the dash to find the clip or spring that keeps the cable in place, but my hands must be too large. All I managed to do was get really frustrated. I tried to get a look at things with a mirror and flashlight, but still no luck. All this was tried with the dash partly disassembled and the duct removed. I think that what I need is a picture of the back of a tach showing the clip that retains the cable. Is the clip always attached to the housing in the same orientation? Which way do you push or depress the clip to release the cable? I have read that one pushes up on the clip, and someone else says the clip is pushed toward the rear of the car. Has anyone ever made a tool that could be used from the engine side of the firewall? Any detailed advice or pictures anyone?
Race Director

Joined: May 2006
Posts: 16,528
Likes: 53
From: Dayton, Ohio
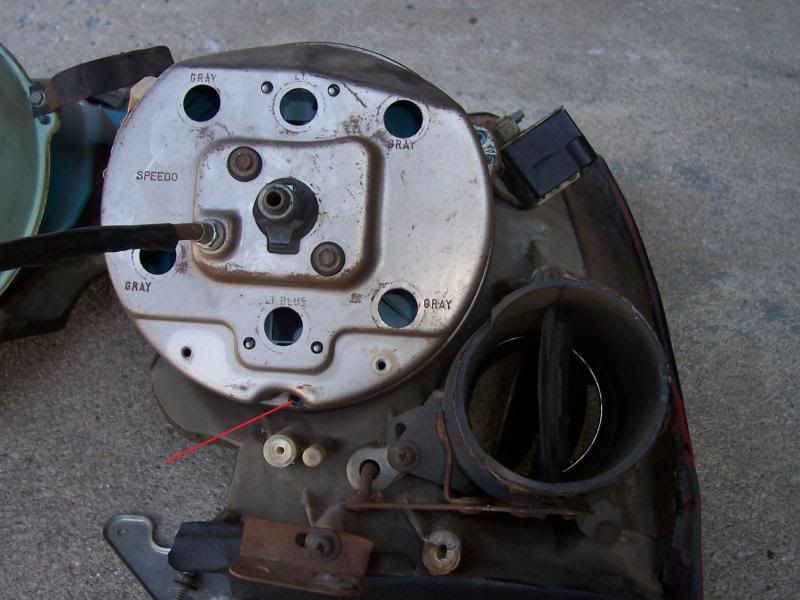
Here is a pic of the speedo with a tool attached its the best I can do tonight. I can take a pic tomorrow of the tach without the tool if you need. The spring clip is on the bottom. If you look close you can see how the tool pushes the clip in to release. The easiest way is remove the cable from the dist,have a helper push the cable lightly toward the tach,now you push the clip in,then have the helper pull on the cable.
I don't have a helper most of the time so I use a bungy cord as my helper.

I don't have a helper most of the time so I use a bungy cord as my helper.
Racer
Joined: Jan 2006
Posts: 323
Likes: 4
From: McKinney Texas
That tool Roger shows is really cool. Would make the job a lot easier.
I replace the tach on my '74 a couple of weeks ago, and tracked it on another post. The summary is below, but the main thing is remove the drivers seat. Four bolts and you will be much more comfortable/productive.
Right as the dash ends, you can look up in there and see where the cable goes into the tach. I just stuck a long bladed screwdriver up there, and pushed the retaining ring into the tach as my son pulled the cable out (from the engine compartment). Took about five minutes.
To put the new cable in, I lined up the cable (this took about five minutes as well, and then my son pushed it in until it clicked. Surprisingly easy, though I may have just been lucky.
Points on this:
1) Remove the drivers seat. Not sure I could have done this standing on my head.
2) Remove the grommit at the firewall that the cable and other wires go through. You need the freedom to move the cable around.
3) I bought my cable from Corvette Central and it is a couple of inches longer than the cable I replaced. I set the distributor so it did not cause a bind, but I could see how the longer cable would be more likely to bind.
I took some pictures, and copied some from other posts to show what the cable to tach connection looked like, but I cannot figure out how to insert them into this post (says I need a url). I will stick them in my photo album for those who are interested.
Thread Starter
Racer
Joined: Aug 1999
Posts: 414
Likes: 3
From: Mineral Ridge Ohio
Roger, those pictures are a great help. And the tool you made looks better than one I had imagined trying to construct. Mandingo, I have to admit that I never thought about getting the seat out of the way. I have had my head and shoulders in what little space there is in there, but with being somewhat large in stature, wasn't able to do much. As far as the new cable length, I had heard that replacement cables generally were not exactly right. Does any vendor supply one that is truly an exact replacement? I have one at the moment, but don't know how it compares with the original.

Safety Car


Joined: Apr 2000
Posts: 3,802
Likes: 61
From: Wichita KS
I replaced my tach cable by taking the top dash off and going from the top down. It was easy to remove but installing the new one was tough because I couldn't get enough leverage to push it past the clip.
I tried pushing it from the engine compartment and was able to get it clipped in. But when I started the car the tach didn't move so I had to mess with it. Turns out it was not seated properly at the distributor.
cc
I tried pushing it from the engine compartment and was able to get it clipped in. But when I started the car the tach didn't move so I had to mess with it. Turns out it was not seated properly at the distributor.
cc
Last edited by CCrane65; Nov 4, 2009 at 11:48 PM.

Le Mans Master

Joined: Sep 2001
Posts: 7,739
Likes: 630
From: Unreconstructed, South Carolina
Roger, those pictures are a great help. And the tool you made looks better than one I had imagined trying to construct. Mandingo, I have to admit that I never thought about getting the seat out of the way. I have had my head and shoulders in what little space there is in there, but with being somewhat large in stature, wasn't able to do much. As far as the new cable length, I had heard that replacement cables generally were not exactly right. Does any vendor supply one that is truly an exact replacement? I have one at the moment, but don't know how it compares with the original.
Soon need to replace tach cable on a 71. The OE housing is AOK but core has become rounded at the tach end. I know about the "wrong" aftermarket cable lengths too. I plan to address this 71 by making up a new inner/core. Pull old core out from tach side & make up a new core. A local heavy truck shop has core & ferrules in stock & has tools/dies to square the core ends. I know shop manager & he told me to come on up & have at it. I've personally made up cores before but it's been at least 30 years since I've even thought about it. IIRC, the ends are a standard 0.104" square drive & seems like round core about 3/32"-7/64" OD. AC Delco & Standard Ignition used to sell cable assemblies & parts through local parts stores.
Corvette Stories
The Best of Corvette for Corvette Enthusiasts

Top 10 Most Expensive Corvettes Ever Sold on Bring A Trailer
Brett Foote
10 Things Every Corvette Owner Needs (2026 Edition)
Michael S. Palmer
8 Most "Only Corvette Owners Understand" Quirks and Problems
Pouria Savadkouei
10 Reasons the C6 Z06 is Still A Performance Benchmark After 20 Years
Joe Kucinski
How Much Horsepower Every Corvette Engine "LOST" in 1972
Joe Kucinski
Top 10 DOs and DON'Ts for Protecting Your Convertible Top!
Michael S. Palmer
Top 10 Most Explosive Corvettes Ever Made: Power-to-Weight Ratio Ranked!
Joe Kucinski
150 hp to 1,250 hp: Every Corvette Generation Compared by the Specs That Matter
Joe Kucinski
8 Coolest Corvette Pace Cars (and Replicas) of All Time
Verdad GallardoRacer
Joined: Jan 2006
Posts: 323
Likes: 4
From: McKinney Texas
Seems like I read you can still get the factory length tach cables from some source. I found that out through forum searches a couple of weeks ago, after I had already purchased mine from Corvette Central.