


Temp gauge schematic?
Thread Starter
Race Director


Joined: Apr 2003
Posts: 19,353
Likes: 654
From: Tampa, Florida
For some odd unknown reason I disassembled the back of my temp gauge to clean up the brass. Apparently I mis-assembled it because it's no longer accurate. It goes up to about 155 and stops. I think one of the small washers may be in the wrong postion.
Anyone have a schematic of the proper position of all those little pieces or perhaps a hi-res pic of the backside of the temp gauge?
Its a '70. I did check all the available publications...
Thanks,
Jim
Anyone have a schematic of the proper position of all those little pieces or perhaps a hi-res pic of the backside of the temp gauge?
Its a '70. I did check all the available publications...
Thanks,
Jim
Drifting


Joined: May 2002
Posts: 1,546
Likes: 282
From: Back in Nebraska
For some odd unknown reason I disassembled the back of my temp gauge to clean up the brass. Apparently I mis-assembled it because it's no longer accurate. It goes up to about 155 and stops. I think one of the small washers may be in the wrong postion.
Anyone have a schematic of the proper position of all those little pieces or perhaps a hi-res pic of the backside of the temp gauge?
Its a '70. I did check all the available publications...
Thanks,
Jim
Anyone have a schematic of the proper position of all those little pieces or perhaps a hi-res pic of the backside of the temp gauge?
Its a '70. I did check all the available publications...
Thanks,
Jim
Race Director
Joined: May 2006
Posts: 16,528
Likes: 53
From: Dayton, Ohio
If this doesn't do it for you I can tell you per stud the correct items and order they are installed.
http://willcoxcorvette.com/instructi...ions_68-82.jpg
http://willcoxcorvette.com/instructi...ions_68-82.jpg
Race Director
Joined: May 2006
Posts: 16,528
Likes: 53
From: Dayton, Ohio
Whats the ohms reading across term 9 and 3 oclock. Should read about 45 ohms if I remember right.
edit - hold the phone-45 is from the 12 to 6
9 to 3 is around 80 ohms
edit - hold the phone-45 is from the 12 to 6
9 to 3 is around 80 ohms
Last edited by ...Roger...; Dec 3, 2009 at 05:21 PM.
Thread Starter
Race Director
Joined: Apr 2003
Posts: 19,353
Likes: 654
From: Tampa, Florida
49 ohms across 12 to 6 and
88 ohms across 9 to 3.
Corvette Stories
The Best of Corvette for Corvette Enthusiasts

5 Best & 5 Worst Corvette Daily Drivers
Joe Kucinski
The Headlights of Every Corvette Generation Explained
Joe Kucinski
5 Best & 5 Most Overrated Corvette Track Packages of All Time!
Joe Kucinski
Every 2027 Corvette Engine Explained
Joe Kucinski
Designer Imagines A Corvette That Looks More Like a Corvette Than the Corvette
Verdad Gallardo
10 Ugly Corvettes That We Still Kinda Love
Joe Kucinski
Top 10 Most Expensive Corvettes Ever Sold on Bring A Trailer
Brett Foote
10 Things Every Corvette Owner Needs (2026 Edition)
Michael S. Palmer
8 Most "Only Corvette Owners Understand" Quirks and Problems
Pouria SavadkoueiRace Director
Joined: May 2006
Posts: 16,528
Likes: 53
From: Dayton, Ohio
If you have some resistors laying around you can bench test the gauge. A 2 pack at Radio Shack is about $1. If you don't have any resistors laying around you can substitute your turn signal or hazard flasher after you read its resistance.
Former Vendor
Joined: Aug 2006
Posts: 76,656
Likes: 1,853
From: Jeffersonville Indiana 812-288-7103
St. Jude Donor '08-'09-'10-'11-'12-'13-'14-'15
Jim,
If you have around 90 ohms resistor and the gauge is installed properly in the cluster housing, I would do this:
Plug up the connector.
Attach the ground wire to the cluster.
With the key on remove the sending unit wire, the gauge should go to cold.
With the key on ground out the sending unit wire and the gauge should peg.
A sign of a resistor problem is a terribly low reading on the gauge but if you tested it then this rules out the resistor unless for some reason contact is not being made to the stud. I would remove the nuts and connectors and clean the contact points between the housing, stud and resistor and and test again.
If you do this function test on the gauge and it works great, but if it fails then run an independent ground from the car to the center dash cluster and test again.
All else fails, pull the gauge out send it to me and I'll test it for you... Christmas present!
I can eliminate or nail the gauge as the problem in about two minutes.
Willcox
Thread Starter
Race Director
Joined: Apr 2003
Posts: 19,353
Likes: 654
From: Tampa, Florida
Thanks,
Jim
Former Vendor
Joined: Aug 2006
Posts: 76,656
Likes: 1,853
From: Jeffersonville Indiana 812-288-7103
St. Jude Donor '08-'09-'10-'11-'12-'13-'14-'15
Willcox
Race Director
Joined: May 2006
Posts: 16,528
Likes: 53
From: Dayton, Ohio
Jim if all you did was disassemble and clean ( and didn't do anything under the hood ) then it would make sense the problem is at the gauge. You said you cleaned the "brass" and I'm guessing thats the studs on the gauge but the more important connections are the 3 spade connections including the connectors in the harness. A high gauge reading of 155 would indicate a dirty or poor connection on the upper spade (the one connected to the 12 oclock stud).
The standard gauge initial test we are speaking of is easy and quick to do.
Reattach the 3 wire connector on the back of the gauge (black wire in connector should ground cluster)
turn ign key to on
under the hood remove the green sender wire -- temp gauge should go to cold
now ground the sender wire-- temp gauge should go to hot
If on this last step the gauge only goes to 155 then we will have to move on to some bench testing or send the gauge to Ernie. (It is possible the needle slipped.)
Ernie I thought you had a complete test on your site for the temp gauge,I can't find it so I can link it. I need to copy all these links and put them in some kind of order.
Team Owner


Joined: Jan 2006
Posts: 37,637
Likes: 3,118
From: Crossville TN
If the gauge works, it isn't the gauge. Did you replace the temp sensor at the same time? If so, your temp sensor may not be correct for your year car. Some of the aftermarket stuff is 'generic' and doesn't provide correct readings. Do the testing Willcox suggested. If that works OK, your gauge, resistor, and wiring are OK. The only item left is the sensor.
P.S. Any possibility that the engine is operating at 160 F? Low temp T-stat or old stat stuck open?
P.S. Any possibility that the engine is operating at 160 F? Low temp T-stat or old stat stuck open?
Last edited by 7T1vette; Dec 4, 2009 at 09:31 AM.
Former Vendor
Joined: Aug 2006
Posts: 76,656
Likes: 1,853
From: Jeffersonville Indiana 812-288-7103
St. Jude Donor '08-'09-'10-'11-'12-'13-'14-'15
Jim if all you did was disassemble and clean ( and didn't do anything under the hood ) then it would make sense the problem is at the gauge. You said you cleaned the "brass" and I'm guessing thats the studs on the gauge but the more important connections are the 3 spade connections including the connectors in the harness. A high gauge reading of 155 would indicate a dirty or poor connection on the upper spade (the one connected to the 12 oclock stud).
The standard gauge initial test we are speaking of is easy and quick to do.
Reattach the 3 wire connector on the back of the gauge (black wire in connector should ground cluster)
turn ign key to on
under the hood remove the green sender wire -- temp gauge should go to cold
now ground the sender wire-- temp gauge should go to hot
If on this last step the gauge only goes to 155 then we will have to move on to some bench testing or send the gauge to Ernie. (It is possible the needle slipped.)
Ernie I thought you had a complete test on your site for the temp gauge,I can't find it so I can link it. I need to copy all these links and put them in some kind of order.
The standard gauge initial test we are speaking of is easy and quick to do.
Reattach the 3 wire connector on the back of the gauge (black wire in connector should ground cluster)
turn ign key to on
under the hood remove the green sender wire -- temp gauge should go to cold
now ground the sender wire-- temp gauge should go to hot
If on this last step the gauge only goes to 155 then we will have to move on to some bench testing or send the gauge to Ernie. (It is possible the needle slipped.)
Ernie I thought you had a complete test on your site for the temp gauge,I can't find it so I can link it. I need to copy all these links and put them in some kind of order.
Roger, you can search these by entering the year and selecting "Help and Repair" from the center drop down box. Then narrow the search with a one word search such as "temp" or "fuel".
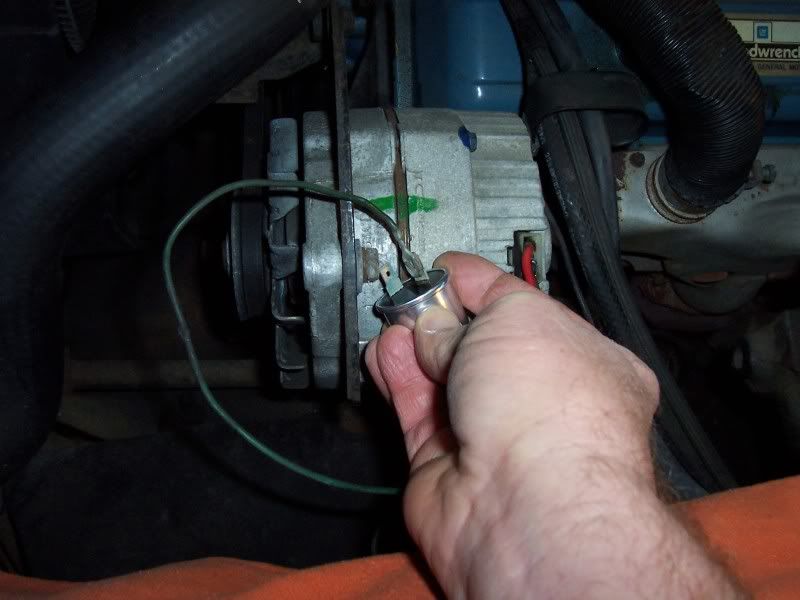
One thing that concerned me in this picture was the amount of corrosion on the terminal in the picture. The studs look great, but the corrosion should be removed from all the terminals top and bottom side.
Willcox
Thread Starter
Race Director
Joined: Apr 2003
Posts: 19,353
Likes: 654
From: Tampa, Florida
If the gauge works, it isn't the gauge. Did you replace the temp sensor at the same time? If so, your temp sensor may not be correct for your year car. Some of the aftermarket stuff is 'generic' and doesn't provide correct readings. Do the testing Willcox suggested. If that works OK, your gauge, resistor, and wiring are OK. The only item left is the sensor.
P.S. Any possibility that the engine is operating at 160 F? Low temp T-stat or old stat stuck open?
P.S. Any possibility that the engine is operating at 160 F? Low temp T-stat or old stat stuck open?
I did the sensor awhile back and used the approriate part from lectriclimited. I'm in Tampa, there's no way my cars running at 160. I'm going run the tests in the morning, I'll report back with the results.
Jim
Thread Starter
Race Director
Joined: Apr 2003
Posts: 19,353
Likes: 654
From: Tampa, Florida
I checked various under hood temps with my IR temp gun, some, like the lower radiator hose were very low (125) while the upper hose and thermostat housing where in the 165 range. I let it idle for 15 minutes which should be plenty long enough to get it up to normal temps and the gauge barely moved past baseline. Even after turning it off and letting the engine heat sink it still didnt move much.
The sending unit is proper for my car, its only 2 years old but I suppose it could be bad.
Jim
Race Director
Joined: May 2006
Posts: 16,528
Likes: 53
From: Dayton, Ohio
Here is a simple test ( i didnt say I was simple) using what you have at home. Attach the green temp sender wire to your hazard flasher and touch the other terminal of the flasher to ground and see what your gauge reads. Then remove the flasher and measure the ohms between the 2 terminals and compare that to the temp gauge ohm chart on Willcox's site. That should tell us if your gauge is accurate.
From Willcox site :
220 degrees = 70 ohms
200 degrees = 90 ohms
160 degrees = 140 ohms
120 degrees = 250 ohms
100 degrees = 340 ohms
From Willcox site :
220 degrees = 70 ohms
200 degrees = 90 ohms
160 degrees = 140 ohms
120 degrees = 250 ohms
100 degrees = 340 ohms
Last edited by ...Roger...; Dec 6, 2009 at 03:01 PM.