
Mn-brent ls1-4l60e swap
 01-04-2010, 10:31 PM
#21
Safety Car


Thread Starter

Driveshaft update.
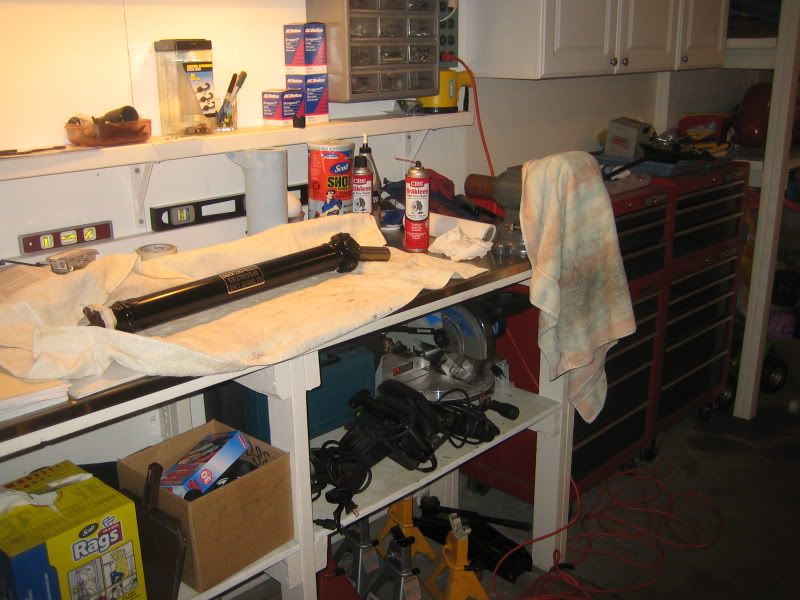
I took the driveshaft over to a local driveline shop in Anoka, Mn and the dropped it off at noon hour. By 2pm, it was done, and I swung in to pick it up after work. $157 bux and my driveshaft was lengthened 1 inch from 25.0 inch u-joint ctr to ctr to 26.0 inch ctr to ctr. They also polished the yoke and mic'd it good to go. Zero pain relatively. Awesome service too.
pic of the finished shaft and the workbench tool box area
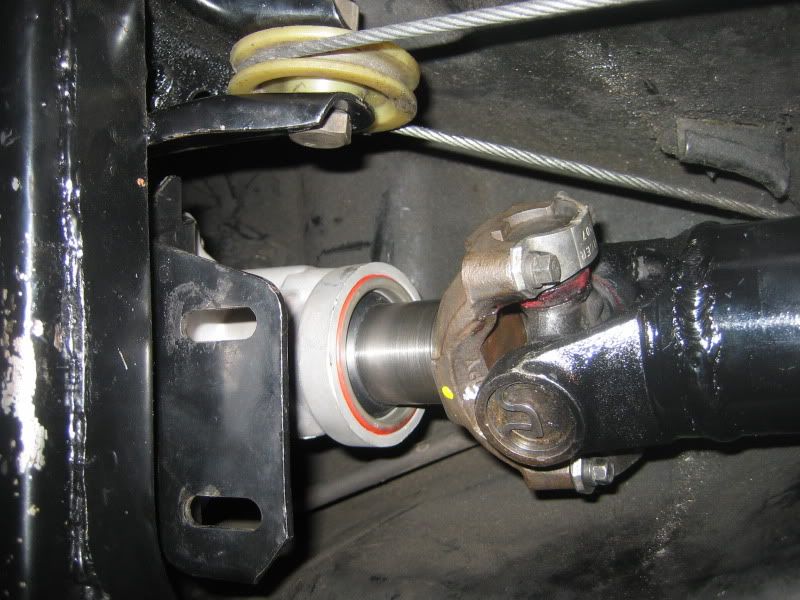
Installed and nice and snug in the tailshaft bushing
I took the driveshaft over to a local driveline shop in Anoka, Mn and the dropped it off at noon hour. By 2pm, it was done, and I swung in to pick it up after work. $157 bux and my driveshaft was lengthened 1 inch from 25.0 inch u-joint ctr to ctr to 26.0 inch ctr to ctr. They also polished the yoke and mic'd it good to go. Zero pain relatively. Awesome service too.
pic of the finished shaft and the workbench tool box area
Installed and nice and snug in the tailshaft bushing
 01-09-2010, 03:24 AM
#23
Melting Slicks

dumb question:
wouldn't using the engine mounts that put the LS 1" further back negate the need to mod the 700R4 crossmember holes (1") and lengthen the driveshaft (1") for a 4L60E install ?????
Or would this introduce more engine bay interference issues ??
following your install closely....................
wouldn't using the engine mounts that put the LS 1" further back negate the need to mod the 700R4 crossmember holes (1") and lengthen the driveshaft (1") for a 4L60E install ?????
Or would this introduce more engine bay interference issues ??
following your install closely....................
01-09-2010, 04:24 AM
#24
Instructor


Member Since: Aug 2005
Posts: 225
Likes: 0
Received 0 Likes
on
0 Posts
[LS1%20SWAP/IMG_5390.jpg[/IMG][/QUOTE]
How much for the gearbox and stall converter
Regards
J Smit
mopkop@netvigator.com
How much for the gearbox and stall converter
Regards
J Smit
mopkop@netvigator.com
01-09-2010, 03:40 PM
#25
Safety Car
Thread Starter
dumb question:
wouldn't using the engine mounts that put the LS 1" further back negate the need to mod the 700R4 crossmember holes (1") and lengthen the driveshaft (1") for a 4L60E install ?????
Or would this introduce more engine bay interference issues ??
following your install closely....................
wouldn't using the engine mounts that put the LS 1" further back negate the need to mod the 700R4 crossmember holes (1") and lengthen the driveshaft (1") for a 4L60E install ?????
Or would this introduce more engine bay interference issues ??
following your install closely....................
Im happy with the motor where it is and glad I stayed with the "standard" position mounts.
 .
01-24-2010, 01:30 AM
.
01-24-2010, 01:30 AM
#26
Safety Car
Thread Starter
Next update:
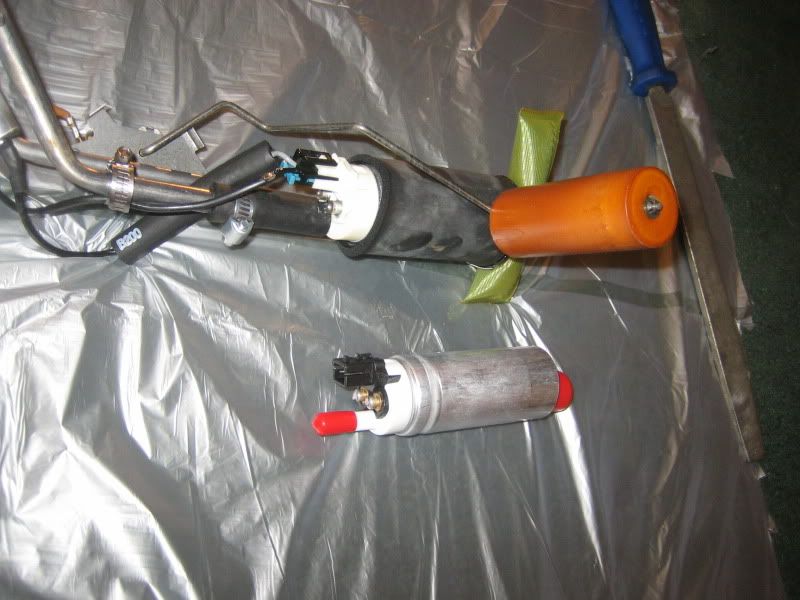
I had an AC Delco EP241 TPI fuel pump (85 pump mod for CFI) and thought I would be able to use this for the LS1. However after further research, I found a post on LS1Tech where a guy was talking with an Airtex contact, and he was stating that the EP241 may get you there, but it will be operating within an inch of it's life trying to maintain the pressure and flow requirements of the LS1. The GM LS1 swappers manual copy I have suggest the EP381 as the preferred pump. This is a GM late model full size truck pump and its form-fit-function is identical to the CFI-TPI pumps, so it went in without a fight.
He also explained that the EP381’s were manufactured with a new thin magnet design which yielded a lot higher torque than the EP241’s. They were specifically designed to work on Vortec & LS1 style engines. The current draw on the EP381 would be significantly less than the EP241 as well, less current = less heat=longer life.
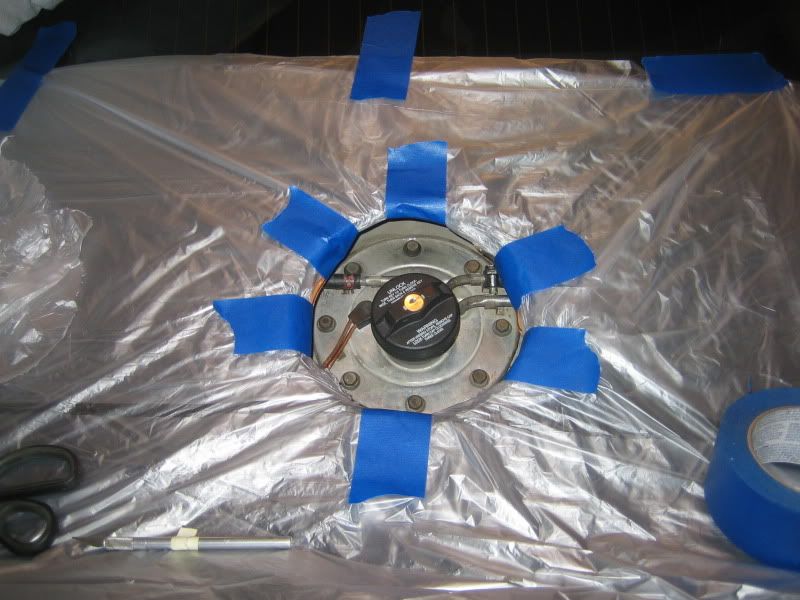
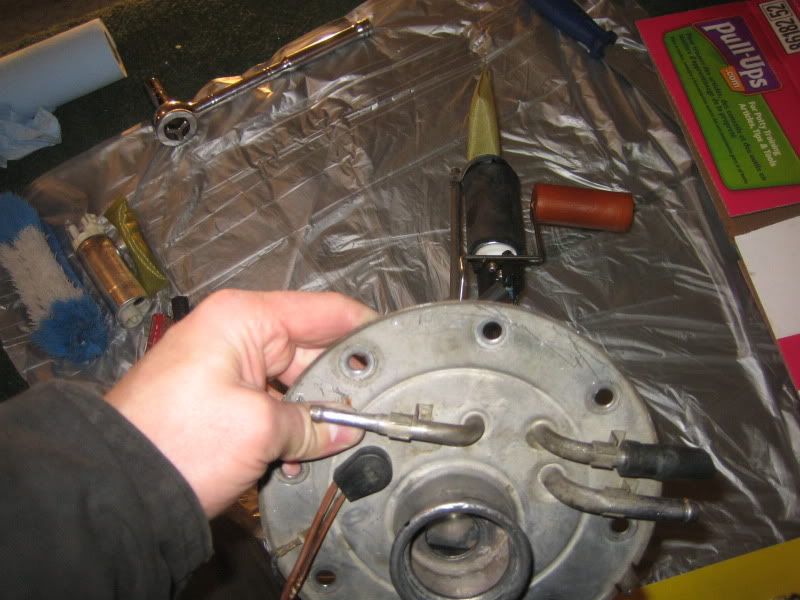
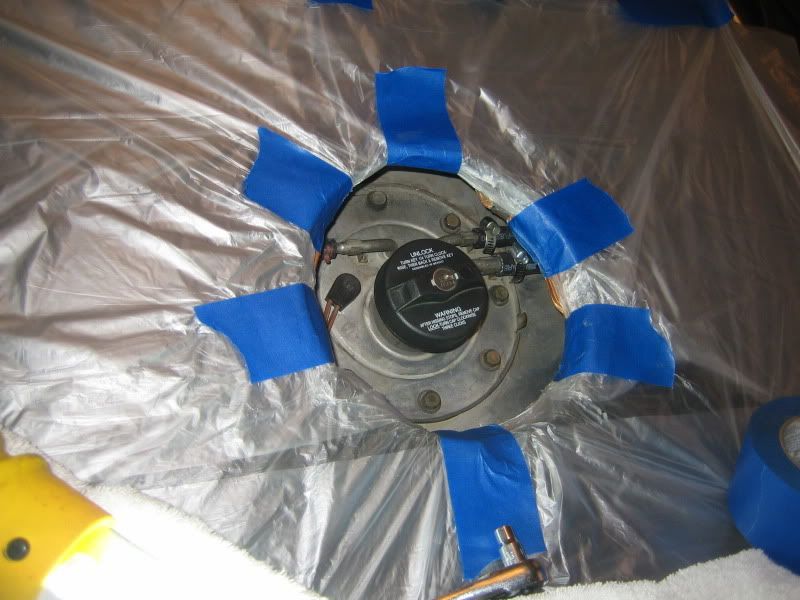
Here is the rear area taped up for removal of the pump out the top:
Here is the AC Delco EP241 still attached and the AC Delco EP381 new pump next to it ready to go on.
EP381 mounted and ready for install
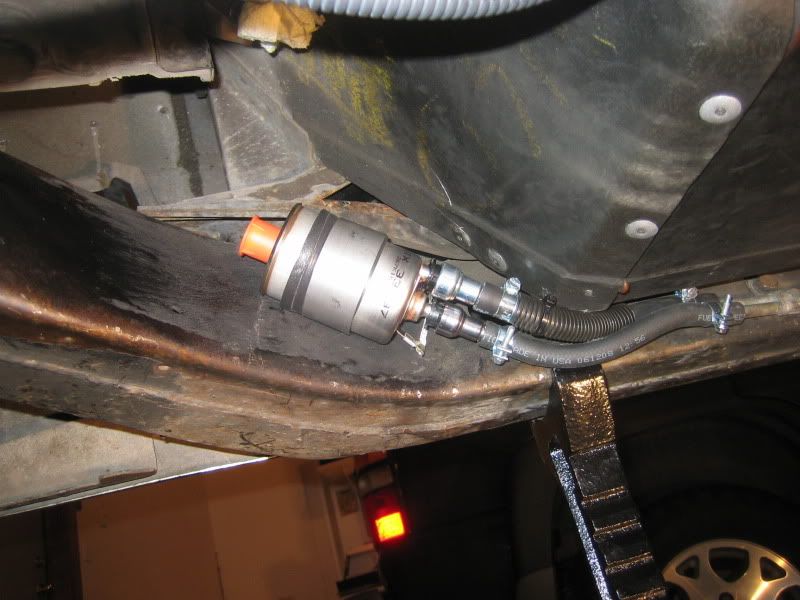
All rubber hoses were replaced with high pressure fuel injection rated to 180PSI. LS1's are regulated at ~58PSI
I'm using the existing CFI hard lines all the way up to the motor area. There is only 2 sets of rubber in this scheme. 2-3 inches at the tank and 5-6 inch at the regulator. From there I have the C5 regulator-filter (Wix 33737) bolted in where the CFI filter was. I'll run braided -AN6 quick release up to the intake from here. Worked out pretty sweet as no hardline was needed to be fabricated
I had an AC Delco EP241 TPI fuel pump (85 pump mod for CFI) and thought I would be able to use this for the LS1. However after further research, I found a post on LS1Tech where a guy was talking with an Airtex contact, and he was stating that the EP241 may get you there, but it will be operating within an inch of it's life trying to maintain the pressure and flow requirements of the LS1. The GM LS1 swappers manual copy I have suggest the EP381 as the preferred pump. This is a GM late model full size truck pump and its form-fit-function is identical to the CFI-TPI pumps, so it went in without a fight.
He also explained that the EP381’s were manufactured with a new thin magnet design which yielded a lot higher torque than the EP241’s. They were specifically designed to work on Vortec & LS1 style engines. The current draw on the EP381 would be significantly less than the EP241 as well, less current = less heat=longer life.
Here is the rear area taped up for removal of the pump out the top:
Here is the AC Delco EP241 still attached and the AC Delco EP381 new pump next to it ready to go on.
EP381 mounted and ready for install
All rubber hoses were replaced with high pressure fuel injection rated to 180PSI. LS1's are regulated at ~58PSI
I'm using the existing CFI hard lines all the way up to the motor area. There is only 2 sets of rubber in this scheme. 2-3 inches at the tank and 5-6 inch at the regulator. From there I have the C5 regulator-filter (Wix 33737) bolted in where the CFI filter was. I'll run braided -AN6 quick release up to the intake from here. Worked out pretty sweet as no hardline was needed to be fabricated
Last edited by MN-Brent; 01-27-2010 at 12:10 PM.
01-24-2010, 01:41 AM
#27
Safety Car
Thread Starter
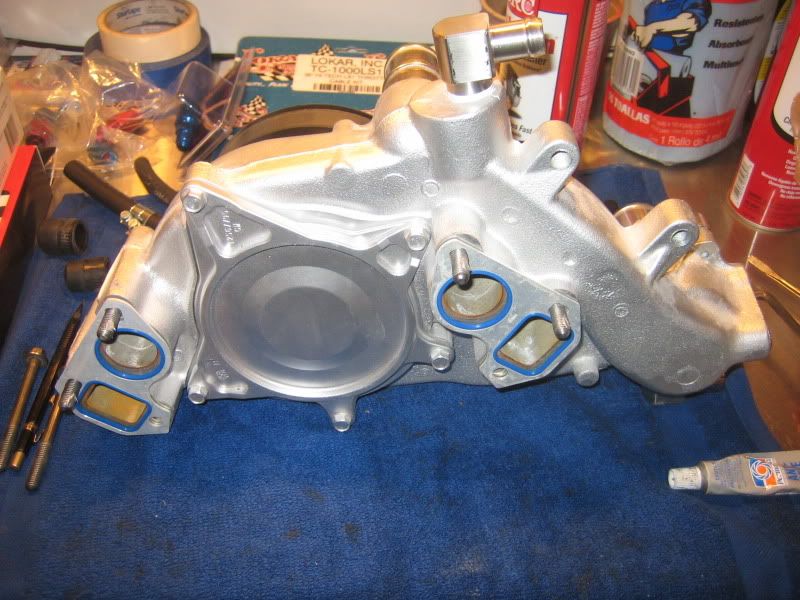
Here is the waterpump modded from Josh (Superpowers). Nice piece and it actually came off his car. There are alot of people that are using parts off of Josh's car
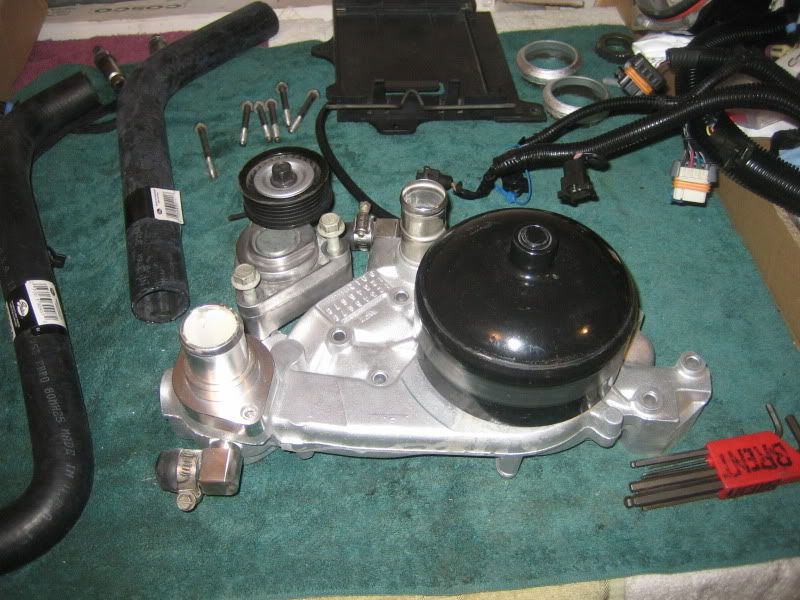
I am using a 180degree standard SBC thermostat with the CSR neck. This is the one from my CFI motor and already has 2 small holes drilled into it. Should work out just fine I'm hoping.
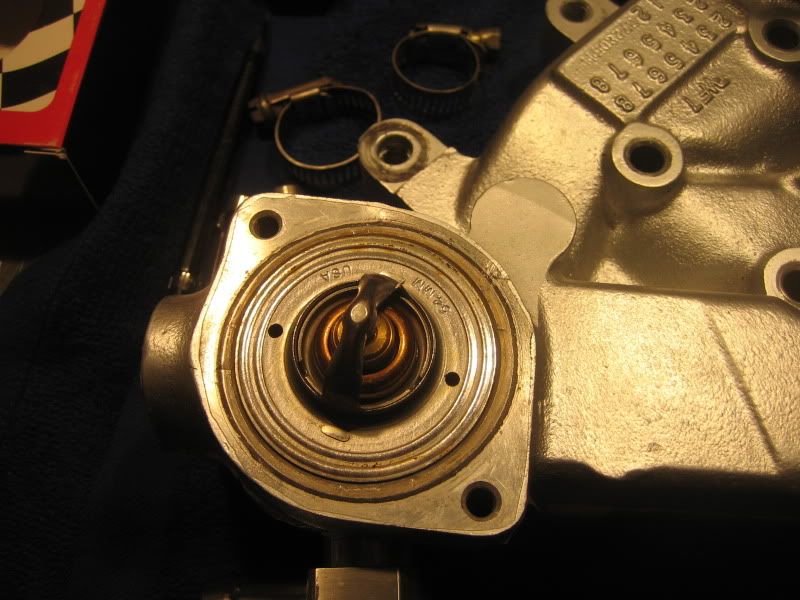
Back side of pump with FelPro gaskets
Installed Pass side view with cut lower rad hose Gates #20416 hose part and serpentine belt installed.
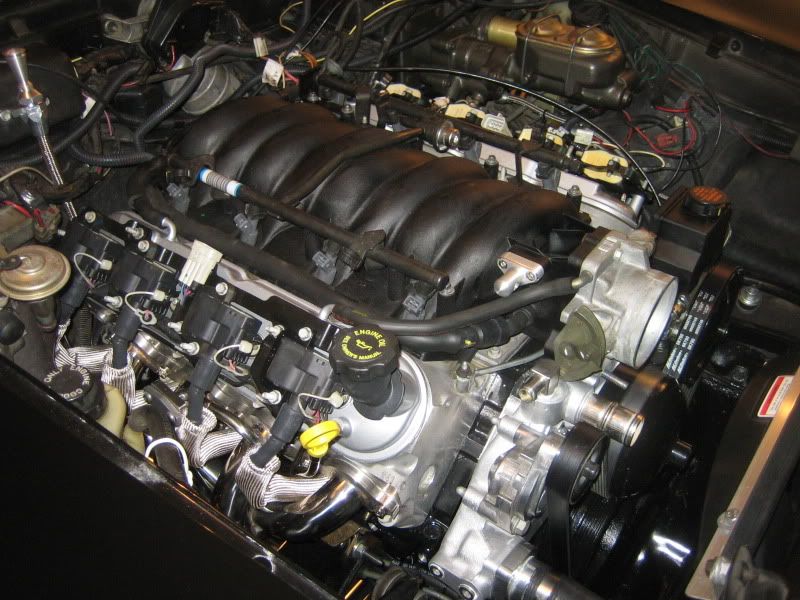
Spreader bar and fan reinstalled. Also had to go with a Lokar trans dipstick and Koolsox type spark plug boots as the header were real close to the new MSD wires. The stock wires and hard shields did not clear the headers.
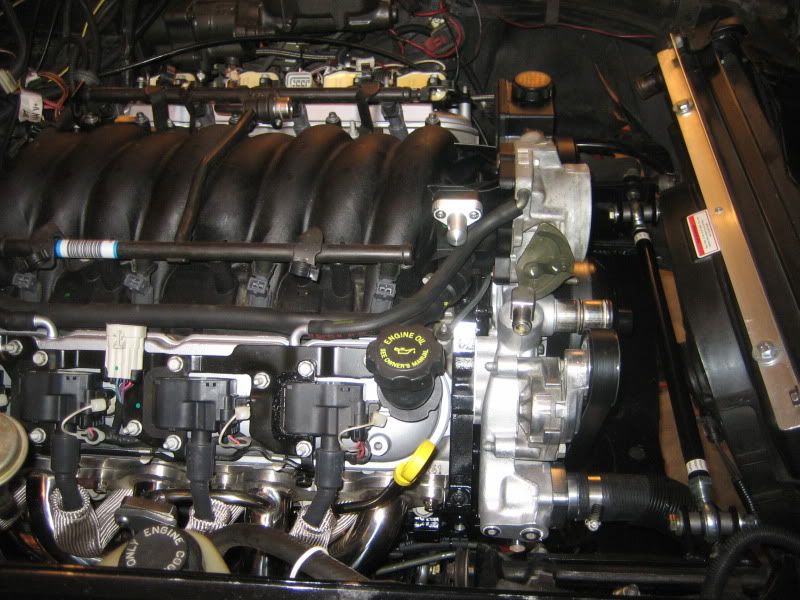
Installed Drvr side view with alternator set-up, hydroboost and R&P lines set-up
I am using a 180degree standard SBC thermostat with the CSR neck. This is the one from my CFI motor and already has 2 small holes drilled into it. Should work out just fine I'm hoping.
Back side of pump with FelPro gaskets
Installed Pass side view with cut lower rad hose Gates #20416 hose part and serpentine belt installed.
Spreader bar and fan reinstalled. Also had to go with a Lokar trans dipstick and Koolsox type spark plug boots as the header were real close to the new MSD wires. The stock wires and hard shields did not clear the headers.
Installed Drvr side view with alternator set-up, hydroboost and R&P lines set-up
Last edited by MN-Brent; 01-24-2010 at 01:44 AM.

 01-24-2010, 03:04 AM
#29
Melting Slicks
Hey Brent -- at this pace you'll have her done WELL before this summer. GREAT PROGRESS !!!!
I would love to come down and have you take me for a spin in it when i'm home (willmar) in July/Aug. I picked up a LS1/4L60E froma 2000 TA (FParts too) and am trying to decide if i want to pop some HP goodies on it before install, BUT want to see/feel what a stock LS does in a C3 before dropping in a motor that might tear the rest of the drivetrain apart/ make the car unmanageable.
I would love to come down and have you take me for a spin in it when i'm home (willmar) in July/Aug. I picked up a LS1/4L60E froma 2000 TA (FParts too) and am trying to decide if i want to pop some HP goodies on it before install, BUT want to see/feel what a stock LS does in a C3 before dropping in a motor that might tear the rest of the drivetrain apart/ make the car unmanageable.
01-25-2010, 03:42 AM
#31
Burning Brakes

Sheesh....I'm doing a TPI engine swap, and I'm going at a snail's pace compared to what you have going on here. From the looks of it though, you have already modified a lot of stuff that I am having to do now...crossmember for the 700R4, etc. Looks really, really nice, and you are going with the same color combination as I am using on mine...the black and aluminum. One question though, I noticed you painted the old transmission...did you get any excess heat buildup from that? I've heard mixed reviews on doing that. Just curious.
Oh, and shoot me a PM with the price, I might be interested since I have 2 Vettes. Thanks!
Deja
Oh, and shoot me a PM with the price, I might be interested since I have 2 Vettes. Thanks!
Deja
01-25-2010, 01:08 PM
#32
Instructor
Congradulations on all the progress. I love to see builds that update/restore C3s!
Very impressive with how quickly your pushing this build along!
Best of luck to you!
Very impressive with how quickly your pushing this build along!
Best of luck to you!
01-27-2010, 12:07 PM
#34
Safety Car
Thread Starter

Josh is sending me a Spectre set-up, similar to what is put into James' car on the DC. My big block copper radiator and Mark VIII fan is thicker than most dual fan set-ups, so we'll see what fits, and go from there. May end up with a silicon right angle tube instead of the polished aluminum look.
This is the look I'm going for and my set-up will look similar as I'm getting the red Z06 covers and the red Spectre filter with polished aluminum tubing:
James car- Mod by Josh (Superpowers)
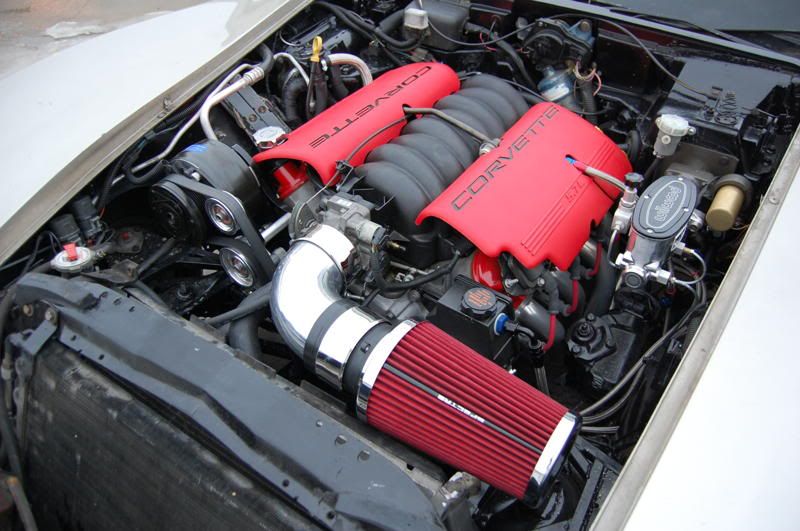
More inspiration

May have to go with a Silicon tube like this one below if fitment and tweeking are required, and you know it probably will be required.
Last edited by MN-Brent; 01-27-2010 at 12:09 PM.
01-27-2010, 02:25 PM
#35
Intermediate

Member Since: Sep 2008
Posts: 34
Likes: 0
Received 0 Likes
on
0 Posts
I really like the way that looks! And my sleeping schedule is jacked due to me spending every waking hour looking at different H/C set ups. Dreaming of a 100 hp add on this winter will tend to keep a guy up all night!!
02-02-2010, 12:04 PM
#36
Safety Car
Thread Starter
Next installment
I'm getting real close to finishing up the mechanical install and will then focus on the electrical stuff.
I'm stuck in limbo waiting on a fuel fitting part (Russell 640940) for the last 5 weeks!! Edelbrock must be waiting until there is enough demand before they place a replenishment order as it appears the global stock of this part is at ZERO right now!!!
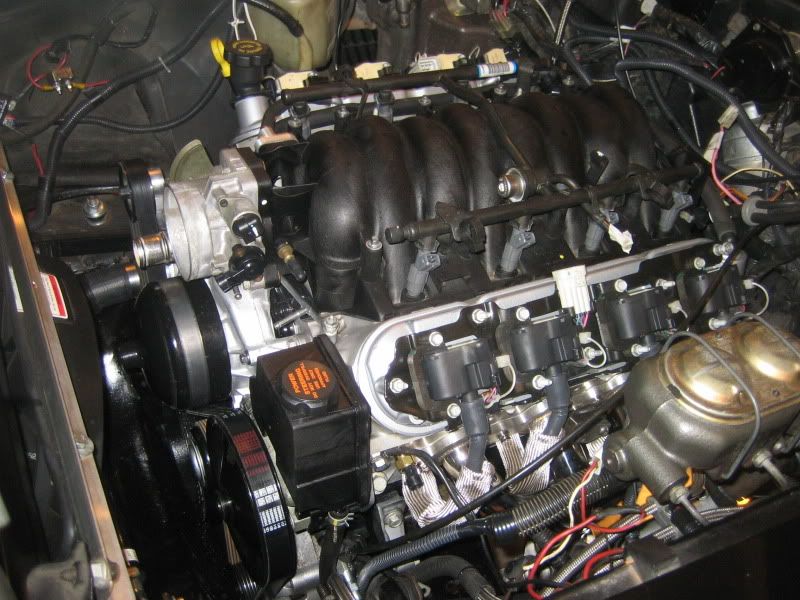
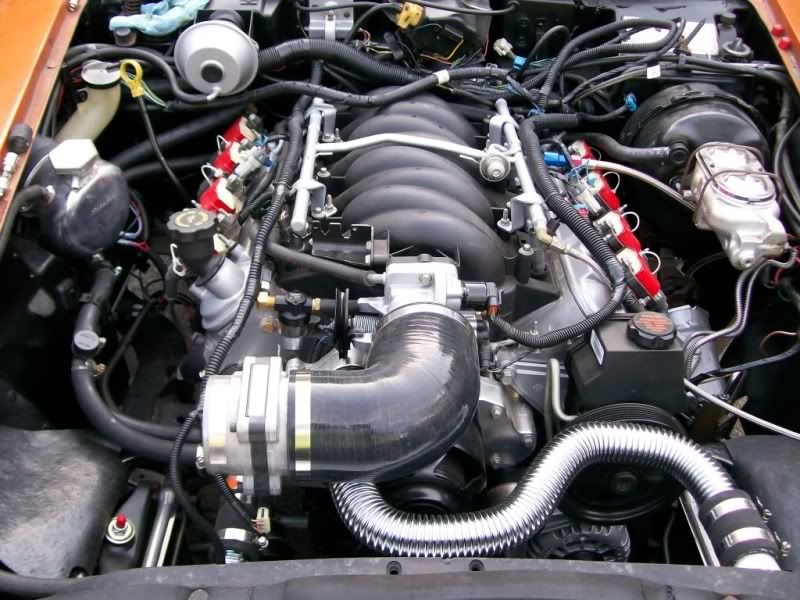
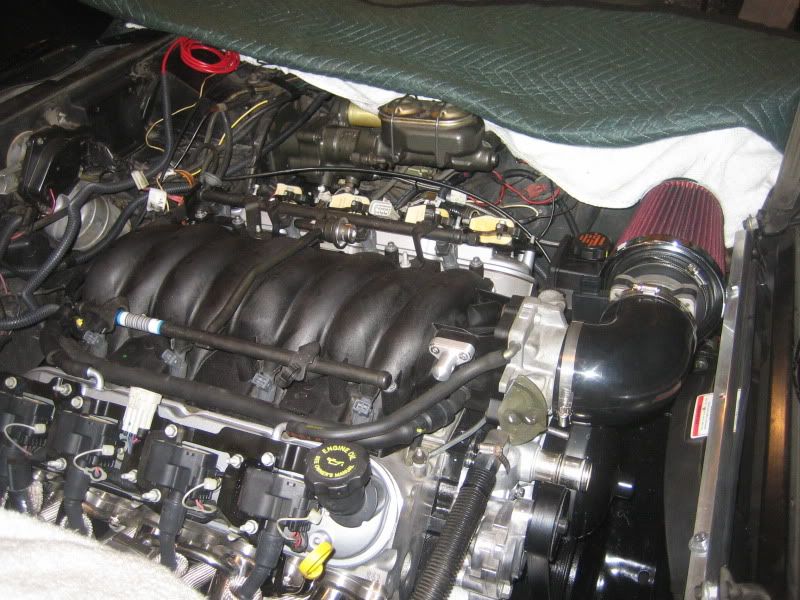
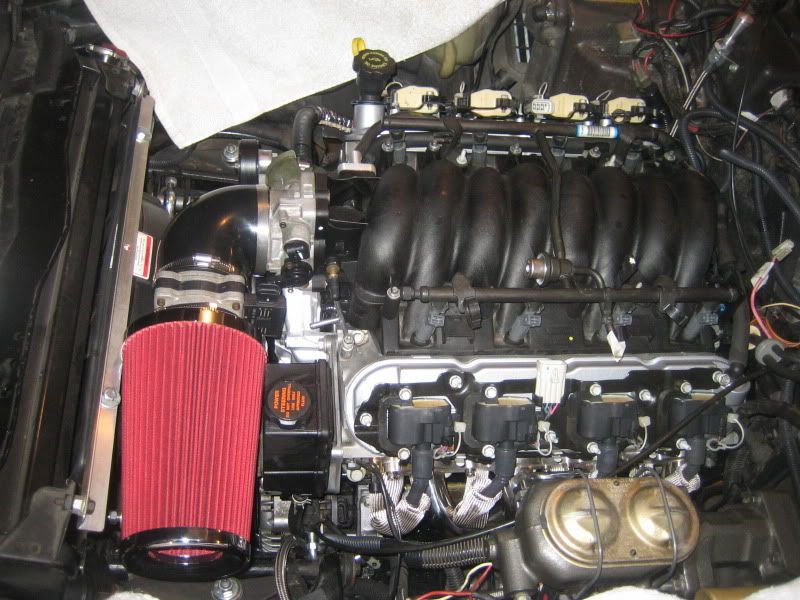
I received an aluminum right angle air intake, Spectre filter, and associated coupler sleeves from Josh to emulate the car Josh just did for James, seen above with the large red Spectre filter. However my motor is slightly more forward, and my radiator fan combo is much larger, so the space I have to work with is not as big. The test fit of the aluminum piece did not even come close, so its out. I scored a tight proximity right angle piece from Spectre and this works. However the filter still is too large and is touching the water pump and radiator and may not clear the hood when it closes-maybe. So out it goes. I have a slightly smaller K&N filter on the way along with a couple of GM MAF adapters for 3.5 to 4.0 inch tubing. That should take car of air intake stuff. The original set-up (identical to James car above) will be for sale for a good price to any forum member man enough to step up to the bar and order a drink
After that I can finish the detail on the upper radiator hose. Once these two are done, I'll finish my heater hose set-up and fuel line set-up, and I'll be done mechanically. Cant wait. Here are some shots of the test fit air intake set-up with the new correct tube, but too large filter that wont work:
I'm getting real close to finishing up the mechanical install and will then focus on the electrical stuff.
I'm stuck in limbo waiting on a fuel fitting part (Russell 640940) for the last 5 weeks!! Edelbrock must be waiting until there is enough demand before they place a replenishment order as it appears the global stock of this part is at ZERO right now!!!
I received an aluminum right angle air intake, Spectre filter, and associated coupler sleeves from Josh to emulate the car Josh just did for James, seen above with the large red Spectre filter. However my motor is slightly more forward, and my radiator fan combo is much larger, so the space I have to work with is not as big. The test fit of the aluminum piece did not even come close, so its out. I scored a tight proximity right angle piece from Spectre and this works. However the filter still is too large and is touching the water pump and radiator and may not clear the hood when it closes-maybe. So out it goes. I have a slightly smaller K&N filter on the way along with a couple of GM MAF adapters for 3.5 to 4.0 inch tubing. That should take car of air intake stuff. The original set-up (identical to James car above) will be for sale for a good price to any forum member man enough to step up to the bar and order a drink
After that I can finish the detail on the upper radiator hose. Once these two are done, I'll finish my heater hose set-up and fuel line set-up, and I'll be done mechanically. Cant wait. Here are some shots of the test fit air intake set-up with the new correct tube, but too large filter that wont work:
02-03-2010, 08:39 AM
#38
Burning Brakes
Nice, nice, nice!!!
That looks very well done. And thanks for the updates and pics! I'm convinced this is the way to go vs. buying new cars anymore. I'll be doing something similar for the wife this fall. She wants me to do a 67 Chevelle for her. Still trying to talk her into another vette, but she says, "We already have one"...didn't have the heart to tell her "I already have one"
This way you get style and performance and you don't have to have the dealer do everything on your new computer...I mean car...
02-03-2010, 09:29 AM
#39
Pro

Member Since: Sep 2006
Location: WATERTOWN SOUTH DAKOTA
Posts: 559
Likes: 0
Received 5 Likes
on
5 Posts

I received an aluminum right angle air intake, Spectre filter, and associated coupler sleeves from Josh to emulate the car Josh just did for James, seen above with the large red Spectre filter. However my motor is slightly more forward, and my radiator fan combo is much larger, so the space I have to work with is not as big. The test fit of the aluminum piece did not even come close, so its out. I scored a tight proximity right angle piece from Spectre and this works. However the filter still is too large and is touching the water pump and radiator and may not clear the hood when it closes-maybe. So out it goes. I have a slightly smaller K&N filter on the way along with a couple of GM MAF adapters for 3.5 to 4.0 inch tubing. That should take car of air intake stuff. The original set-up (identical to James car above) will be for sale for a good price to any forum member man enough to step up to the bar and order a drink
For those of you that are thinking about doing the LS swap, give me a shout if you need parts or information. I specialize in these and I will help you out in any way possible. (sorry for the shameless plug)
02-03-2010, 09:48 AM
#40
Burning Brakes
Nice, nice, nice!!!
That looks very well done. And thanks for the updates and pics! I'm convinced this is the way to go vs. buying new cars anymore. I'll be doing something similar for the wife this fall. She wants me to do a 67 Chevelle for her. Still trying to talk her into another vette, but she says, "We already have one"...didn't have the heart to tell her "I already have one"
This way you get style and performance and you don't have to have the dealer do everything on your new computer...I mean car...
That looks very well done. And thanks for the updates and pics! I'm convinced this is the way to go vs. buying new cars anymore. I'll be doing something similar for the wife this fall. She wants me to do a 67 Chevelle for her. Still trying to talk her into another vette, but she says, "We already have one"...didn't have the heart to tell her "I already have one"
This way you get style and performance and you don't have to have the dealer do everything on your new computer...I mean car...
 Isn't THAT the truth?! That's what happened to me, but I lucked out....found a 76 Vette, and was able to convince my wife that I would build her car JUST for her...and that has turned into a complete TPI/700R4 swap! Her car is going to be cooler than my 80 when it's all said and done!! And just FYI, trying to "feed" 2 Vettes WILL eat you out of house and home!