


68 Dash, Bezel and Speedo Removal
Thread Starter
Melting Slicks


Joined: Mar 2005
Posts: 2,187
Likes: 7
From: Chetwynd B.C.
I'm going to start my next project. Replacing the gauge bezel, dash lights and speedo in my 68. Any help, advice and pictures would be GREATLY appreciated.
shmoky
shmoky

Team Owner


Joined: Jul 2004
Posts: 40,422
Likes: 792
From: Redondo Beach, California
You have to start by removing the three door storage compartment frame that's behind the seats. It's easy to remove by unscrewing a bunch of little screws. Lifting it out is a concern. It comes out with the storage compartment doors still attached (heavy) and since the plastic is old, it will easily crack. Be slow and careful. After removing the compartment frame and attached paper mache compartments, you can look inside and see a bolt that holds on the parking brake console. Undo this bolt and the screws in the front of the parking brake console (these screw heads are visible). By maneuvering the parking brake handle and the console, you can remove the console.
Next remove the shifter console. Remove/loosen the shifter plate die casting. Undo all the external visible screw heads. With the shifter console loosened, remove the two nuts that attach the central instrument gauge to the shifter console. It's difficult to access these nuts.
With the shifter console moved backwards, you can start to unscrew all the screws that hold in the central console and drivers and passengers side consoles. At this stage, you should remove the drivers side seat. Remove the two fasteners that hold on the steering column under the dash. This will allow the steering column to be dropped an inch or two. Pull the speedo/tach dash out a few inches and stick your hand in from the top and unscrew the tach and speedo cables. Then from underneath, reach up and pull out all the lamps in the speedo/tach dash. You need to remove the headlight switch. Reaching in from the top and on the inside, there's a little pushbutton on the switch assembly. When you press that, the headlight switch **** will pull out of the switch assembly. Now you can disconnect the switch assembly from the dash.
I'm running out of time here. What I've written above will get you started. Work slow and don't force anything. All the plastic interior parts of you 68 have aged to the characteristics of thin glass. Any forcing or stressing will cause them to crack/shatter.
Team Owner


Joined: Sep 2006
Posts: 31,301
Likes: 4,389
From: Westminster Maryland
Hi Shmoky and 68/70,
I'm not so sure that the emergency brake console and shifter console need to be loosened in any way.
I've always started by taking out the passenger's side dash pad first, then the center gauge console (getting to the 2 nuts on the studs at the bottom of the bezel is a wonderful experience as 68/70 said), drop the steering column (if it's in the car) and then the driver's side dash pad.
Lots of reaching around the 3 pieces to disconnect things as they come out is required.
I tagged the electrical connections as I loosened them. The pads are very brittle from age so don't put too much pressure on them or they'll crack. The top part of the gauge bezel (where the wiper switch bezel is) can VERY be easily broken off from the lower part. As 68/70 said.... BE CAREFUL!!!
Installation is the reverse order. On 71s those 2 nuts I mentioned can be started on the studs and slid into position on the front/top of the shifter console. I'm not sure if that's true in 68.
Good Luck! Take your time, it's not a quick job.
Regards,
Alan
Last edited by Alan 71; Jan 31, 2010 at 09:41 AM.
Drifting


Joined: Feb 2010
Posts: 1,551
Likes: 10
From: Kulpmont PA
I just started a similar project on my 69. It didnt take long to discover that removing the two nuts at the bottom of the cluster was going to be a challenge. How did you make out with that - any advice on how to get at them?
Team Owner
Joined: Sep 2006
Posts: 31,301
Likes: 4,389
From: Westminster Maryland
Hi Roy,
Some people have success using a small ratchet with 2 long extensions to reach up from the foot-well along the INSIDE of the side of the shifter console. Others use a 'wobble' socket to reach in from the small access trim panel on each side, under the radio.
Not easy under any circumstance.
Regards,
Alan

Melting Slicks


Joined: Sep 2004
Posts: 2,655
Likes: 19
If you're going to do just the drivers side lower dash pad and center gauge console, noo need to take out the shifter or brake console.
You will need to start by lowering the steering column. There are 3 bolts that need to be removed under the dash and 2 bolts lon the firewall just need to be loosened. Btw, removing the drivers seat does make it easier.
there are 2 screws in the door area, 3 into the upper dash support, and 2 connecting to the center console. Removing those will allow you to pull the drivers dash down and unscrew the speedo and tach cable. Then you can get to all the electrical.
center gauge bezel is removed by taking out the 4 side screw (2 on each side), one upper screw that goes into the upper dash support, and the 2 nuts that hold the bezel to the shifter console. They're hard to reach, but trial and error will get it eventually. The 2 nuts dont have to be removed, just loosened and the bezel will slide forward through 2 slots in the shifter console and it's metal support. When putting it back on, use a couple wingnuts instead, much easier to tighten.
Drifting
Joined: Feb 2010
Posts: 1,551
Likes: 10
From: Kulpmont PA
Thanks for the suggestions & advice - I'm half way there (passenger side is off). That's a great suggestion on using wing nuts - I wasnt looking forward to getting these tightened up when the time comes.
Former Vendor
Joined: Aug 2006
Posts: 76,656
Likes: 1,853
From: Jeffersonville Indiana 812-288-7103
St. Jude Donor '08-'09-'10-'11-'12-'13-'14-'15
Shmoky
I have a page on the site for dash pad removal. http://willcoxcorvette.com/repairand...lp.php?hID=105
This covers all the dash pads though. It might help you some!
Willcox
I have a page on the site for dash pad removal. http://willcoxcorvette.com/repairand...lp.php?hID=105
This covers all the dash pads though. It might help you some!
Willcox
Corvette Stories
The Best of Corvette for Corvette Enthusiasts

Every 2027 Corvette Engine Explained
Joe Kucinski
Designer Imagines A Corvette That Looks More Like a Corvette Than the Corvette
Verdad Gallardo
10 Ugly Corvettes That We Still Kinda Love
Joe Kucinski
Top 10 Most Expensive Corvettes Ever Sold on Bring A Trailer
Brett Foote
10 Things Every Corvette Owner Needs (2026 Edition)
Michael S. Palmer
8 Most "Only Corvette Owners Understand" Quirks and Problems
Pouria Savadkouei
10 Reasons the C6 Z06 is Still A Performance Benchmark After 20 Years
Joe Kucinski
How Much Horsepower Every Corvette Engine "LOST" in 1972
Joe Kucinski
Top 10 DOs and DON'Ts for Protecting Your Convertible Top!
Michael S. PalmerFormer Vendor
Joined: Aug 2006
Posts: 76,656
Likes: 1,853
From: Jeffersonville Indiana 812-288-7103
St. Jude Donor '08-'09-'10-'11-'12-'13-'14-'15
Shmoky... did Tommy get with you on the switches.. I tested some we had here and there were no problems. I kinda forgot about it.. I'm sorry... but I think I asked Tommy to get with you.. I'd better log in my office and leave me a note for Monday.
Ernie
Ernie
Thread Starter
Melting Slicks
Joined: Mar 2005
Posts: 2,187
Likes: 7
From: Chetwynd B.C.
No...no one contacted me yet.
Got my speedo, ignition and gauge bezel out today. Still have to solve my dash light problem but ALL the wiring is now exposed This is what it looks like now.
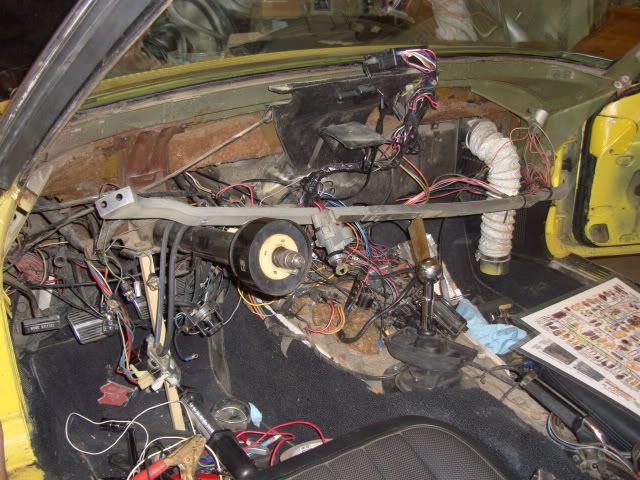
Will get back to it tomorrow. Wish me luck.
shmoky
Got my speedo, ignition and gauge bezel out today. Still have to solve my dash light problem but ALL the wiring is now exposed
This is what it looks like now. Will get back to it tomorrow. Wish me luck.
shmoky
Last edited by shmoky; Feb 26, 2010 at 06:33 PM.
Former Vendor
Joined: Aug 2006
Posts: 76,656
Likes: 1,853
From: Jeffersonville Indiana 812-288-7103
St. Jude Donor '08-'09-'10-'11-'12-'13-'14-'15
Shmoky-
That duct it the right corner.. what is that drier duct hose? I may have a used original one..I'll have to check.
I've been sick since Sunday with a bad cold.. but what is up with the lights?
Ernie
That duct it the right corner.. what is that drier duct hose? I may have a used original one..I'll have to check.
I've been sick since Sunday with a bad cold.. but what is up with the lights?
Ernie
Thread Starter
Melting Slicks
Joined: Mar 2005
Posts: 2,187
Likes: 7
From: Chetwynd B.C.
 Yes that IS a drier duct hose
 That's what was there when I opened it up. :o PM me with a price and I may add it to my parts order when I put it in.
 I had no dash lights so figured I should tear the dash apart and check it all out. I've had the bezel out before and new it was a real mess behind it so wanted to have a look. (at least that is what I am telling myself NOW). After tearing out EVERYTHING the solution was the 4amp fuse in the fuse panel

 The wiring needs some serious cleaning up and re-routing and removing old and non-functioning wires. Found a 6X16ga. wire loom that was cut off at both ends routed behind the heater box so pulled it out. Not sure what it was for but useless as it went nowhere on both ends. And "WHILE I'M AT IT...... I will replace all the bulbs just cause I'm in there. Got new vent door cables so need to re-route those too.
 Never thought I would be this confident
 to attempt something like this but figured what the hell. I can always get help from here.
  I do have an OsoEasy wireing diagram which is a GREAT help.
 shmoky
Last edited by shmoky; Feb 23, 2010 at 11:19 PM.