


Door ajar vs door jamb switch...which does what?
Thread Starter
Safety Car


Joined: Oct 2006
Posts: 3,993
Likes: 9
From: Gig Harbor WA
According to the AIM...
...the "door ajar" switch is mounted at the rear of the door opening.
...the "door jamb" switch is at the front of the door opening, and is part of the alarm horn circuit, along with the hood switch
The FRONT "door jamb" switches on my 72 turn on the (3) interior courtesy lights and the door open buzzer. I am assuming they will activate the alarm, IF I ever get it working and the system is armed.
What do the "door ajar" switches do??? Mine are not currently hooked up, but what is their function??
I'm confused
Rob
Le Mans Master


Joined: Aug 2006
Posts: 7,426
Likes: 1,559
From: mount holly NC
2025 c3 ('74-'82) of the Year Finalist - Unmodified
2019 C3 of Year Finalist (appearance mods)
Not 100% sure but the front switch does 3 things, #1 it provides a ground for the alarm, #2 it provides a ground so the courtesy lights go on and #3 it provides a ground that makes a buzzer go on to let you know that you left the key in the ignition.
The rear switch, just lights a bulb in the center console to let you know that the door is not closed 100%.
Here's a schematic http://www.nrjvette.com/johdotukset/?c=d;o=d
The rear switch, just lights a bulb in the center console to let you know that the door is not closed 100%.
Here's a schematic http://www.nrjvette.com/johdotukset/?c=d;o=d
Thread Starter
Safety Car
Joined: Oct 2006
Posts: 3,993
Likes: 9
From: Gig Harbor WA
Race Director

Joined: Aug 2007
Posts: 10,977
Likes: 19
From: Canboro Ontario
Not 100% sure but the front switch does 3 things, #1 it provides a ground for the alarm, #2 it provides a ground so the courtesy lights go on and #3 it provides a ground that makes a buzzer go on to let you know that you left the key in the ignition.
The rear switch, just lights a bulb in the center console to let you know that the door is not closed 100%.
Here's a schematic http://www.nrjvette.com/johdotukset/?c=d;o=d
The rear switch, just lights a bulb in the center console to let you know that the door is not closed 100%.
Here's a schematic http://www.nrjvette.com/johdotukset/?c=d;o=d
 correct. BTW, I went to that site posted, and it came up blank for me.
Thread Starter
Safety Car
Joined: Oct 2006
Posts: 3,993
Likes: 9
From: Gig Harbor WA
Its a list of down-loadable and printable wiring diagrams by year. I already had mine, but virtually every year is there.
Very nice to have if you can figure a way to get to it.. The link worked fine for me...
Try this link for your 73..
http://www.nrjvette.com/johdotukset/...tte%201973.pdf
Rob
Team Owner


Joined: Sep 2006
Posts: 31,266
Likes: 4,355
From: Westminster Maryland
Hi Rob,
I forgot to mention that 'originally' there was a little rubber/plastic 'pad' about 5/8"x5/8"x3/16" that was stuck to a flat spot on the door opposite the switch location. The vendors sell them.
You local home store probably has some that are remarkably close in appearance in their cabinet hardware section.
Without the pad you often have to adjust the switch so far out of the jam to shut off the light that the switch falls out.
Regards,
Alan
Thread Starter
Safety Car
Joined: Oct 2006
Posts: 3,993
Likes: 9
From: Gig Harbor WA
Hi Rob,
I forgot to mention that 'originally' there was a little rubber/plastic 'pad' about 5/8"x5/8"x3/16" that was stuck to a flat spot on the door opposite the switch location. The vendors sell them.
You local home store probably has some that are remarkably close in appearance in their cabinet hardware section.
Without the pad you often have to adjust the switch so far out of the jam to shut off the light that the switch falls out.
Regards,
Alan
I forgot to mention that 'originally' there was a little rubber/plastic 'pad' about 5/8"x5/8"x3/16" that was stuck to a flat spot on the door opposite the switch location. The vendors sell them.
You local home store probably has some that are remarkably close in appearance in their cabinet hardware section.
Without the pad you often have to adjust the switch so far out of the jam to shut off the light that the switch falls out.
Regards,
Alan
Corvette Stories
The Best of Corvette for Corvette Enthusiasts

Top 10 Most Expensive Corvettes Ever Sold on Bring A Trailer
Brett Foote
10 Things Every Corvette Owner Needs (2026 Edition)
Michael S. Palmer
8 Most "Only Corvette Owners Understand" Quirks and Problems
Pouria Savadkouei
10 Reasons the C6 Z06 is Still A Performance Benchmark After 20 Years
Joe Kucinski
How Much Horsepower Every Corvette Engine "LOST" in 1972
Joe Kucinski
Top 10 DOs and DON'Ts for Protecting Your Convertible Top!
Michael S. Palmer
Top 10 Most Explosive Corvettes Ever Made: Power-to-Weight Ratio Ranked!
Joe Kucinski
150 hp to 1,250 hp: Every Corvette Generation Compared by the Specs That Matter
Joe Kucinski
8 Coolest Corvette Pace Cars (and Replicas) of All Time
Verdad Gallardo
Instructor


Joined: Apr 2001
Posts: 242
Likes: 3
From: New York, NY USA
while we're on the subject, my passenger door jamb switch is intermittent bad in that the inner cylinder (not the part that contacts the door) can slide into the area where the hex nut is (the main body) - when this happens, the switch stays in the "on" position (e.g. inside lights stay on) even when the door is closed....so I tried to put a socket on the hex and remove the switch to replace it and there is fiberglass too tight to the hex to get the socket on there - anyone experience this? what's the fix?
Race Director
Joined: May 2006
Posts: 16,528
Likes: 53
From: Dayton, Ohio
while we're on the subject, my passenger door jamb switch is intermittent bad in that the inner cylinder (not the part that contacts the door) can slide into the area where the hex nut is (the main body) - when this happens, the switch stays in the "on" position (e.g. inside lights stay on) even when the door is closed....so I tried to put a socket on the hex and remove the switch to replace it and there is fiberglass too tight to the hex to get the socket on there - anyone experience this? what's the fix?

Team Owner


Joined: Jul 2004
Posts: 40,403
Likes: 791
From: Redondo Beach, California
Bubba had attacked my 1970 alarm harness. I ordered a new repro harness from M&H. (Actually I ordered it from one of the Vette vendors and when it came I noticed who made it.) The harness stretches from the extreme back of the car to, where the on/off switch is in the back panel above the tail lights, to the hood open/closed sensing switch is on the engine firewall. It also is wired into the door open/closed switches in the front of the door and also to some relays, etc in the jack compartment. You have to lift up the storage compartment carpet to install it. My 70 doesn't have a spare tire carrier or exhaust pipes so it was easy to install it in the rear.
I ordered all new repro door switches from Paragon. Their door ajar switches worked fine. The door open/closed switches had metric threads so I had to reuse my original switches. The repro switches are SS and look really nice. The stock are tin plated steel and so with age they look a little dull.
I ordered all new repro door switches from Paragon. Their door ajar switches worked fine. The door open/closed switches had metric threads so I had to reuse my original switches. The repro switches are SS and look really nice. The stock are tin plated steel and so with age they look a little dull.
Burning Brakes

Joined: Feb 2008
Posts: 1,042
Likes: 19
From: Oswego New York
Many of the Corvette vendors sell the rubber pads, but all that I have seen are not correct ... and are shaped like a 'right trapezoid' in section. The correct ones (at least on my '70) have straight sides ... and are rectangular in section.
Do you (or anyone else) know of a vendor that offers the correct ones?
Instructor
Joined: Apr 2001
Posts: 242
Likes: 3
From: New York, NY USA
Roger - I have pulled the thin sleeve out with my fingers and was thinking about possibly using some epoxy to "set" it - I am not sure how putting flats on it will work, but am interested in this approach as an alternative - can you elaborate? How was the thin sleeve originally secured in the switch? (I would really rather just change the thing, but I would have to grind fiberglass to get at the hex head) - Thanks
Instructor
Joined: Apr 2001
Posts: 242
Likes: 3
From: New York, NY USA
Team Owner
Joined: Sep 2006
Posts: 31,266
Likes: 4,355
From: Westminster Maryland
Hi 427/390,
I'm surprised you can't reach the hex head body of the switch.
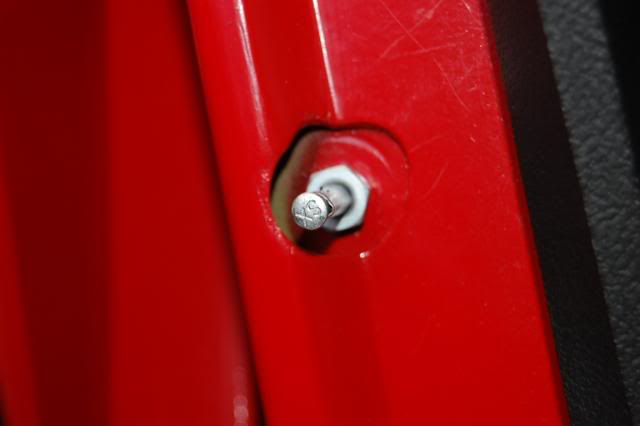
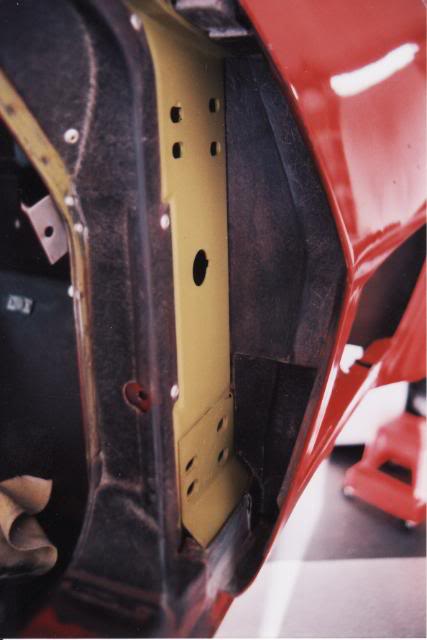
Here are a couple of pictures of the switch that show how the fiberglass was cut on the hinge pillar cover in 71. It's about a 3/4" circular cutout.
What does yours look like?
Regards,
Alan

I'm surprised you can't reach the hex head body of the switch.
Here are a couple of pictures of the switch that show how the fiberglass was cut on the hinge pillar cover in 71. It's about a 3/4" circular cutout.
What does yours look like?
Regards,
Alan
Last edited by Alan 71; Feb 11, 2010 at 01:21 PM.
Instructor
Joined: Apr 2001
Posts: 242
Likes: 3
From: New York, NY USA
while the jambs in my car look clean, they are no where near as tight as yours - your picture is spot on, but on the right side of the "hex" on the switch on my car, the glass is so close that the thickness of the socket will not allow it to get close enough to the nut to unscrew it....
Team Owner
Joined: Sep 2006
Posts: 31,266
Likes: 4,355
From: Westminster Maryland
Hi 427/390,
That piece of fiberglass is pop-riveted and bonded in place. I guess it could have been miss-placed when installed which would cause the interference you're finding.
Can you enlarge the hole enough to get access without screwing things up too much?
Regards,
Alan
That piece of fiberglass is pop-riveted and bonded in place. I guess it could have been miss-placed when installed which would cause the interference you're finding.
Can you enlarge the hole enough to get access without screwing things up too much?
Regards,
Alan
Instructor
Joined: Apr 2001
Posts: 242
Likes: 3
From: New York, NY USA
yes, I can enlarge the hole carefully using a razor and since my car is black it's not that difficult (especially given that it's the jamb) to do a touch up - just thought there could be a way to address it another way.
thank you for your interest and thoughts - I will post when I get upstate to mess around with it
thank you for your interest and thoughts - I will post when I get upstate to mess around with it
Team Owner
Joined: Jul 2004
Posts: 40,403
Likes: 791
From: Redondo Beach, California
When you remove these little beauties, pince the shaft with your fingers of your left hand (if right handed) and use a socket wrench to loosen the nut. This keeps the shaft from rotating as you unloosed the switch. If you don't, the shaft will rotate with the nut and the wires on the other side will start twisting. They're very small and probably can take a few rotations, but allow them to twist too much will creat problem of messing up the connector pins.