


Sealed Over Headlight Adventure!
Thread Starter
Race Director


Joined: Dec 2005
Posts: 13,515
Likes: 12
From: Fisher, IL
Well it's about that time in my project. Ordered a motive power bleeder so while i'm waiting on that i figured i'd tackle the disaster that the previous owner made.
They took out the headlights, sealed them up, and painted over it all(really poorly).
You can see where it was cracking on it's own before i even started tearing into things.


I chipped away at the old paint to find that everything had this brown undercoating. Primer? Bondo?


Some of the cracks were already big enough to get a hack saw through. From underneath I can see a slight outline of where the headlights should be going....i hope.


They took out the headlights, sealed them up, and painted over it all(really poorly).
You can see where it was cracking on it's own before i even started tearing into things.
I chipped away at the old paint to find that everything had this brown undercoating. Primer? Bondo?
Some of the cracks were already big enough to get a hack saw through. From underneath I can see a slight outline of where the headlights should be going....i hope.
Thread Starter
Race Director
Joined: Dec 2005
Posts: 13,515
Likes: 12
From: Fisher, IL
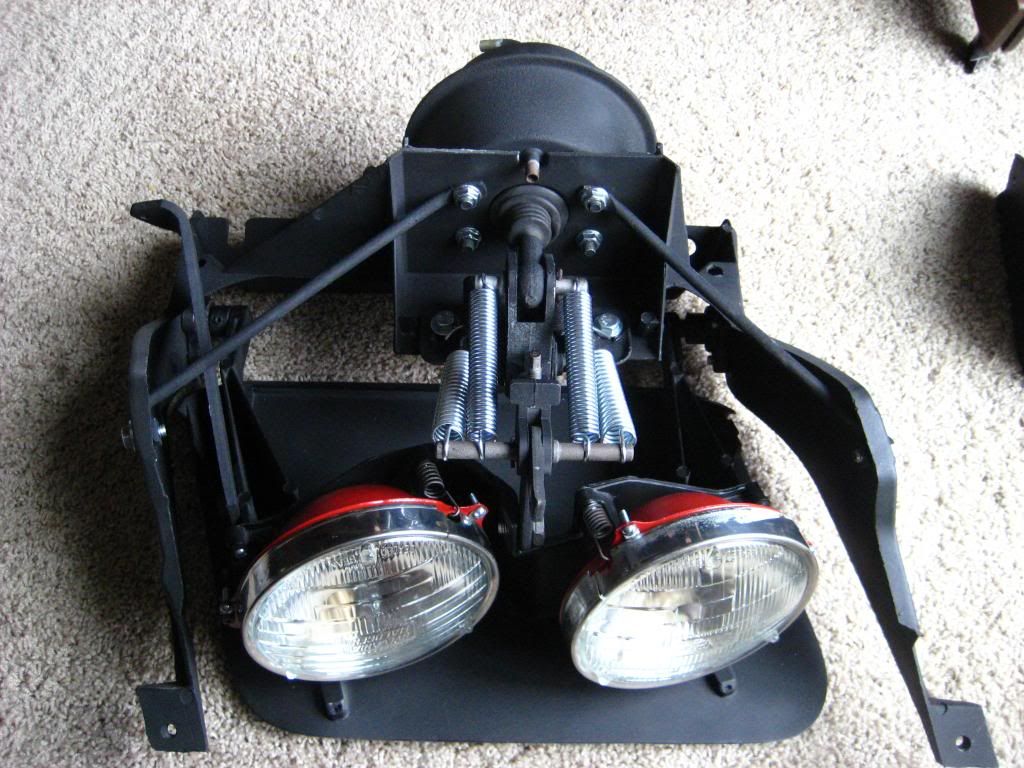
and the obligated photo of the soon to be installed headlights all cleaned up and ready to go!
So what's this stuff they sealed it up with and why is it so hard to get them to pop out?
So what's this stuff they sealed it up with and why is it so hard to get them to pop out?
Thread Starter
Race Director
Joined: Dec 2005
Posts: 13,515
Likes: 12
From: Fisher, IL
I've been told that
1. lightens up 20-40 pounds not having the huge assemblies.
2. The air flow to the radiator is much better.
So this is usually done if you're racing the car.
Not sure why they had to seal it over and paint it all up but...
1. lightens up 20-40 pounds not having the huge assemblies.
2. The air flow to the radiator is much better.
So this is usually done if you're racing the car.
Not sure why they had to seal it over and paint it all up but...
Le Mans Master

Joined: Apr 2000
Posts: 7,562
Likes: 9
From: B'Ville NY
Cruise-In III Veteran
St. Jude Donor '05
 I hope that doesn't happen to mine! I just sealed mine up with resin and fiberglass cloth. I'm going with my headlamps behind the grill with my new paint job. You're assembly does look nice


Corvette Stories
The Best of Corvette for Corvette Enthusiasts

Every 2027 Corvette Engine Explained
Joe Kucinski
Designer Imagines A Corvette That Looks More Like a Corvette Than the Corvette
Verdad Gallardo
10 Ugly Corvettes That We Still Kinda Love
Joe Kucinski
Top 10 Most Expensive Corvettes Ever Sold on Bring A Trailer
Brett Foote
10 Things Every Corvette Owner Needs (2026 Edition)
Michael S. Palmer
8 Most "Only Corvette Owners Understand" Quirks and Problems
Pouria Savadkouei
10 Reasons the C6 Z06 is Still A Performance Benchmark After 20 Years
Joe Kucinski
How Much Horsepower Every Corvette Engine "LOST" in 1972
Joe Kucinski
Top 10 DOs and DON'Ts for Protecting Your Convertible Top!
Michael S. Palmer
Instructor

Joined: Jun 2010
Posts: 199
Likes: 0
depending on how long ago they were sealed over could be nitrostan that was once red and faded or a mixture of nitrostans they had lying around it came in red green and blue since the brown is thin. also could be a old lacquer primer i do belive there was a cheapo company at one time that made a brown primer.
By the looks of the way thats cracking its all bondo in the holes you could probably get away with tapping that from underneath with a body hammer and it breaking itself away from the car.
and on the racing bit sealing them up gave better air flow to the rad. by the looks and location or the headlight holes you would think it would be better to leave them open as they would be like 2 big snorkles straight to the rad.
Last edited by elke_10; Jul 19, 2010 at 12:18 AM.
Thread Starter
Race Director
Joined: Dec 2005
Posts: 13,515
Likes: 12
From: Fisher, IL
Yeah i really hope I can eventually just tap it with a hammer and get them to pop out. I can weaken them some where they're already cracking but the upper and lower parts aren't cracking as bad so it's hard to get it started.
I used a knife to dig into it a bit thinking they used the old lens and sealed around that but it was all soft so it must be bondo.
I used a knife to dig into it a bit thinking they used the old lens and sealed around that but it was all soft so it must be bondo.
Instructor
Joined: Jun 2010
Posts: 199
Likes: 0
The only thing i see from the pic that might be bothersome is shown by the green arrow in your pick now that looks like a screw in this pic maybe just some bodyfiller or undercoating can't really tell but if thats a screw calls for alarm as they may have the original covers or possibly something else mounted below that mudding job. But in either case a few light taps working around the edge should make that old filler thats water logged hence the crack pop out. good luck.
P.S. great job on those assemblies

P.S. great job on those assemblies
Melting Slicks


Joined: Jan 2003
Posts: 2,877
Likes: 13
From: Doha
St. Jude Donor '08

Le Mans Master
Joined: Apr 2000
Posts: 7,562
Likes: 9
From: B'Ville NY
Cruise-In III Veteran
St. Jude Donor '05
Hamad I bought mine on ebay, but would suggest theretrofit.com due to their good prices and fast shipping. I would also suggest their sealed projectors since you won't have to fabricate sealing them like I had to  http://www.theretrofitsource.com/pro...roducts_id=141
Punisher if you need the covers, I have all the parts I removed, send me an email
http://www.theretrofitsource.com/pro...roducts_id=141Punisher if you need the covers, I have all the parts I removed, send me an email
Melting Slicks
Joined: Jan 2003
Posts: 2,877
Likes: 13
From: Doha
St. Jude Donor '08
Hamad I bought mine on ebay, but would suggest theretrofit.com due to their good prices and fast shipping. I would also suggest their sealed projectors since you won't have to fabricate sealing them like I had to http://www.theretrofitsource.com/pro...roducts_id=141
Punisher if you need the covers, I have all the parts I removed, send me an email
http://www.theretrofitsource.com/pro...roducts_id=141Punisher if you need the covers, I have all the parts I removed, send me an email

Thread Starter
Race Director
Joined: Dec 2005
Posts: 13,515
Likes: 12
From: Fisher, IL
Well I just tackled the openings and it didn't go as smoothly as i had hoped but i got it done in a way.
I hit the first one with a big hammer and it broke free for about 90% of it. The 10% left that was stuck really well might have taken some of the body's fiberglass so i'll have to learn how to repair that.
On the other side i used a heat gun to melt the black tar underneath to expose the fiberglass lip. I then used a jigsaw from up above to follow that lip as best i could. Most places i'll need to sand the rest of the bondo away and I went a tad deep in others but it worked out a bit smoother on that side.


area where i was a bit too far from the lip so a little sanding will get me close.

Area where the paint crack didn't match up to the fiberglass lip meaning it's a bit weakened in that area.

I hit the first one with a big hammer and it broke free for about 90% of it. The 10% left that was stuck really well might have taken some of the body's fiberglass so i'll have to learn how to repair that.
On the other side i used a heat gun to melt the black tar underneath to expose the fiberglass lip. I then used a jigsaw from up above to follow that lip as best i could. Most places i'll need to sand the rest of the bondo away and I went a tad deep in others but it worked out a bit smoother on that side.
area where i was a bit too far from the lip so a little sanding will get me close.
Area where the paint crack didn't match up to the fiberglass lip meaning it's a bit weakened in that area.
Thread Starter
Race Director
Joined: Dec 2005
Posts: 13,515
Likes: 12
From: Fisher, IL
Overall it's hard to tell where exactly i need to be cutting without ever seeing it original but i followed that small lip thinking it was stock and hoped that was what i needed.
Not sure how i'm going to fix the broken fiberglass areas that are still cracked and weren't in need of cutting out.
Also not sure how the headlight assemblies go into the car. Seems like i have to take the hood off, then a center support beam for the bumper to make room for them.
Not sure how i'm going to fix the broken fiberglass areas that are still cracked and weren't in need of cutting out.
Also not sure how the headlight assemblies go into the car. Seems like i have to take the hood off, then a center support beam for the bumper to make room for them.
Team Owner


Joined: Sep 2006
Posts: 31,289
Likes: 4,380
From: Westminster Maryland
Hi pv,
The head light assemblies can go in through the grill openings.
I would take the actuators, head-lights, and the long flat arm on the outer side of the mechanism off before putting the doors in place. After adjusting the door gaps you can put the rest of the parts in place pretty easily from the front, rear and below.
Good Luck with your fiberglass work.
Regards,
Alan
The last picture shows the allen wrench screw in the stop on each of the pivots that are used to locate the doors side to side.
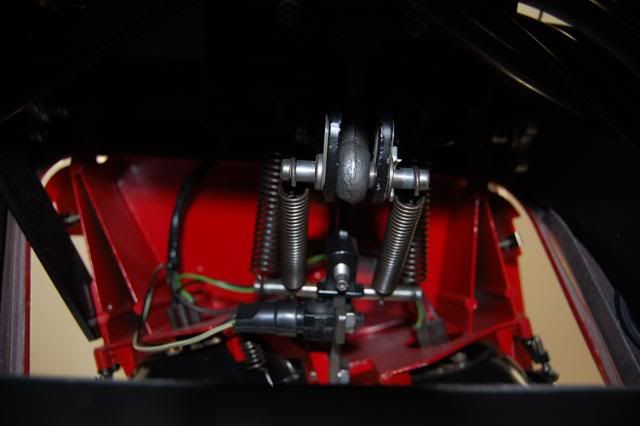
Thread Starter
Race Director
Joined: Dec 2005
Posts: 13,515
Likes: 12
From: Fisher, IL
I was able to get them in through the grill but you have to have most of the inner parts disconnected to clear.
I'm more optimistic about the project as they seemed to go in okay.
I still have some wiring problems somewhere as I can now only get low beams to come on( when last time i tested i only got high beams to come on.... )
)
the pull switch in the car.....pulled all the way out is high beams right?


I'm more optimistic about the project as they seemed to go in okay.
I still have some wiring problems somewhere as I can now only get low beams to come on( when last time i tested i only got high beams to come on....
)the pull switch in the car.....pulled all the way out is high beams right?
Instructor
Joined: Jun 2010
Posts: 199
Likes: 0
looking good as for the lil areas that need some attention that you cut to far or removed some fiberglass that hole you might want to use mat and resin or just use duraglas and touch that up then body filler over that. while your at it there you have the chance to make your gaps whatever you want them to be. just don't go 2 tight
your up and on your way bud looking good.
your up and on your way bud
looking good.