


Windshield trim gap?
Thread Starter
Holley HP EFI w/TPI


Joined: May 2009
Posts: 553
Likes: 0
From: Kanata ON
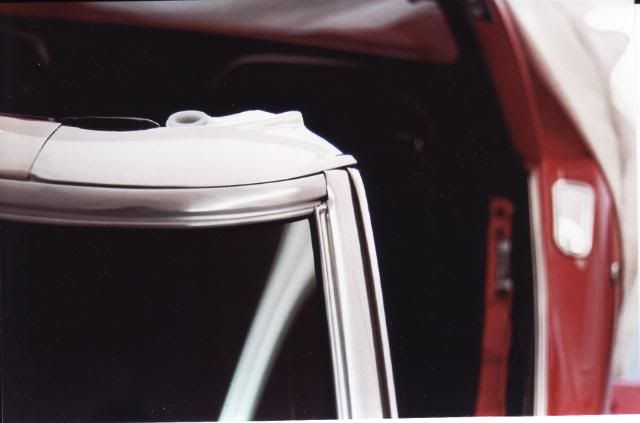
I have a gap on the windshield trim (outer) at the top, on the passenger side, about 1/2"
Is there supposed to be any gap, if not, how do I go about fixing it?
Is there supposed to be any gap, if not, how do I go about fixing it?

Melting Slicks


Joined: Apr 2007
Posts: 3,189
Likes: 111
From: Tolland CT
Team Owner


Joined: Sep 2006
Posts: 31,301
Likes: 4,390
From: Westminster Maryland
Hi ms,
I agree with bb that some pictures would help.
The trim was tight against the glass originally.
The new glass needs to be the proper thickness (SOME replacement glass is thinner), the glass needs to be spaced away from the windshield frame the proper amount, and the trim and clips must be in good shape so the trim goes on properly.
As you can see a LOT of things need to be done properly to get a nice tight fit.
Pictures?
Regards,
Alan
Former Vendor
Joined: Aug 2006
Posts: 76,656
Likes: 1,853
From: Jeffersonville Indiana 812-288-7103
St. Jude Donor '08-'09-'10-'11-'12-'13-'14-'15
How much room do you have on the driver side? If you remove the side trim and then the top trim you may be able to move the molding over enough to hide this.
Last edited by Willcox Corvette; Jul 24, 2010 at 10:41 AM.
Team Owner
Joined: Sep 2006
Posts: 31,301
Likes: 4,390
From: Westminster Maryland
Hi m,
It looks to me like the rear tabs on the long thin piece of SS trim aren't slid down into the trim clips properly, which has put a severe bend in the long piece of trim.
The ends of the long piece needs to be able to slide UNDER the SS trim on the a-pillar
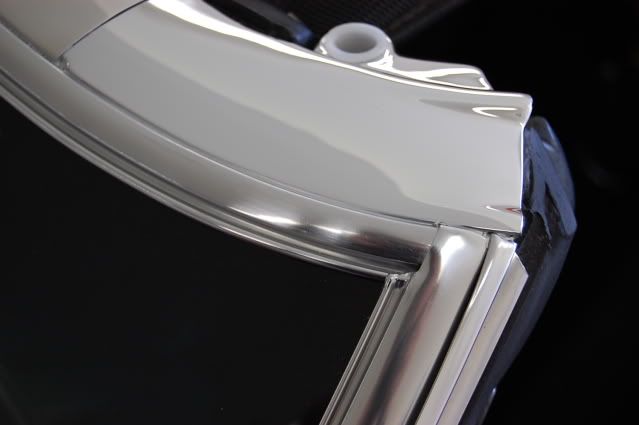
Compare it's shape to the same piece in my picture.
Regards,
Alan
It looks to me like the rear tabs on the long thin piece of SS trim aren't slid down into the trim clips properly, which has put a severe bend in the long piece of trim.
The ends of the long piece needs to be able to slide UNDER the SS trim on the a-pillar
Compare it's shape to the same piece in my picture.
Regards,
Alan
Corvette Stories
The Best of Corvette for Corvette Enthusiasts

Every 2027 Corvette Engine Explained
Joe Kucinski
Designer Imagines A Corvette That Looks More Like a Corvette Than the Corvette
Verdad Gallardo
10 Ugly Corvettes That We Still Kinda Love
Joe Kucinski
Top 10 Most Expensive Corvettes Ever Sold on Bring A Trailer
Brett Foote
10 Things Every Corvette Owner Needs (2026 Edition)
Michael S. Palmer
8 Most "Only Corvette Owners Understand" Quirks and Problems
Pouria Savadkouei
10 Reasons the C6 Z06 is Still A Performance Benchmark After 20 Years
Joe Kucinski
How Much Horsepower Every Corvette Engine "LOST" in 1972
Joe Kucinski
Top 10 DOs and DON'Ts for Protecting Your Convertible Top!
Michael S. Palmer


Team Owner
Joined: Sep 2006
Posts: 31,301
Likes: 4,390
From: Westminster Maryland
Hi,
I agree that the ss strip needs to be slid to the right side but the tabs on the back of the piece are in FRONT of the clips not IN the clips. That's caused the gap between the large SS header trim and the long SS trim. It only needs to go back about 1/8", but that will allow it to fit normally.
Regards,
Alan
Former Vendor
Joined: Aug 2006
Posts: 76,656
Likes: 1,853
From: Jeffersonville Indiana 812-288-7103
St. Jude Donor '08-'09-'10-'11-'12-'13-'14-'15
Alan, Noonie and Moon...
I copied his top picture and blew it up.. if you do this and look real close there is only about 1/8" of the molding under the driver side. I don't think he's going to have room to slide it over. It does look like the molding is not on the header clips, but it also appears as if someone may have cut the passenger side of the molding off. No telling for sure as both you know.
The upper windshield molding has tabs on it to retain in the clip and I wonder if these tabs are not bent. Either way, the top molding should butt up pretty close to the upper top molding and you should not have that huge gap in there.
My advice would be to remove the pillar side moldings, and the header and see what's going on. To slide the upper molding over you need to remove the side pillars anyway and once you have them off the upper can be pulled off and repositioned easily if needed.
The uppers can be found used in decent condition
Thread Starter
Holley HP EFI w/TPI
Joined: May 2009
Posts: 553
Likes: 0
From: Kanata ON
I popped the top trim piece off and moved it over towards the passenger side.
It's not a perfect fit, but it's much better than it was before.
Do I bend the tabs to get it to fit closer to the t-top moldings?
It's not a perfect fit, but it's much better than it was before.
Do I bend the tabs to get it to fit closer to the t-top moldings?
Team Owner
Joined: Sep 2006
Posts: 31,301
Likes: 4,390
From: Westminster Maryland
Hi MS,
As I posted, you need to make sure the tabs are going IN the clips not IN FRONT of them.
If the tabs are in front of the clips it causes the gap between the front of the header ss trim and the back of the long thin ss trim piece.
It's very hard to see were the tabs are going if there is a lot of gunk and sealer around the clips.
Regards,
Alan
Team Owner
Joined: Sep 2006
Posts: 31,301
Likes: 4,390
From: Westminster Maryland
Hi MS,
There should be very little gap. Maybe 1/64".
St. Louis used a silver colored 'caulk' in the gap. It went on quite soft, almost like a thick liquid and set up quite hard.
I used Squibbles 3d fabric paint from the craft's store. It comes in a small soft plastic bottle with a fine tipped nozzle that lets you squeeze it out in a fine bead. I put a bead in place and then smoothed it with my finger like you do with bathtub caulk. I used Iridescent Silver.
Regards,
Alan
Burning Brakes

Joined: May 2008
Posts: 860
Likes: 0
From: Stratford Ontario
Nice job I really like how that finishes it off. I looked at the pic before I read Your reply and thought You had somehow set Yours beyond perfect.
Hi MS,
There should be very little gap. Maybe 1/64".
St. Louis used a silver colored 'caulk' in the gap. It went on quite soft, almost like a thick liquid and set up quite hard.
I used Squibbles 3d fabric paint from the craft's store. It comes in a small soft plastic bottle with a fine tipped nozzle that lets you squeeze it out in a fine bead. I put a bead in place and then smoothed it with my finger like you do with bathtub caulk. I used Iridescent Silver.
Regards,
Alan
There should be very little gap. Maybe 1/64".
St. Louis used a silver colored 'caulk' in the gap. It went on quite soft, almost like a thick liquid and set up quite hard.
I used Squibbles 3d fabric paint from the craft's store. It comes in a small soft plastic bottle with a fine tipped nozzle that lets you squeeze it out in a fine bead. I put a bead in place and then smoothed it with my finger like you do with bathtub caulk. I used Iridescent Silver.
Regards,
Alan