


quick tach cable change

Thread Starter
Advanced

Joined: Aug 2009
Posts: 59
Likes: 0
From: Newburgh in
for some unknown reason my tach cable broke again on my 74 and about time i do this myself instead of paying the shop $150 for the labor. Is thieir a down and dirt quick way or do i need to drop steering column and everything just to get to this thing?

Le Mans Master

Joined: Sep 2001
Posts: 7,739
Likes: 630
From: Unreconstructed, South Carolina
remove driver seat from '74 C3 cabin.
smaller hands-fingers may fit up behind tach to pry retainer away & cable out of tach. If not, drop column a bit & move instrument cluster forward a bit.
vert has additional under-dash bracing; makes job tougher.
smaller hands-fingers may fit up behind tach to pry retainer away & cable out of tach. If not, drop column a bit & move instrument cluster forward a bit.
vert has additional under-dash bracing; makes job tougher.
Race Director

Joined: May 2006
Posts: 16,528
Likes: 53
From: Dayton, Ohio
I have a tool I made to remove the cable.
Without a tool the best way I can think of is to remove the cable end from the dist and have a helper hold that end and be ready to pull when you release the tach end of the cable.
Disconnect your battery,lay on the floor looking up and with a long screwdriver depress the clip holding the cable,tell your helper to pull.
I think I have a pic of the clip , I'll see if I can find it and post it.
edit-the clip is on the bottom side of the cable,just push it towards the tach housing
Last edited by ...Roger...; Jan 18, 2011 at 01:09 PM.
Instructor
Joined: Oct 2006
Posts: 127
Likes: 0
From: Monroe Washington
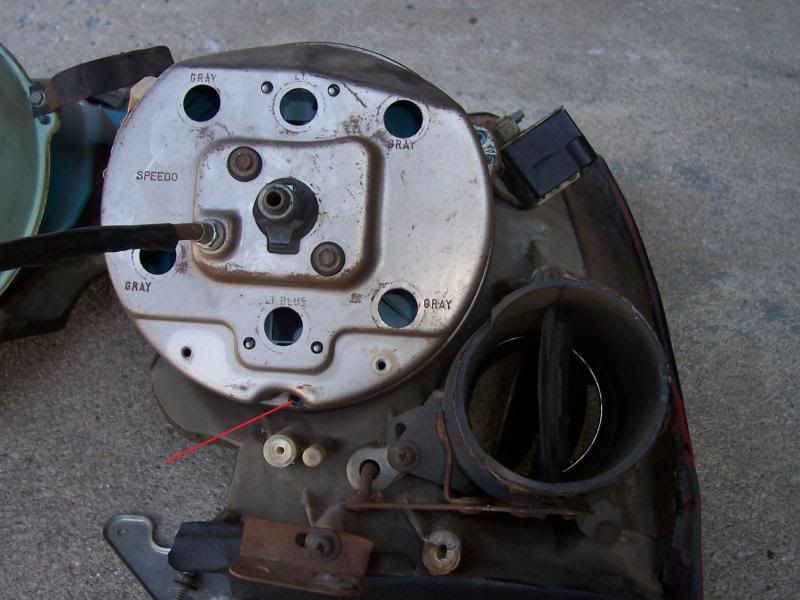
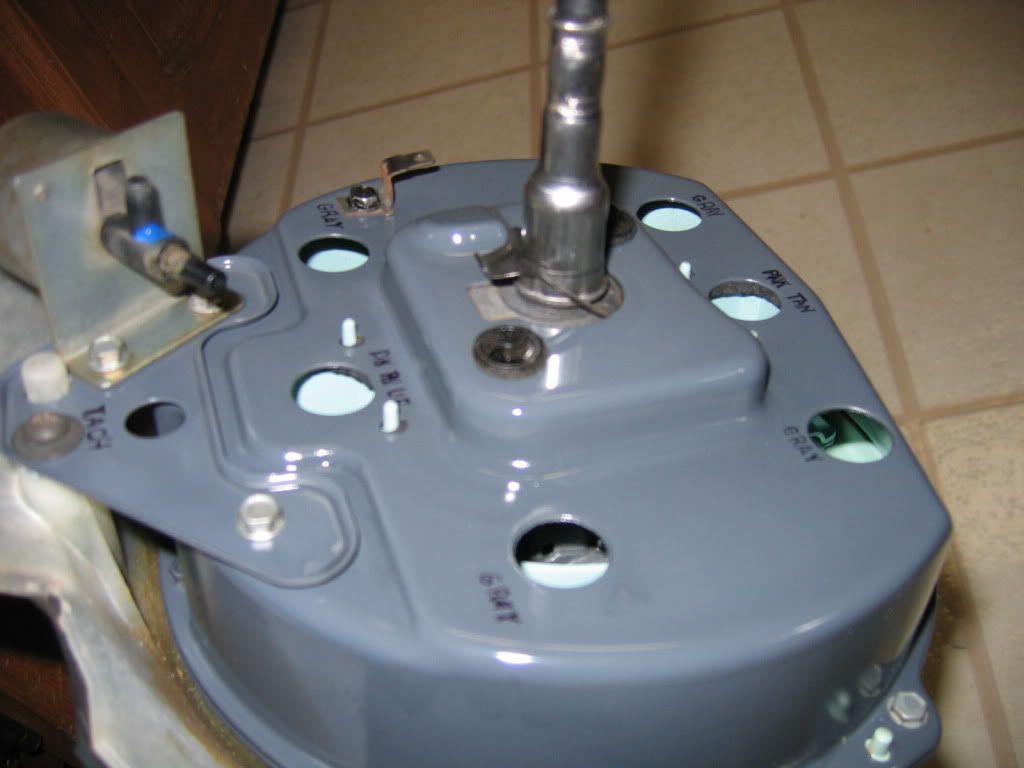
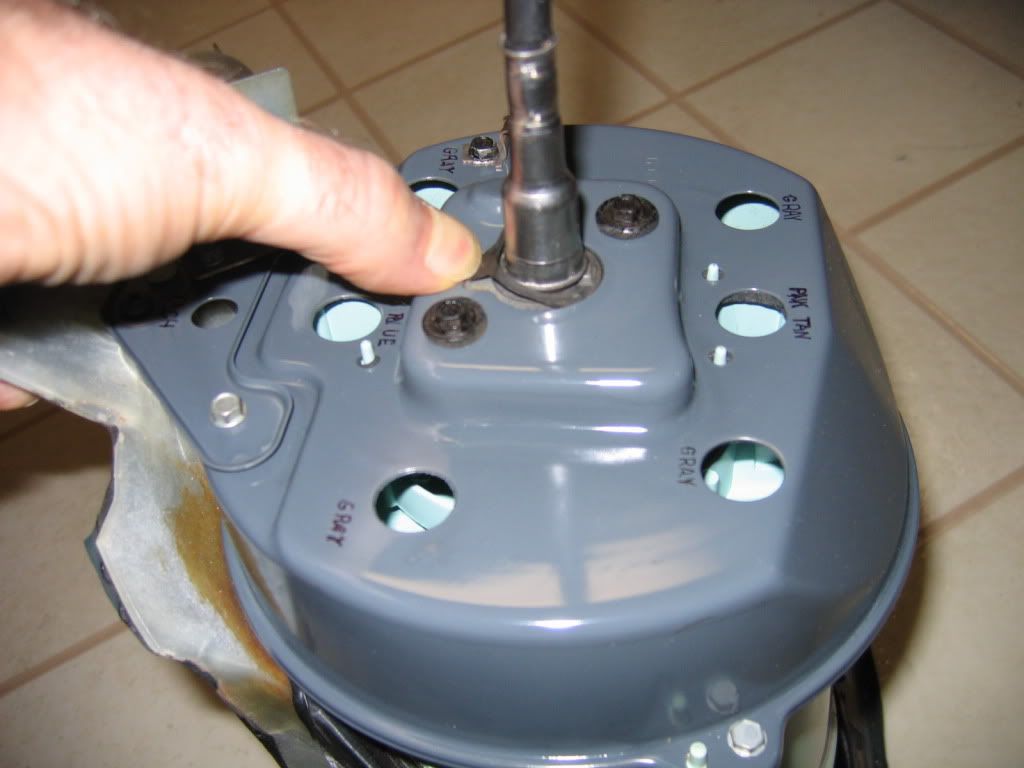
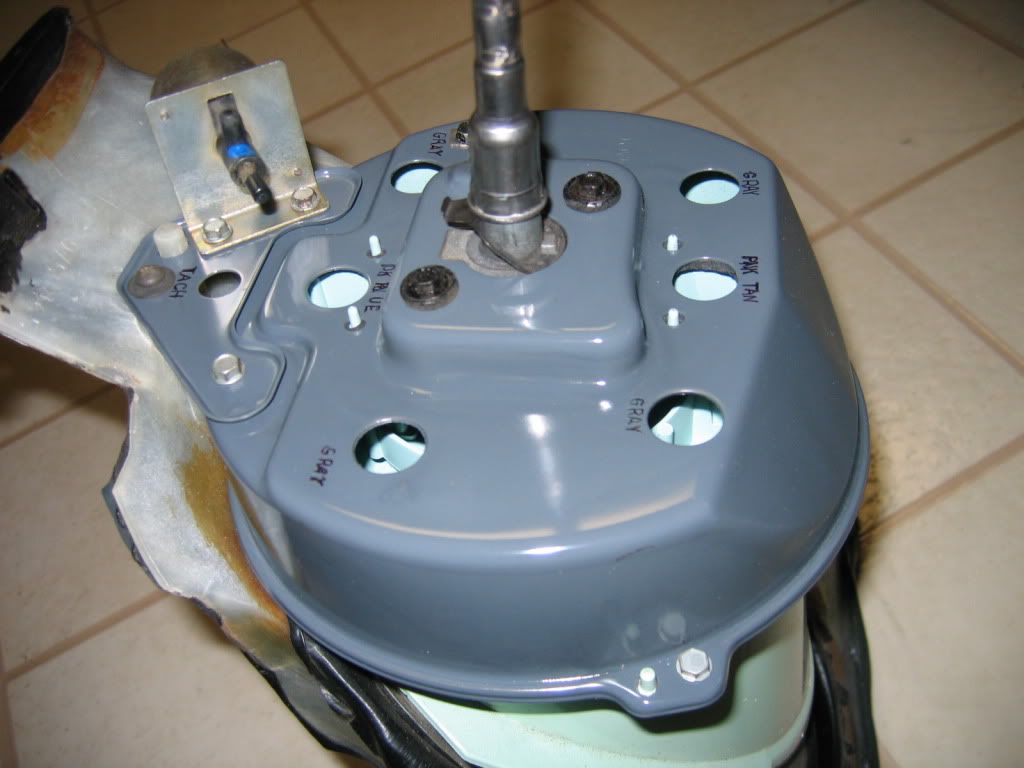
My instrument panel is out, so I took some pictures to show you the clip that holds the cable to the tach. Picture 1 shows the clip in the locked position. Picture 2 shows the clip being held down to unlock the cable. Picture 3 shows the cable unlocked and free to be removed.
Ron

[IMG]
 [/IMG]
[IMG]
 [/IMG]
[IMG]
 [/IMG]

Pro

Joined: Apr 2009
Posts: 650
Likes: 1
If you don't have a buddy handy, just unscrew the tach line from the distributor and tape some fish tape to the end of it. Now run that over your windshield and down into the cockpit. With one hand, push on the release at the back of the tach and with the other hand, give the fish tape a very gentle tug. It'll pop right off. If you're worried about angle, run the fish tape around the water neck over the thermostat to give you more of a straight line angle when tugging. The modern fish tape is very smooth and will not mar or scratch anything. String will also work. It doesn't take a lot of force to separate the tach cable from the back of the tach. Then pull it through the firewall leaving the fish tape in the firewall and tape the end of the new cable to the fish tape and pull it back out of the firewall and screw it to your distributor. 15 min. Done.
Corvette Stories
The Best of Corvette for Corvette Enthusiasts

5 Best & 5 Worst Corvette Daily Drivers
Joe Kucinski
The Headlights of Every Corvette Generation Explained
Joe Kucinski
5 Best & 5 Most Overrated Corvette Track Packages of All Time!
Joe Kucinski
Every 2027 Corvette Engine Explained
Joe Kucinski
Designer Imagines A Corvette That Looks More Like a Corvette Than the Corvette
Verdad Gallardo
10 Ugly Corvettes That We Still Kinda Love
Joe Kucinski
Top 10 Most Expensive Corvettes Ever Sold on Bring A Trailer
Brett Foote
10 Things Every Corvette Owner Needs (2026 Edition)
Michael S. Palmer
8 Most "Only Corvette Owners Understand" Quirks and Problems
Pouria Savadkouei
Le Mans Master
Joined: Sep 2001
Posts: 7,739
Likes: 630
From: Unreconstructed, South Carolina
in other words ... if you wanted to test cable & tach head ... pull cable out of distributor ... lightly chuck core into reversible drill motor ... operate drill in REVERSE. A drill spinning about 600rpm will display about 1200 at tach. If you poke a matchstick into dist's tach drive (cable removed) ... the matchstick will rotate Clockwise when as motor turns over
Note camshaft spins at half engine rpm ... cam & dist drive gears are 1:1 ... dist shaft also spins at half of engine rpm ... dist tach drive gears also 1:1 ... so tach cable (core) also spins at half engine rpm ... tach head is designed to display 2X core rpm. So when you're cruising at 2500 engine rpm ... camshaft, dist shaft & tach core are each spinning about 1250 rpm ... tach displays about 2500.
and yes, those are dandy pics Ron!

Safety Car

Joined: Oct 2005
Posts: 3,570
Likes: 1
From: Algonac Michigan
Melting Slicks


Joined: Apr 2006
Posts: 2,084
Likes: 14
From: Airdrie Alberta
Have you found out why you have had to have it replaced so many times?

I would do a search for the Lars paper on Corvette Distributer installation, it may not be oriented properly and may have too much of a bend on the tach cable.
Le Mans Master
Joined: Sep 2001
Posts: 7,739
Likes: 630
From: Unreconstructed, South Carolina
Instructor

Joined: Apr 2004
Posts: 201
Likes: 1
From: Taunton Ma
I just wanted to update this thread with my own experiences hoping to help someone out by making a difficult job easier. First off i followed the directions above, remove the seat, dropped the stearing column, removed the screws from the drivers side dash so it might give you a little room from behind. Now i'm not a big guy so i was able to wedge myself on the floor looking up and with one arm attempting to get to the cable and the other pushing the dash forward to hopefully buy myself a little room for my hand to get to the cable. Unfortunatly for this excersize my car is a convertible and i see the brace mentioned a little further up in this thread. There is also a big bundle of wires that is right in the way that didn't want to move much. After several attempts there was no way i was able to get my hand up to the clip to remove the cable never mind putting the cable back on. So I decided to try to attack this thing from another angle. What i did was ball up two rags and placed one between the upper dash pad and the dash around the middle and the other between the dash and the gage bezel again around the middle. This was enough to pull the upper right conner out a couple of inches. Next I removed the wiper switch and bezel. Then I reached in through the opennig where the bezel was and the cable was right there! I was able to push the clip and remove the cable with one hand. Removed the other end of the cable and pulled it through the hole in the fire wall. I took the new cable and threaded it through the hole about six to eight inches. Went back inside the car reached in through the wiper bezel hole found the cable and slid it on. The whole procedure of replacing the cable portion of the repair took less than two minutes. I was even able to place the bulb and socket back in the hole for the emergency brake and replace a light socket that would not stay in it's hole. I hope this helps someone with a job that is a real pita. Oh one other thing after i put everything back togeather i noticed my emergency bkake light is always on. Traced it back to the distribution switch block. One step forward another step back.

Intermediate
Joined: Oct 2008
Posts: 25
Likes: 0
From: Lakeville Minnesota
I ended up pulling the center bezel, dropping steering column and loosing the tach/speedo dash cluster to get access to the tach table.
Was a quick swap once I got access. Thank you again!