
My Fuel Tank & Pump Saga - Long Post, Pictures
 05-31-2011, 06:30 PM
#1
Drifting


Thread Starter

In March 2011 I had the Borgeson power steering unit installed in my manual steering ’69 convertible. The install went well, and the owners of the shop raved about how good the car steered compared to the stock linkage assist power steering.
While driving home, I gassed the car and felt a slight hesitation, but since the tank was almost empty I thought the pickup ran dry for a moment and that’s why it missed a beat. When I got to town, I stopped at a busy Chevron station put about 15 gallons in the tank. I haven’t filled it for years as the interior smells like gas when the tank is full. As I left the station, the engine kept dying, so I had to keep my foot on the accelerator as I moved through traffic and onto the freeway home.
As I accelerated up to highway speed, the engine quit like I turned the ignition off. I let off the gas and it picked up again. I tried to gas it again, and it died, but caught when I got off the gas. I could maintain 35-40 mph, but that was all. I pulled off when I got to a breakdown lane and with the flashers on, opened the hood and removed the air cleaner. I gassed the throttle at the carb and could see fuel squirting out of the accel pump squirters. As I seemed to have fuel, I took off up the hill to home. Same problem; it would die with a heavy foot on the gas, so I was limited to about 45mph in the breakdown lane with the four-way flashers on to get home.
I called the shop and asked them if they had a problem with the car when they test drove it for the steering. Both owners said it ran fine for them, they ran it up through the gears. One said sounds like water in the fuel, try some gas treatment. I tried that, no difference.
Since I did seem to have fuel in the carb, one friend said it could be loss of spark. It sure felt like the spark was going away when it lost power – no stumbling, or backfiring through the carb like a lean condition will do. It felt like the key was turned off and then back on. I took the dissy cap off, and checked it for carbon tracking, cracks, and other abnormal conditions. All looked fine.
I have the Breakerless Electronic conversion kit http://www.lectriclimited.com/breakerless_se.htm
so I called their tech dept. and asked them about failure modes. They said unless the unit had failed, it will fire unless the input voltage drops below 4.0 VDC at which point it shuts down to protect the internal circuitry. I hooked up a digital volt meter to the + side of the coil and ground and took the car for a drive. I had 9.6 V at idle, and 11.3 V at 3K rpm. I had a steady 11.3 V when the engine cut out, so I decided unless the unit was bad, I didn’t have a bad ignition module, and since the voltage held constant, the car wiring was not the problem.
In the past I had problems with the Holley DP carb getting “stuff” into it and causing problems, I decided to remove it, tear it down, and clean it out. I did all that, and found no smoking gun, no crud in the carb, nothing that shouldn’t be there. I reinstalled it, couldn’t get the engine started. I took the fuel line off the carb inlet and cranked the engine with a hose on the fuel line going into a jar. I hardly got any fuel out of the pump, just a weak stream so I went on to the next suspect, the sock filter in the tank.
Since the sock filter in the tank is original, I thought, and was told it could be clogged. The inside of the tank looked good, not any real rust of note; just a couple of dime sized spots. I drained the tank using the Chevrolet Service Manual method of siphoning the gas.
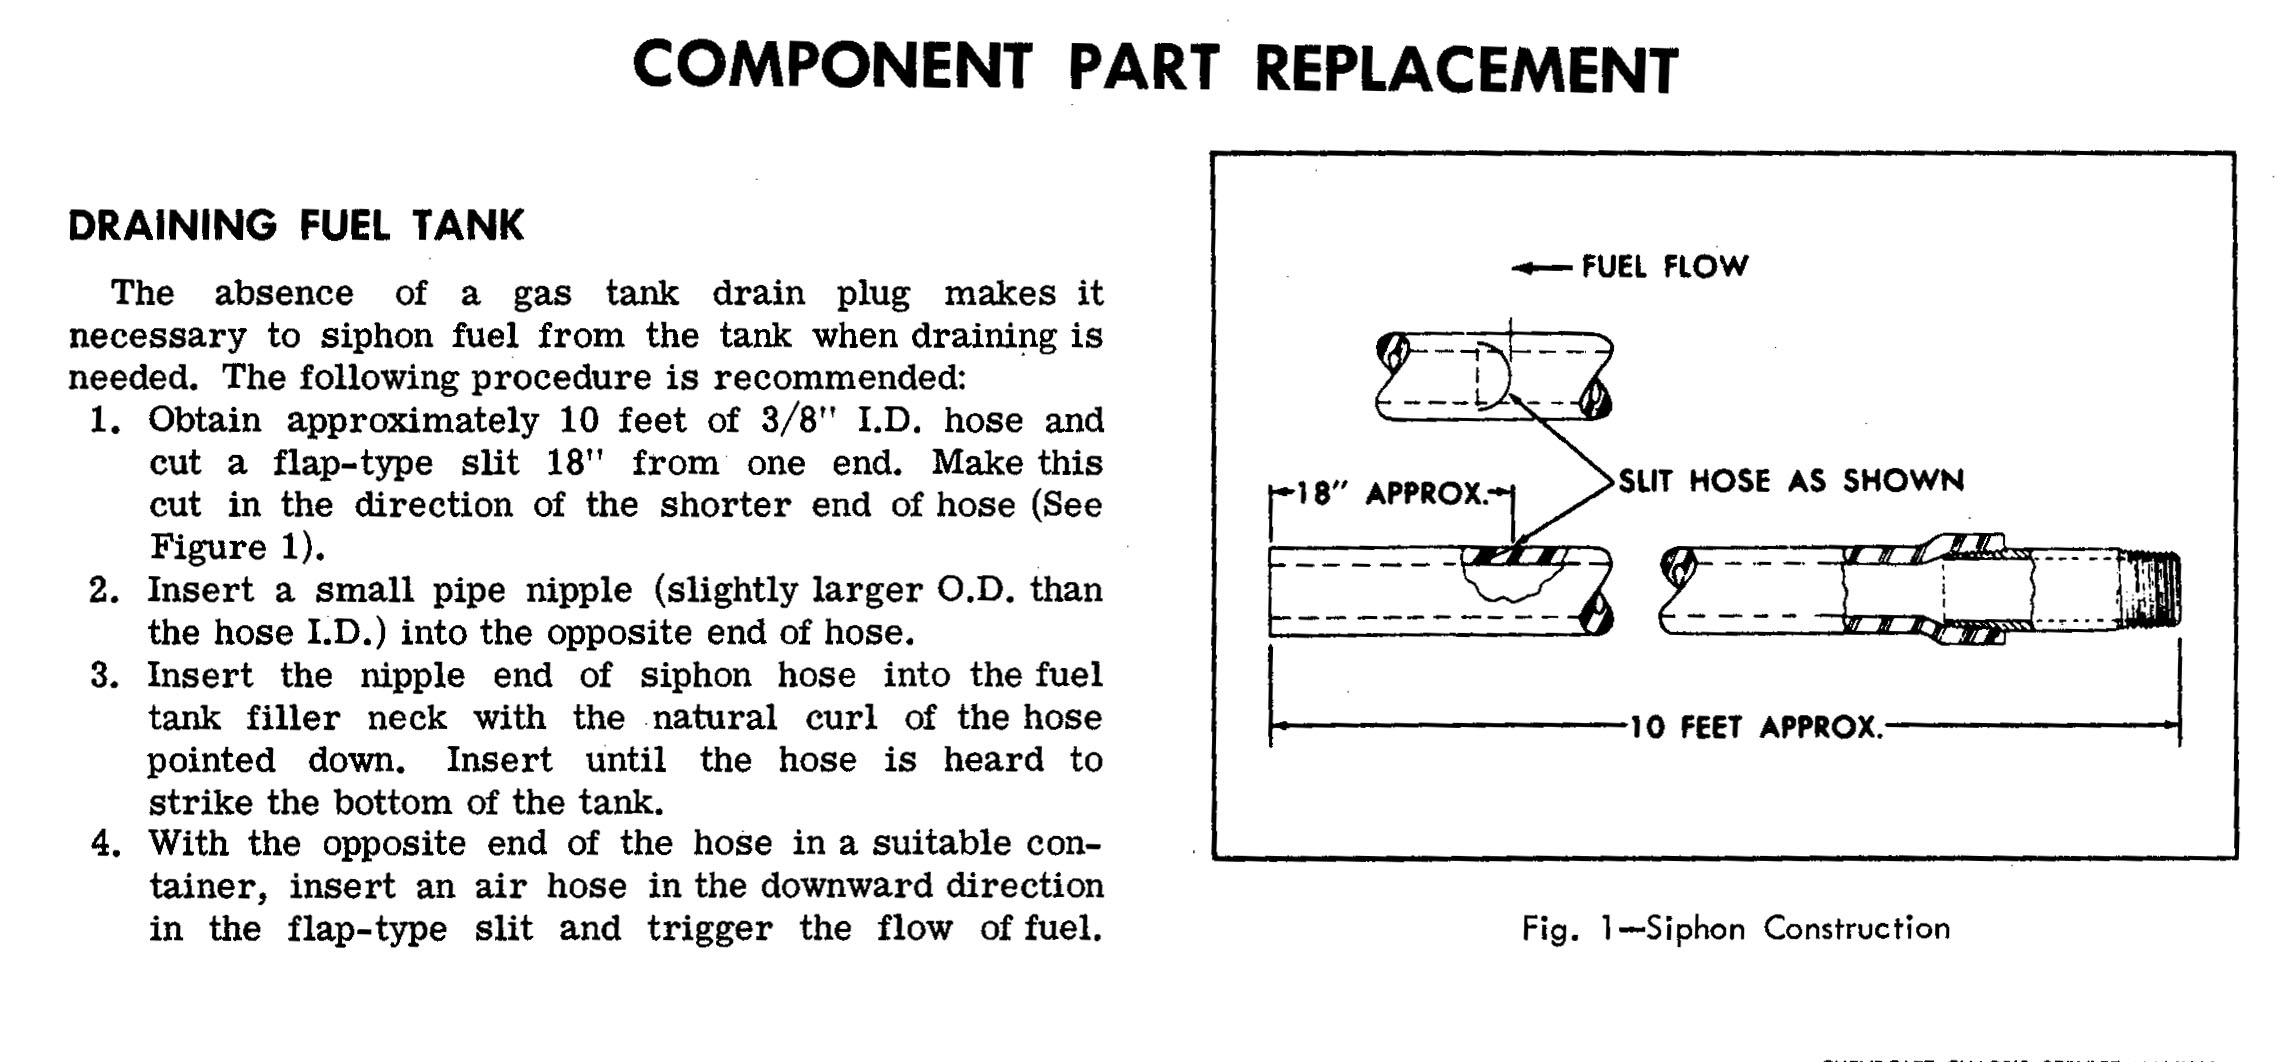
I had my Chassis Service Manual at hand for the step-by-step instructions, but most helpful in this entire adventure was having copies of the pages from the 1969 AIM stapled together and at hand as I worked through the removal and installation. The AIM has nice large line drawings of each assembly, and torque values are right there for all the fasteners. The AIM was really more helpful than the manual.
With the tank almost empty, I removed the ring that holds the pickup and fuel gauge sending unit so I could remove the unit and replace the sock filter. The sock filter was split in several places, definitely needing replacement. While I was at it, I decided the tank was almost out, so why not remove it so I can replace the supply and return hoses. I reasoned that the hoses were forty plus years old and probably deteriorated causing the gas odor in the car. Also, I wanted to see the built sheet, so this was my opportunity to kill two birds with one stone, so to say. Following the steps in the Service Manual, I got the tank out pretty easily. But what I saw was not pleasant:
The tank appears to have been leaking at the front and rear seam as will as from that “seal” just to the left of the filler neck in the depression. And the built sheet was toast!
Reproduction tanks are not very expensive, so I ordered one from Paragon, along with a new non-locking cap, and the anti-squeak insulators that have to be glued to the tank. The parts arrived in about 10 days – east coast to west coast.
The tank came with a gasket for the filler neck, and new screws with 0-rings under the head to attach the filler neck, as well as a new gasket for the sending unit, and a new locking ring to secure the sending unit.
The new tank ready to go in the car, complete with new non-locking cap. The small hose on the right is the fuel return line which comes from the fuel filter on the ‘69s.
The tank went in pretty easily once the left muffler was dropped to the ground – an undertaking in itself as mine are welded from the header flange to the chrome tip. The hardest part was hooking up the fuel return hose. I found that using silicone spray on the hose and on the fitting let me easily slide the hose on, and to slide the little spring clamps into position. This has to be done with the tank partially in place, but rotated 90° forward as it must be to remove and install in into place. So I was on my creeper on my back, balancing the tank up in the car, and trying to use my other two hands to get the hose attached securely. It was a learning experience I tell ya.
With the tank in, I decide that while I have the car on jack stands, I’ll take the fuel pump off and take it apart to inspect the valves. Since I still hadn’t found a real cause for the problem that started all this, I reasoned that, perhaps the old torn sock filter in the tank had allowed some crud in the tank to get into the pump and jam a valve open, or partially open. My pump is a "GM Fuel Pump High Capacity (Small Block). For use on carbureted engines. Pump has 7psi shut-off pressure and a free-flow rate of 30gph. Lower housing can be rotated to reposition inlet and outlet ports."
I took the pump out of the car and took it apart and found this:

You’ll notice both valves look the same, which is wrong. These are one-way check valves; the input valve on the left should allow fuel to flow into the diaphragm chamber and the valve on the right lets fuel flow into the chamber on the right where it is forced out the OUT fitting on the right. The input valve was not seated, and slightly cocked, so I took a small screw driver and pried it out.
Then I put it in the correct way, tapped it home with the socket in the photo and staked it to keep it in place.
This was my smoking gun! I had finally found a real problem that was causing my engine to cut out. The pump has a few thousand miles on it, and has always until now worked well. What caused that valve to come out of its hole and flip over? How did the engine even run with the valve flipped over like that? (That rusty color is the photo, not rust in the pump.)
I got the pump back together and back in the car – it’s amazing how something so small and easy to reach is so hard to bolt to the block. I did use the trick I learned here where I removed the bolt on the front of the block and installed a longer one to hold the push rod in place. That’s a neat trick, works well and eliminates the hassle of fooling with the push rod while trying to get the pump bolts started.
One final roadblock awaited me – somehow I got some crud in the primary needle/seat so when I started the car, I had fuel dribbling off the boosters, and causing the engine to run really bad. I tried to adjust the float down but ended up with it on the bottom of the bowl, and still letting too much gas into the bowl. I took the needle/seat out – simple on these carbs, just loosen the lock screw and screw the needle/seat out of the bowl. I examined it with a magnifying glass, and didn’t see anything so I put it back in but it still leaked and flooded the engine. Then I did what I should have done the first time, removed the needle/seat and blew it clear with air. Success!
This might seem like a long and involved process to fix a bad fuel pump, but the problem was never clear as it ran mostly ran well, but just cut out some of the time – and it cut out cleanly as if the ignition was turned off. I now have a nice new fuel tank, new fuel hoses that are very hard to access, and a repaired fuel pump. And no gas smell in the car when I have a full tank.

Pete
While driving home, I gassed the car and felt a slight hesitation, but since the tank was almost empty I thought the pickup ran dry for a moment and that’s why it missed a beat. When I got to town, I stopped at a busy Chevron station put about 15 gallons in the tank. I haven’t filled it for years as the interior smells like gas when the tank is full. As I left the station, the engine kept dying, so I had to keep my foot on the accelerator as I moved through traffic and onto the freeway home.
As I accelerated up to highway speed, the engine quit like I turned the ignition off. I let off the gas and it picked up again. I tried to gas it again, and it died, but caught when I got off the gas. I could maintain 35-40 mph, but that was all. I pulled off when I got to a breakdown lane and with the flashers on, opened the hood and removed the air cleaner. I gassed the throttle at the carb and could see fuel squirting out of the accel pump squirters. As I seemed to have fuel, I took off up the hill to home. Same problem; it would die with a heavy foot on the gas, so I was limited to about 45mph in the breakdown lane with the four-way flashers on to get home.
I called the shop and asked them if they had a problem with the car when they test drove it for the steering. Both owners said it ran fine for them, they ran it up through the gears. One said sounds like water in the fuel, try some gas treatment. I tried that, no difference.
Since I did seem to have fuel in the carb, one friend said it could be loss of spark. It sure felt like the spark was going away when it lost power – no stumbling, or backfiring through the carb like a lean condition will do. It felt like the key was turned off and then back on. I took the dissy cap off, and checked it for carbon tracking, cracks, and other abnormal conditions. All looked fine.
I have the Breakerless Electronic conversion kit http://www.lectriclimited.com/breakerless_se.htm
so I called their tech dept. and asked them about failure modes. They said unless the unit had failed, it will fire unless the input voltage drops below 4.0 VDC at which point it shuts down to protect the internal circuitry. I hooked up a digital volt meter to the + side of the coil and ground and took the car for a drive. I had 9.6 V at idle, and 11.3 V at 3K rpm. I had a steady 11.3 V when the engine cut out, so I decided unless the unit was bad, I didn’t have a bad ignition module, and since the voltage held constant, the car wiring was not the problem.
In the past I had problems with the Holley DP carb getting “stuff” into it and causing problems, I decided to remove it, tear it down, and clean it out. I did all that, and found no smoking gun, no crud in the carb, nothing that shouldn’t be there. I reinstalled it, couldn’t get the engine started. I took the fuel line off the carb inlet and cranked the engine with a hose on the fuel line going into a jar. I hardly got any fuel out of the pump, just a weak stream so I went on to the next suspect, the sock filter in the tank.
Since the sock filter in the tank is original, I thought, and was told it could be clogged. The inside of the tank looked good, not any real rust of note; just a couple of dime sized spots. I drained the tank using the Chevrolet Service Manual method of siphoning the gas.
I had my Chassis Service Manual at hand for the step-by-step instructions, but most helpful in this entire adventure was having copies of the pages from the 1969 AIM stapled together and at hand as I worked through the removal and installation. The AIM has nice large line drawings of each assembly, and torque values are right there for all the fasteners. The AIM was really more helpful than the manual.
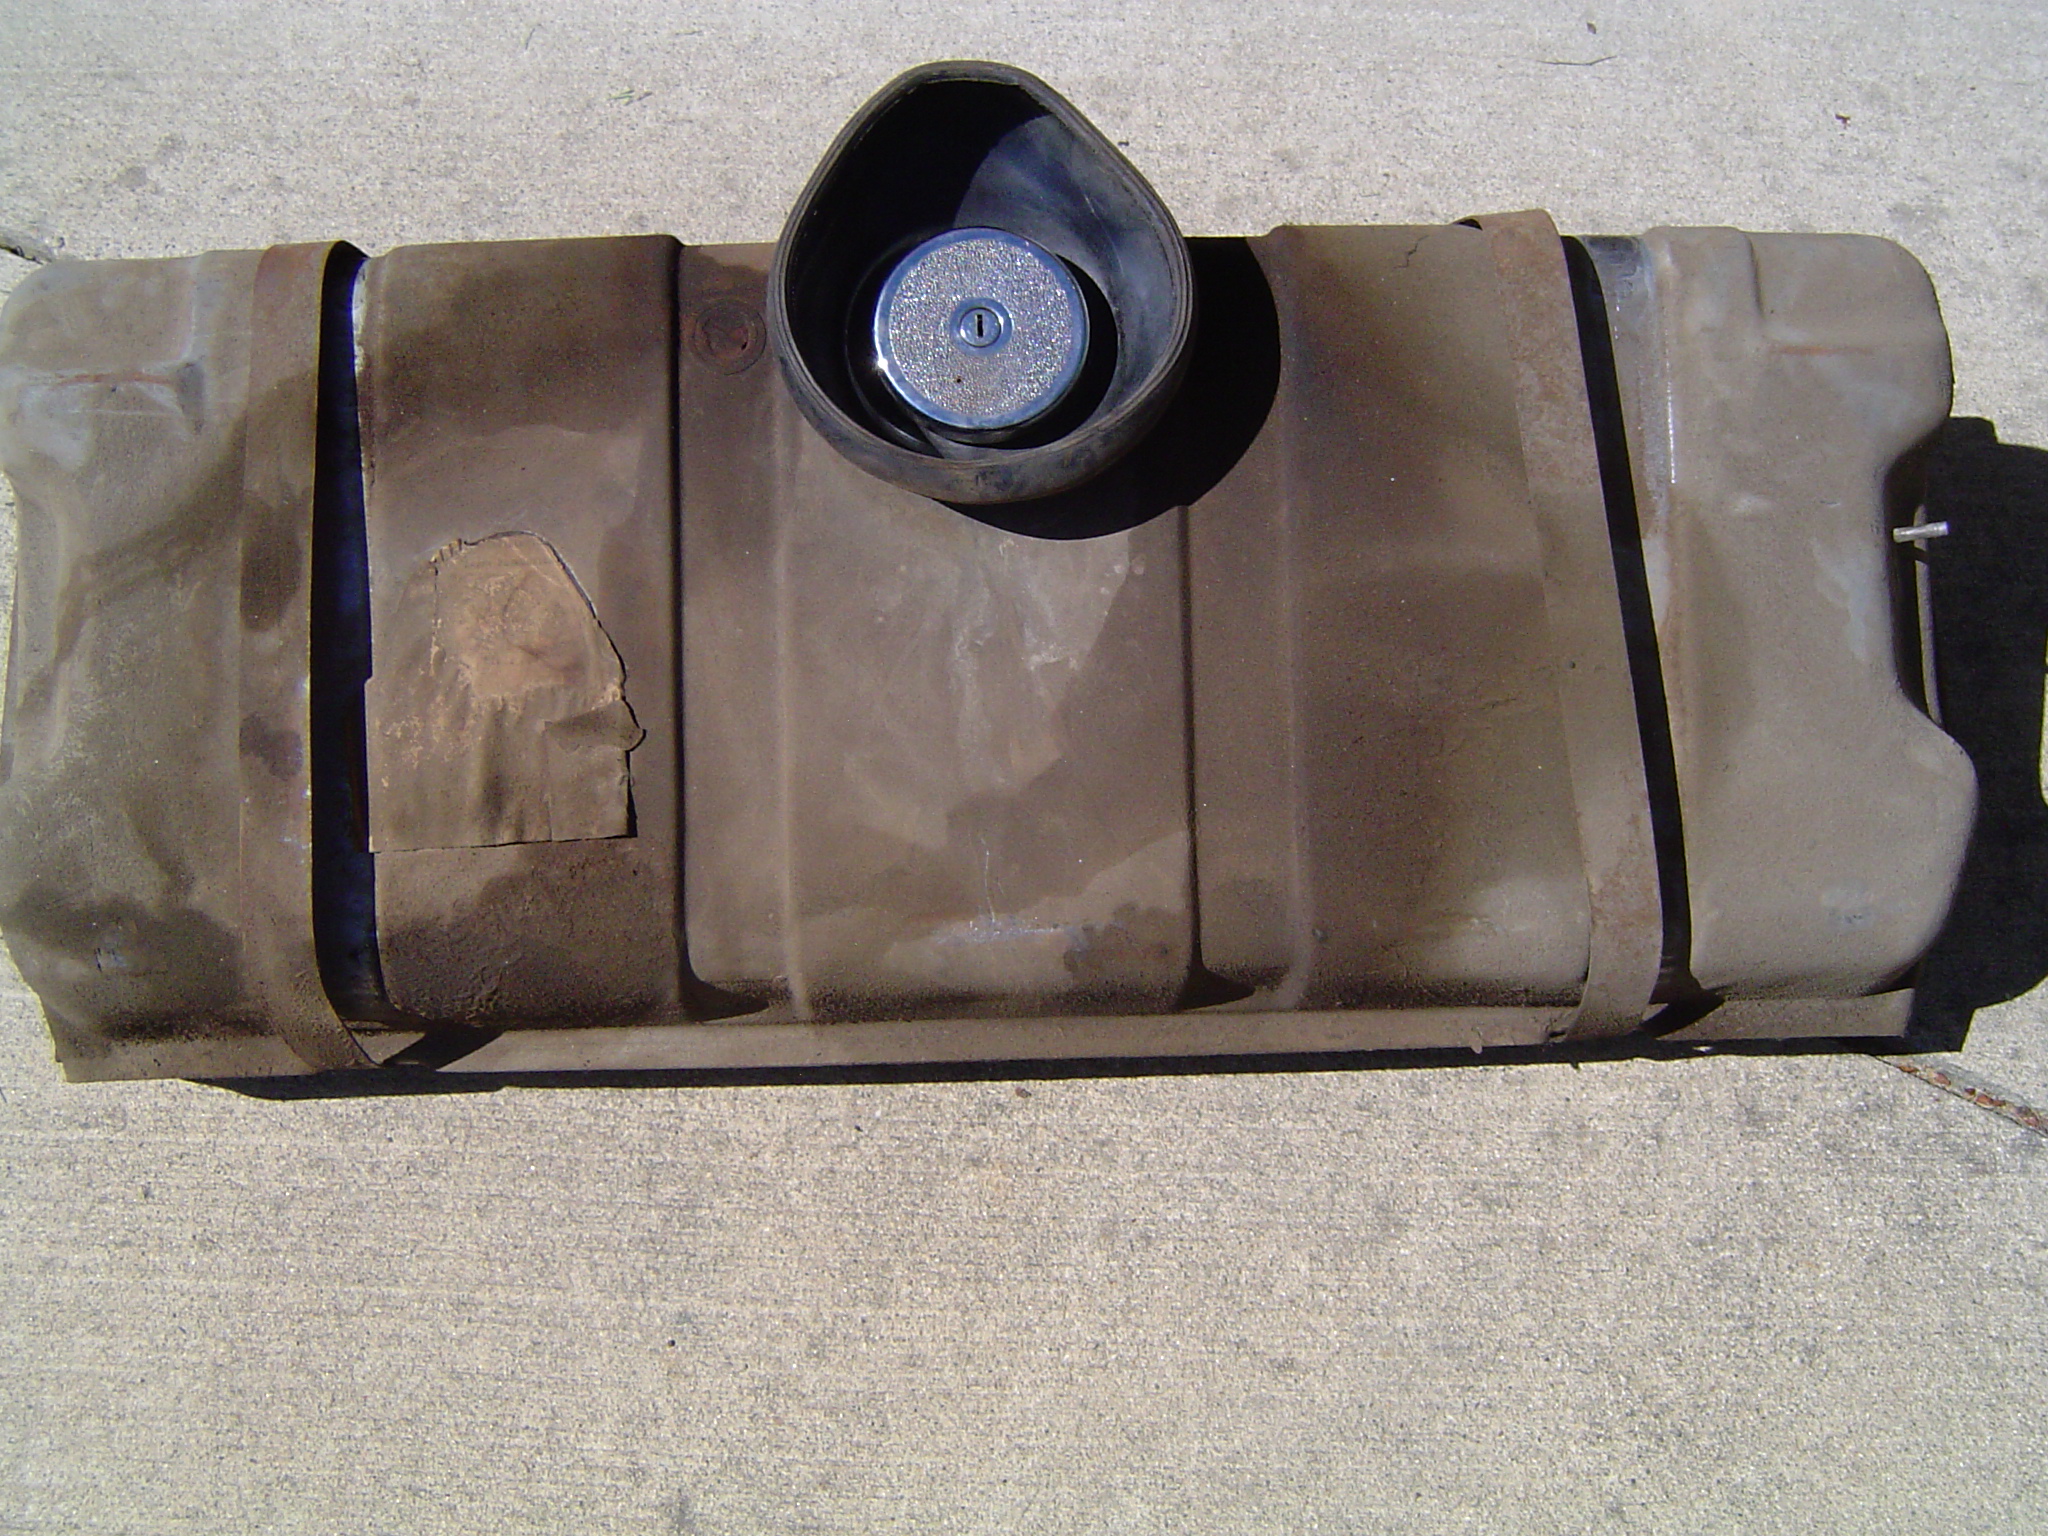
With the tank almost empty, I removed the ring that holds the pickup and fuel gauge sending unit so I could remove the unit and replace the sock filter. The sock filter was split in several places, definitely needing replacement. While I was at it, I decided the tank was almost out, so why not remove it so I can replace the supply and return hoses. I reasoned that the hoses were forty plus years old and probably deteriorated causing the gas odor in the car. Also, I wanted to see the built sheet, so this was my opportunity to kill two birds with one stone, so to say. Following the steps in the Service Manual, I got the tank out pretty easily. But what I saw was not pleasant:
The tank appears to have been leaking at the front and rear seam as will as from that “seal” just to the left of the filler neck in the depression. And the built sheet was toast!
Reproduction tanks are not very expensive, so I ordered one from Paragon, along with a new non-locking cap, and the anti-squeak insulators that have to be glued to the tank. The parts arrived in about 10 days – east coast to west coast.
The tank came with a gasket for the filler neck, and new screws with 0-rings under the head to attach the filler neck, as well as a new gasket for the sending unit, and a new locking ring to secure the sending unit.
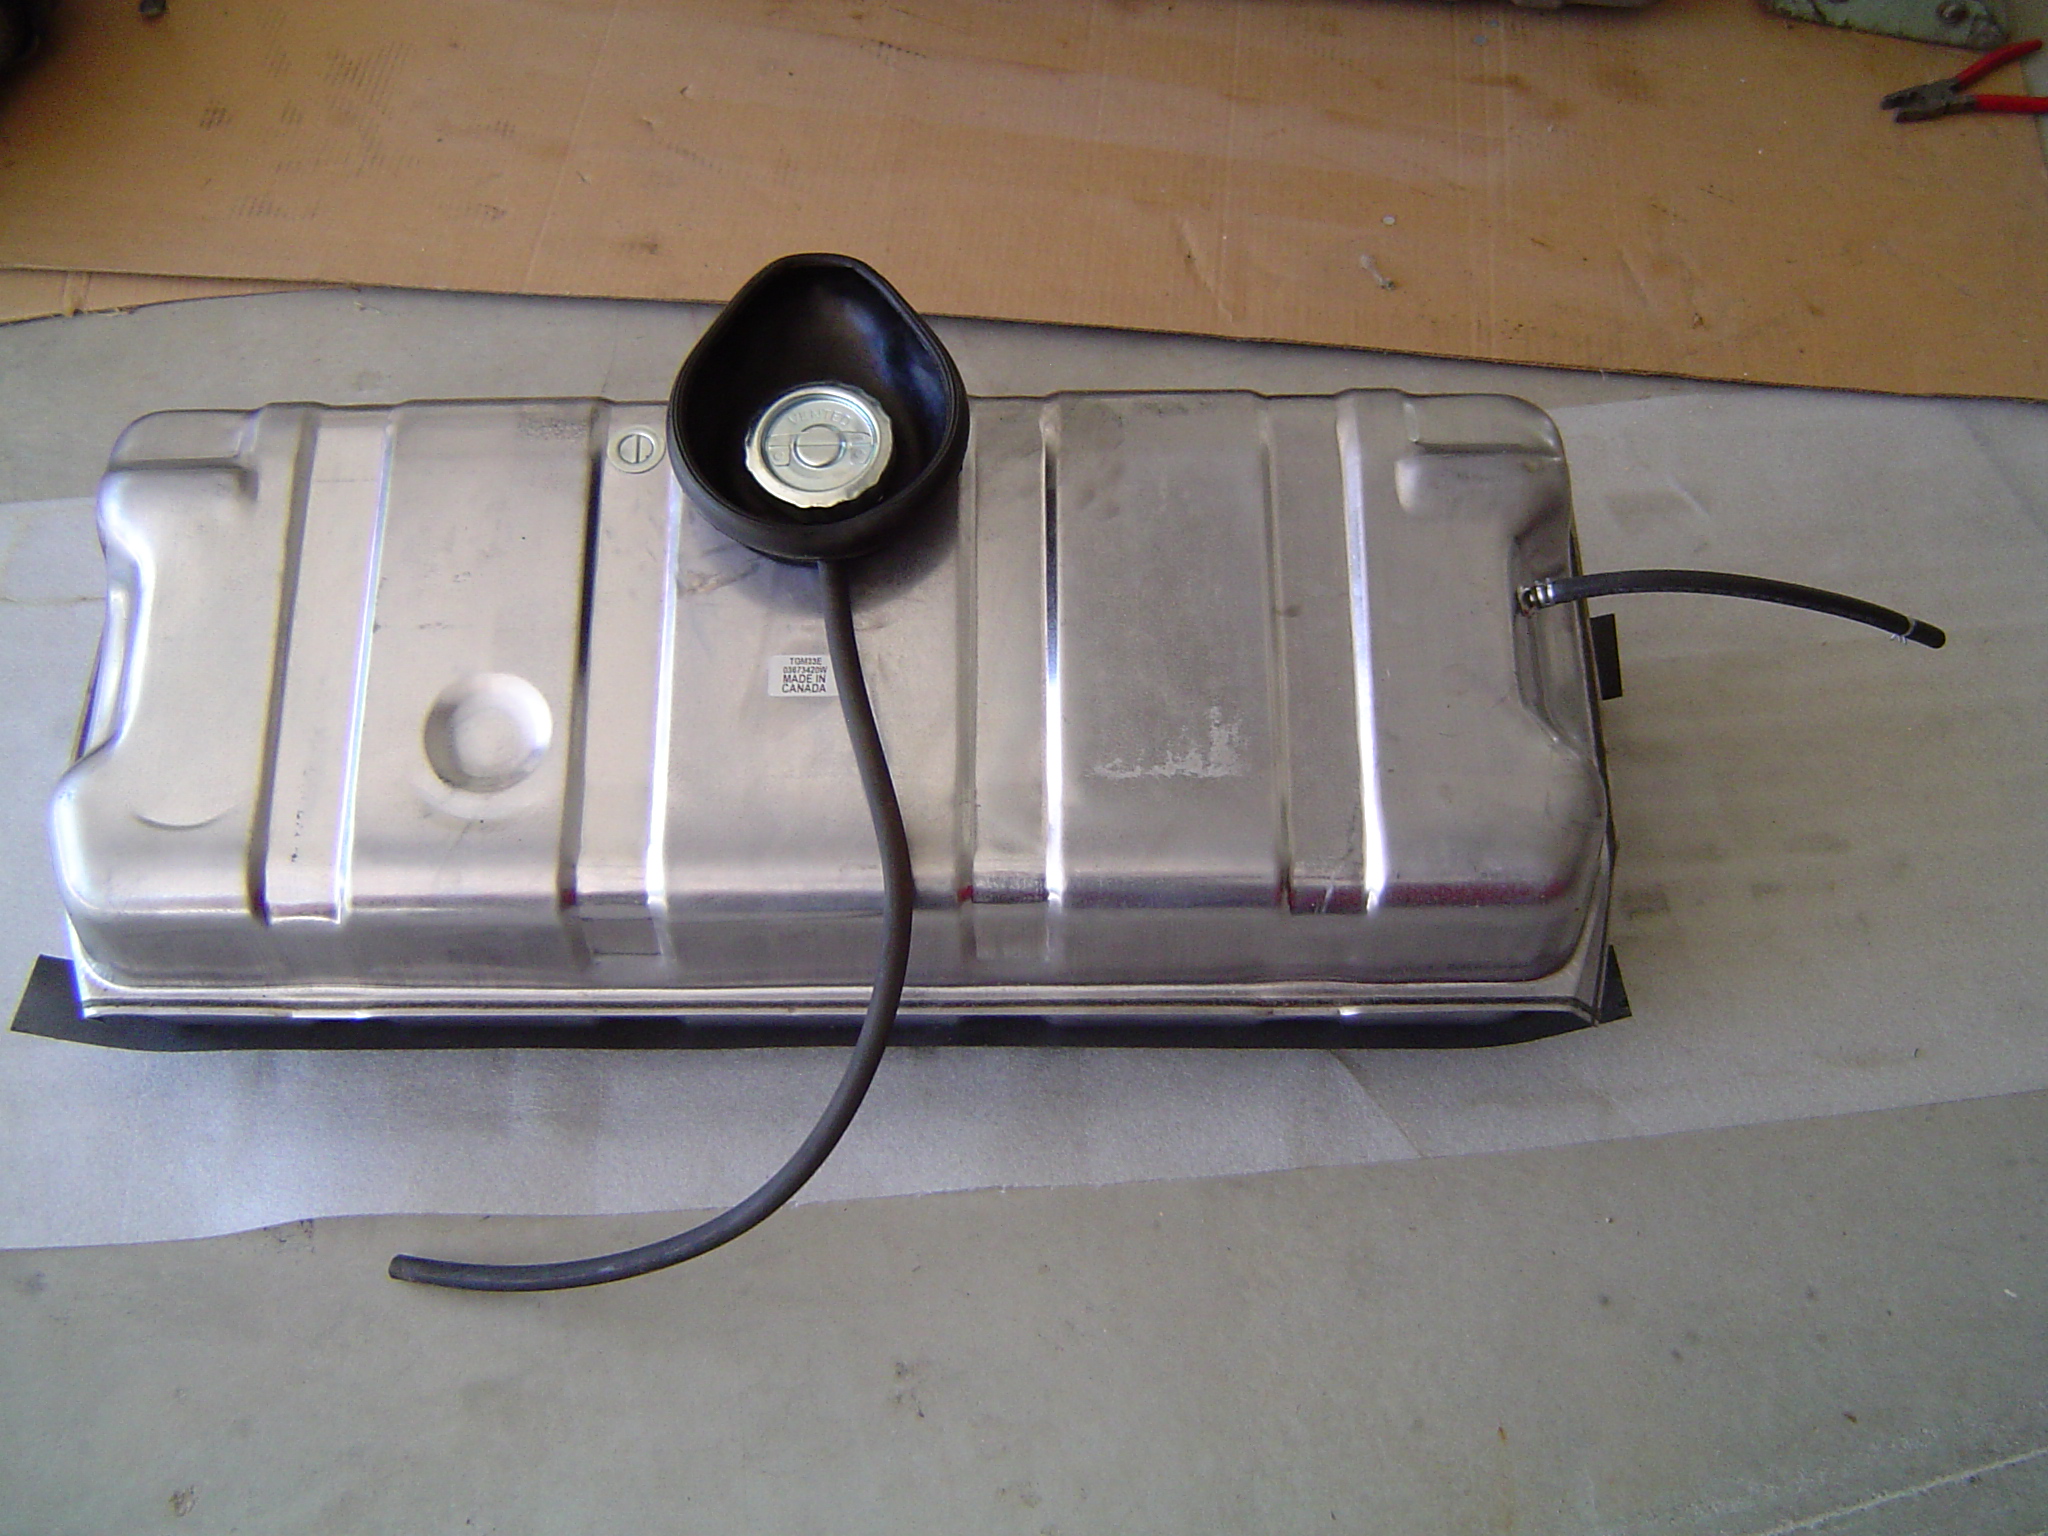
The new tank ready to go in the car, complete with new non-locking cap. The small hose on the right is the fuel return line which comes from the fuel filter on the ‘69s.
The tank went in pretty easily once the left muffler was dropped to the ground – an undertaking in itself as mine are welded from the header flange to the chrome tip. The hardest part was hooking up the fuel return hose. I found that using silicone spray on the hose and on the fitting let me easily slide the hose on, and to slide the little spring clamps into position. This has to be done with the tank partially in place, but rotated 90° forward as it must be to remove and install in into place. So I was on my creeper on my back, balancing the tank up in the car, and trying to use my other two hands to get the hose attached securely. It was a learning experience I tell ya.
With the tank in, I decide that while I have the car on jack stands, I’ll take the fuel pump off and take it apart to inspect the valves. Since I still hadn’t found a real cause for the problem that started all this, I reasoned that, perhaps the old torn sock filter in the tank had allowed some crud in the tank to get into the pump and jam a valve open, or partially open. My pump is a "GM Fuel Pump High Capacity (Small Block). For use on carbureted engines. Pump has 7psi shut-off pressure and a free-flow rate of 30gph. Lower housing can be rotated to reposition inlet and outlet ports."
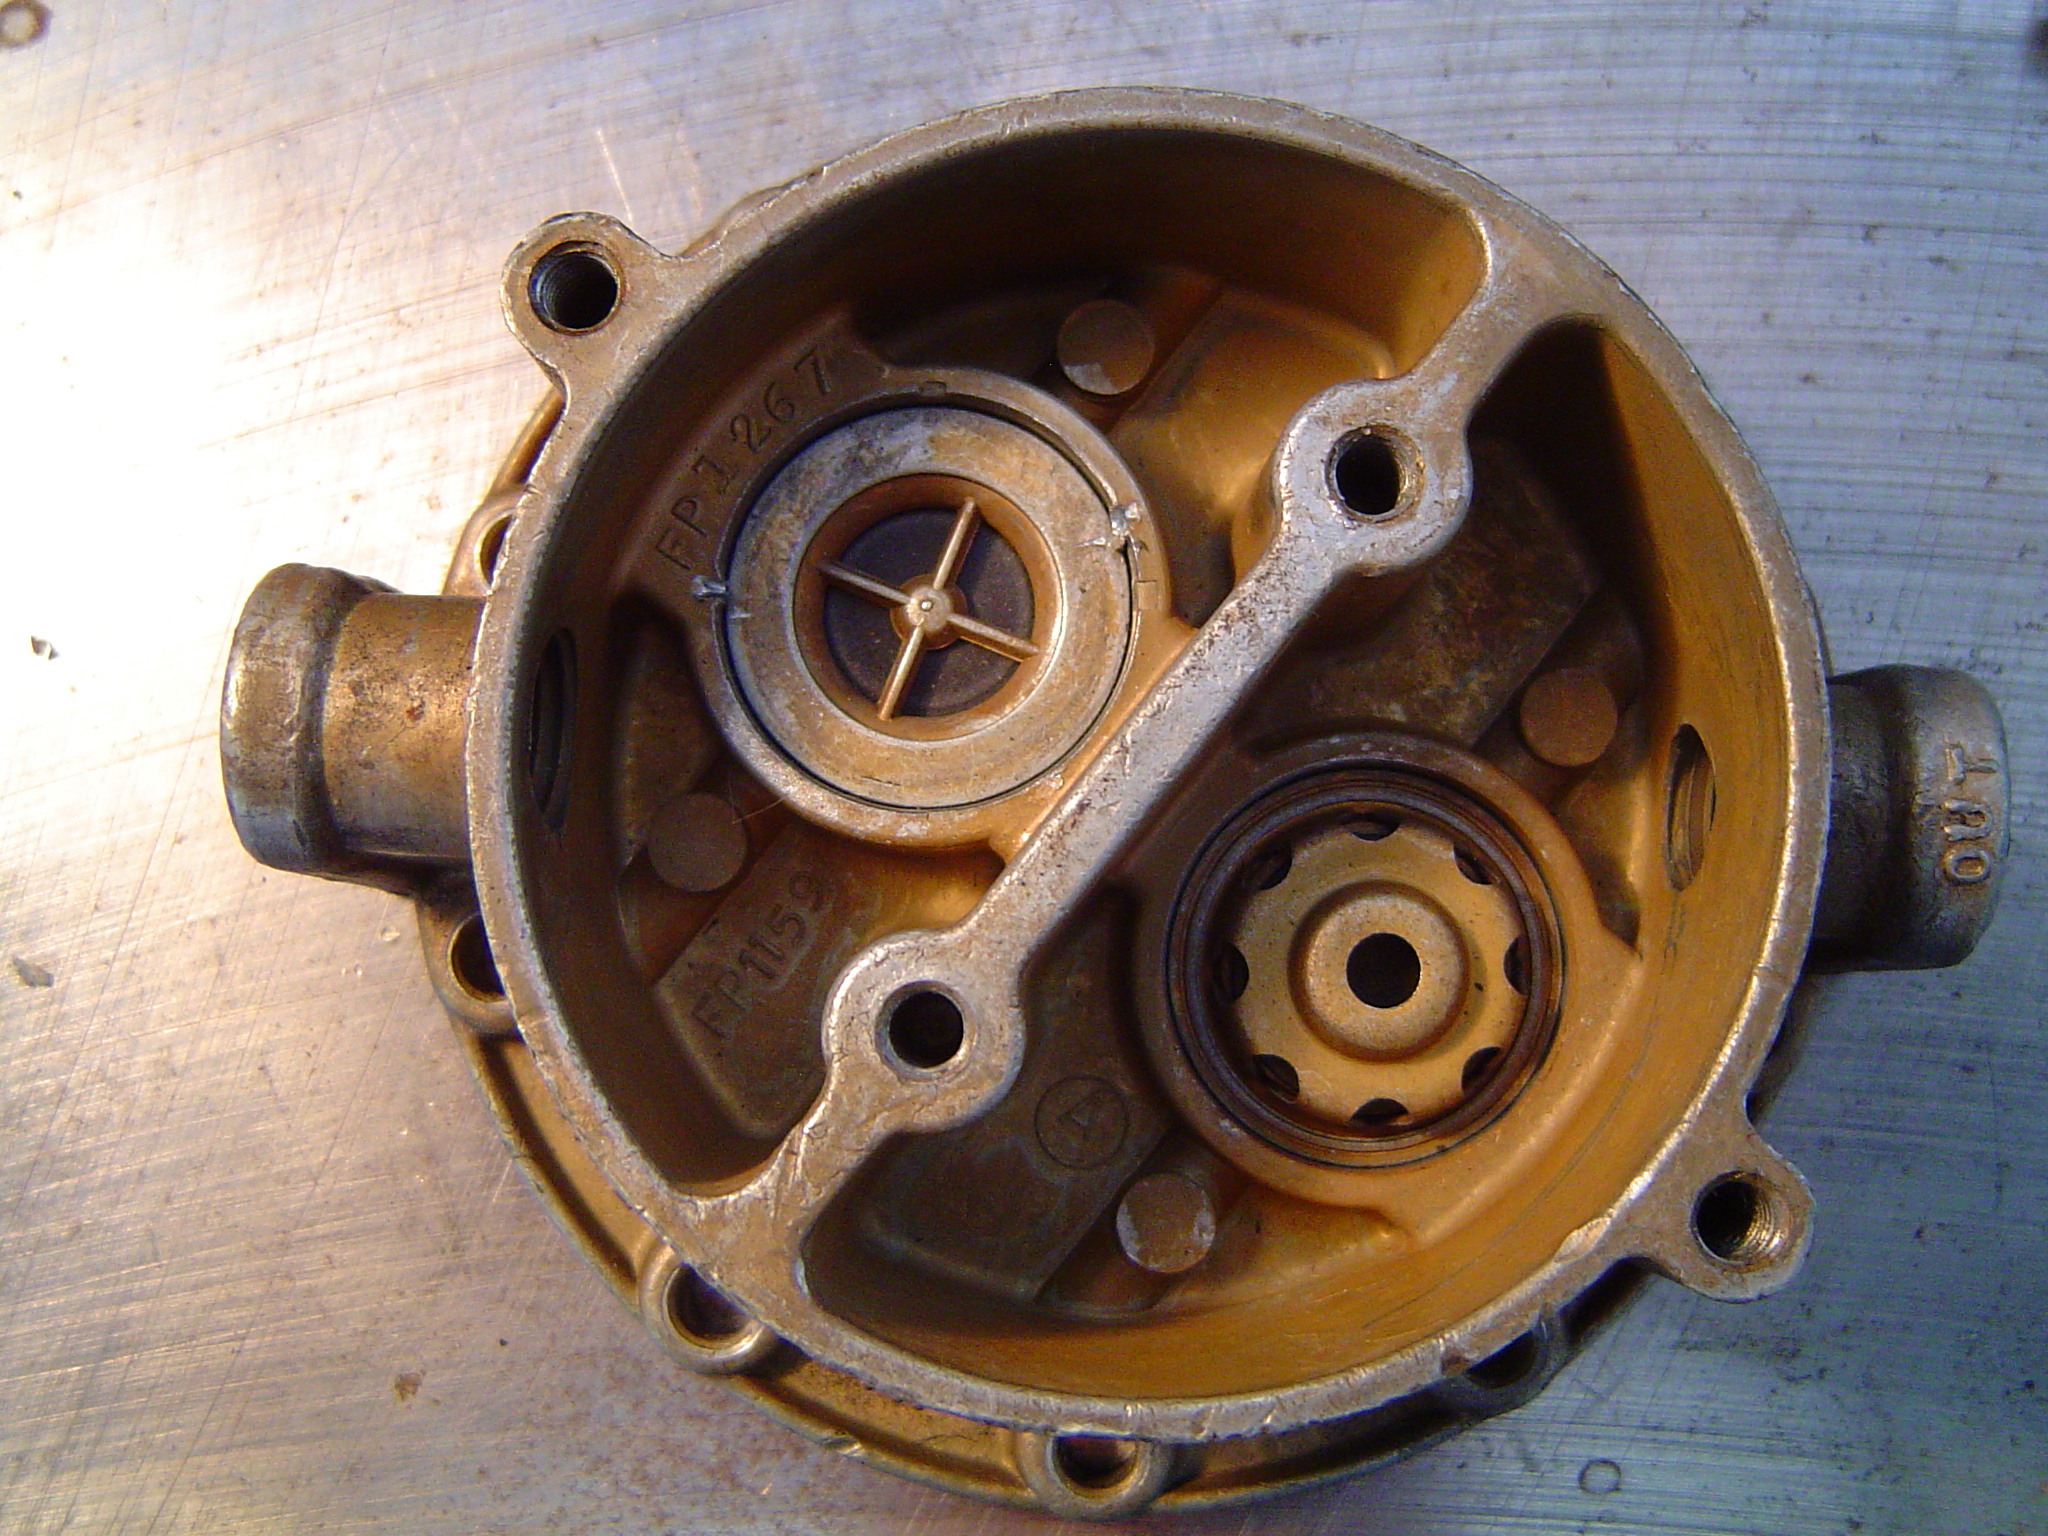
I took the pump out of the car and took it apart and found this:
You’ll notice both valves look the same, which is wrong. These are one-way check valves; the input valve on the left should allow fuel to flow into the diaphragm chamber and the valve on the right lets fuel flow into the chamber on the right where it is forced out the OUT fitting on the right. The input valve was not seated, and slightly cocked, so I took a small screw driver and pried it out.
Then I put it in the correct way, tapped it home with the socket in the photo and staked it to keep it in place.
This was my smoking gun! I had finally found a real problem that was causing my engine to cut out. The pump has a few thousand miles on it, and has always until now worked well. What caused that valve to come out of its hole and flip over? How did the engine even run with the valve flipped over like that? (That rusty color is the photo, not rust in the pump.)
I got the pump back together and back in the car – it’s amazing how something so small and easy to reach is so hard to bolt to the block. I did use the trick I learned here where I removed the bolt on the front of the block and installed a longer one to hold the push rod in place. That’s a neat trick, works well and eliminates the hassle of fooling with the push rod while trying to get the pump bolts started.
One final roadblock awaited me – somehow I got some crud in the primary needle/seat so when I started the car, I had fuel dribbling off the boosters, and causing the engine to run really bad. I tried to adjust the float down but ended up with it on the bottom of the bowl, and still letting too much gas into the bowl. I took the needle/seat out – simple on these carbs, just loosen the lock screw and screw the needle/seat out of the bowl. I examined it with a magnifying glass, and didn’t see anything so I put it back in but it still leaked and flooded the engine. Then I did what I should have done the first time, removed the needle/seat and blew it clear with air. Success!
This might seem like a long and involved process to fix a bad fuel pump, but the problem was never clear as it ran mostly ran well, but just cut out some of the time – and it cut out cleanly as if the ignition was turned off. I now have a nice new fuel tank, new fuel hoses that are very hard to access, and a repaired fuel pump. And no gas smell in the car when I have a full tank.
Pete
 06-01-2011, 09:37 AM
#3
Burning Brakes

Member Since: May 2008
Location: Stratford Ontario
Posts: 860
Likes: 0
Received 0 Likes
on
0 Posts
It might be helpfull to have an in line filter that can be replaced regularly. When I replaced my tank and lines I kept getting tiny bits of things in the needle and seat. After a couple times cleaning I bought a second one that I could just swap them while I was cleaning. After about 8 times it stopped and has been great ever since. Nice post and good luck. 
06-01-2011, 05:49 PM
#4
Drifting
Thread Starter
It might be helpfull to have an in line filter that can be replaced regularly. When I replaced my tank and lines I kept getting tiny bits of things in the needle and seat. After a couple times cleaning I bought a second one that I could just swap them while I was cleaning. After about 8 times it stopped and has been great ever since. Nice post and good luck.
Thanks
Pete