






Question re body removal.

Thread Starter
Safety Car


Joined: Mar 2005
Posts: 4,255
Likes: 82
From: Brampton Ont.

For me it comes down to wanting this Vette to "live forever", partially since I'm the orignal owner and I thought it would be cool if I handed it down to one of my kids since they are also Vette Lovers.
If it were a matter of another $1000.00 then I think that's money well spend based on the fact that I truly believe you'd get that back if you did do a true body off resto. What you won't get back in the many hours of labor that you've put into it. If you plan on keeping the car, then ...............well you get it.
For me it's all boils down to motivation, the car has sat for 22 years and I know without question, (even with a dozen cans of PB Blaster) it's going to be a bitch to unbolt all 8 body mounts, let alone finding pandora's box hidden somewhere.
After all is said and done, I know I won't be happy till I do a body off but need the motivation to do so. As for my wife's support, she doesn't really care as long as I keep a budget and get er done. After all, I think she's tired of having this car take up valuable space in the garage without even being able to take advantage in driver her.
In conclusion, I bought the complete s/s brake and fuel lines and am presently doing couple home reno's, keeps the wife really happy. Therefore............I'm still on the fence........
To be continued!
If it were a matter of another $1000.00 then I think that's money well spend based on the fact that I truly believe you'd get that back if you did do a true body off resto. What you won't get back in the many hours of labor that you've put into it. If you plan on keeping the car, then ...............well you get it.
For me it's all boils down to motivation, the car has sat for 22 years and I know without question, (even with a dozen cans of PB Blaster) it's going to be a bitch to unbolt all 8 body mounts, let alone finding pandora's box hidden somewhere.
After all is said and done, I know I won't be happy till I do a body off but need the motivation to do so. As for my wife's support, she doesn't really care as long as I keep a budget and get er done. After all, I think she's tired of having this car take up valuable space in the garage without even being able to take advantage in driver her.
In conclusion, I bought the complete s/s brake and fuel lines and am presently doing couple home reno's, keeps the wife really happy. Therefore............I'm still on the fence........
To be continued!

Melting Slicks


Joined: Apr 2004
Posts: 2,008
Likes: 38
From: Space Coast Gator Territory
Very curious what you decided to do here because I am in a very similar situation. I really want to remove the body to get the frame sandblasted and repainted. To be honest it really doesn't need it from what I can tell with the body on as there is very little rust, this car was rarely out. However, like you I want my Vette to live forever. If I never drive it in the rain and of course not in winter, do I really need to do this for the sake of it looking good? Probably not, right? That's kind of my dilemma but I am really **** about how it looks. I have plenty of garage space, lots of tools, time over this winter and relatively decent funds for the project. I say 'decent' funds but I based that on not getting too carried away with the 'while i'm at it' stuff. My goal was clean paint the frame and get all the under car mechanicals cleaned and reconditioned, no motor parts are to be touched, that is next winters project as I want to drive the car in the spring. I already have all the suspension parts purchased, trailing arms, springs, steering components, bushings, etc. I figured if I pull the body I could expect to blow maybe an additional $1000 fixing the unexpected, does that seam reasonable for an 80 that is really in pretty good shape already? Thanks! 
 [/IMG]
I had the IRS and components powder coated with chrome, but a much less expensive and easier alternative is POR silver paint. That is what I used on the fuel tank and was happy with the results. Color contrast keeps the underside interesting.
[IMG]
 [/IMG]
[IMG]
 [/IMG]
The wheel wells were molded and painted with PPG epoxy red primer with 1/3 more hardner for a semi gloss finish.
[IMG]
 [/IMG]
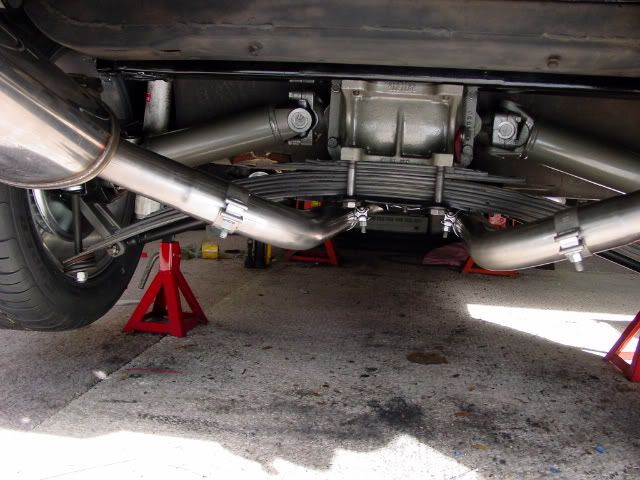
The exhaust is installed and wrapped to protect the new composite spring. Subsequently, the entire exhaust was wrapped from the headers back to the mufflers to reduce under hood and interior temps and is very effective.
[IMG]
 [/IMG]
I hope these photos are inspirational to those who are contemplating a body on approach to upgrades. There is no easy way out and plenty of elbow grease is required to make the metal and fiberglass squeaky clean and properly prepared for paint. Anything less will result in poor results.

Burning Brakes


Joined: May 2009
Posts: 1,232
Likes: 6
From: Tucson AZ
St. Jude Donor '12
Originally Posted by someone famous
"Removing A Body From A Frame Isn't All That Hard"

Pro


Joined: Sep 2011
Posts: 613
Likes: 11
From: EVANSVILLE Wisconsin
Hey Red 69, Your car looks great but I am really struggling to understand how you got there with the body on. Just looking at some of the pics you included and thinking of the painstaking, not to mention seemingly impossible areas you would have had to get into with paint, cleaners, etc I just don't get it. I would think that to do what you have done with the body on would be 5x the work vs. just taking the body off and having better access to everything, am I missing something? 
Melting Slicks
Joined: Apr 2004
Posts: 2,008
Likes: 38
From: Space Coast Gator Territory
Hey Red 69, Your car looks great but I am really struggling to understand how you got there with the body on. Just looking at some of the pics you included and thinking of the painstaking, not to mention seemingly impossible areas you would have had to get into with paint, cleaners, etc I just don't get it. I would think that to do what you have done with the body on would be 5x the work vs. just taking the body off and having better access to everything, am I missing something?
The underside of my car had layers of undercoating that needed to be scrapped off with a putty knife and then wiped clean with lacquer thinner. Lacquer thinner worked very well BTW. The frame was hand sanded where a wire brush could not reach. The frame was mostly taken down to bare metal before I etched it with acid and before painting with POR. I took my time and would not settle for a half a** job. There is not a spot on top of the frame or on the underside above the frame, that does not have paint on it. I used mirrors and custom paint brushes that could reach difficult areas. All work was done from jack stands in a cramped garage. The time was taken to cover areas I did not want paint on. My point in saying all this is, if you set a goal and are motivated, you can achieve what you set your sights on.
BTW...I have also done a body off, so know the problems and advantages of both methods. If you have a car that is in running condition, a body off may not be necessary, or recommended. Choose a time of year you do not use the car to focus on the most needy section first. Most likely any section of the car can be completed in under six months, if you budget your spare time to it. This way the car is down for only a short period of time and with a smaller cost budget. As soon as that area is completed, you are back on the road. The next season, you do the same thing with your focus on the cars next needy area. In this way you can be driving your car and end up with a total restoration over time. A body off is usually a several year project with a budget that stresses the pocket book and challenges motivation. You can achieve similar results, short of replacing birdcage pieces with the body on. It is easy to take the body off, but not so easy to finish the job and there in lies the problem and why I suggest a body on.
An older retired bodyman was the most productive builder I have known. The number of projects he could finish in a short time testified to his knowing what he was doing. His health was failing and had bypass surgery and a list of health issues for which he was medicated. He told me he worked on a project every day, even if it was only 15 minutes. If he was feeling well he might get three hours. Doing this kept progress moving forward and that maintained his motivation. He taught me many little tricks that save time and maintain motivation. YOU CAN DO IT!! Many other members of the forum have.
Last edited by Red 69; Nov 10, 2011 at 06:08 PM.
Melting Slicks
Joined: Apr 2004
Posts: 2,008
Likes: 38
From: Space Coast Gator Territory

Corvette Stories
The Best of Corvette for Corvette Enthusiasts

How Much Horsepower Every Corvette Engine "LOST" in 1972
Joe Kucinski
Top 10 DOs and DON'Ts for Protecting Your Convertible Top!
Michael S. Palmer
Top 10 Most Explosive Corvettes Ever Made: Power-to-Weight Ratio Ranked!
Joe Kucinski
150 hp to 1,250 hp: Every Corvette Generation Compared by the Specs That Matter
Joe Kucinski
8 Coolest Corvette Pace Cars (and Replicas) of All Time
Verdad Gallardo
Top 10 Corvette Engines RANKED by Peak Torque (70+ Years of Muscle!)
Joe Kucinski
Corvette ZR1X Will Be Pacing the Indy 500, And Could Probably Race, Too!
Verdad Gallardo
Top 10 Corvettes Coming to Mecum Indy 2026!
Brett Foote
Top 10 C9 Corvette MUST-HAVES to Fix These C8 Generation Flaws!
Michael S. Palmer
Race Director


Joined: Apr 2007
Posts: 11,150
Likes: 890
From: South Western Ontario
I helped dad put together a 78 that he purchased almost 2 years ago now. It took about 8 months to put it together. The previous owner had taken it all apart expecting to do a frame off and then had given up and left it stored for about 15 years. It's a very solid car (all the body mounts had unbolted with no problem) so it would have been nice to do a frame off and really clean it up. But another 3 or 4 years and $10k or $15k more just wasn't something dad wanted to get into at this time in his life. It was fun working together with him to put it together. But, he would have been out of "gas" on the project if he was just dropping the body back on the frame this winter.
If you want to know the expected extra time and cost, I'd say about 3 more years and $15k more. Once you go that far, you just can't leave the small things that you otherwise would and end up replacing and repairing which means you spend a whole bunch more time and money.
The other problem is the possibility that you will be handing down a parts car if you have trouble getting motivated.
Peter
If you want to know the expected extra time and cost, I'd say about 3 more years and $15k more. Once you go that far, you just can't leave the small things that you otherwise would and end up replacing and repairing which means you spend a whole bunch more time and money.
The other problem is the possibility that you will be handing down a parts car if you have trouble getting motivated.
Peter
Last edited by lionelhutz; Nov 10, 2011 at 07:36 PM.

Le Mans Master


Joined: Apr 2007
Posts: 7,353
Likes: 72
From: Graceland in a Not Correctly Restored Stingray
Before starting any project, be sure to research what parts you will need, their cost and tools needed. Make a list of dis-assembly order to follow, take photos to help remember where everything goes and don't be afraid to post questions on the forum when stuck. If you don't do this homework first, you will experience momentum blockers and this is when your progress will be halted and motivation challenged. A good plan that leaves no surprises will keep a project on track and finished on time.

Pro
Joined: Sep 2011
Posts: 613
Likes: 11
From: EVANSVILLE Wisconsin
[QUOTE=Red 69;1579185661]Nope...you are not missing a thing. Everything you see under the car was done by me in my spare time and in about six months. I have forum members who will remember when I did it and about how long it took me. That said, I did not rebuild the TA's, but had a forum sponsor do them with off-set units. I was having the differential rebuilt for drag racing, so I had it powder coated. Next time I will use silver POR, as I have suggested in one of my posts.
Hey Red, I hope you didn't misinterpret my questioning your work. I had no doubt that you accomplished that work with the body on, I just need some more explanation on how, and you provided that so thank you. I have no idea what your ultimate goal for the car was, but looking at it I cannot imagine you didn't reach it. Truly amazing work and yes, you have motivated me to push forward and make my goal a reality. I've wanted a Vette since the beginning of my memories and finally made it reality. I really don't need to do a body off on my car for any reason other than my own personal understanding what makes a Vette tick, (and a dash of being really **** about it looking good). Anyway, hope my car turns out 1/2 as nice as yours!!
Hey Red, I hope you didn't misinterpret my questioning your work. I had no doubt that you accomplished that work with the body on, I just need some more explanation on how, and you provided that so thank you. I have no idea what your ultimate goal for the car was, but looking at it I cannot imagine you didn't reach it. Truly amazing work and yes, you have motivated me to push forward and make my goal a reality. I've wanted a Vette since the beginning of my memories and finally made it reality. I really don't need to do a body off on my car for any reason other than my own personal understanding what makes a Vette tick, (and a dash of being really **** about it looking good). Anyway, hope my car turns out 1/2 as nice as yours!!
Melting Slicks
Joined: Mar 2007
Posts: 2,520
Likes: 11
From: Hinckley OH
Hey Red 69. That is truly impressive work you did without removing the body. I can't imagine the difficulty getting into some of the places with the body on. I have the body off my '74 and it will be around two years by the time it's done. The key for me though is that I have a '76 to drive while I work on the '74, so I work on it when I'm motivated. Motivation is easy for me. All I need is a nice day when I don't have anything else that needs to be done. I'm retired so I get a lot of days when I'm motivated.
Instructor

Joined: Apr 2010
Posts: 215
Likes: 0
From: Lakeland FL
If uour frame is in decent shape and without much rust, it may not be in the interest of time to disassemble the car. If you are already planning on removing the TA's and fuel tank much is exposed. Go anead and remove the differential with its crossmember and you have much exposed. Believe me, doing a body on, following my procedure earlier in this thread will save you many hours labor and have the car back on the road for next season. The frame needs to be ground down with a rope type wire brush on an angle grinder and sand paper before painting. The work is labor intensive, but worth it for the time you save IMO. You can even replace the body mounts, if they need it, or even just the bolts. You can pick up new bolts only at ACE Hardware. While I was at it, I molded the wheel well areas to eliminate areas that held debris and made cleaning easier. All the paint I used was brushed on, below are a few photos. The first is the starting point and one #4 mount was completely rusted through and needed replacing. This is typical of a C-3 undersaide and what can be done with the body on.
[/IMG]
I had the IRS and components powder coated with chrome, but a much less expensive and easier alternative is POR silver paint. That is what I used on the fuel tank and was happy with the results. Color contrast keeps the underside interesting.
[IMG][/IMG]
[IMG][/IMG]
The wheel wells were molded and painted with PPG epoxy red primer with 1/3 more hardner for a semi gloss finish.
[IMG][/IMG]
The exhaust is installed and wrapped to protect the new composite spring. Subsequently, the entire exhaust was wrapped from the headers back to the mufflers to reduce under hood and interior temps and is very effective.
[IMG][/IMG]
I hope these photos are inspirational to those who are contemplating a body on approach to upgrades. There is no easy way out and plenty of elbow grease is required to make the metal and fiberglass squeaky clean and properly prepared for paint. Anything less will result in poor results.
[/IMG]I had the IRS and components powder coated with chrome, but a much less expensive and easier alternative is POR silver paint. That is what I used on the fuel tank and was happy with the results. Color contrast keeps the underside interesting.
[IMG]
[/IMG][IMG]
[/IMG]The wheel wells were molded and painted with PPG epoxy red primer with 1/3 more hardner for a semi gloss finish.
[IMG]
[/IMG]The exhaust is installed and wrapped to protect the new composite spring. Subsequently, the entire exhaust was wrapped from the headers back to the mufflers to reduce under hood and interior temps and is very effective.
[IMG]
[/IMG]I hope these photos are inspirational to those who are contemplating a body on approach to upgrades. There is no easy way out and plenty of elbow grease is required to make the metal and fiberglass squeaky clean and properly prepared for paint. Anything less will result in poor results.
I realize I'm getting to this thread way late but I just wanted to say thanks. I am planning on keeping my '75 Vette forever (I'm 46 so what does that mean, right?). I have been contemplating in the 2012 year, installing a two-post in my garage.
I'm blown away by the work you did and wanted to thank you for the inspiration. I do want to pull the wiring and replace it completely and thought I would talk myself into a frame off at that point.
We'll see. I just finished the interior (carpet, dash pad, tach repair, etc.).....with pics to follow very soon.
Maybe, I'll just let my wife drive her for a few weeks, fall in love with her the way I have and then see where that takes me.
Again....thanks....
Pro

Joined: Jan 2010
Posts: 533
Likes: 18
From: Boca Raton Florida
I'm in the middle of a long drawn out set of modifications to my '72 big block. Some of the work can be done with the car and frame together but a few things really need the body off the frame. I want to keep the project down to one bay of my garage so the body is only going to be lifted a few inches. I thought about jacks and blocks of wood but it just seemed like a disaster in the making. I work on the car by myself so I'd like it to be a safe environment, especially when my only hand is between the body and frame. Seemed to me the body mounts are the perfect lift points so I made some simple screw jacks from 1/2" all thread, three nuts, three fender washers, one lock washer and the original body mount (1/2" aluminum plate).

After jacking the body up about two inches, I pass the rod through the frame mount, aluminum body mount and one fender washer. Thread two nuts on the all-thread, stack up a fender washer and pass the end though the body mount where another fender washer, lock washer and nut go on. I tighten the nuts to clamp the all-thread to the body mount and use the bottom nut to raise the body.
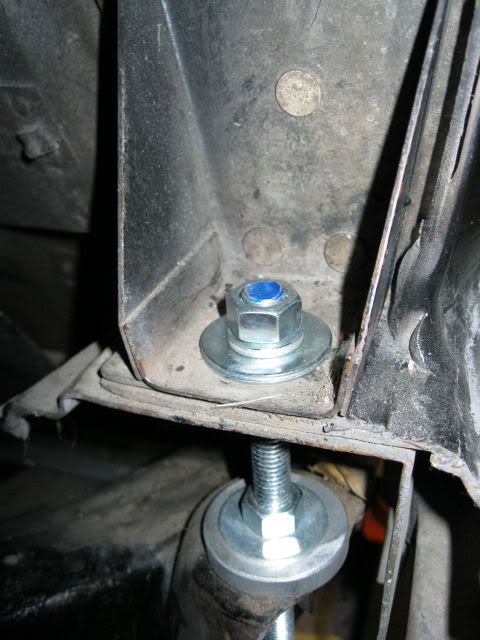
With four of these jacking points I can safely lift the body and not have it balanced on a stack of wooden blocks or jury-rigged saw horses. I still use hydraulic jacks to lift the body but I can quickly adjust each side of the car (the nuts can be turned by hand). I cut the three foot all-threads in half so there's nearly 18-inches of lifting capability. I doubt I'll need more than 8-inches.

It doesn't look like it's the right size but I used the white cardboard box to hold the all-thread up while I was threading the nuts on.
After jacking the body up about two inches, I pass the rod through the frame mount, aluminum body mount and one fender washer. Thread two nuts on the all-thread, stack up a fender washer and pass the end though the body mount where another fender washer, lock washer and nut go on. I tighten the nuts to clamp the all-thread to the body mount and use the bottom nut to raise the body.
With four of these jacking points I can safely lift the body and not have it balanced on a stack of wooden blocks or jury-rigged saw horses. I still use hydraulic jacks to lift the body but I can quickly adjust each side of the car (the nuts can be turned by hand). I cut the three foot all-threads in half so there's nearly 18-inches of lifting capability. I doubt I'll need more than 8-inches.
It doesn't look like it's the right size but I used the white cardboard box to hold the all-thread up while I was threading the nuts on.
Melting Slicks
Joined: Apr 2004
Posts: 2,008
Likes: 38
From: Space Coast Gator Territory
Bob, I like your ingenuity and approach and know there are many ways to skin the proverbial cat. For those interested in doing the body on, they should know the strength in the body is close to the bonding areas. Only one side should be raised at a time, if you are only interested in disconnecting a minimal number of parts. If you want to disconnect the front bumper, engine ground etc, you are basically doing a body off, with the body hovering the frame as Bob appears prepared to do. There are many ways as there are goals, so plan accordingly.
When I did mine, I kept the body mounting bolts in one side, but loosened, as I worked on the raised other side. Remember, as you raise the body there will be stress applied to areas not disconnected. The trick is to proceed slowly and practice stress management and not break anything. Look at it like a rubber band, or balloon that will stretch to a point, but exceed that and pop goes the weasel. Don't forget to disconnect the seat belt reinforcement cable and emergency brake cable before raising. Expect to raise the body three or four inches using this method and not any more. If you fail to disconnect parts mentioned, something can be broken. Think everything through and go slowly. The turtle in this case will always beat the hare.
There is a long bonding seam on the body floor, inside the frame rails and this is where jacks can be used. Never put a jack directly against fiberglass. I used an old folded towel to protect the fiberglass and placed a scrap of 2 X 8 lumber between it and a jack. Two jacks at two locations along the frame is required under the body. You don't want to bend or break anything. The rear bumper must be disconnected from the shock absorber in the frame (in rubber bumper cars); I believe there are four bolts per side. That is all I disconnected on my rubber bumper car, beside the seat belt cable, emergency brake and ground strap at the #1 body mount location, but my entire IRS was out, as was the fuel tank. A steel bumper car will most likely need to have the rear bumpers and brackets removed.
Using two jacking points enabled me to raise the area I was working on a little more than the other, one side at a time. There is obviously a limit on how high you can raise the body; I don't believe i went more than four inches. This is a seat of the pants type thing, so proceed with caution and feel how tight things become as you go. If you need to raise the body more than three or four inches, you will need to disconnect the steering rag joint and front bumper attachments as well. My idea of a body on is to disconnect as little as possible to get the job done. How much you need, or want to do is a personal thing and left to ones judgment. With these four inches, I was able to clean the rocker channels and frame and completely paint everything.
Safety is priority number one and can't be stressed enough. Always protect yourself and don't risk your safety. Working under a car is potentially dangerous; if you can't do it safely, don't do it. Good luck and best wishes to all in this hobby of improving an already cool car.
When I did mine, I kept the body mounting bolts in one side, but loosened, as I worked on the raised other side. Remember, as you raise the body there will be stress applied to areas not disconnected. The trick is to proceed slowly and practice stress management and not break anything. Look at it like a rubber band, or balloon that will stretch to a point, but exceed that and pop goes the weasel. Don't forget to disconnect the seat belt reinforcement cable and emergency brake cable before raising. Expect to raise the body three or four inches using this method and not any more. If you fail to disconnect parts mentioned, something can be broken. Think everything through and go slowly. The turtle in this case will always beat the hare.
There is a long bonding seam on the body floor, inside the frame rails and this is where jacks can be used. Never put a jack directly against fiberglass. I used an old folded towel to protect the fiberglass and placed a scrap of 2 X 8 lumber between it and a jack. Two jacks at two locations along the frame is required under the body. You don't want to bend or break anything. The rear bumper must be disconnected from the shock absorber in the frame (in rubber bumper cars); I believe there are four bolts per side. That is all I disconnected on my rubber bumper car, beside the seat belt cable, emergency brake and ground strap at the #1 body mount location, but my entire IRS was out, as was the fuel tank. A steel bumper car will most likely need to have the rear bumpers and brackets removed.
Using two jacking points enabled me to raise the area I was working on a little more than the other, one side at a time. There is obviously a limit on how high you can raise the body; I don't believe i went more than four inches. This is a seat of the pants type thing, so proceed with caution and feel how tight things become as you go. If you need to raise the body more than three or four inches, you will need to disconnect the steering rag joint and front bumper attachments as well. My idea of a body on is to disconnect as little as possible to get the job done. How much you need, or want to do is a personal thing and left to ones judgment. With these four inches, I was able to clean the rocker channels and frame and completely paint everything.
Safety is priority number one and can't be stressed enough. Always protect yourself and don't risk your safety. Working under a car is potentially dangerous; if you can't do it safely, don't do it. Good luck and best wishes to all in this hobby of improving an already cool car.
Pro
Joined: Jan 2010
Posts: 533
Likes: 18
From: Boca Raton Florida
If you want to disconnect the front bumper, engine ground etc, you are basically doing a body off, with the body hovering the frame as Bob appears prepared to do. There are many ways as there are goals, so plan accordingly.
Safety is priority number one and can't be stressed enough. Always protect yourself and don't risk your safety. Working under a car is potentially dangerous; if you can't do it safely, don't do it. Good luck and best wishes to all in this hobby of improving an already cool car.
Safety is priority number one and can't be stressed enough. Always protect yourself and don't risk your safety. Working under a car is potentially dangerous; if you can't do it safely, don't do it. Good luck and best wishes to all in this hobby of improving an already cool car.
I didn't plan to do a frame-off. I pulled the radiator to replace the drain petcock and found the radiator support was held together by paint. While I had it out, the area around the support was accessible so I cleaned it up and sprayed some paint.
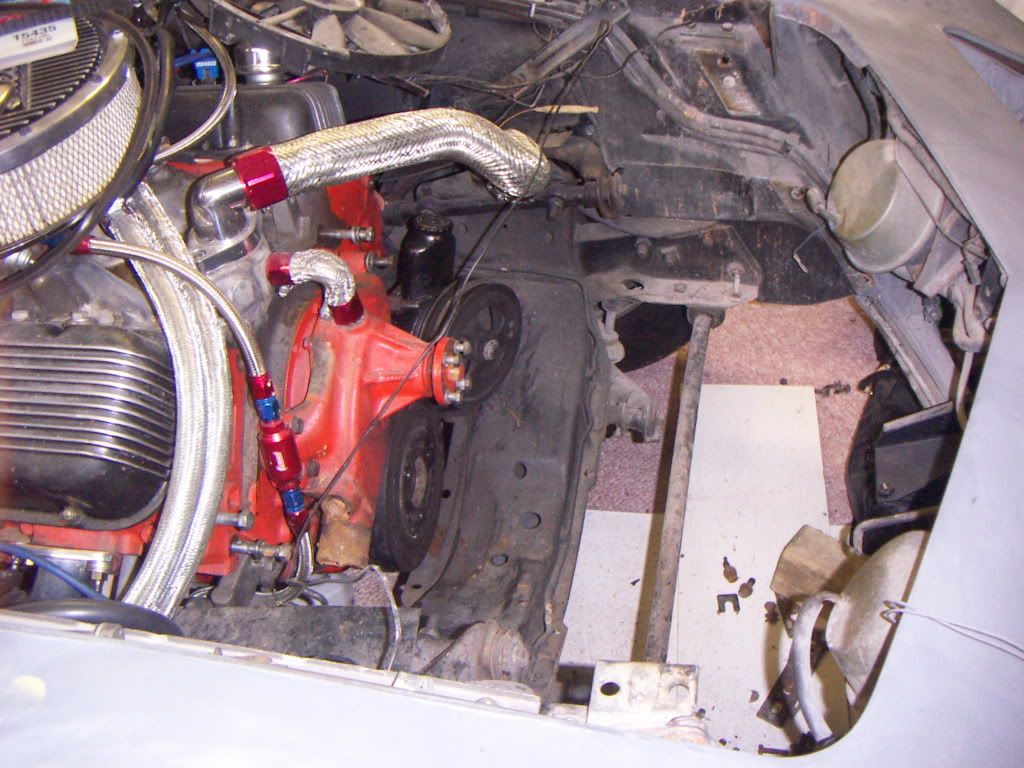
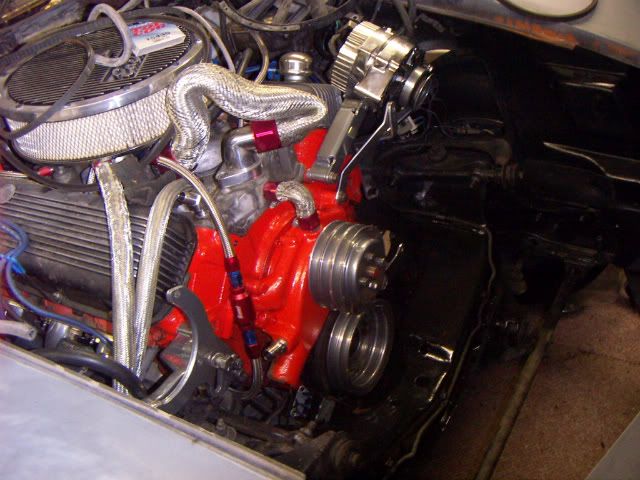
Of course, the removable crossmember looked shabby so it came out and got painted. Brake fluid ruined the paint on the driver side frame so I touched it up and noticed how bad the transmission crossmember looked.
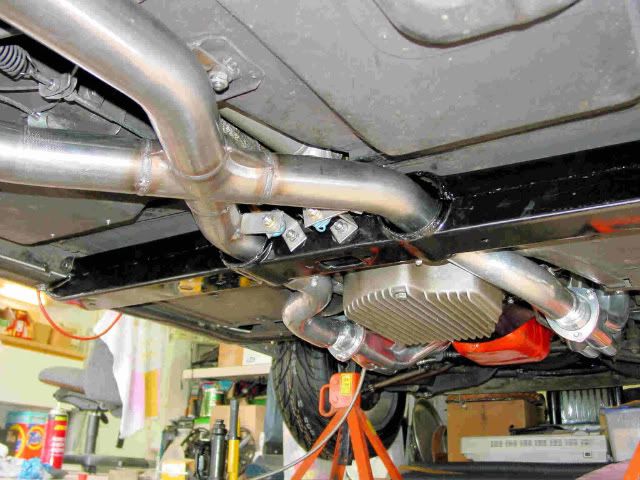
Had to change the differential fluid so it made sense to drop the whole thing and of course it couldn't go back in without being painted.
Once you have a patchwork quilt of shiny and dirty parts, you're past the point of just walking away. Stainless brake lines went in with no problem but the fuel lines are a different story, Body has to be lifted or the fuel lines have to be cut and spliced. As I was staring at the problem, I remembered wanting to replace the solid body mounts on the '72 with rubber or poly so the lifting process was started. Bumpers and braces were already off and the e-brake cable had already been removed once (time to order a stainless cable and replace it anyway).
With one side balancing on the bottle jacks and 2x6, I found myself stacking blocks of wood between the frame and body. By the time the frame was exposed, the stack was not very safe looking. That's when I came up with the jackshaft idea...
Melting Slicks
Joined: Apr 2004
Posts: 2,008
Likes: 38
From: Space Coast Gator Territory
Thanks....I got a chuckle outta your post, as I see you caught the bug as well, it is contagious. As other may find out, that is the way it goes and something to be considered before starting a car project. You did a super job and kept another BB C-3 Vette for others to drool over!!
BTW...Bob, I am up I-95 from you on the east side of the swamp, between Malbourne and Cocoa.
BTW...Bob, I am up I-95 from you on the east side of the swamp, between Malbourne and Cocoa.
Last edited by Red 69; Dec 1, 2011 at 06:00 PM.
Instructor
Joined: Mar 2009
Posts: 209
Likes: 1
From: Denver CO
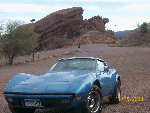
Heres what my body mount replacement turned into. Go big or go home... it wasn't that much more work to take the body off. I called up some buddies, grabbed a 30 rack, and we had a little body removal party.
Pics:


Good luck...
-Danny
Pics:
Good luck...
-Danny
Instructor
Joined: Apr 2010
Posts: 215
Likes: 0
From: Lakeland FL
I'm just going to say it. "I love these posts!!!!" Lots of great pics.....lots of strategy discussion.
I want to do a frame off so bad my hands are shaking. However, I love driving "the mistress" too. In a few years I will have accumulated the knowledge, tools, and $$$ (gotta have that) to make this happen. The kids will be grown and gone, I hope and my wife will have settled into her role as "C3 widow" as well.
I have body fitment issues in the front that, in the meantime, I am going to confront. With each project resolution, from gas door bumper installation, to electric fan conversion, to interior redo, I fall more in love with her.
Best regards to one and all.
Last edited by kirt8548; Dec 2, 2011 at 11:24 AM.
Pro
Joined: Jan 2010
Posts: 533
Likes: 18
From: Boca Raton Florida
Thanks....I got a chuckle outta your post, as I see you caught the bug as well, it is contagious. As other may find out, that is the way it goes and something to be considered before starting a car project. You did a super job and kept another BB C-3 Vette for others to drool over!!
BTW...Bob, I am up I-95 from you on the east side of the swamp, between Malbourne and Cocoa.
BTW...Bob, I am up I-95 from you on the east side of the swamp, between Malbourne and Cocoa.
I used to spend a fair amount of time in the '80s autocrossing at TiCo airport and shopping at Eckler's annual weekend. A bit slower pace than here in the South Bronx -- sorry -- Florida.