
1976 Stingray DIY Project w/ pics
 10-18-2011, 07:31 PM
#1
8th Gear

Thread Starter

Member Since: Aug 2011
Posts: 8
Likes: 0
Received 0 Likes
on
0 Posts
This is my first post on this site and I want to thank everyone for the large amount of info I have already received just by reading your posts.
This is my first project car.
I have worked on various parts of other newer vehicles in the past but never on anything that needed such thorough restoration.

The Good:
-Matching numbers.
-The price.
-Chassis is a little dirty but decent shape.
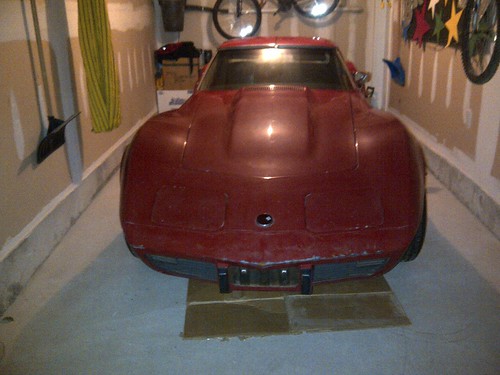
-Body is beautiful. Targa. Needs paint and seals but that is all.
-Engine is a 350, 4 barrel with 75k miles, starts and runs well.
-A/C
-Auto-trans. Understandably a bad thing depending on driver.
-New tires.
-Chromed wheel covers, air intake, distributer cover, valve covers.
The Bad:
-I have a single garage and limited tools.
-No Brakes, think it�s the lines because the emergency brake works fine.
-Drivers side lock mechanism and exterior handle broken, have replacement for lock. Windows sluggish and probably need readjusting along with doors.
-New door panels needed, previous owner ripped these ones apart trying to open doors without functional locks.
-Rear suspension is shot, the leaf is almost concave and the absorbers must be done by now as well.
-Differential: leaking from the left yoke and carrier cover is cracked right where the spring mounts. I was told that the previous owner had it towed onto a flatbed by hooking it up to the leaf. L
-Rust on drivers side floor pan.
-3 small leaks of transmission fluid, oil and coolant. Pretty sure the gaskets are to blame, maybe a water pump replacement is also needed (the coolant leak seems to be from the weep hole).
-Odometer and gauge cluster are non-functional.
-Lots of clean up on undercarriage.
I am thinking I will tackle this in priority of estimated difficulty.
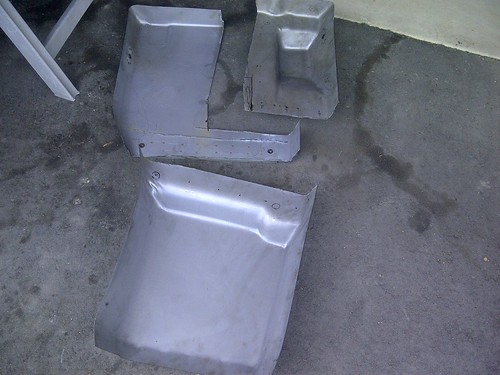
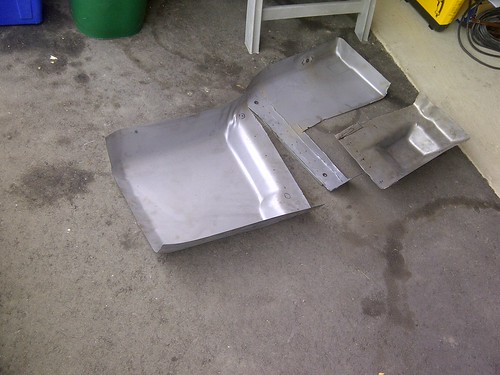
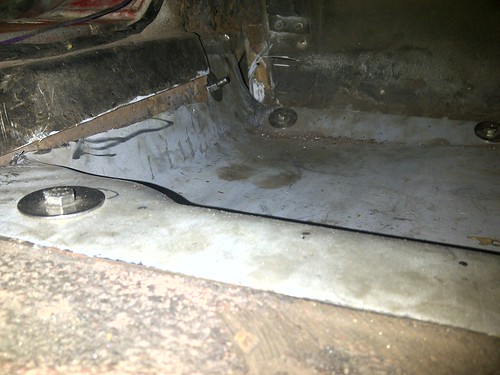
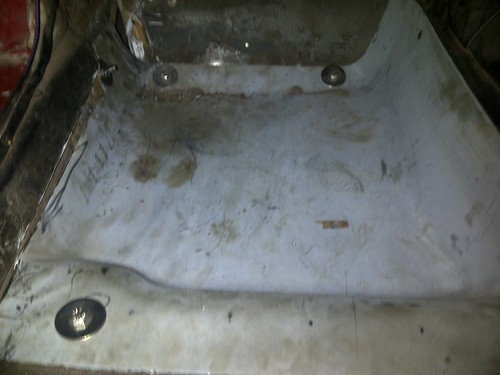
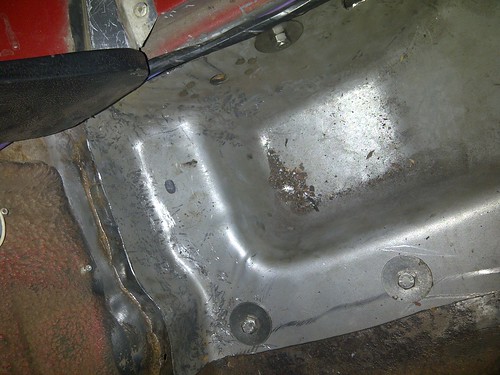
Having almost no body experience, I really wanted to get the floor pan rust-free. I could see the floor of my garage in several spots under the pedals and back where the seatbelt mounted. They weren�t small enough to just patch so the previous owner had purchased a full floor pan which I had decided would be cut into two pieces so I could retain the integrity of the original floor.
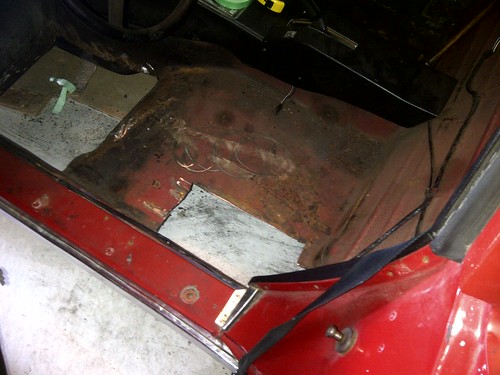
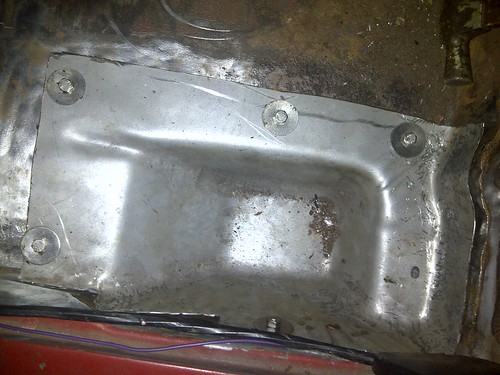
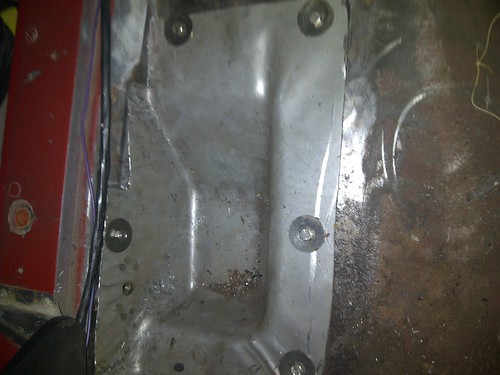
I cut out the rusted floor and made room for the new pan(s). The one piece pan I had received with the car also had to be cut into shape. I decided just to bolt the newly cut pans into place suspending them on the middle and sides of the original floor. I figure that I can have these welded in professionally, given my lack of expertise in this area. Right now I am comfortable monitoring the seems and bolts regularly, once it is driveable.
I am now in the process of drilling out the whole for the seat to mount and then installing the seatbelt. Unfortunately, the previous seatbelt bolt was rusted so I probably will grind off and replace. Right now I have it suspended in the trunk attached to a small piece of the old rusted floor pan.
My next task after seatbelts and seats will most likely be removing the spare tire carrier and then ordering parts for the rear end.
My goal on this car is to spend as little money as possible to have a decent corvette for next summer. I am not worrying about carpets or other aesthetics (some gauges, ripped leather, door panels, paint) until the main work is done and it is road-worthy.
This is my first project car.
I have worked on various parts of other newer vehicles in the past but never on anything that needed such thorough restoration.
The Good:
-Matching numbers.
-The price.
-Chassis is a little dirty but decent shape.
-Body is beautiful. Targa. Needs paint and seals but that is all.
-Engine is a 350, 4 barrel with 75k miles, starts and runs well.
-A/C
-Auto-trans. Understandably a bad thing depending on driver.
-New tires.
-Chromed wheel covers, air intake, distributer cover, valve covers.
The Bad:
-I have a single garage and limited tools.
-No Brakes, think it�s the lines because the emergency brake works fine.
-Drivers side lock mechanism and exterior handle broken, have replacement for lock. Windows sluggish and probably need readjusting along with doors.
-New door panels needed, previous owner ripped these ones apart trying to open doors without functional locks.
-Rear suspension is shot, the leaf is almost concave and the absorbers must be done by now as well.
-Differential: leaking from the left yoke and carrier cover is cracked right where the spring mounts. I was told that the previous owner had it towed onto a flatbed by hooking it up to the leaf. L
-Rust on drivers side floor pan.
-3 small leaks of transmission fluid, oil and coolant. Pretty sure the gaskets are to blame, maybe a water pump replacement is also needed (the coolant leak seems to be from the weep hole).
-Odometer and gauge cluster are non-functional.
-Lots of clean up on undercarriage.
I am thinking I will tackle this in priority of estimated difficulty.
Having almost no body experience, I really wanted to get the floor pan rust-free. I could see the floor of my garage in several spots under the pedals and back where the seatbelt mounted. They weren�t small enough to just patch so the previous owner had purchased a full floor pan which I had decided would be cut into two pieces so I could retain the integrity of the original floor.
I cut out the rusted floor and made room for the new pan(s). The one piece pan I had received with the car also had to be cut into shape. I decided just to bolt the newly cut pans into place suspending them on the middle and sides of the original floor. I figure that I can have these welded in professionally, given my lack of expertise in this area. Right now I am comfortable monitoring the seems and bolts regularly, once it is driveable.
I am now in the process of drilling out the whole for the seat to mount and then installing the seatbelt. Unfortunately, the previous seatbelt bolt was rusted so I probably will grind off and replace. Right now I have it suspended in the trunk attached to a small piece of the old rusted floor pan.
My next task after seatbelts and seats will most likely be removing the spare tire carrier and then ordering parts for the rear end.
My goal on this car is to spend as little money as possible to have a decent corvette for next summer. I am not worrying about carpets or other aesthetics (some gauges, ripped leather, door panels, paint) until the main work is done and it is road-worthy.
 10-18-2011, 07:47 PM
#2
Drifting

you have bought the best looking year corvette ever made and now that it is off the wall you should be well on your way.did you figure out where the leak was that caused the rust?since you are like me and don't want to spend much $ i would try to repair as much of the interior i could,that stuff is big $.don't forget the u-joints too.good luck!
10-19-2011, 05:52 AM
#3
Racer

Member Since: Sep 2009
Location: London
Posts: 310
Likes: 0
Received 0 Likes
on
0 Posts
Nice! Good luck with your project! My car is also a 76, not much power compared to other years but still enough to have fun IMO.
"-No Brakes, think it’s the lines because the emergency brake works fine. "
Just wanted to point out that the two are independent! standard brakes are the rotors and calipers, E brake is like a drum brake inside the rear wheel hubs... The fact that the E brakes work tells you nothing about the standard brakes!
10-19-2011, 07:59 AM
#4
Team Owner

Member Since: Sep 2006
Location: Westminster Maryland
Posts: 30,173
Likes: 0
Received 2,878 Likes
on
2,515 Posts

Hi vr,
WELCOME!
It looks and sounds like you're in for some big fun! Having a plan, and thinking about what you're going to be doing, is a great idea when working on an old Corvette.
There are 2 publications you may want to consider buying. The 76ASSEMBLY INSTRUCTION MANUAL, (AIM); it was used on the production line in St. Louis and has a tremendous amount of information in it. Also, the GM CHASSIS SERVICE MANUAL,(CSM); this was used by the service techs at the dealerships. It will be a big help when working on your car. Both are well worth their cost.
Good Luck!
Regards,
Alan
10-29-2011, 06:50 PM
#5
8th Gear
Thread Starter
Member Since: Aug 2011
Posts: 8
Likes: 0
Received 0 Likes
on
0 Posts
Sorry I haven't updated lately. Been gearing up for this rear-end project.
I patched up the front of the floor pan as well, right in the corner with some fibreglass. That seems to be where the leakage was coming in, probably funeling from the wiper cowel area. Also installed the seats and seat belt so it feels a lot more like a car now
I will post pics of the interior soon. Just want to finish up the fibreglass work first so I am not posting endless amounts.
Also, appreciate the heads up on the emergency brake being located in the drum. My daily right now is a vw and the system on that thing is completely different.
It took two days to get the spare tire carrier off and it's definately not going back on. The rear bolts over the exhaust weren't fun at all to remove. At one point I was considering just cutting them off.
Looks like my rear spring is flat, no curve whatsoever and the two points on the carrier cover have completely sheared off, so I have to order that in before I get started on taking the cross member off.
Not thinking about anything but getting the diff cover and spring done. I figure if I think about it one task at a time I won't get overwhelmed by how much work needs to get done. Have a few questions but I will wait until I get to that point in the project to ask them.

 11-01-2011, 02:44 AM
#7

Hey Canuck,
There is a shop in Burnaby, Corvette Specialties that sells a Corvette assemble manual that will help you with you present and future repairs. Gotta love that 1976 Vega Steering Wheel, must have been cut backs from the parts department to use up old stock from Vega station wagons. The uniqeness of Corvettes will stand out in time.
I have been told lower control arms on C3's are the same for Chevelles. Not gospel but just what I have been told. Good luck to you on your enjoyable Corvette.
11-01-2011, 08:49 AM
#8
Drifting

Member Since: Aug 2010
Location: Kanuckistan
Posts: 1,617
Received 127 Likes
on
68 Posts
2022 C3 of the Year Finalist - Modified

A lot in common we have : 76 restoration in Canada in a tiny garage.
Feel free to check my thread, maybe you'll find some tips for your project.
Looking good so far, keep us posted.
Feel free to check my thread, maybe you'll find some tips for your project.
Looking good so far, keep us posted.
 11-02-2011, 12:15 AM
#10
Melting Slicks

Congratulations on your purchase!
IMHO, aside from the chrome bumpers, truth is the 76 is pretty much the same as the previous ones back to 68 for much less money. Big C3 bang for the buck I say!
On my floor pans with holes, I just fiberglassed the whole floor pan area over the holes, I figured the previous years had all fiberglass floor pans, so it must be ok? Although, it looks like you are past that it now.
Couple of thoughts for you. I was in the same boat, do this as a low budget exercise. First get some knowledgeable mechanic to help you prioritize the work needed to get it safe to drive. I splurged and replaced the seat belts too. And, check ebay and around for used parts and good deals. Autozone has cheap calipers with a lifetime warranty too. And finally and the best part is this forum is the best ever with great and knowledgeable people eager to help.
Best of luck to you and have fun!

 11-02-2011, 10:50 AM
#12
Racer

I worked on my '76 about 4 years ago in a 1 car garage. Bought fairly cheap, body and paint very good, ran OK, no major problems. 5 grand later, most problems fixed, no major repairs needed, runs better, more work to do!! Just to let you know what you're getting into. It's a lot like having a boat! Good Luck !
11-02-2011, 11:16 AM
#13
Safety Car

Look'in good and congrats on the great work.
I saw a couple of your threads Denpo and you've done a lot of work. I'm going to be starting my resto next year and to be honest, I'm not really looking forward to it, but I've got to do what I've got to do.
I saw a couple of your threads Denpo and you've done a lot of work. I'm going to be starting my resto next year and to be honest, I'm not really looking forward to it, but I've got to do what I've got to do.
11-02-2011, 11:25 AM
#14
Thought I would give my 2 cents worth. While you have the diff cover off it would be a very good time to replace the side yoke seals, check to see whether the side yokes need replacing, most of the time the shafts are wore down to the snap ring slot. If you order rebuilt or new ones, make sure you get the hardened tipped ones as this will prevent them from a repeat. Keep the pics coming!
PS. You may want to concider pop riviting the floor pan pieces in place as the large heads of those bolts may be felt and seen through the carpet.

PS. You may want to concider pop riviting the floor pan pieces in place as the large heads of those bolts may be felt and seen through the carpet.
11-02-2011, 08:03 PM
#15
Drifting
Member Since: Aug 2010
Location: Kanuckistan
Posts: 1,617
Received 127 Likes
on
68 Posts
2022 C3 of the Year Finalist - Modified
It's a long road, but knowing people's watching is a great source of energy when sometimes you feel a little down.
Looking forward to follow your thread.
11-04-2011, 05:57 PM
#16
Safety Car
I've always wondered what the average hours went into a C3 body off resto. I know that there are many variables based on the condition of the car but taking an average....... I'll take a guess at maybe..........600 hrs? Any thoughts?
11-04-2011, 10:34 PM
#17
Le Mans Master

Member Since: Mar 2008
Location: Oxford MA-----You just lost the game!!!!
Posts: 5,948
Likes: 0
Received 62 Likes
on
52 Posts
Hi vr,
WELCOME!
It looks and sounds like you're in for some big fun! Having a plan, and thinking about what you're going to be doing, is a great idea when working on an old Corvette.
There are 2 publications you may want to consider buying. The 76ASSEMBLY INSTRUCTION MANUAL, (AIM); it was used on the production line in St. Louis and has a tremendous amount of information in it. Also, the GM CHASSIS SERVICE MANUAL,(CSM); this was used by the service techs at the dealerships. It will be a big help when working on your car. Both are well worth their cost.
Good Luck!
Regards,
Alan
WELCOME!
It looks and sounds like you're in for some big fun! Having a plan, and thinking about what you're going to be doing, is a great idea when working on an old Corvette.
There are 2 publications you may want to consider buying. The 76ASSEMBLY INSTRUCTION MANUAL, (AIM); it was used on the production line in St. Louis and has a tremendous amount of information in it. Also, the GM CHASSIS SERVICE MANUAL,(CSM); this was used by the service techs at the dealerships. It will be a big help when working on your car. Both are well worth their cost.
Good Luck!
Regards,
Alan

I don't have a Chassis Service Manual, so I can't comment on it, but the AIM is invaluable, it literally shows you how every single nut and bolt is used.
Scott