


Plenum Valve- Non-A/C to A/C Conversion

Thread Starter
Drifting


Joined: Aug 2005
Posts: 1,443
Likes: 65
From: Wauconda IL
I am in the process of assembling the pieces to install the factory GM A/C into my non-A/C 69' Coupe.
I've got most of the stuff lined up but my biggest question revolves around the plenum valve (in the upper cowl, not the kick panel) and if anyone out here has actually attempted installing one in a non-A/C car?
I know the trend is to go to the Vintage Air type installation but I'm a glutton for punishment and I want to install the original system that the old General installed back in the day, complete with R-12.
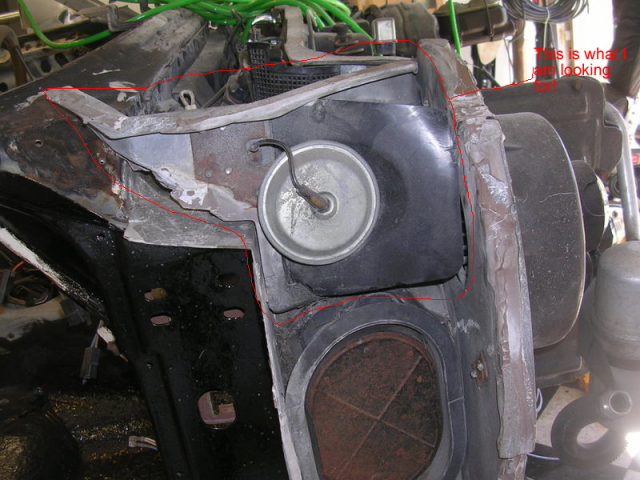
It looks like the plenum valve requires a filler panel (which I have on order) but it seems that it can only be installed with the right fender removed- Can anyone elaborate or share any pictures/war stories?
Is there any way to install this piece otherwise (even if I cut it in 2 somehow and then glass it in place)?
The rest of the install seems relatively straight forward (as long as you have all the bits), this appears to be the only area that isn't quite 'bolt-on'.
Any pictures or advice would be most appreciated.
Thanks!
Elm
I've got most of the stuff lined up but my biggest question revolves around the plenum valve (in the upper cowl, not the kick panel) and if anyone out here has actually attempted installing one in a non-A/C car?
I know the trend is to go to the Vintage Air type installation but I'm a glutton for punishment and I want to install the original system that the old General installed back in the day, complete with R-12.
It looks like the plenum valve requires a filler panel (which I have on order) but it seems that it can only be installed with the right fender removed- Can anyone elaborate or share any pictures/war stories?
Is there any way to install this piece otherwise (even if I cut it in 2 somehow and then glass it in place)?
The rest of the install seems relatively straight forward (as long as you have all the bits), this appears to be the only area that isn't quite 'bolt-on'.
Any pictures or advice would be most appreciated.
Thanks!
Elm
Team Owner


Joined: Jun 2000
Posts: 38,923
Likes: 1,482
From: Southbound
Cruise-In II Veteran
The assembly instruction manual (AIM) shows the complete factory AC installation, including the flapper door panel you will need.
I do not think the panels are being reproduced.

I do not think the panels are being reproduced.
Last edited by Easy Mike; Sep 11, 2012 at 11:23 AM.
Thread Starter
Drifting
Joined: Aug 2005
Posts: 1,443
Likes: 65
From: Wauconda IL
A reproduction filler panel is available through several sources (an NOS one is currently listed on ebay as well) and I have a good, used OEM panel on the way-
From my understanding, the upper plenum valve is an A/C only feature.
Non-A/C cars have the oval kick panel vent (same as A/C cars) and then a smaller, round vent further up in the cowl for the 'Astro Ventilation' outlets in the lower dash.
This is not the same as the A/C plenum vent.
The AIM manual is only good to a point.
I would really need to see actual pictures of the installation to have it make total sense.
Elm

Racer


Joined: Jul 2008
Posts: 353
Likes: 30
From: warwick rhode island
installing the door in a non - a/c car is do-able. i had to cut mine into two pieces though. i tried to find a way to slip it in and turn and position it without cutting, but i couldn't. below you will find my assembly sequence.
where the frame goes under the fender
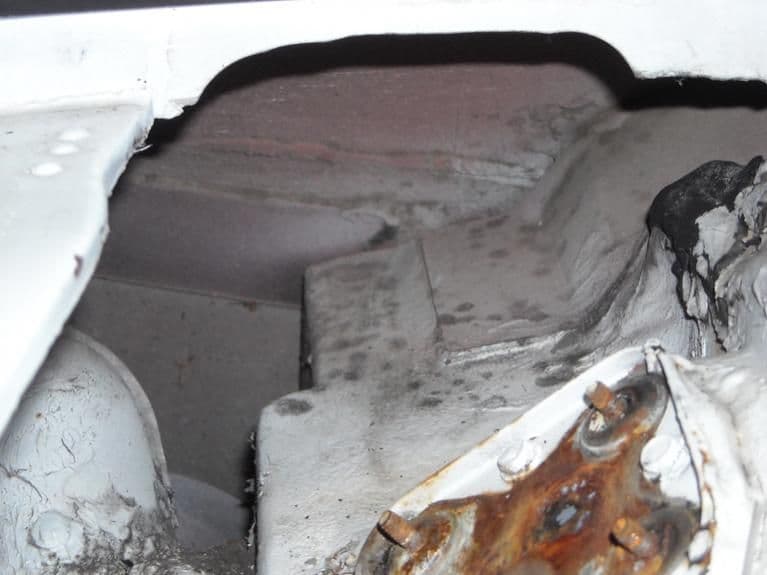
the upper astro vent intake must be removed. i cut it off with a saw blade. don't forget to seal the hole where the vent was. i made a disk and sealed it in over the hole.
[IMG] [/IMG]
this how i cut the frame to get it into place
[IMG] [/IMG]
this is how i attach the two frame pieces together. i went with screws in sheet metal plates in case i wanted to remove it at some future point.
[IMG] [/IMG]
front view of split frame and air door. the door clears the screws.
[IMG] [/IMG]
back view of the split frame and air door. again clearance is not a problem. look at the four nuts on the right side. they were a pain in the *** to get in after the frame was in place. if you make a small plate that rivets to the frame and is tapped for those screws it will make you life easier. getting your hand behind the frame to holds the nuts is #@% difficult.

the frame positioned in place. i think i got a very good fit.

another view of the frame in place. you can see my way cool auto zone metal a/c blower.

i used polyurethane foam to seal the frame in place. the factory uses bonding putty. i used the foam so i could cut it back out if i wanted to remove the assembly later. foam is easy to trim with a knife after it cures.
[IMG] [/IMG]
the plenum air door installed in the open position
[IMG] [/IMG]
the plenum air door installed in the closed position
[IMG] [/IMG]
since my 69 vert was a non a/c car i needed to modify my right kick panel. this is from my spare set. don't want to destroy original parts. the screw holes to mount the vacuum actuator for the foot well door are already there from the factory. the screws are sheet metal type. sorry i don't remember the size.
[IMG] [/IMG]
not a bad project. less than a day total time.
where the frame goes under the fender
the upper astro vent intake must be removed. i cut it off with a saw blade. don't forget to seal the hole where the vent was. i made a disk and sealed it in over the hole.
[IMG]
this how i cut the frame to get it into place
[IMG]
this is how i attach the two frame pieces together. i went with screws in sheet metal plates in case i wanted to remove it at some future point.
[IMG]
front view of split frame and air door. the door clears the screws.
[IMG]
back view of the split frame and air door. again clearance is not a problem. look at the four nuts on the right side. they were a pain in the *** to get in after the frame was in place. if you make a small plate that rivets to the frame and is tapped for those screws it will make you life easier. getting your hand behind the frame to holds the nuts is #@% difficult.
the frame positioned in place. i think i got a very good fit.
another view of the frame in place. you can see my way cool auto zone metal a/c blower.
i used polyurethane foam to seal the frame in place. the factory uses bonding putty. i used the foam so i could cut it back out if i wanted to remove the assembly later. foam is easy to trim with a knife after it cures.
[IMG]
the plenum air door installed in the open position
[IMG]
the plenum air door installed in the closed position
[IMG]
since my 69 vert was a non a/c car i needed to modify my right kick panel. this is from my spare set. don't want to destroy original parts. the screw holes to mount the vacuum actuator for the foot well door are already there from the factory. the screws are sheet metal type. sorry i don't remember the size.
[IMG]
not a bad project. less than a day total time.
Thread Starter
Drifting
Joined: Aug 2005
Posts: 1,443
Likes: 65
From: Wauconda IL
oldboat,
Thank you for the tutorial!
I apologize for the delay in responding- I don't know how I could have missed your detail reply. My apologies.
Looks like I have my work cut out for me this winter
Thanks again!
Elm
Thank you for the tutorial!
I apologize for the delay in responding- I don't know how I could have missed your detail reply. My apologies.
Looks like I have my work cut out for me this winter
Thanks again!
Elm
Thread Starter
Drifting
Joined: Aug 2005
Posts: 1,443
Likes: 65
From: Wauconda IL
Is there any chance of fitting it in one piece by going through the right side kick panel vent from the inside or is that opening just way too small?
I hate to have to cut up this expensive chunk of fiberglass but if it's the only way, it's the only way-
Thanks again!
Elm
I hate to have to cut up this expensive chunk of fiberglass but if it's the only way, it's the only way-
Thanks again!
Elm
Corvette Stories
The Best of Corvette for Corvette Enthusiasts

Top 10 Most Expensive Corvettes Ever Sold on Bring A Trailer
Brett Foote
10 Things Every Corvette Owner Needs (2026 Edition)
Michael S. Palmer
8 Most "Only Corvette Owners Understand" Quirks and Problems
Pouria Savadkouei
10 Reasons the C6 Z06 is Still A Performance Benchmark After 20 Years
Joe Kucinski
How Much Horsepower Every Corvette Engine "LOST" in 1972
Joe Kucinski
Top 10 DOs and DON'Ts for Protecting Your Convertible Top!
Michael S. Palmer
Top 10 Most Explosive Corvettes Ever Made: Power-to-Weight Ratio Ranked!
Joe Kucinski
150 hp to 1,250 hp: Every Corvette Generation Compared by the Specs That Matter
Joe Kucinski
8 Coolest Corvette Pace Cars (and Replicas) of All Time
Verdad Gallardo
Racer
Joined: Jul 2008
Posts: 353
Likes: 30
From: warwick rhode island
i don't see anyway you could slide it in from the foot vent area. it is just too big. if you look at easy mike's pic toward the top you can see the relative size of the foot vent opening compared to the piece you have to install. sure was easy at the factory without the fender in the way.
i tried every way i could think of to get it in in one piece. i just couldn't do it. after you take off the wiper door and linkage you can try getting it in. i may well have missed something. let us know what you end up doing.
i know just how you feel about cutting a perfectly good part in half. i just couldn't think of another solution.
Thread Starter
Drifting
Joined: Aug 2005
Posts: 1,443
Likes: 65
From: Wauconda IL
For grins, I made a cardboard template of the kick panel vent hole, using an old door as a template. I was able to get the frame through the opening easy enough but the question remains as far as how much room there is on the other side to actually fit the part in and swing it into position between the cowl and fender.
I'll post my results when I finally tear into this.
I also just picked up a cheap, used plenum frame and door assembly off ebay that I will use as the test piece-
If nothing else, I can figure out if it will fit in one piece and if not, I can practice where it's best for me to make cuts before I start hacking on the new piece.
Thanks again!
Elm