


C3 Headlight Door Alignment

Thread Starter
Cruising

Joined: Mar 2012
Posts: 11
Likes: 3
From: Long Island NY
I vote for buying the AIM too. The pictures alone are worth it (which is good, because the text is almost useless). I went through mine and created an index of my own, noting the key words for each page and putting them in a Microsoft Word table so I can search on the key words quickly.

7th Gear
Joined: Jun 2014
Posts: 7
Likes: 1
From: Trenton TN
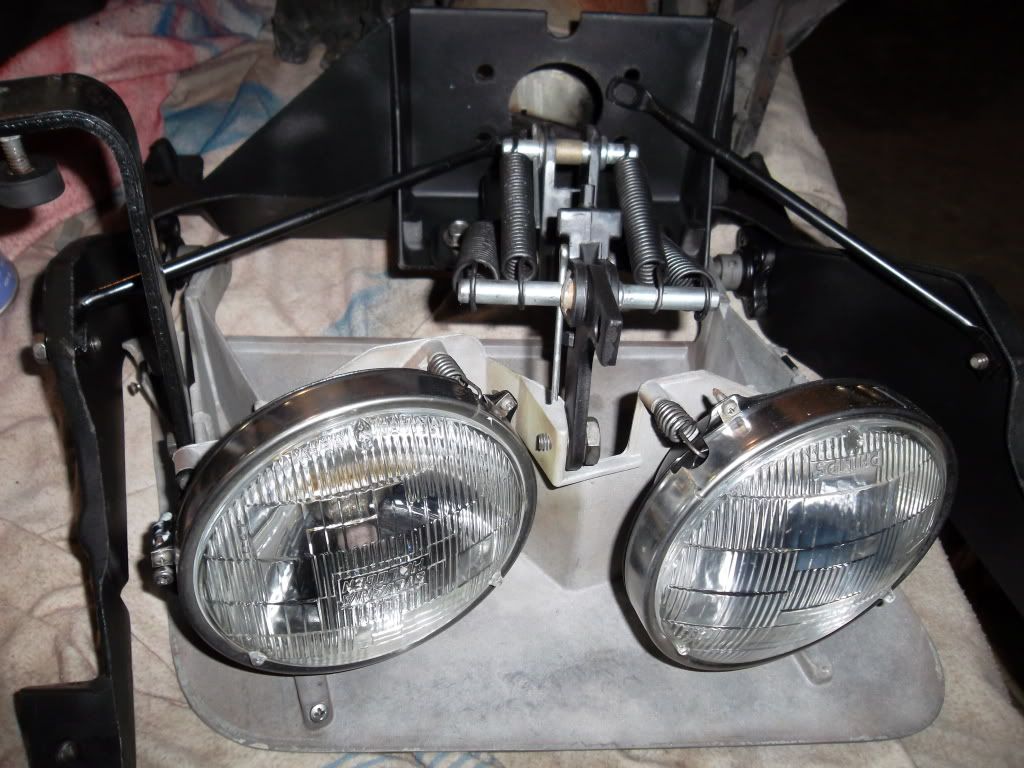
Sharing the fruits of my hard labor. I've seen a number of incomplete and/or erroneous posts on this subject, so I reasoned out the process and tested it on my 76. Here are the steps in the correct order. Do this with the engine not running and no vacuum in the reservoir, or you could get pinched fingers (or worse). Remove the grill (5 screws) so you can reach the mechanism from the front as well as from underneath.
1. If a new installation, center the headlight door in the opening by adjusting the pivot points and the collars (on the hinge posts) at the upper rear corners of the assembly. Hold the door in the closed position and adjust the pivot points until the corners of the door are aligned with the corners of the opening. Don't worry about the final open/closeed height at this point - just be sure the door is centered and on the same plane as the surrounding bodywork when held in the closed position. Tighten the pivot point mounting bolts and verify the alignment is still correct in the closed position.
2. Loosen the 3 bolts on the bracket in front of the vacuum actuator (NOT the ones on the vacuum actuator itself) - the ones that locate the bracket holding the linkage with the springs and the clevis (remove the clevis to get at the center bolt). To remove the clevis, first remove the 2 springs that attach to the clevis pin, then the cotter pin and the clevis pin itself. The other 2 springs can stay attached.
3. Adjust the full open height with the adjusting bolt - the one on the arm that contacts the headlight frame when full open. Out is lower, in is higher. Use a long socket extension and a universal joint to reach the adjusting bolt through the grill opening. Make the bottom of the bezel flush with the front edge of the opening.
4. Actuate the mechanism by hand so you can feel the "over center" condition when the door is fully open and the linkage fully extended forward. Move the bracket until you get a slight interference fit - the linkage gently, but firmly, "snaps" forward into the over center position when you actuate it manually. Tighten the 3 bolts loosened in step 2.
5. Adjust the clevis by turning it on its shaft until the clevis pin (the rod that goes through the clevis, and where the springs mount) is all the way to the front of the curved slot it rides in. Remove the clevis pin and turn the clevis 1 to 1 1/2 turns counterclockwise to give a slight interference fit at the end of its travel in the open position. The clevis must extend enough to push the linkage into the over center position, which is what locks the door in the open position. The interference fit ensures this locking, and prevents rattles too.
6. Last step - adjust the closed position with the small hex bolt - this is in the center of the linkage, and points down at the ground when the door is closed. The hex is small - the same size as the diameter of the bolt itself. Adjust so the front edge of the door is about 1/32" inch lower than the front edge of the opening. This will minimize wind noise and water entry.
7. Test. The door should snap into full open firmly, with a click, but not a thud. If it makes a loud thud or a bang, re-do step 4. The thud means the over center position is too tight, and this will put too much strain on the linkage, damaging it over time.
Note: It goes without saying, but just in case, you should use a good lubricant on all pivot points and moving parts in the linkage.

Team Owner


Joined: Jan 2008
Posts: 30,896
Likes: 1,190
From: chicago
I did the full rebuild. The bushings are only $28 at Paragon and do both sides. I replated the pins (in house, I have the Caswell kit). When I took them apart they had been inop for a long time from the appearance of things. The only bushing that was seized was on one of the pins where the plating failed. The rest were hard and brittle, but still tight and smooth operating. Seemed like a good system based on that and because we are going for the restoration look, opted to do the full restore and not grease the pivot points.
One thing about lubing. On the pivots at the three bolt hinges, the pin and the collar were unprotected steel, vs plating on other pins. From that and examining the hinge it appears to me that it was intentional that they be allowed to rust. I believe the self centering bushing on the hinge should not turn on the shaft. The bushing is nylon in alum and while alum will oxidise, as long as it moves periodically should not cause the problem that a nylon bushing on bare metal would. Plus the ball like bushing is meant to centre in the little support so it would seem logical that it also pivots in the support.
In short, don't grease the pin. If you are going to grease it, get your lube between the bushing and the alum bushing support.
Steve g

6th Gear
Joined: Sep 2013
Posts: 6
Likes: 0
It's been a while since adjusted my headlight door, son I can't tell anything specific. I just know that I had to lay under there and study it a while to find that bolt he refers to. Once I found it, adjustment was easy. I read thru his write up a couple times while looking up in there from below with a flashlight. Best of luck with it.
Corvette Stories
The Best of Corvette for Corvette Enthusiasts

5 Best & 5 Worst Corvette Daily Drivers
Joe Kucinski
The Headlights of Every Corvette Generation Explained
Joe Kucinski
5 Best & 5 Most Overrated Corvette Track Packages of All Time!
Joe Kucinski
Every 2027 Corvette Engine Explained
Joe Kucinski
Designer Imagines A Corvette That Looks More Like a Corvette Than the Corvette
Verdad Gallardo
10 Ugly Corvettes That We Still Kinda Love
Joe Kucinski
Top 10 Most Expensive Corvettes Ever Sold on Bring A Trailer
Brett Foote
10 Things Every Corvette Owner Needs (2026 Edition)
Michael S. Palmer
8 Most "Only Corvette Owners Understand" Quirks and Problems
Pouria Savadkouei


Melting Slicks

Joined: Oct 2008
Posts: 2,154
Likes: 69
From: Regina Sk Canada