
427/390 intake manifold bolts stuck
 07-15-2012, 04:59 PM
#1
Instructor

Thread Starter

Member Since: Jun 2010
Location: Fritsla Sweden
Posts: 173
Likes: 0
Received 0 Likes
on
0 Posts
Hi,
After searching for vacuum leaks with starting fluid, idle raises like crazy when spraying in junction between head and manifold at a couple of places. So I will replace the intake manifold gaskets first.
All intake bolts came loose very easy (almost too easy), EXCEPT for 2. They are stuck, and I have not dared to bring out the large extension handle yet. I did use a punch at gave them a couple of fairly sharps blows in the center....no luck.
Any tricks that can help to avoid snapping off the bolts? Try with engine fully warmed up? Perhaps I should try the air impact wrench?
1 stuck bolt on the driver side and the other on the passenger side so I'm afraid I cant get the manifold off the engine if both breaks....
Martin


 07-15-2012, 07:41 PM
#3
Team Owner

Using a larger breaker bar might break it...but might not break it loose--unless you soak the thing with rust penetrating fluid [Liquid Wrench, PB Blaster, etc] for several hours. Find a way to keep it wet with the penetrant, if possible. And, you would do better to use an impact wrench, rather than a consistently high level of torque.
07-15-2012, 08:53 PM
#5
Le Mans Master


I'm with "7T1" and think an impact wrench on a lower setting would be a good idea, after attemps at pentrating oil, if the stuff even makes it to the threads. This should do it, but if not, time to pull the valve covers, clean everything up, and put some torch heat to heads close to mating threads. If having to resort to this, you can wrap some wet rags around the valve seal areas.
07-16-2012, 05:33 PM
#6
Instructor
Thread Starter
Member Since: Jun 2010
Location: Fritsla Sweden
Posts: 173
Likes: 0
Received 0 Likes
on
0 Posts
After using the air impact wrench one bolt came loose. The other one broke off. Managed to pull the intake off quite easy. Closeup of the stud:
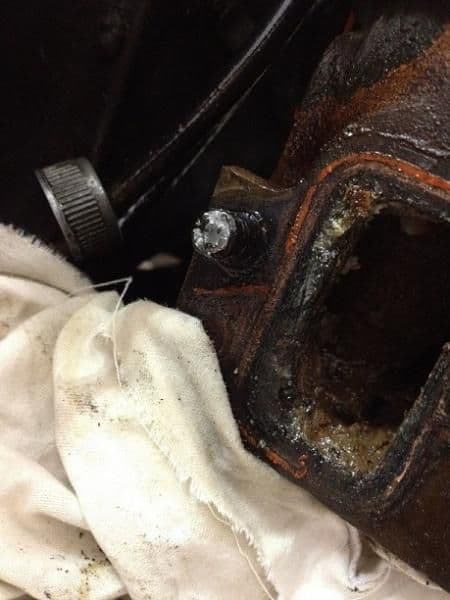
I will try welding a nut on and heat the stud up with propane torch and try to work it loose. It sticks out a fair amount, 1/3" perhaps.
On four places I found small cracks:

Dont know if I should try to have them welded or just leave them alone. Its on the same four "tabs" on the intake.
Besides this, I notied very large deposits on the intake valves. Perhaps the intake gasket leak has sucked oil from the valley for some years...hmmm....
Martin
I will try welding a nut on and heat the stud up with propane torch and try to work it loose. It sticks out a fair amount, 1/3" perhaps.
On four places I found small cracks:
Dont know if I should try to have them welded or just leave them alone. Its on the same four "tabs" on the intake.
Besides this, I notied very large deposits on the intake valves. Perhaps the intake gasket leak has sucked oil from the valley for some years...hmmm....
Martin
07-16-2012, 08:41 PM
#7
Le Mans Master
Really think your best bet would be heating up the head surface surrounding the bolt red with an oxy/acetelyne torch, rather than the bolt itself. Suppose welding a nut on the stud isn't a bad idea, but you may be able to break the stud loose with vice grips, when heating things up.
07-16-2012, 11:04 PM
#8
Le Mans Master
Heat the broken stud as hot as you can and put a candle on it. Let it cool then get out your vise grips.
The broken upper holes on your intake are common= too much torque on them and they crack/snap off. It's a BB thing.
The broken upper holes on your intake are common= too much torque on them and they crack/snap off. It's a BB thing.
07-17-2012, 08:58 AM
#9
Really think your best bet would be heating up the head surface surrounding the bolt red with an oxy/acetelyne torch, rather than the bolt itself. Suppose welding a nut on the stud isn't a bad idea, but you may be able to break the stud loose with vice grips, when heating things up.

I doubt you'd even have to use a torch. Keep in mind there's no pressure on the threads now with the intake off. Just grab it with some vice grips, and I bet you can spin it right out. If not then break out the torch.
07-17-2012, 12:30 PM
#10
Drifting

I would grind-off broken surface of stud flat - centre-pop the exact centre of the stud - then firstly using a centre drill in-to stud in increasing sizes - no need to drill out to thread diameter - just enough to relax the internal molecular stucture of the stud - then use vice grips, or weld a nut to the stud to remove. I have used this method sucessfully to remove snapped high tensile flywheel to crankshaft bolts.
07-17-2012, 07:21 PM
#11
Burning Brakes

Grinding and drilling would be a last resort for me. I would heat the area around the bolt and grab it with a good vice grip and work it back and forth untill it moves,
Bill
Bill
 07-18-2012, 12:37 PM
#14
Melting Slicks

07-25-2012, 05:06 PM
#15
Instructor
Thread Starter
Member Since: Jun 2010
Location: Fritsla Sweden
Posts: 173
Likes: 0
Received 0 Likes
on
0 Posts
After some gentle heating with acetylen/oxygen torch it did came loose very easy using vice grips and working it back and forth. So now I'm cleaning the gaskets surfaces and will reinstall with new bolts and hope the vacuum leak is gone in that area at least.
What is the general opinion on how to use the RTV sealant to minimize possible issues of coolant/oil/air leakage? Fel-Pro's instructions more or less just recommends using very thin layer to hold the gaskets in place and a couple of dabs in the corners where the gaskets joins. I have seen lots of suggestions on NOT using the supplied thin rubber block gaskets for instance, instead using RTV.
Thanks for all suggestions and moral support.
07-25-2012, 08:55 PM
#16
Team Owner
If your manifold and engine block are stock...and have not been milled...you can use the rubber galley end seals, if you want. You can also use black RTV (not any other kind of silicone sealant) for the end seals by putting a bead on each end and letting the sealant cure for 15-30 minutes. In either case, you want to use a dab of RTV sealant at the junctions between the end seals and intake manifold gaskets. Also, once you put your manifold down in place, just put bolts in finger tight, then lightly snug and let it sit overnight before you torque the bolts up. You want the RTV to set up, so that it doesn't just squeeze out when it's soft.
07-27-2012, 12:10 PM
#17
Instructor
Thread Starter
Member Since: Jun 2010
Location: Fritsla Sweden
Posts: 173
Likes: 0
Received 0 Likes
on
0 Posts
Almost done. One thing made me confused when I removed the carb for better access when torquing down the manifold bolts. On the intake (at the carb) there is one gasket, then a staniless steel blocking plate, then directly the carb. Is that setup correct? Shoud there be a gasket between the carb and the SS plate?


07-28-2012, 04:45 AM
#18
Safety Car


Member Since: Sep 2011
Location: Madeira Beach, FL
Posts: 3,563
Received 797 Likes
on
447 Posts
2023 C2 of the Year Finalist - Unmodified
2020 C3 of the Year Finalist - Unmodified

Vos,
Greeting from America
I have the same engine and asked LARS last fall what is correct.
He advised me of the three gaskets required.
You have 2 outta 3 correct.
Also you have them installed correctly.
They must match the shape of the manifold or they will be ineffective.
Your bottom gasket is a Fel Pro 60043.
Your middle steel heat shield is a Fel Pro 60731.
The top gasket is a Mr. Gasket 4256G.
Avail from Summit Racing.
This is the 4 hole fiber gasket w/o the groove(smiley face)
This gasket must be a composite gasket as paper will burn through
and cause fuel /air leaks
This is what I did and no problems.
Marshal
07-28-2012, 04:50 AM
#19
Safety Car
Member Since: Sep 2011
Location: Madeira Beach, FL
Posts: 3,563
Received 797 Likes
on
447 Posts
2023 C2 of the Year Finalist - Unmodified
2020 C3 of the Year Finalist - Unmodified
Vos,
I also noticed you have the 3x2 choke coil cover.
You need the 1 for 390 hp.
The hole is inboard carb side vs. outboard valve cover side.
If your choke is working leave well enogh alone.
I too had the same wrong part installed on my engine.
I think it bore a Holley carb some time in its life.
Check out Dr Rebuild's site he shows the two and the differences.
Marshal
07-28-2012, 03:40 PM
#20
Instructor
Thread Starter
Member Since: Jun 2010
Location: Fritsla Sweden
Posts: 173
Likes: 0
Received 0 Likes
on
0 Posts
Thanks for the info. Now that you mention it I recall that Lars even sold kits with all 3 pieces.
Anyway, as long as I have owned the car (3 years now) there has been no gasket betweek carb and SS plate. I will fix that immediately. The reason for me starting with intake manifold gasket change etc. is that:
1) Idle mixture screws were ABSOLUTELY ineffective, I could turn them all the way in without any noticeable change.
2) Car has always had a tendenacy to diesel after I turn off. Very annoying to know even if I can easily lower RPM with clutch before turning off.
I wonder how "important" the gasket I have been missing is...will be interesting to see if I get any difference. I also discovered another important thing with the carb off the manifold, the throttle plate screws (on the carb underside) were very loose.
I hope the engine is much more air-tight after this little overhaul.
Anyway, as long as I have owned the car (3 years now) there has been no gasket betweek carb and SS plate. I will fix that immediately.
The reason for me starting with intake manifold gasket change etc. is that:1) Idle mixture screws were ABSOLUTELY ineffective, I could turn them all the way in without any noticeable change.
2) Car has always had a tendenacy to diesel after I turn off. Very annoying to know even if I can easily lower RPM with clutch before turning off.
I wonder how "important" the gasket I have been missing is...will be interesting to see if I get any difference. I also discovered another important thing with the carb off the manifold, the throttle plate screws (on the carb underside) were very loose.
I hope the engine is much more air-tight after this little overhaul.