
1968 427/390 idle mixture screws completely ineffective
 08-08-2012, 10:03 AM
#21
Instructor

Thread Starter

Member Since: Jun 2010
Location: Fritsla Sweden
Posts: 173
Likes: 0
Received 0 Likes
on
0 Posts
I'm concerned that my carb is put together from mismatched throttle plate and bowl housing. That makes the gasket finding more interesting.
Is it possible to tell this by looking at the pictures above?
Thanks.
Is it possible to tell this by looking at the pictures above?
Thanks.
 08-08-2012, 11:03 AM
#22
Tech Contributor

Member Since: Aug 1999
Location: At my Bar drinking and wrenching in Lafayette Colorado
Posts: 13,658
Received 4,928 Likes
on
1,933 Posts

The carb float bowl in the photos is not a '68 float bowl: It has the "long" float pin provision, which was not used in '68. Also, as you noted, the idle air bleed holes were not used in '68, but you need to run the bleed configuration which is correct for the bowl and the IFRs installed in the bowl. Yes, it sounds and looks like they sold you a mix-match of parts, which is typical of those commercial builders.
Lars
Lars
08-08-2012, 11:15 AM
#23
Le Mans Master

Member Since: Mar 2008
Location: Oxford MA-----You just lost the game!!!!
Posts: 5,948
Likes: 0
Received 62 Likes
on
52 Posts

http://www.youtube.com/watch?v=MpBe80W-AhY
On the idle circuit, that low pressure area is generated by manifold vacuum. If the throttle blades are not fairly tightly closed, then enough airflow can go through the venturi to generate a signal, causing fuel to flow through the main circuit, and also lessen the signal to the idle circuit. If the throttle blades are fairly tightly closed, then the "suction" of the manifold vacuum is the only signal that the carb has to work with, and the idle circuit will work properly. What you have done by removing those lead plugs is introduce some more air to the system, which will allow you to close those throttle blades more. Once the throttle blades are closed, the venturi will not be generating a signal, and fuel should not flow through the main system, because it's getting it's extra air from a different source.
I don't know a whole lot about the mysterious inner workings of a Q-jet, but those holes look like they will let quite a bit of air into the system, and what you may end up with is the exact opposite problem that you have now. You may find that even with the throttle blades closed as far as they will go with the idle speed screw, the engine is getting too much air, resulting in a high idle speed. Not to worry, though, as Lars is on the case, and I'm sure he will have the solution. I have heard it said that Lars could get an engine to run fairly decent using an old coffee can with a hole poked in the bottom as a carb! Good luck!
Keep the shiny side up!

Scott
08-08-2012, 12:34 PM
#24
Race Director

 08-08-2012, 09:33 PM
#25
Tech Contributor
Member Since: Aug 1999
Location: At my Bar drinking and wrenching in Lafayette Colorado
Posts: 13,658
Received 4,928 Likes
on
1,933 Posts
The carb you have is not a ’68 Q-Jet. It’s probably about a ’70-72. Here are some shots of different years with some comments:
This is a ’68 Q-Jet. Note that the choke blade screws are set close together; the plastic choke counterweight cam; “doghouse” covering the bowl vent; and “Jesus clips” on the accel pump rod and the secondary airvalve rod:


Bowl shot of a ’68: Note the very narrow, fragile float hinge point supports and no idle air bleed holes drilled in the outer chambers:

Bottom of the ’68 float bowl:

Here’s the bottom of the ’68 throttle plate: No idle air bleed holes:

Throttle bores are very simple: Just an idle fuel discharge hole and the transition fuel slot:

This is a ’73 float bowl: Note the wide float hinge pin supports spanning the float bowl and the idle air bleed holes in the outer chambers:

Note the similarity between your throttle plate and this ’73 throttle plate: Note the “chamfered” idle air bleed hole on the right, and the in-bore bleed hole on the left:

A later model throttle plate showing idle air bleed holes set into deep recessed slot features in the throttle plate. These idle air bleed holes are not in the same location as the ’73 holes:

Bottom of the ’73 float bowl. Note that the secondary well plugs are now lead instead of the brass plugs used in ’68:

Top of the ’73 throttle plate showing the position of the idle air bleed holes:

Here’s the correct gasket on the ’73:

And here’s the same ’73 with the late-model gasket (same gasket that has been used on your carb):

Comparison of the ’73 throttle plate and gasket to the later-model plate and gasket. Note the shift in the right side idle air bleed holes:

It would appear that your carb is a modified early ‘70s carb with ’74-or-so throttle plate gasket and a bad jetting combo. With the right gaskets and jetting components, it can probably be set up to run well.
Typical comment I get in my e-mail on a daily basis: "Lars - I don't understand why you're so critical about the commercially rebuilt carbs. What's so bad about them?"
Lars
This is a ’68 Q-Jet. Note that the choke blade screws are set close together; the plastic choke counterweight cam; “doghouse” covering the bowl vent; and “Jesus clips” on the accel pump rod and the secondary airvalve rod:
Bowl shot of a ’68: Note the very narrow, fragile float hinge point supports and no idle air bleed holes drilled in the outer chambers:
Bottom of the ’68 float bowl:
Here’s the bottom of the ’68 throttle plate: No idle air bleed holes:
Throttle bores are very simple: Just an idle fuel discharge hole and the transition fuel slot:
This is a ’73 float bowl: Note the wide float hinge pin supports spanning the float bowl and the idle air bleed holes in the outer chambers:
Note the similarity between your throttle plate and this ’73 throttle plate: Note the “chamfered” idle air bleed hole on the right, and the in-bore bleed hole on the left:
A later model throttle plate showing idle air bleed holes set into deep recessed slot features in the throttle plate. These idle air bleed holes are not in the same location as the ’73 holes:
Bottom of the ’73 float bowl. Note that the secondary well plugs are now lead instead of the brass plugs used in ’68:
Top of the ’73 throttle plate showing the position of the idle air bleed holes:
Here’s the correct gasket on the ’73:
And here’s the same ’73 with the late-model gasket (same gasket that has been used on your carb):
Comparison of the ’73 throttle plate and gasket to the later-model plate and gasket. Note the shift in the right side idle air bleed holes:
It would appear that your carb is a modified early ‘70s carb with ’74-or-so throttle plate gasket and a bad jetting combo. With the right gaskets and jetting components, it can probably be set up to run well.
Typical comment I get in my e-mail on a daily basis: "Lars - I don't understand why you're so critical about the commercially rebuilt carbs. What's so bad about them?"
Lars
Last edited by lars; 08-08-2012 at 09:48 PM.
08-09-2012, 05:47 AM
#26
Instructor
Thread Starter
Member Since: Jun 2010
Location: Fritsla Sweden
Posts: 173
Likes: 0
Received 0 Likes
on
0 Posts
I can't say how helpful this is. THANKS! No doubt that a 73 gasket will fit.
Lars, as I mentioned I was able to get the parts from a local guy over here. So I will try this:
- Jets/needles: 74/43
- B26 vacuum can on distributor
- Gaskets for a 1973 carb
- New float (standard motors FL1)
I will reassemble the carb this weekend after careful cleaning and see. I'll get back with results. WIll be interesting to say the least.
Lars, I can't understand how you can find energy and strength to help people out like this. It's truly fantastic. I like your final comment in the above post.
08-09-2012, 11:13 AM
#27
Tech Contributor
Member Since: Aug 1999
Location: At my Bar drinking and wrenching in Lafayette Colorado
Posts: 13,658
Received 4,928 Likes
on
1,933 Posts
Disassembling 4 carbs and shooting some photos is certainly no problem...
One more thing: Shoot me a photo down the "throat" of the carb: Open the choke and shoot a photo straight down into the venturi area (frame it so both venturis are in the photo) so I can see if the builder also removed your low speed air bleeds. If you still have idle issues, there are 2 more "tricks" we can do to get it right...
Lars
 08-09-2012, 03:51 PM
#29
Tech Contributor
Member Since: Aug 1999
Location: At my Bar drinking and wrenching in Lafayette Colorado
Posts: 13,658
Received 4,928 Likes
on
1,933 Posts
The problem is that he's in Sweden, so shipping and customs will kill this project, unless the US Air Force out of Hill AFB can provide some transportation...
08-10-2012, 01:25 PM
#31
Tech Contributor
Member Since: Aug 1999
Location: At my Bar drinking and wrenching in Lafayette Colorado
Posts: 13,658
Received 4,928 Likes
on
1,933 Posts
That's the float bowl - I need the shots down the choke part of the airhorn with the choke open.
Lars
Lars
08-10-2012, 02:51 PM
#32
Instructor
Thread Starter
Member Since: Jun 2010
Location: Fritsla Sweden
Posts: 173
Likes: 0
Received 0 Likes
on
0 Posts
 New pictures:
Top view:
Bottom view:
Tomorrow morning I will reassemble. Found the exact same gasket as you recommended with correct hole pattern. Also got the jets/needles you recommended. The only thing I could find in vacuum can was a B20A, but when I checked with my vacuum pump it seems like it was all in at approx. 13-14". Could't find the B20A in your paper, but its perhaps the same as a B20?
Thanks...
08-11-2012, 07:29 AM
#33
Instructor
Thread Starter
Member Since: Jun 2010
Location: Fritsla Sweden
Posts: 173
Likes: 0
Received 0 Likes
on
0 Posts
So. Saturday morning. I did reassemble the carb with the new jets, needles, float and gaskets. Changed to the B20 vacuum can and rerouted hoses so manifold vacuum controls ignition advance. Set float height at 12/32".
Very easy to start, idles very smoothly, no part throttle issues what so ever, transition to secondaries is perfect, car runs very, very strong. Warm-up from coldstart was much more stable,. no hunting issues etc. It feels like a huge improvement.
The idle screws are starting to be more responsive, however, I still have some fuel dripping from the primaries. I can get a quite stable idle at 700-750 rpm, but only if I crank up the throttle plates enough, but MUCH less than before. If I close the throttle plates gradually I can see that dribbling stops at approx. 550-600rpm, but then the car barely is running.
I can feel strong vacuum in the two slots in the airhorn where the idle air bleed holes suck air (the two holes that were plugged).
Also, the vacuum reading at 750-800rpm is 17-18", and MUCH more stable than before, needle fluctuates perhaps 1" maximum.
If I screws the idle micture screws all the way in the car runs much more rough (cant kill it though), and if I back them out 6 turns idle speed and quality changes significantly.
In the best of the worlds - at idle - there should be zero dripping of fuel from the primaries?
Does my current setup and observations mean that my 427 wants more air than the current idle circuits can provide?
Thanks.
08-11-2012, 09:19 AM
#34
Tech Contributor
Member Since: Aug 1999
Location: At my Bar drinking and wrenching in Lafayette Colorado
Posts: 13,658
Received 4,928 Likes
on
1,933 Posts
Sounds like you're getting close - glad the hear the jetting suggestion is working well.
But...
Your low speed air bleeds are missing: there should be a brass restrictor pressed into each of the 2 open holes next to your screws inside the venturi area of the airhorn. If you have access to a precision machine shop, or if you have a lathe and know how to use it, I can send you a sketch or a description of the dimensional requirements. Or, I can make you 2 bleeds and send them to you.
Lars
"Lars - I don't understand why you're so critical about the commercially rebuilt carbs. What's so bad about them?"
Last edited by lars; 08-11-2012 at 09:26 AM.
08-11-2012, 10:04 AM
#35
Tech Contributor
Member Since: Aug 1999
Location: At my Bar drinking and wrenching in Lafayette Colorado
Posts: 13,658
Received 4,928 Likes
on
1,933 Posts
Here's what the carb should look like wth the correct low speed bleeds installed:
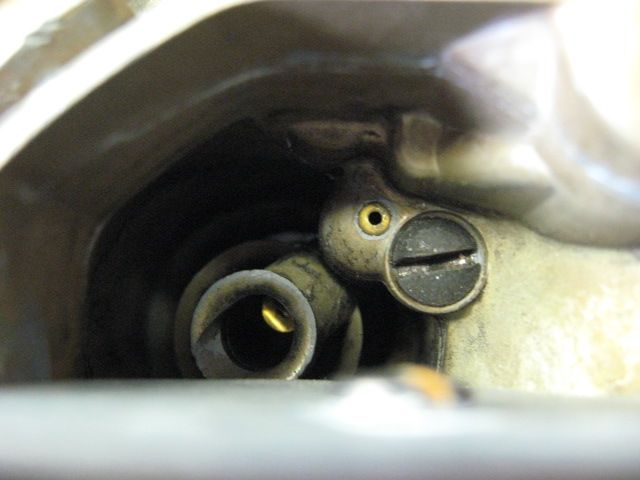
Your missing low speed bleeds are causing you to suck too much air into your idle/transition fuel stream, which is why your idle mixture screws are all the way out at 6 turns: Your idle circuit is starting to work, but it's still not all there, so you're having to compensate by getting the idle into the main metering circuit still. Not as bad as before, but you're still not idling entirely on the idle circuit. Once it's running right, that carb should idle perfectly at about 1.5 - 3 turns on the mixture screws.
Lars
Last edited by lars; 08-11-2012 at 10:07 AM.
08-12-2012, 07:14 AM
#36
Instructor
Thread Starter
Member Since: Jun 2010
Location: Fritsla Sweden
Posts: 173
Likes: 0
Received 0 Likes
on
0 Posts
Todays quote:
"The best carburation restoration in the world".

Lars,
Are the restrictors application specific? I checked the old carb that was on the car, unknown history, the idle air bleed restictors were knocked out there as well. In addition to plugged air bypasses etc. etc.
I could probably use my lathe to fix up a couple of restrictors if not to ultra-critical in tolerances. If you want please send info on dimensions etc. Very appreciated.
So without the restrictors its simply too much air sucked down together with idle fuel?
If you have time a picture from the underside of the airhorn, showing the restrictor installed would be valuable.
Thanks.
"The best carburation restoration in the world".
Lars,
Are the restrictors application specific? I checked the old carb that was on the car, unknown history, the idle air bleed restictors were knocked out there as well. In addition to plugged air bypasses etc. etc.
I could probably use my lathe to fix up a couple of restrictors if not to ultra-critical in tolerances. If you want please send info on dimensions etc. Very appreciated.
So without the restrictors its simply too much air sucked down together with idle fuel?
If you have time a picture from the underside of the airhorn, showing the restrictor installed would be valuable.
Thanks.
08-12-2012, 10:37 AM
#37
Instructor
Thread Starter
Member Since: Jun 2010
Location: Fritsla Sweden
Posts: 173
Likes: 0
Received 0 Likes
on
0 Posts
Lars,
I forgot to mention that the power piston adjustment screw was in good condition on this carb, not seized. Is it worth trying to adjust the PP a bit to see what happens - or is it waste of time until I have the restrictors put in?
Thanks.
I forgot to mention that the power piston adjustment screw was in good condition on this carb, not seized. Is it worth trying to adjust the PP a bit to see what happens - or is it waste of time until I have the restrictors put in?
Thanks.
08-12-2012, 01:08 PM
#38
Tech Contributor
Member Since: Aug 1999
Location: At my Bar drinking and wrenching in Lafayette Colorado
Posts: 13,658
Received 4,928 Likes
on
1,933 Posts
Your power piston height adjustment is already right about where it needs to be - further adjustment won't gain you anything - you need to install the missing parts. Yes, without the restrictors in the low speed passage, the carb is sucking more air than fuel through the idle and transition circuit, making the fuel stream too lean. Since it won't run on the lean mixture from the "air bubbles" in the fuel, you're compensating by getting the idle into the main metering circuit. Once you install these bleeds, you can also lower your float level down to about .400 for better fuel control.
If your other carb also has the lead plugs in the idle bypass bleed holes, then it's also a commercially built carb that's all screwed up - they knock the low speed bleeds out of the carb when they put the lead plugs in.
Here are the dimensions for the brass low speed bleeds - all dimensions are in inches:
Outside diameter: 0.122
Inside diameter (hole diameter): 0.052 (#55 diameter drill)
Length: 0.100
Note that the outside diameter is just under an eight of an inch, so you can use some 1/8" round stock and simply sand off a few thousands in the lathe. Run the #55 drill through the stock, and part off 2 lengths to the .100 dimension.
Tap them in from the top of the airhorn with a 1/8" diameter pin punch until they're flush with the casting surface as shown in my photo above.
Photo of some of my spares meeting these dimensional requirements:
08-12-2012, 02:06 PM
#39
Le Mans Master


Another awesome thread.
Lars makes it look easy becuase he's always got the right answer...I can't think of anyone else that would get things sorted out so quickly and right the heart of the problems.
Lars makes it look easy becuase he's always got the right answer...I can't think of anyone else that would get things sorted out so quickly and right the heart of the problems.
08-12-2012, 02:20 PM
#40
Tech Contributor
Member Since: Aug 1999
Location: At my Bar drinking and wrenching in Lafayette Colorado
Posts: 13,658
Received 4,928 Likes
on
1,933 Posts
Bill -
Glad you're enjoying the tech exchange in this thread. I'm hoping everyone gets the "flavor" from this process that these old carbs tend to be a bit screwed up: When someone posts the question, "My carb is running rough - which screws do I turn to fix it?" there is not a clean-cut easy answer in many cases. The problems tend to be deeper than a simple idle mixture tweak.
In Martin's case, I would usually suggest that he just ship me the carb so I can identify and correct all these issues with an in-person inspection and evaluation - you can see how lengthy the trouble-shooting process is via Forum exchange. But since he's in Europe, the shipping thing isn't cheap or easy, so we have to take a look at every screwed up aspect, one thread post at a time. The carb is getting better, but it's still not there... more to come!
Lars
Last edited by lars; 08-12-2012 at 02:24 PM.