


Port matching question
Thread Starter
Le Mans Master


Joined: Apr 2011
Posts: 6,284
Likes: 1,171
From: Hermosa
I'm getting to the point where I will need to port match the heads to the intake manifold. My heads are aluminum assembled heads.
When I start porting should I remove the valves to make sure I get all aluminum particles cleaned out when I'm done or can the valves stay in and just blow the ports out really well when done?
When I start porting should I remove the valves to make sure I get all aluminum particles cleaned out when I'm done or can the valves stay in and just blow the ports out really well when done?
Thread Starter
Le Mans Master
Joined: Apr 2011
Posts: 6,284
Likes: 1,171
From: Hermosa
Thought of another question on port matching. What exactly is gained if the intake manifold is smaller than the head port in both width and height.
I've read about fuel dropout on the down side from the sudden increase in volume, it wasn't explained why, but i can guess it's due to a reduction in pressure and velocity, is that all of it?
I've read about fuel dropout on the down side from the sudden increase in volume, it wasn't explained why, but i can guess it's due to a reduction in pressure and velocity, is that all of it?

Burning Brakes

Joined: Sep 2012
Posts: 818
Likes: 0
From: coon rapids mn
usually the intake port is smaller then the head port,so enlarge and match the intake port to match the head port.you can make a template of the heads ports and scribe them onto the intake.no need to remove valves if you are just porting the intake.

Melting Slicks


Joined: Oct 2002
Posts: 2,317
Likes: 111
From: St Louis MO
Whatever you do, don't match the ports or intake to the gasket. The gasket will be larger than either - a better approach is to make the intake runner the same size (or slightly smaller) than the port of the head. If you find that the head needs to be enlarged a bit to match the intake runner, that's ok.
Thread Starter
Le Mans Master
Joined: Apr 2011
Posts: 6,284
Likes: 1,171
From: Hermosa
I'm kinda leaning towards not porting them at all. I did have the heads shaved .030" so they sit a little lower than they would have otherwise. I'll need to figure a way out to see if the top of the port on the heads will be a problem. Mocking it up the intake sits well on the heads but of course I can't see how the ports line up. Tape on the heads and some die around the intake ports maybe?
If the intake ports are smaller that should be good as a reversion dam?
If the intake ports are smaller that should be good as a reversion dam?
Race Director

Joined: May 2005
Posts: 10,674
Likes: 122
From: Millington Illinois
St. Jude Donor '08-'09
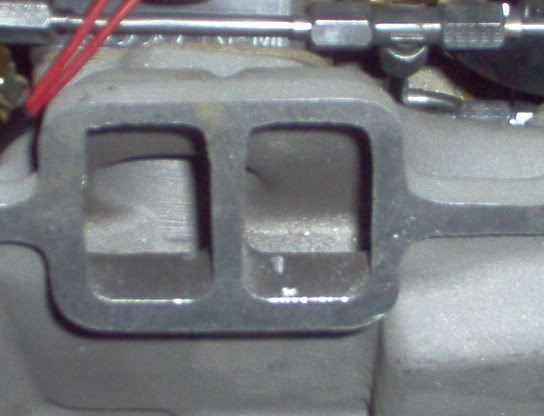
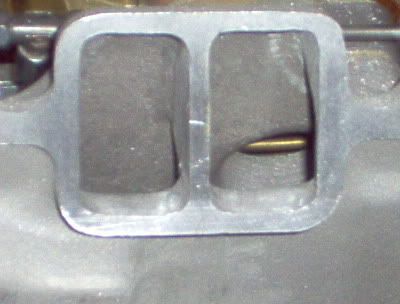
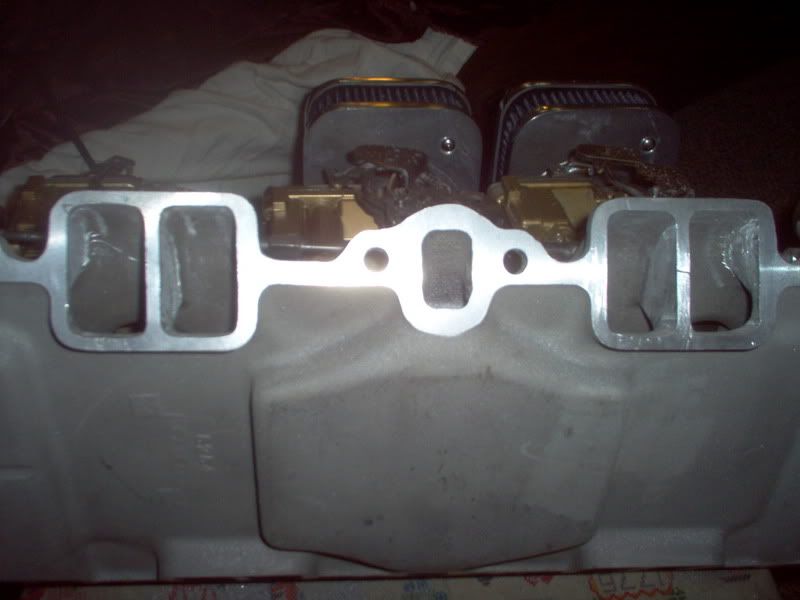
I make a cardboard pattern that used the two outside holes in the heads as a reference. Cut out the ports then use the template to black the areas that needed material removed on the intake. I had to take a lot. Here are some pictures.
Last edited by 63mako; Feb 22, 2013 at 01:20 AM.
Corvette Stories
The Best of Corvette for Corvette Enthusiasts

Top 10 Most Expensive Corvettes Ever Sold on Bring A Trailer
Brett Foote
10 Things Every Corvette Owner Needs (2026 Edition)
Michael S. Palmer
8 Most "Only Corvette Owners Understand" Quirks and Problems
Pouria Savadkouei
10 Reasons the C6 Z06 is Still A Performance Benchmark After 20 Years
Joe Kucinski
How Much Horsepower Every Corvette Engine "LOST" in 1972
Joe Kucinski
Top 10 DOs and DON'Ts for Protecting Your Convertible Top!
Michael S. Palmer
Top 10 Most Explosive Corvettes Ever Made: Power-to-Weight Ratio Ranked!
Joe Kucinski
150 hp to 1,250 hp: Every Corvette Generation Compared by the Specs That Matter
Joe Kucinski
8 Coolest Corvette Pace Cars (and Replicas) of All Time
Verdad Gallardo
Thread Starter
Le Mans Master
Joined: Apr 2011
Posts: 6,284
Likes: 1,171
From: Hermosa
Once the intake is ported to match the size of the head ports how do you insure that alignment of the ports is correct for installation? The bolt holes allow for a fair amount of movement. I can see how the ports could be the same size but misaligned during installation which would undo much of your effort. Seems like some kind of alignment pin/s would help keep things straight.
I want to block off the crossover heat also. I've read that the gasket will get eaten through over time. So to keep this from happening would a small piece of sheet metal and some rtv to seal things up suffice?
I want to block off the crossover heat also. I've read that the gasket will get eaten through over time. So to keep this from happening would a small piece of sheet metal and some rtv to seal things up suffice?
Last edited by REELAV8R; Feb 22, 2013 at 10:39 AM.
Safety Car

Joined: Jan 2009
Posts: 3,736
Likes: 56
From: anchorage ak
Once the intake is ported to match the size of the head ports how do you insure that alignment of the ports is correct for installation? The bolt holes allow for a fair amount of movement. I can see how the ports could be the same size but misaligned during installation which would undo much of your effort. Seems like some kind of alignment pin/s would help keep things straight.
I want to block off the crossover heat also. I've read that the gasket will get eaten through over time. So to keep this from happening would a small piece of sheet metal and some rtv to seal things up suffice?
I want to block off the crossover heat also. I've read that the gasket will get eaten through over time. So to keep this from happening would a small piece of sheet metal and some rtv to seal things up suffice?
Race Director
Joined: May 2005
Posts: 10,674
Likes: 122
From: Millington Illinois
St. Jude Donor '08-'09
That is what I did. When installing I visually checked the outer intake bolt holes were centered with the head holes. just start the bolts and look at the centering in the intake bolt hole. Mine lined up fine on the above build with a .32 cut on the head decks. As you can see I had to port mine as there was a big difference.
Thread Starter
Le Mans Master
Joined: Apr 2011
Posts: 6,284
Likes: 1,171
From: Hermosa
You can the use a bore scope to check them.

That is what I did. When installing I visually checked the outer intake bolt holes were centered with the head holes. just start the bolts and look at the centering in the intake bolt hole. Mine lined up fine on the above build with a .32 cut on the head decks. As you can see I had to port mine as there was a big difference.


Burning Brakes
Joined: Jan 2007
Posts: 1,057
Likes: 4
From: Concord Calif
This port matching thing is not the best idea if your manifold port is smaller than the head. If the head port is smaller then by all means match them match. The step at the manifold assuming the manifold is smaller is a good thing as it acts to stall the reversing air flow cause by cam overlap to stop right there as opposed to going all the way up into the carb and messing the single up in the carb causing mixture problems.

Thread Starter
Le Mans Master
Joined: Apr 2011
Posts: 6,284
Likes: 1,171
From: Hermosa
This port matching thing is not the best idea if your manifold port is smaller than the head. If the head port is smaller then by all means match them match. The step at the manifold assuming the manifold is smaller is a good thing as it acts to stall the reversing air flow cause by cam overlap to stop right there as opposed to going all the way up into the carb and messing the single up in the carb causing mixture problems.

As I understand it the reversion of air, if it makes it all the way up to the carb, will actually pull a little fuel from the jet and then when the air reverses and resumes the right direction it will once again pull fuel. This creates some difficult tuning conditions since at low rpm the reversion may reach the carb and at higher rpms it may not. Like I said as I understand it not experienced it yet.
nobody has mentioned gasket numbers.... port it to the correct gasket felpro gasket... they are numbered so you get the correct size every time....
If the manifold port is smaller than the heads, then doesn't the pressure drop cause fuel to separate from the air fuel mixture by changing the temperature at the same time?
Burning Brakes
Joined: Feb 2005
Posts: 894
Likes: 91
The ONLY effective way to a true 'Port-Match".
1-Have heads pre-mounted on block to be used, with both head gaskets in place.
2-Use 2 pieces of masking tape or 2 spots of silicone and position intake gaskets in place.
3-At this point make sure the intake gaskets (marked R/L) fit the head ports the way you want them.
4-Lay the intake in place with 4 corner bolts, at this time you'll know if bolt location is OK.
5-Snug the bolts down, and using a 1/8" drill, drill 4 holes (1 at each corner) through the intake making sure where you drill you will hit the gasket (don't drill where there is no gasket below).
6-Let the drill tip pass right through the gasket and stop on the head. Remove the intake and lay the gaskets on the respective sides as templates, we use 1/8" "cleco" buttons to mount the gaskets back on the intake sides, you can use (2) 1/8" drill bits for alignment. With the gaskets mounted on the intake, simply scribe out the ports on the intake and "grind away".
By using this method we can literally leave a perfect "overhang" (reversion-wall) on the intake runner of .020"/.030". In simpler terms, the head port is slightly larger than the intake port.
It's your choice to line up the port perfectly or leave the "overhang".
The entire procedure takes about 20/30 minutes to achieve and guarantees a "perfect" fit on the final ***�y. This procedure can be done on assembled long blocks that have been running and getting an intake change. We run the intake port "inside" the head port for anti-reversion only on street engines and not on "track only" motors due to the higher VE of race prepared engines.
Thanks, Gary in N.Y.
P.S. There is no other accurate way (that I'm aware of after 41+ years of engine building) to get "perfect" port alignment, period!
Le Mans Master


Joined: Apr 2007
Posts: 7,353
Likes: 72
From: Graceland in a Not Correctly Restored Stingray
Template method, per 63mako.
...and port matching does NOT involve opening intake and head ports up to the gasket.
.
...and port matching does NOT involve opening intake and head ports up to the gasket.
.
Last edited by TheSkunkWorks; Feb 22, 2013 at 09:12 PM.