


Spreader bar Install
Drifting


Joined: Apr 2007
Posts: 1,970
Likes: 45
From: Cameron Park CA
I lurked here when I first saw the thread as I was waiting for my Speed Direct Spreader Bar to arrive and I wondered what I was in for.
Having installed mine yesterday, I can say a lot of folks on this forum do not bother to read the instructions that come with the device.
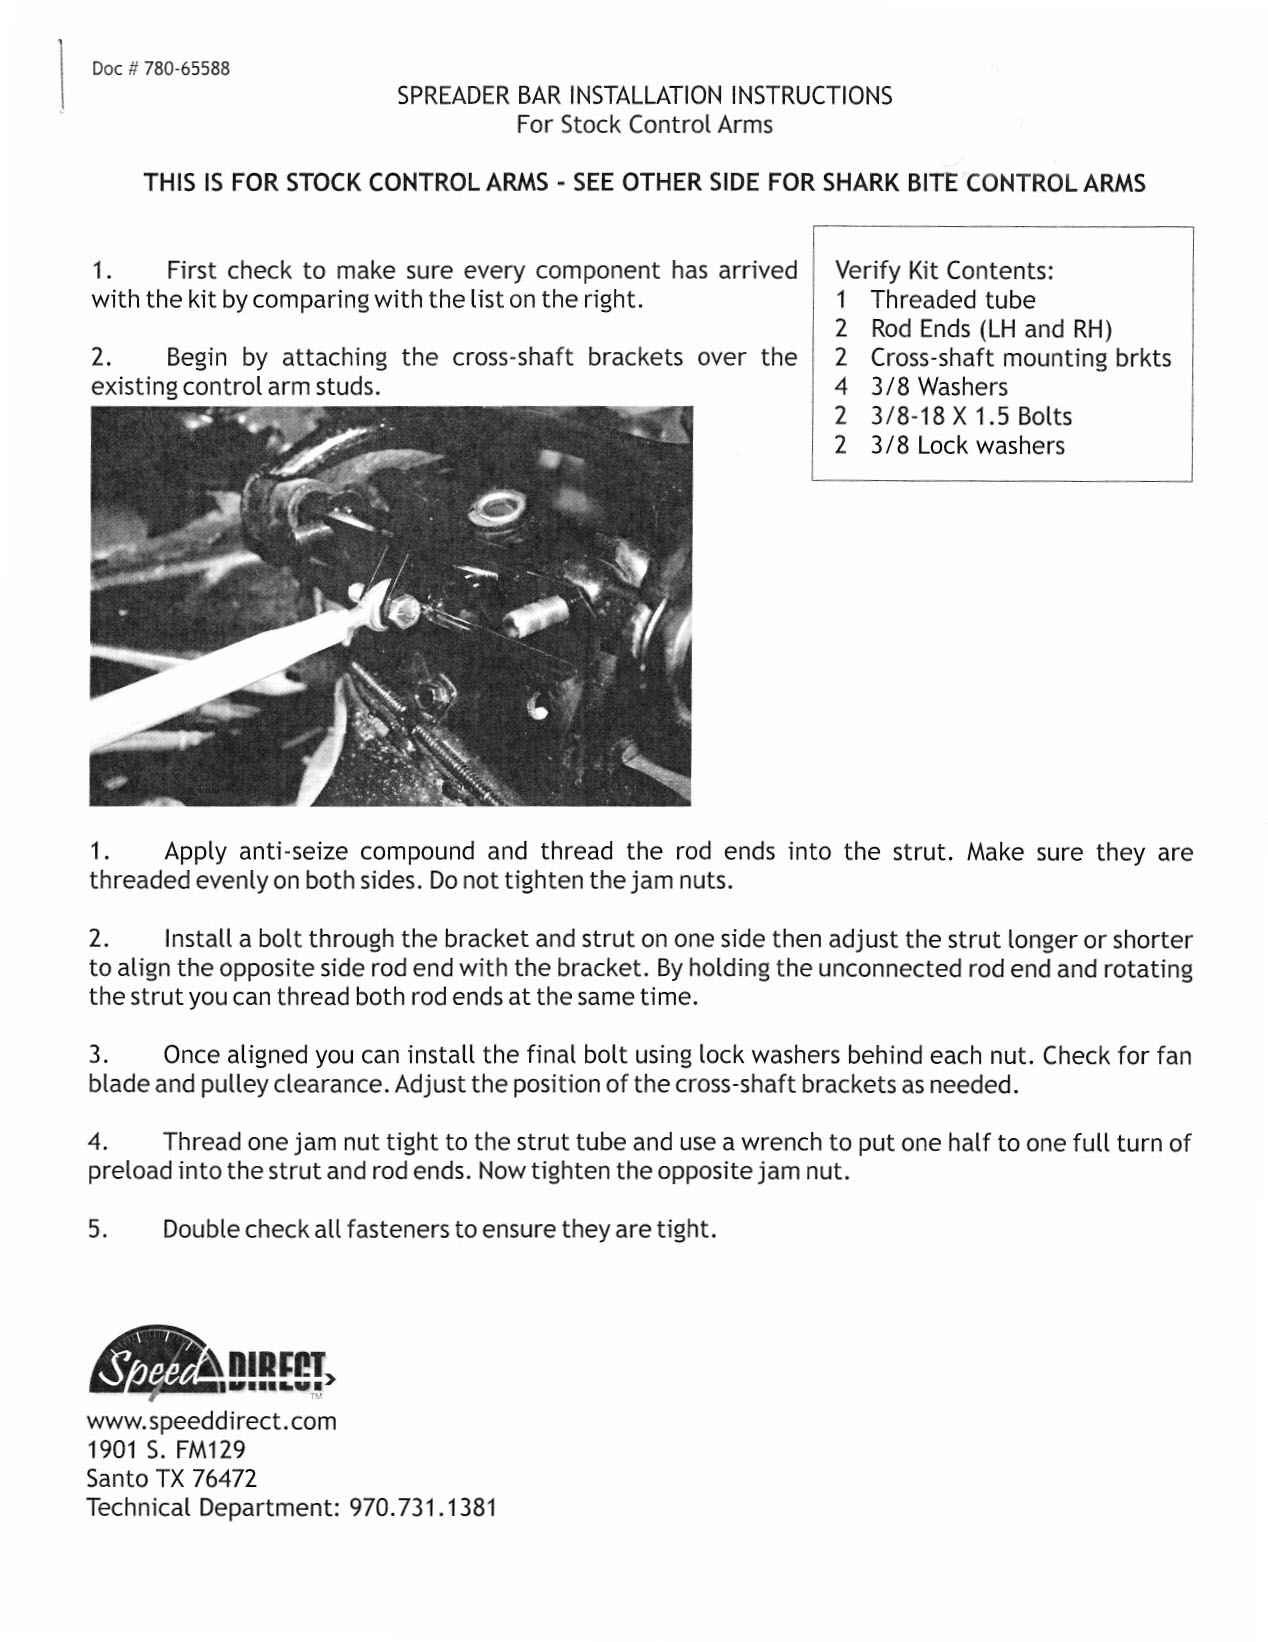
Notice no where does it say to raise the vehicle. I tried that and it's not a good idea. I raised the car when the control arm cross shaft followed the nuts toward the center of the car. Fearing that they would come off the end of the studs when the nuts were removed. The cross shafts stopped moving after a couple of inches of movement.
The problem with raising the car is when you put it back on the ground, you have to drive it to get the frame back to it's natural state. You can't do that with the spreader bar in place because it will biind everything up. So I got the brackets aligned properly for fore and aft placement so the bar didn't touch the fan or the p/s pulley. Then I was able to remove the bar by shortening it. Once the bar was removed, I drove around the block to settle the suspension, and finally I put the bar back in.
No where does it say zero preload, in fact, exactly the opposite. See instruction #4. It wants one half to one full turn of preload on the bar. Hey, I'm just repeating the maufacturer here.
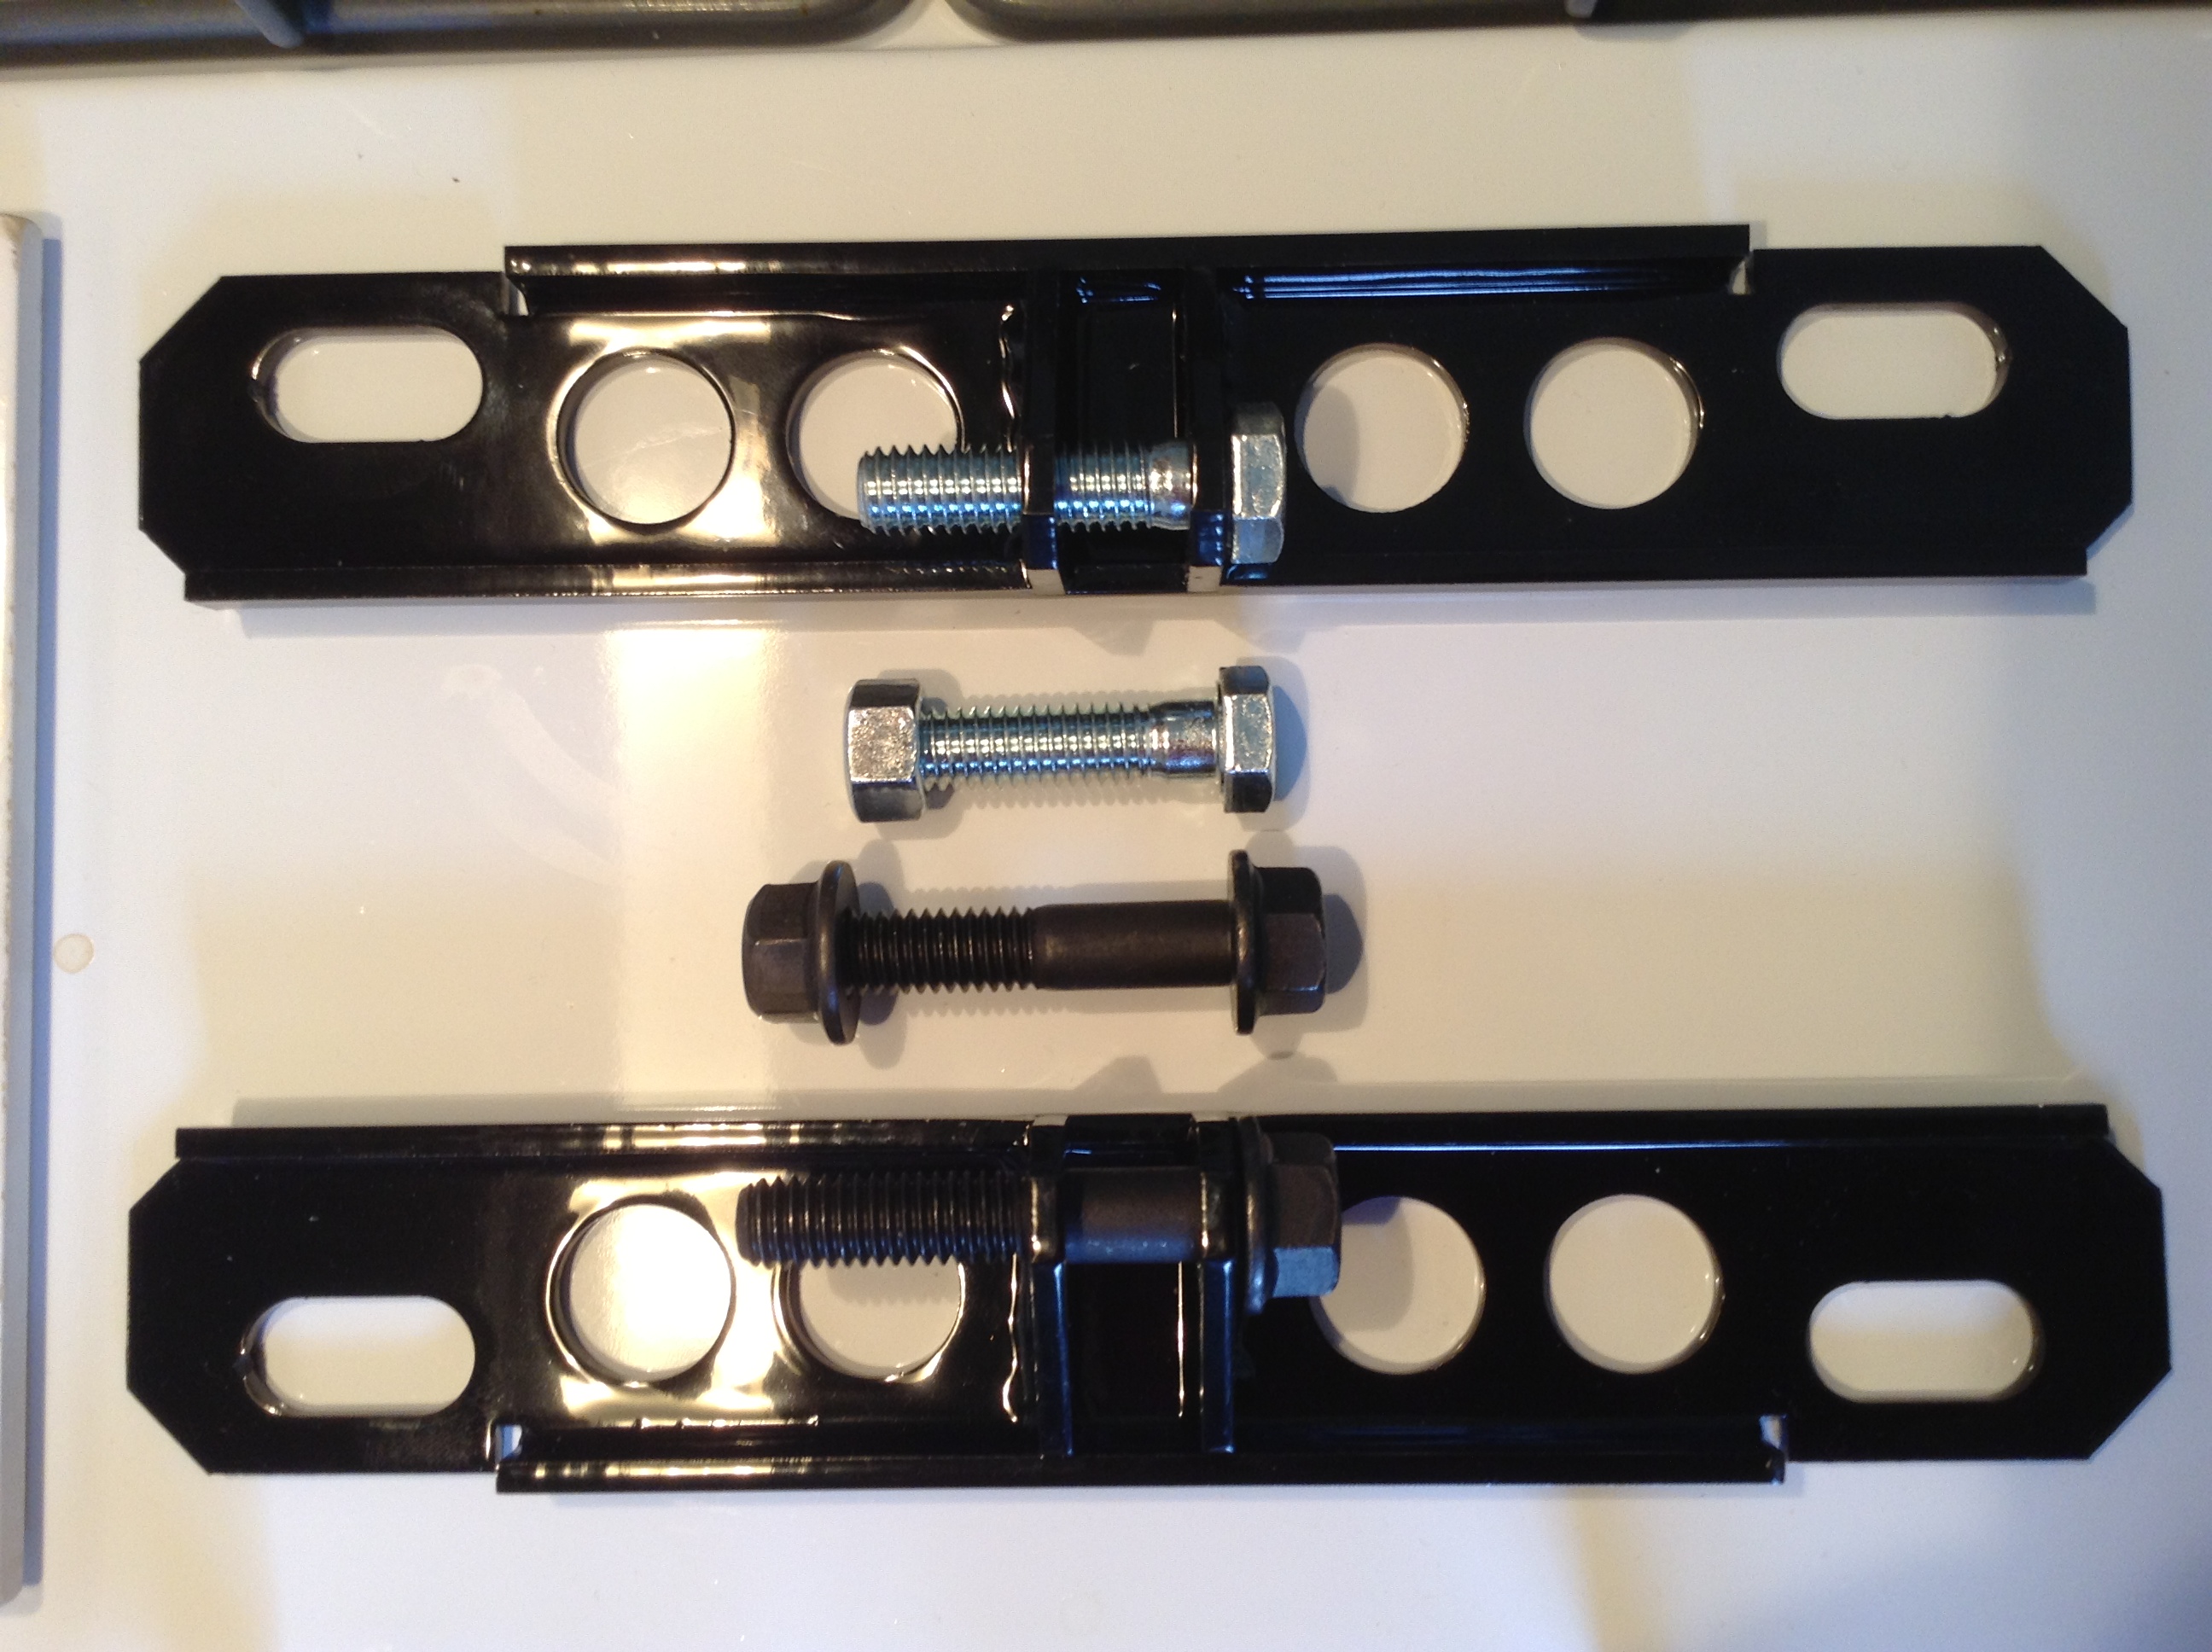
I made what I think is a significant improvment to the product. The grade 5 bolts which are used to attach the bar ends to the brackets are threaded all most all the way to the head - the shank or unthreaded part is very short. The result is that part of the bar end and the second piece of bracket the bolt goes through, seat on threads, not the shank. I found some grade 8 bolts that have shanks just long enough to pass through both bracket tabs. The only downside to these is the nuts are lock nuts, like the valve adjusting nuts. That meant tightening the nuts was a very slow and laborous task.
I think (I hope) my mod is an improvement although the amount of stress on those bolts and the bar itself shouldn't be that great.
So OP, if you haven't already read the instructions, give them a once or twice over and have fun with the installation.

Pete
Having installed mine yesterday, I can say a lot of folks on this forum do not bother to read the instructions that come with the device.
Notice no where does it say to raise the vehicle. I tried that and it's not a good idea. I raised the car when the control arm cross shaft followed the nuts toward the center of the car. Fearing that they would come off the end of the studs when the nuts were removed. The cross shafts stopped moving after a couple of inches of movement.
The problem with raising the car is when you put it back on the ground, you have to drive it to get the frame back to it's natural state. You can't do that with the spreader bar in place because it will biind everything up. So I got the brackets aligned properly for fore and aft placement so the bar didn't touch the fan or the p/s pulley. Then I was able to remove the bar by shortening it. Once the bar was removed, I drove around the block to settle the suspension, and finally I put the bar back in.
No where does it say zero preload, in fact, exactly the opposite. See instruction #4. It wants one half to one full turn of preload on the bar. Hey, I'm just repeating the maufacturer here.
I made what I think is a significant improvment to the product. The grade 5 bolts which are used to attach the bar ends to the brackets are threaded all most all the way to the head - the shank or unthreaded part is very short. The result is that part of the bar end and the second piece of bracket the bolt goes through, seat on threads, not the shank. I found some grade 8 bolts that have shanks just long enough to pass through both bracket tabs. The only downside to these is the nuts are lock nuts, like the valve adjusting nuts. That meant tightening the nuts was a very slow and laborous task.
I think (I hope) my mod is an improvement although the amount of stress on those bolts and the bar itself shouldn't be that great.
So OP, if you haven't already read the instructions, give them a once or twice over and have fun with the installation.
Pete
Last edited by PeteZO6; Jun 11, 2013 at 05:23 PM.
Thread Starter
Drifting

Joined: Jan 2011
Posts: 1,853
Likes: 81
From: Hamilton Virginia
I had planned to install mine last weekend, but I had forgotten the p/o had cut the front bolt on the passengerside to get the fan shroud out easier. So I am ordering a new bolt this week. Then I have to replace. Hopefully will be able to install the weekend of the 22nd. Not in a big hurry, weather sucks anyways.
Melting Slicks


Joined: Aug 2012
Posts: 2,548
Likes: 379
From: Woodinville WA
when you do put it on the car, it's best to check to see how far it's flexed - and align it if necessary after you put the spreader in place.
Drifting


Joined: May 2005
Posts: 1,968
Likes: 44
From: East TN
Is it pre-load to push the frame rails back to where they were when the car left the factory? The whole point of the spreader bar is to double the strength of the top of the a-arm because the frame will flex there. I used a t-square before I put the bar on to check where the frame was in relation and was pretty amazed at how far inboard it was at rest and how far it moved just by jacking the car up and allowing the suspension to drop...
when you do put it on the car, it's best to check to see how far it's flexed - and align it if necessary after you put the spreader in place.
when you do put it on the car, it's best to check to see how far it's flexed - and align it if necessary after you put the spreader in place.
Corvette Stories
The Best of Corvette for Corvette Enthusiasts

150 hp to 1,250 hp: Every Corvette Generation Compared by the Specs That Matter
Joe Kucinski
8 Coolest Corvette Pace Cars (and Replicas) of All Time
Verdad Gallardo
Top 10 Corvette Engines RANKED by Peak Torque (70+ Years of Muscle!)
Joe Kucinski
Corvette ZR1X Will Be Pacing the Indy 500, And Could Probably Race, Too!
Verdad Gallardo
Top 10 Corvettes Coming to Mecum Indy 2026!
Brett Foote
Top 10 C9 Corvette MUST-HAVES to Fix These C8 Generation Flaws!
Michael S. Palmer
10 Revolutionary 'Corvette Firsts' Most People Don't Know
Joe Kucinski
5 Reasons to Upgrade to an LS6-Powered Corvette; 5 Reasons to Stay LT2
Michael S. Palmer
2027 Corvette vs The World: Every C8 vs Its Closest Competitor
Joe Kucinski
Drifting
Joined: Apr 2007
Posts: 1,970
Likes: 45
From: Cameron Park CA

Pete

Drifting
Joined: Jul 2002
Posts: 1,944
Likes: 20
From: The only Corvettes in Highett Victoria
G'day,
I have all of the parts to make a spreader bar for some time now, but have never gotten around to fitting it. However, I have asked the question previously about the stock factory distance between the two shock towers and have received replies from Forum members that the correct measurement is 26+3/8".
So, it might pay you to adjust your spreader bar until you reach this dimension. Comment on the above will be appreciated.
Regards from Down Under.
aussiejohn
Burning Brakes

Joined: Feb 2012
Posts: 925
Likes: 7
I'm sitting here with the VB&P non-welded spreader bar in a box next to me. I'm not arguing or taking sides, just reporting as was done in Post 21. The instructions from VB&P say "You may need to lift the frame of the car slightly so the cross shafts do not try to slide off the studs. Once the bar is installed, you can pre-load it slightly outwards."
Seems that they mean to pre-load the bar after the jack is off the frame, although it doesn't specifically say it.
I have a lot going on with my car right now, but when I get to the spreader bar, I'll be having fun putting it on a big block with an engine-driven fan, exactly the application the kit isn't designed for.
Burning Brakes
Joined: Feb 2002
Posts: 752
Likes: 31
From: Melbourne Australia
G'day,
I have all of the parts to make a spreader bar for some time now, but have never gotten around to fitting it. However, I have asked the question previously about the stock factory distance between the two shock towers and have received replies from Forum members that the correct measurement is 26+3/8".
So, it might pay you to adjust your spreader bar until you reach this dimension. Comment on the above will be appreciated.
Regards from Down Under.
aussiejohn
I have all of the parts to make a spreader bar for some time now, but have never gotten around to fitting it. However, I have asked the question previously about the stock factory distance between the two shock towers and have received replies from Forum members that the correct measurement is 26+3/8".
So, it might pay you to adjust your spreader bar until you reach this dimension. Comment on the above will be appreciated.
Regards from Down Under.
aussiejohn
If you set to factory then you'll need another wheel alignment. Chances are, your existing alignment will be based on the settled distance between towers which is now less than factory.
BTW, any interest in making/selling me a kit for my 69? US Vendors + Shipping make these spreader bars very expensive!
Just PM me.
Joe
Le Mans Master

Joined: Aug 2010
Posts: 9,272
Likes: 17
there is an excellent write up from a member here who made his own from materials purchased at a hardware store, total cash , bout $40. you can also buy all the materials on line. His looked as good as some and better than others
Team Owner


Joined: Jul 1999
Posts: 65,492
Likes: 230
From: Orange Park Florida

car corners like Lord intended....
of course other mods also help....but the difference with good rubber is night and day....
Le Mans Master
Joined: Oct 2007
Posts: 7,444
Likes: 970
From: Tennessee/Rhode Island
Speed direct bar on my 78 with the mechanical stock fan and shrouding. As others have stated-made a gigantic difference. I installed my bar AFTER I had put on 17 inch rims with 255/60/17 ZR tires years before. Every C3 can benefit from a spreader bar due to the frame flex. Best bang for the buck!

Safety Car

Joined: Mar 2007
Posts: 3,652
Likes: 49
From: Bridgewater nj

Thanks for the honest info